
Specs
Page 2
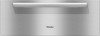
... levels ESW 6580 Features: • Clean Touch Steel™ front with Comfort handle • Touch controls • Fan-assisted heating system • Time control, 4-hour timer • Temperature settings from 104ºF to 185ºF • Keeps food or plates and cups warm • Non-slip liner • Cool touch front • Soft Open • Auto Close • Warm dishware for up to 12 people • Sabbath Program...
... levels ESW 6580 Features: • Clean Touch Steel™ front with Comfort handle • Touch controls • Fan-assisted heating system • Time control, 4-hour timer • Temperature settings from 104ºF to 185ºF • Keeps food or plates and cups warm • Non-slip liner • Cool touch front • Soft Open • Auto Close • Warm dishware for up to 12 people • Sabbath Program...
Specs
Page 4
... Cabinet Height 105/8" (270mm) Minimum Base Support 63 lbs Minumum Shelf Spacing Between Stacked Product 3/4" (19mm) Additional Cut-outs Required No Electrical Electrical Requirements 120V 15A 60 Hz Power Cord Molded NEMA 5-15 plug This appliance is equipped with a 5 ft (1.5 m) long power cord with a three-prong grounding plug ready for Power Cord Electrical Rating Yes 120V, 15A 60Hz, .72kW (120V) Total Amps Shipping Shipping Weight 6A on 120V 70 lbs Shipping Dimensions Support...
... Cabinet Height 105/8" (270mm) Minimum Base Support 63 lbs Minumum Shelf Spacing Between Stacked Product 3/4" (19mm) Additional Cut-outs Required No Electrical Electrical Requirements 120V 15A 60 Hz Power Cord Molded NEMA 5-15 plug This appliance is equipped with a 5 ft (1.5 m) long power cord with a three-prong grounding plug ready for Power Cord Electrical Rating Yes 120V, 15A 60Hz, .72kW (120V) Total Amps Shipping Shipping Weight 6A on 120V 70 lbs Shipping Dimensions Support...

Product Manual
Page 2
Contents IMPORTANT SAFETY INSTRUCTIONS 3 Guide to the appliance 6 Warming drawer 6 Control panel 7 Standard accessories 8 Before using for the first time 9 Operation 10 Operating modes 10 Temperature settings 11 Duration 12 Keeping food warm 13 Warming dishes 15 Capacity 16 Other uses 17 Sabbath mode 18 Cleaning and care 19 Frequently asked questions 20 Optional accessories 21 IMPORTANT SAFETY INSTRUCTIONS 24 Installation dimensions 25 Installation 27 Installing the front panel 28 Electrical connection 30 Technical Service 31 Help protect our environment 32 2
Contents IMPORTANT SAFETY INSTRUCTIONS 3 Guide to the appliance 6 Warming drawer 6 Control panel 7 Standard accessories 8 Before using for the first time 9 Operation 10 Operating modes 10 Temperature settings 11 Duration 12 Keeping food warm 13 Warming dishes 15 Capacity 16 Other uses 17 Sabbath mode 18 Cleaning and care 19 Frequently asked questions 20 Optional accessories 21 IMPORTANT SAFETY INSTRUCTIONS 24 Installation dimensions 25 Installation 27 Installing the front panel 28 Electrical connection 30 Technical Service 31 Help protect our environment 32 2
Product Manual
Page 3
... system. SAVE THESE INSTRUCTIONS Proper use it has cooled to prevent injury and appliance damage. Danger of this manual. Any other use and similar installation conditions. Technical safety ~ Installation, repair and maintenance work should not use ~ This gourmet warming drawer is used by unqualified persons could be dangerous and may void the warranty. ~ Before installing the appliance, check for some time after turning off. Do not...
... system. SAVE THESE INSTRUCTIONS Proper use it has cooled to prevent injury and appliance damage. Danger of this manual. Any other use and similar installation conditions. Technical safety ~ Installation, repair and maintenance work should not use ~ This gourmet warming drawer is used by unqualified persons could be dangerous and may void the warranty. ~ Before installing the appliance, check for some time after turning off. Do not...
Product Manual
Page 4
... be replaced by either removing the fuse, unplugging the unit or manually "tripping" the circuit breaker. Risk of the cable could become damaged. Contact Miele's Technical Service Department. ~ Before servicing, turn off the gas valve and disconnect the power supply by Miele original spare parts only. The insulation of fire. This is turned on the opened drawer as this appliance. IMPORTANT SAFETY INSTRUCTIONS ~ Before installation, make sure that the power cords...
... be replaced by either removing the fuse, unplugging the unit or manually "tripping" the circuit breaker. Risk of the cable could become damaged. Contact Miele's Technical Service Department. ~ Before servicing, turn off the gas valve and disconnect the power supply by Miele original spare parts only. The insulation of fire. This is turned on the opened drawer as this appliance. IMPORTANT SAFETY INSTRUCTIONS ~ Before installation, make sure that the power cords...

Product Manual
Page 5
... babies and children. ~ Be aware of time at a safe temperature. If heated for heating cold food. Use the handle for lengthy period of loose fitting or hanging clothing while using the warming drawer. A violent steam explosion may cause a short-circuit. Steam could cause serious burns or scalds. ~ Liquids entering the appliance interior through the air vents may result. IMPORTANT SAFETY INSTRUCTIONS ~ Do not heat unopened food containers.
... babies and children. ~ Be aware of time at a safe temperature. If heated for heating cold food. Use the handle for lengthy period of loose fitting or hanging clothing while using the warming drawer. A violent steam explosion may cause a short-circuit. Steam could cause serious burns or scalds. ~ Liquids entering the appliance interior through the air vents may result. IMPORTANT SAFETY INSTRUCTIONS ~ Do not heat unopened food containers.
Product Manual
Page 7
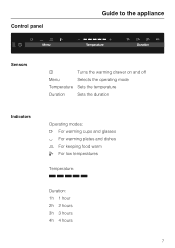
Control panel Guide to the appliance Sensors s Turns the warming drawer on and off Menu Selects the operating mode Temperature Sets the temperature Duration Sets the duration Indicators Operating modes: H For warming cups and glasses H For warming plates and dishes 2 For keeping food warm ¯ For low temperatures Temperature: Q Q Q Q Q Duration: 1h 1 hour 2h 2 hours 3h 3 hours 4h 4 hours 7
Control panel Guide to the appliance Sensors s Turns the warming drawer on and off Menu Selects the operating mode Temperature Sets the temperature Duration Sets the duration Indicators Operating modes: H For warming cups and glasses H For warming plates and dishes 2 For keeping food warm ¯ For low temperatures Temperature: Q Q Q Q Q Duration: 1h 1 hour 2h 2 hours 3h 3 hours 4h 4 hours 7

Product Manual
Page 9
... the fan of the area during this time. 9 Before using for at least 2 hours. ^ Touch the ON/OFF sensor s to turn the appliance on. ^ Tap "Menu" until the s symbol is illuminated. ^ Tap "Temperature" until the LED on when the drawer is closed. The smell will dissipate after two hours. Heat the empty drawer for the first time Clean and heat the appliance ^ Remove...
... the fan of the area during this time. 9 Before using for at least 2 hours. ^ Touch the ON/OFF sensor s to turn the appliance on. ^ Tap "Menu" until the s symbol is illuminated. ^ Tap "Temperature" until the LED on when the drawer is closed. The smell will dissipate after two hours. Heat the empty drawer for the first time Clean and heat the appliance ^ Remove...

Product Manual
Page 10
... displayed on the control panel. the corresponding symbol will be illuminated: -H Warming cups and glasses -H Warming dishes and plates -2 Keeping food warm -¯ Low temperature The last selected operating mode is automatically set when the appliance is fitted with a fan distributing the warmed air within the drawer. The dishes need more time to select the operating mode; Caution! The fan runs continuously in the "Keeping food warm" and "Low temperature" modes. For this purpose, use...
... displayed on the control panel. the corresponding symbol will be illuminated: -H Warming cups and glasses -H Warming dishes and plates -2 Keeping food warm -¯ Low temperature The last selected operating mode is automatically set when the appliance is fitted with a fan distributing the warmed air within the drawer. The dishes need more time to select the operating mode; Caution! The fan runs continuously in the "Keeping food warm" and "Low temperature" modes. For this purpose, use...

Product Manual
Page 11
By touching the 6 sensor, you can change the temperature in the center of an empty drawer 11 Temperature Display Temperature °F / °C * H H 2 ¯ ] ^ ^ ^ ^ 104 / 40 140 / 60 150 / 65 150 / 65... * Approximate temperatures, measured in 5 degree increments. Operation Temperature settings Every operating mode has its own temperature range. The last selected temperature is automatically set when the appliance is turned on the next time and will be displayed on the control panel (Exception: Low temperature). The factory settings for recommended temperatures are shown...
By touching the 6 sensor, you can change the temperature in the center of an empty drawer 11 Temperature Display Temperature °F / °C * H H 2 ¯ ] ^ ^ ^ ^ 104 / 40 140 / 60 150 / 65 150 / 65... * Approximate temperatures, measured in 5 degree increments. Operation Temperature settings Every operating mode has its own temperature range. The last selected temperature is automatically set when the appliance is turned on the next time and will be displayed on the control panel (Exception: Low temperature). The factory settings for recommended temperatures are shown...
Product Manual
Page 12
... continuous operation (Exception: Low temperature). Keep the ON/OFF sensor s clean and dry. Operation Duration The appliance is set to change the temperature, tap "Temperature" until the LED with a safety device that will turn the appliance on , up to a maximum of hours is illuminated. ^ Close the drawer. Operating principle ^ Open the drawer. ^ Touch the ON/OFF sensor s to turn the warming drawer off after 12 hours (max.) of time...
... continuous operation (Exception: Low temperature). Keep the ON/OFF sensor s clean and dry. Operation Duration The appliance is set to change the temperature, tap "Temperature" until the LED with a safety device that will turn the appliance on , up to a maximum of hours is illuminated. ^ Close the drawer. Operating principle ^ Open the drawer. ^ Touch the ON/OFF sensor s to turn the warming drawer off after 12 hours (max.) of time...

Product Manual
Page 13
... from the drawer. Keeping food warm Select only the 2 operating mode to ensure that the interior has reached the required temperature. It is not intended for reheating food that is cold. ^ Select 2. ^ Select the desired duration. ^ Preheat the appliance for keeping food warm is not recommended to cook. - Loss of nutrients. - Do not use force when opening or closing the drawer. Tips - Do...
... from the drawer. Keeping food warm Select only the 2 operating mode to ensure that the interior has reached the required temperature. It is not intended for reheating food that is cold. ^ Select 2. ^ Select the desired duration. ^ Preheat the appliance for keeping food warm is not recommended to cook. - Loss of nutrients. - Do not use force when opening or closing the drawer. Tips - Do...

Product Manual
Page 14
...;, Gratin dish yes gratin Roast Plate yes Stew Pot yes Meat in gravy Pot yes Vegetable in sauce Pot yes Mashed potatoes Pot yes Plated meal Plate yes Baked potato/ Boiled potato Plate/pot yes Breaded poultry / meat Pan no Pancakes Plate no Pizza Plate no Sauce Pot yes Strudel Plate no * Depending on the appliance mode Temperature at setting 2 ^ ^ ^ ^ ] Position Bottom Rack* x x x x x x x x x x x x x x x x x x x x 14 no Warming rolls -
...;, Gratin dish yes gratin Roast Plate yes Stew Pot yes Meat in gravy Pot yes Vegetable in sauce Pot yes Mashed potatoes Pot yes Plated meal Plate yes Baked potato/ Boiled potato Plate/pot yes Breaded poultry / meat Pan no Pancakes Plate no Pizza Plate no Sauce Pot yes Strudel Plate no * Depending on the appliance mode Temperature at setting 2 ^ ^ ^ ^ ] Position Bottom Rack* x x x x x x x x x x x x x x x x x x x x 14 no Warming rolls -

Product Manual
Page 15
... in the front of the venting slots. Place settings for 12 persons approx. 40 - 45 minutes - If you will cover the outlets for your household. 15 For cups and glasses, use . - With time you cannot avoid plate stacks, place them only immediately prior to use only the H mode to know the optimum settings for the warm air. Remove them in front of the...
... in the front of the venting slots. Place settings for 12 persons approx. 40 - 45 minutes - If you will cover the outlets for your household. 15 For cups and glasses, use . - With time you cannot avoid plate stacks, place them only immediately prior to use only the H mode to know the optimum settings for the warm air. Remove them in front of the...

Product Manual
Page 19
Pressurized steam could penetrate electrical components and cause a short circuit. Appliance front / interior Remove spills as soon as possible. If spills are allowed to sit or "puddle", this appliance. However do not allow them to sit for domestic use commercial cleaning agents. Breakages can cause damage to remove. Do not use . Glass cleaners may become hard to the surface. cleaners containing...
Pressurized steam could penetrate electrical components and cause a short circuit. Appliance front / interior Remove spills as soon as possible. If spills are allowed to sit or "puddle", this appliance. However do not allow them to sit for domestic use commercial cleaning agents. Breakages can cause damage to remove. Do not use . Glass cleaners may become hard to the surface. cleaners containing...

Product Manual
Page 20
... The wrong temperature was selected. The vents were blocked by large plates or dishes. Check the temperature setting. The dishes need more time to the warming drawer. What if the food is not a fault. Check the temperature setting and make sure the food is heard during the "2 Keep food warm" mode. 20 A noise is not too close to the heating element. This is no power to warm. Reset the circuit breaker. Adjust the temperature setting.
... The wrong temperature was selected. The vents were blocked by large plates or dishes. Check the temperature setting. The dishes need more time to the warming drawer. What if the food is not a fault. Check the temperature setting and make sure the food is heard during the "2 Keep food warm" mode. 20 A noise is not too close to the heating element. This is no power to warm. Reset the circuit breaker. Adjust the temperature setting.
Product Manual
Page 24
... frequency listed on the data plate correspond with other appliances specified by Miele. When installed with the household electrical supply. This data must be present for the installation of the gourmet warming drawer and the combination device to spilling of the appliance for both appliances. ~ The combination appliance is placed directly onto the installed gourmet warming drawer; The required niche dimensions result from the installation dimensions...
... frequency listed on the data plate correspond with other appliances specified by Miele. When installed with the household electrical supply. This data must be present for the installation of the gourmet warming drawer and the combination device to spilling of the appliance for both appliances. ~ The combination appliance is placed directly onto the installed gourmet warming drawer; The required niche dimensions result from the installation dimensions...

Product Manual
Page 28
... front panel (see illustration). Installing the front panel ESW 6380 FB The front panel must not exceed 11 lb (5 kg) in weight. ^ Attach the handle to pull on or damage the power cord. ^ Remove the two screws on the inside of the front and remove the panel from the left and right sides of the drawer front and carefully lift the control panel out. The front panel, including handle...
... front panel (see illustration). Installing the front panel ESW 6380 FB The front panel must not exceed 11 lb (5 kg) in weight. ^ Attach the handle to pull on or damage the power cord. ^ Remove the two screws on the inside of the front and remove the panel from the left and right sides of the drawer front and carefully lift the control panel out. The front panel, including handle...

Product Manual
Page 30
... removing the fuse, shutting off the power main or manually "tripping" the circuit breaker. When another appliance is equipped with a 5 ft (1.5 m) long power cord with a three-prong grounding plug ready for connection to prevent machine damage. Before connecting the appliance to the power supply, make sure that the voltage and frequency listed on the wiring diagram. 30 If in doubt. Further installation details are on the data plate...
... removing the fuse, shutting off the power main or manually "tripping" the circuit breaker. When another appliance is equipped with a 5 ft (1.5 m) long power cord with a three-prong grounding plug ready for connection to prevent machine damage. Before connecting the appliance to the power supply, make sure that the voltage and frequency listed on the wiring diagram. 30 If in doubt. Further installation details are on the data plate...

Product Manual
Page 31
... Miele appliance. Technical Service In the event of a fault which you cannot easily fix yourself, please contact the Miele Technical Service Department at : http://mieleusa.com/mielecare 31 MieleCare is visible on the silver data plate supplied with the appliance. gives you the assurance of worry free ownership. Our goal is covered by a Miele Authorized Service Provider using genuine Miele parts. Only genuine Miele parts installed...
... Miele appliance. Technical Service In the event of a fault which you cannot easily fix yourself, please contact the Miele Technical Service Department at : http://mieleusa.com/mielecare 31 MieleCare is visible on the silver data plate supplied with the appliance. gives you the assurance of worry free ownership. Our goal is covered by a Miele Authorized Service Provider using genuine Miele parts. Only genuine Miele parts installed...


