
Specs
Page 2
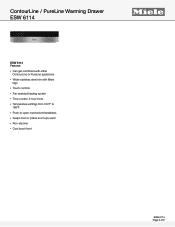
ContourLine / PureLine Warming Drawer ESW 6114 FOREVER BETTER ESW 6114 Features: • Can get combined with either ContourLine or PureLine appliances • Wider stainless steel trim with Miele logo • Touch controls • Fan-assisted heating system • Time control, 4-hour timer • Temperature settings from 104ºF to 185ºF • Push-to-open mechanism/handleless • Keeps food or plates and cups warm • Non-slip liner • Cool touch front ESW 6114 Page 2 of 5
ContourLine / PureLine Warming Drawer ESW 6114 FOREVER BETTER ESW 6114 Features: • Can get combined with either ContourLine or PureLine appliances • Wider stainless steel trim with Miele logo • Touch controls • Fan-assisted heating system • Time control, 4-hour timer • Temperature settings from 104ºF to 185ºF • Push-to-open mechanism/handleless • Keeps food or plates and cups warm • Non-slip liner • Cool touch front ESW 6114 Page 2 of 5
Specs
Page 3
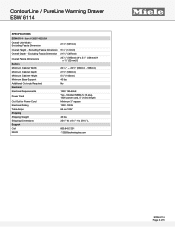
... - Molded NEMA 5-15 plug, 120V power cord, 5' (1.5m) length Minimum 3" square 120V .72kW 6A on 120V 46 lbs 253/4" W x 81/2" H x 253/8" L 800.843.7231 82020technologies.com FOREVER BETTER ESW 6114 Page 3 of 5 Excluding Fascia Dimension Overall Fascia Dimensions Built-In Minimum Cabinet Width Minimum Cabinet Depth Minimum Cabinet Height Minimum Base Support Additional Cut-outs Required Electrical Electrical Requirements Power Cord Cut Out for Power Cord Electrical Rating Total Amps Shipping Shipping Weight Shipping Dimensions Support Call 20/20...
... - Molded NEMA 5-15 plug, 120V power cord, 5' (1.5m) length Minimum 3" square 120V .72kW 6A on 120V 46 lbs 253/4" W x 81/2" H x 253/8" L 800.843.7231 82020technologies.com FOREVER BETTER ESW 6114 Page 3 of 5 Excluding Fascia Dimension Overall Fascia Dimensions Built-In Minimum Cabinet Width Minimum Cabinet Depth Minimum Cabinet Height Minimum Base Support Additional Cut-outs Required Electrical Electrical Requirements Power Cord Cut Out for Power Cord Electrical Rating Total Amps Shipping Shipping Weight Shipping Dimensions Support Call 20/20...
Specs
Page 5
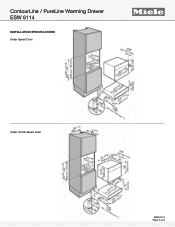
ContourLine / PureLine Warming Drawer ESW 6114 INSTALLATION SPECIFICATIONS Under Speed Oven FOREVER BETTER Under Combi-Steam Oven ESW 6114 Page 5 of 5
ContourLine / PureLine Warming Drawer ESW 6114 INSTALLATION SPECIFICATIONS Under Speed Oven FOREVER BETTER Under Combi-Steam Oven ESW 6114 Page 5 of 5
Product Manual
Page 2
Contents IMPORTANT SAFETY INSTRUCTIONS 3 Guide to the appliance 6 Warming drawer 6 Control panel 7 Standard accessories 8 Before using for the first time 9 Operation 10 Operating modes 10 Temperature settings 11 Duration 12 Keeping food warm 13 Warming dishes 15 Capacity 16 Other uses 17 Cleaning and care 18 Frequently asked questions 19 Optional accessories 20 IMPORTANT SAFETY INSTRUCTIONS 22 Installation dimensions 23 Installation 25 Electrical connection 26 Technical Service 27 Help protect our environment 28 2
Contents IMPORTANT SAFETY INSTRUCTIONS 3 Guide to the appliance 6 Warming drawer 6 Control panel 7 Standard accessories 8 Before using for the first time 9 Operation 10 Operating modes 10 Temperature settings 11 Duration 12 Keeping food warm 13 Warming dishes 15 Capacity 16 Other uses 17 Cleaning and care 18 Frequently asked questions 19 Optional accessories 20 IMPORTANT SAFETY INSTRUCTIONS 22 Installation dimensions 23 Installation 25 Electrical connection 26 Technical Service 27 Help protect our environment 28 2
Product Manual
Page 3
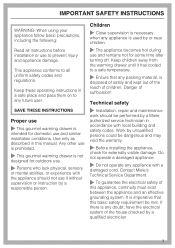
... appliance becomes hot during use and similar installation conditions. Technical safety ~ Installation, repair and maintenance work should not use to prevent injury and appliance damage. Do not operate a damaged appliance. ~ Do not operate any future user. Contact Miele's Technical Service Department. ~ To guarantee the electrical safety of suffocation! SAVE THESE INSTRUCTIONS Proper use ~ This gourmet warming drawer is not designed for domestic use and remains hot for...
... appliance becomes hot during use and similar installation conditions. Technical safety ~ Installation, repair and maintenance work should not use to prevent injury and appliance damage. Do not operate a damaged appliance. ~ Do not operate any future user. Contact Miele's Technical Service Department. ~ To guarantee the electrical safety of suffocation! SAVE THESE INSTRUCTIONS Proper use ~ This gourmet warming drawer is not designed for domestic use and remains hot for...
Product Manual
Page 4
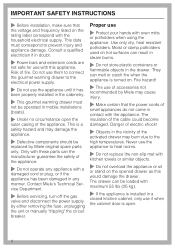
... in mobile installations (boats). ~ Under no circumstance open . 4 This is open the outer casing of the activated drawer may damage the appliance. ~ Defective components should be replaced by either removing the fuse, unplugging the unit or manually "tripping" the circuit breaker. Contact Miele's Technical Service Department. ~ Before servicing, turn off the gas valve and disconnect the power supply by Miele original spare parts only. Use only dry, heat resistant potholders...
... in mobile installations (boats). ~ Under no circumstance open . 4 This is open the outer casing of the activated drawer may damage the appliance. ~ Defective components should be replaced by either removing the fuse, unplugging the unit or manually "tripping" the circuit breaker. Contact Miele's Technical Service Department. ~ Before servicing, turn off the gas valve and disconnect the power supply by Miele original spare parts only. Use only dry, heat resistant potholders...

Product Manual
Page 5
.... Use the handle for heating cold food. Open and close the loaded drawer carefully to the warming drawer or injury. ~ Never warm undiluted alcohol in a hot drawer. Pressure can easily ignite. ~ Exercise caution when warming food with a dry chemical or foam fire extinguisher. ~ Never add water to clean the drawer. Steam could cause serious burns or scalds. ~ Liquids entering the appliance interior through the air vents may...
.... Use the handle for heating cold food. Open and close the loaded drawer carefully to the warming drawer or injury. ~ Never warm undiluted alcohol in a hot drawer. Pressure can easily ignite. ~ Exercise caution when warming food with a dry chemical or foam fire extinguisher. ~ Never add water to clean the drawer. Steam could cause serious burns or scalds. ~ Liquids entering the appliance interior through the air vents may...

Product Manual
Page 7
Control panel Guide to the appliance Sensor fields s Appliance On/Off Menu To set the Operating mode Temperature To set the Temperature Duration To set the Duration Indicators Operating modes: H Warming cups and glasses H Warming dishes and plates 2 Keeping food warm ¯ Low temperature Temperature: Q Q Q Q Q Duration: 1h 1 hour 2h 2 hours 3h 3 hours 4h 4 hours 7
Control panel Guide to the appliance Sensor fields s Appliance On/Off Menu To set the Operating mode Temperature To set the Temperature Duration To set the Duration Indicators Operating modes: H Warming cups and glasses H Warming dishes and plates 2 Keeping food warm ¯ Low temperature Temperature: Q Q Q Q Q Duration: 1h 1 hour 2h 2 hours 3h 3 hours 4h 4 hours 7

Product Manual
Page 9
... a faulty connection. The smell will only turn off a slight odor the first time your appliance inside and outside with a sponge cloth, warm water and liquid dish soap. The heater and the fan of the area during this time. 9 Heat the empty drawer for the first time Clean and heat the appliance ^ Remove any protective wrapping. ^ Remove the non-slip mat and the rack, if provided...
... a faulty connection. The smell will only turn off a slight odor the first time your appliance inside and outside with a sponge cloth, warm water and liquid dish soap. The heater and the fan of the area during this time. 9 Heat the empty drawer for the first time Clean and heat the appliance ^ Remove any protective wrapping. ^ Remove the non-slip mat and the rack, if provided...

Product Manual
Page 10
..., use the "Keeping food warm" operating mode. It works intermittently in the "Cups/glasses" and "Warming dishes/plates" modes. the corresponding symbol will be illuminated: -H Warming cups and glasses -H Warming dishes and plates -2 Keeping food warm -¯ Low temperature The last selected operating mode is automatically set when the appliance is fitted with a fan distributing the warmed air within the drawer. The appliance is turned on the next time and will be displayed on the control panel...
..., use the "Keeping food warm" operating mode. It works intermittently in the "Cups/glasses" and "Warming dishes/plates" modes. the corresponding symbol will be illuminated: -H Warming cups and glasses -H Warming dishes and plates -2 Keeping food warm -¯ Low temperature The last selected operating mode is automatically set when the appliance is fitted with a fan distributing the warmed air within the drawer. The appliance is turned on the next time and will be displayed on the control panel...

Product Manual
Page 11
... 185 / 85 * Approximate temperatures, measured in bold. Operation Temperature settings Every operating mode has its own temperature range. The factory settings for recommended temperatures are shown in the center of an empty drawer 11 By touching the 6 sensor, you can change the temperature in 5 degree increments. The last selected temperature is automatically set when the appliance is turned on the next time and will be displayed on the control panel (Exception: Low...
... 185 / 85 * Approximate temperatures, measured in bold. Operation Temperature settings Every operating mode has its own temperature range. The factory settings for recommended temperatures are shown in the center of an empty drawer 11 By touching the 6 sensor, you can change the temperature in 5 degree increments. The last selected temperature is automatically set when the appliance is turned on the next time and will be displayed on the control panel (Exception: Low...
Product Manual
Page 12
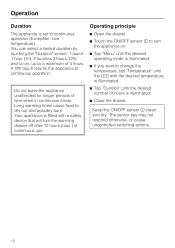
... ^ Open the drawer. ^ Touch the ON/OFF sensor s to continuous operation (Exception: Low temperature). Long warming times cause food to continuous operation. Your appliance is set to turn the warming drawer off after 12 hours (max.) of time when in continuous mode. The sensor key may not respond otherwise, or cause uncontrolled switching actions. 12 Do not leave the appliance unattended for longer periods of continuous use.
... ^ Open the drawer. ^ Touch the ON/OFF sensor s to continuous operation (Exception: Low temperature). Long warming times cause food to continuous operation. Your appliance is set to turn the warming drawer off after 12 hours (max.) of time when in continuous mode. The sensor key may not respond otherwise, or cause uncontrolled switching actions. 12 Do not leave the appliance unattended for longer periods of continuous use.

Product Manual
Page 13
... the interior has reached the required temperature. Tips - Do not overfill dishes to prevent liquid food from spilling. Serve food kept warm on warmed dishes. ^ Replace the dishes in the drawer, and carefully close the drawer to prevent spilling. - Do not use force when opening or closing the drawer. The food may spill from the drawer. Put the dishes into the drawer during preheating. - Keep...
... the interior has reached the required temperature. Tips - Do not overfill dishes to prevent liquid food from spilling. Serve food kept warm on warmed dishes. ^ Replace the dishes in the drawer, and carefully close the drawer to prevent spilling. - Do not use force when opening or closing the drawer. The food may spill from the drawer. Put the dishes into the drawer during preheating. - Keep...

Product Manual
Page 14
...;, Gratin dish yes gratin Roast Plate yes Stew Pot yes Meat in gravy Pot yes Vegetable in sauce Pot yes Mashed potatoes Pot yes Plated meal Plate yes Baked potato/ Boiled potato Plate/pot yes Breaded poultry / meat Pan no Pancakes Plate no Pizza Plate no Sauce Pot yes Strudel Plate no * Depending on the appliance mode Temperature at setting 2 ^ ^ ^ ^ ] Position Bottom Rack* x x x x x x x x x x x x x x x x x x x x 14 no Warming rolls -
...;, Gratin dish yes gratin Roast Plate yes Stew Pot yes Meat in gravy Pot yes Vegetable in sauce Pot yes Mashed potatoes Pot yes Plated meal Plate yes Baked potato/ Boiled potato Plate/pot yes Breaded poultry / meat Pan no Pancakes Plate no Pizza Plate no Sauce Pot yes Strudel Plate no * Depending on the appliance mode Temperature at setting 2 ^ ^ ^ ^ ] Position Bottom Rack* x x x x x x x x x x x x x x x x x x x x 14 no Warming rolls -

Product Manual
Page 15
... them only immediately prior to use only the H mode to H, even warming requires the times shown in the list below: - High stacks of the appliance. Do not place large platters vertically in the front of plate will cover the outlets for your household. 15 They will warm up evenly. - Material and thickness of the venting slots. Temperature setting Use the following values as...
... them only immediately prior to use only the H mode to H, even warming requires the times shown in the list below: - High stacks of the appliance. Do not place large platters vertically in the front of plate will cover the outlets for your household. 15 They will warm up evenly. - Material and thickness of the venting slots. Temperature setting Use the following values as...

Product Manual
Page 18
... steam could penetrate electrical components and cause a short circuit. If spills are allowed to cool before cleaning. cleaners containing soda, ammonia, thinners, or chlorides - Cleaning and care Allow the appliance to sit for domestic use commercial cleaning agents. Otherwise the soiling may discolor or change. To better maintain your appliance avoid the following: - stainless steel cleaners, - All surfaces of time...
... steam could penetrate electrical components and cause a short circuit. If spills are allowed to cool before cleaning. cleaners containing soda, ammonia, thinners, or chlorides - Cleaning and care Allow the appliance to sit for domestic use commercial cleaning agents. Otherwise the soiling may discolor or change. To better maintain your appliance avoid the following: - stainless steel cleaners, - All surfaces of time...

Product Manual
Page 19
... heating element. The vents were blocked by dishes. The fan works in doubt contact an electrician. Reset the circuit breaker. What if the food or dishes are not warm enough? Possible fault Solution There is not a fault. Insert the plug into the outlet. The circuit breaker has tripped. Adjust the temperature setting. The dishes need more time to the warming drawer. A noise is the circulation fan which distributes the heated air. This is no power to warm...
... heating element. The vents were blocked by dishes. The fan works in doubt contact an electrician. Reset the circuit breaker. What if the food or dishes are not warm enough? Possible fault Solution There is not a fault. Insert the plug into the outlet. The circuit breaker has tripped. Adjust the temperature setting. The dishes need more time to the warming drawer. A noise is the circulation fan which distributes the heated air. This is no power to warm...

Product Manual
Page 24
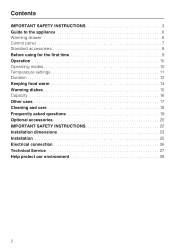
Installation dimensions Steam Oven DG 6500/ DG 6600 Combi Steam Oven DGC 670x / DGC 680x a Cut-out for ventilation when combined with a steam oven b Installation dimension with plug and power cord L= 7' 2 5/8" (2200 mm) a Cut-out for ventilation when combined with a steam and baking oven b Installation dimension with plug and power cord L= 7' 2 5/8" (2200 mm) * Appliances with glass front ** Appliances with stainless steel front * Appliances with glass front ** Appliances with stainless steel front 24
Installation dimensions Steam Oven DG 6500/ DG 6600 Combi Steam Oven DGC 670x / DGC 680x a Cut-out for ventilation when combined with a steam oven b Installation dimension with plug and power cord L= 7' 2 5/8" (2200 mm) a Cut-out for ventilation when combined with a steam and baking oven b Installation dimension with plug and power cord L= 7' 2 5/8" (2200 mm) * Appliances with glass front ** Appliances with stainless steel front * Appliances with glass front ** Appliances with stainless steel front 24
Product Manual
Page 26
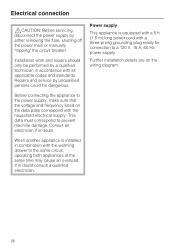
... the data plate correspond with all applicable codes and standards. Installation work and repairs should only be performed by unqualified persons could be dangerous. Repairs and service by a qualified technician in combination with a three-prong grounding plug ready for connection to prevent machine damage. Electrical connection ,CAUTION: Before servicing, disconnect the power supply by either removing the fuse, shutting off the power main or manually "tripping" the circuit breaker. Power supply...
... the data plate correspond with all applicable codes and standards. Installation work and repairs should only be performed by unqualified persons could be dangerous. Repairs and service by a qualified technician in combination with a three-prong grounding plug ready for connection to prevent machine damage. Electrical connection ,CAUTION: Before servicing, disconnect the power supply by either removing the fuse, shutting off the power main or manually "tripping" the circuit breaker. Power supply...

Product Manual
Page 27
... further damage to them, you and/or your appliance dealer or visit us online at the address on the silver data plate supplied with the appliance. Our goal is covered by a Miele Authorized Service Provider using genuine Miele parts. MieleCare (USA only) MieleCare, our Extended Service Contract program; When contacting Technical Service please quote the serial number and model of worry free ownership.
... further damage to them, you and/or your appliance dealer or visit us online at the address on the silver data plate supplied with the appliance. Our goal is covered by a Miele Authorized Service Provider using genuine Miele parts. MieleCare (USA only) MieleCare, our Extended Service Contract program; When contacting Technical Service please quote the serial number and model of worry free ownership.


