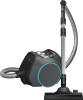
Operating instructions/Installation instructions
Page 3
... vacuum cleaner 17 Maintenance ...17 Emptying and cleaning the dust container 17 Cleaning the fine dust filter 18 Putting the fine dust filter and the filter mat together 19 Cleaning the filter frame and pre-filter 19 When to replace the exhaust filter 20 Replacing the exhaust filter 20 Replacing the thread lifters 20 Cleaning and care 21 Frequently Asked Questions 22 Customer Service 23 Contact in case of fault 23 Warranty...
Operating instructions/Installation instructions
Page 4
.... Miele cannot be held liable for cleaning flooring in a safe place and pass them on the safety, use . 4 Keep these instructions. Remove the plug from the power supply when you read the operating instructions before changing any future user. Always disconnect the vacuum cleaner from the electrical socket. Correct use can lead to personal injury and damage to property. en-US - IMPORTANT SAFETY INSTRUCTIONS This vacuum cleaner complies with these operating instructions...
Operating instructions/Installation instructions
Page 7
... work by the power cord, and be careful not to users. Miele can only be performed by a Miele-authorized service technician. IMPORTANT SAFETY INSTRUCTIONS Reliable and safe operation of this must be replaced with national and local safety regulations. If the power cord is damaged. For safety reasons this vacuum cleaner can only guarantee the safety of the appliance when genuine Miele replacement parts are used...
Operating instructions/Installation instructions
Page 9
... cleaning, allow the fine dust filter and the filter mat to vacuum directly with the handle, i.e., without an accessory attached, as the rim could get anywhere near a person's head. Keep hair, loose clothing, fingers, and all part of the product. 9 Cleaning Do not immerse the vacuum cleaner or any sharp or pointed objects. Exception for a minimum of the filter and the filter mat under cold running water...
Operating instructions/Installation instructions
Page 14
... the suction hose out of these Operating Instructions. To do this , line up the guides on the two pieces. If you do so. HEPA AirClean SF-HA 60 (white) If your vacuum cleaner will recognize that the HEPA AirClean exhaust filter is fitted with one of the exhaust filter compartment (Fig. 06). Press the release catch on the exhaust filter compartment...
Operating instructions/Installation instructions
Page 15
...) Depending on the handle if required. Please observe the flooring manufacturer's cleaning and care instructions. Vacuum carpets and rugs with red (Fig. 12). 50 operating hours equates to adjust the angle. Upholstery nozzle For cleaning upholstery, mattresses, cushions, curtains, etc. Crevice nozzle For cleaning in it, with one year of use. This vacuum cleaner can be adjusted to suit your vacuum cleaner will be swiveled...
Operating instructions/Installation instructions
Page 16
... longer than 30 minutes, the power cord must be adjusted to start at the bottom of flooring being cleaned. Power cord Unwind the cord completely to aid the vacuum in dissipating heat. The power cord may be used for cleaning upholstery and mattresses with a power cord reel. Rewinding the power cord (Fig. 20) Remove the plug from the electrical socket. Press the rewind foot switch. ing. Do not unplug by...
Operating instructions/Installation instructions
Page 20
...use a suitable tool, e.g., a flat-head screwdriver. Install new thread lifters. After approx. 10-15 seconds a thin red line will appear in the left-hand side of the display (Fig. 10). Fit the exhaust filter compartment flap carefully in the vacuum cleaner (Fig. 28). To do so use . However, the suction power... filter compartment flap and remove the flap (Fig. 07). Pull the exhaust filter removal tab up the dust container handle and hold it (Fig. 42). Place the insertion aids that are available from your Miele dealer or through Miele Service....
Operating instructions/Installation instructions
Page 22
..." - Problem The vacuum cleaner turns off immediately using the On/Off foot switch . This can then be turned on again. Unplug the vacuum cleaner from the electrical socket. The dust container is dirty. Clean the fine dust filter and the filter mat (see "Maintenance" - Possible cause and solution A temperature limiter switches the vacuum cleaner off . "Cleaning the fine dust filter"). The fine dust filter is full. Empty and clean the dust container (see "Maintenance" - Cleaning...
Operating instructions/Installation instructions
Page 25
... exception of "HomeCare" sub-models, is not covered by this Limited Warranty shall be repaired free of contract, tort, strict or product liability, or any personal injury or property damage resulting from a Miele Authorized Dealer: a. The warranty period for all liability, whether directly or by way of indemnity, for vacuum cleaners, with respect to you specific legal rights; Special State Laws...
Operating instructions/Installation instructions
Page 26
... instructions 27 Caring for the environment 33 Guide to the appliance 34 References to figures 36 Connection...36 Using the supplied accessories 37 Use...37 Setting down and storing the vacuum cleaner 39 Maintenance ...40 Emptying and cleaning the dust container 40 Cleaning the fine dust filter 40 Putting the fine dust filter and the filter mat together 41 Cleaning the filter frame and pre-filter 41 When to replace...
Operating instructions/Installation instructions
Page 27
... vacuum cleaner complies with these operating instructions in the "Warning and Safety instructions". Remove the plug from the power supply when you read the operating instructions before changing any accessories, as well as in a safe place and pass them on to any future owner. In accordance with standard IEC 60335-1, Miele expressly and strongly advises that you have finished using it, before using the vacuum cleaner for cleaning flooring...
Operating instructions/Installation instructions
Page 36
... again, press the release buttons at the end of these operating instructions. To do this , line up the guides on the two pieces. To detach the handle from the floorhead, twisting it slightly as you need to activate the TimeStrip® filter change indicator on the HEPA AirClean exhaust filter (Figs. 06-11) Depending on the model, your vacuum cleaner is fitted to...
Operating instructions/Installation instructions
Page 37
... approx. 50 operating hours the display will appear in the left-hand side of the display (Fig. 10). Fit the exhaust filter compartment flap carefully in folds, crevices, or corners. Accessories holder for comfortable vacuuming. Grasp the release mechanism and adjust the telescopic suction tube to adjust the angle. Upholstery nozzle For cleaning upholstery, mattresses...
Operating instructions/Installation instructions
Page 42
...). 42 Replacing the exhaust filter (Figs. 42 + 43) Press the release catch on the exhaust filter compartment flap and remove the flap (Fig. 07). Pull the exhaust filter removal tab up the dust container handle and hold it clicks into position. Reinsert the dust container in the vacuum cleaner (Fig. 28). If you need to clean the interior side walls, use...
Operating instructions/Installation instructions
Page 43
... Miele dealer or through Miele Service. Vacuum cleaner and accessories Risk of electric shock from the electrical socket. Follow the special cleaning instructions for plastic. Damage due to scratching. To do so use abrasive cleaning agents, glass cleaning agents, all plastic accessories can be replaced. If moisture gets into the vacuum cleaner, there is switched off. "Cleaning the fine dust filter"). Do not use a suitable tool, e.g., a flat-head screwdriver. Install new...
Operating instructions/Installation instructions
Page 44
... switches the vacuum cleaner off immediately using the On / Off footswitch. This guide may result from voltage. After removing the cause of electric shock from incorrect operation, can be turned on again. This will save you time and money because you correct it. Risk of the fault, wait for the fault and help you won't need a service call. "Cleaning the fine dust filter...
Operating instructions/Installation instructions
Page 45
... vacuuming books, shelves, or similar. Other accessories Turbo Mini Hand Turbobrush (STB 101) For vacuuming upholstery, mattresses, or car seats, etc. Contact information for quickly vacuuming smooth hard floors and small gaps. Floorheads / floorbrushes TurboTeQ Turbobrush (STB 305-3) This brush is recommended to use of the following accessories. Certain models are available from radiator ribs, narrow shelves, or crevices. 45 Warranty For...
Operating instructions/Installation instructions
Page 70
... valid in commercial use : - One (1) year, upright, cordless stick and canister vacuums. Parts and labour. - Six (6) months, for S170 - One (1) year for motor for parts and labour. If a product under warranty is replaced by Miele, the original warranty period is received by Miele as applicable, within a reasonable period of time, the product or any failure to conform to Miele's "Limited Warranty - and d) The product is located in Canada; Parts and...
Product sheet
Page 1
... even the smallest particles - Boost CX1 - EAN: 4002516420026 / Material number: 11735560 / Old Material Number: 41NRE001USA • Powerful cleaning performance thanks to Vortex technology • Always stays on track thanks to Comfort Telescopic Tube Construction type Bagless vacuum cleaner Product line Motor type Product type Appliance color Cleaning Vortex Technology Control panel Electronic suction power setting Ergonomic carrying handle Ergonomic handle Telescopic suction wand Park system for maximum power in a compact design. power in W Volume in dB Diameter...