
User Guide
Page 1
MP3227 User's Guide Portable CD Player with AM/FM Stereo Radio and Cassette Recorder Before operating this product, please read these instructions completely.
MP3227 User's Guide Portable CD Player with AM/FM Stereo Radio and Cassette Recorder Before operating this product, please read these instructions completely.
User Guide
Page 5
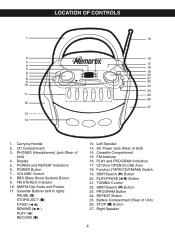
...Left Speaker 13. PLAY and PROGRAM Indicators 17. STOP (I ) F.FWD (¦¦) REWIND (‹‹) PLAY (¦) RECORD (q) 12. CD Door OPEN/CLOSE Area 18. TUNING Control 22. FM Antenna 16. Battery Compartment (Rear of Unit) 14. FM STEREO Indicator 10. REPEAT Button ...25. POWER Button 7. Carrying Handle 2. CD Compartment 3. Cassette Buttons (left to right): PAUSE (p) STOP/EJECT (I ) Button 27. PHONES (Headphones) Jack (Rear of Unit) 4. PLAY/PAUSE ...
...Left Speaker 13. PLAY and PROGRAM Indicators 17. STOP (I ) F.FWD (¦¦) REWIND (‹‹) PLAY (¦) RECORD (q) 12. CD Door OPEN/CLOSE Area 18. TUNING Control 22. FM Antenna 16. Battery Compartment (Rear of Unit) 14. FM STEREO Indicator 10. REPEAT Button ...25. POWER Button 7. Carrying Handle 2. CD Compartment 3. Cassette Buttons (left to right): PAUSE (p) STOP/EJECT (I ) Button 27. PHONES (Headphones) Jack (Rear of Unit) 4. PLAY/PAUSE ...
User Guide
Page 7
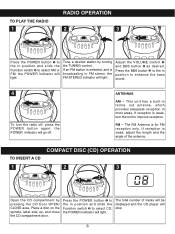
...the unit to enhance the bass sound. 4 To turn the radio off . Place a disc on the spindle, label side up, and close the CD compartment door. TO PLAY THE RADIO 1 2 1 RADIO OPERATION 2 3 2 1 Press the POWER button 1 to the in position and slide the Function switch...to improve reception. If reception is broadcasting in position and slide the Function switch 2 to select AM or FM; COMPACT DISC (CD) OPERATION TO INSERT A CD 1 2 3 2 1 Open the CD compartment by turning the TUNING control. Adjust the VOLUME control 1 and BBS button 2 as desired. FM - Press the POWER button...
...the unit to enhance the bass sound. 4 To turn the radio off . Place a disc on the spindle, label side up, and close the CD compartment door. TO PLAY THE RADIO 1 2 1 RADIO OPERATION 2 3 2 1 Press the POWER button 1 to the in position and slide the Function switch...to improve reception. If reception is broadcasting in position and slide the Function switch 2 to select AM or FM; COMPACT DISC (CD) OPERATION TO INSERT A CD 1 2 3 2 1 Open the CD compartment by turning the TUNING control. Adjust the VOLUME control 1 and BBS button 2 as desired. FM - Press the POWER button...
User Guide
Page 8
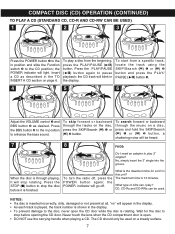
... the beginning, press the PLAY/PAUSE (®p) button. Press the BBS button 2 to the in position and slide the Function switch 2 to the CD position; To skip forward or backward through playing, it is through the tracks on a disc, press and hold the SKIP/Search (o) 1 or (n) ... • To prevent damage to the disc, never open . • DO NOT use the carrying handle when playing a CD. The CD should only be used . COMPACT DISC (CD) OPERATION (CONTINUED) TO PLAY A CD (STANDARD CD, CD-R AND CD-RW CAN BE USED) 1 2 3 2 1 2 3 1 Press the POWER button 1 to the in position to ...
... the beginning, press the PLAY/PAUSE (®p) button. Press the BBS button 2 to the in position and slide the Function switch 2 to the CD position; To skip forward or backward through playing, it is through the tracks on a disc, press and hold the SKIP/Search (o) 1 or (n) ... • To prevent damage to the disc, never open . • DO NOT use the carrying handle when playing a CD. The CD should only be used . COMPACT DISC (CD) OPERATION (CONTINUED) TO PLAY A CD (STANDARD CD, CD-R AND CD-RW CAN BE USED) 1 2 3 2 1 2 3 1 Press the POWER button 1 to the in position to ...
User Guide
Page 9
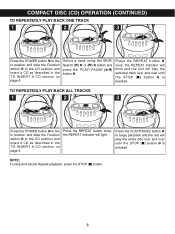
... 3 2 1 2 3 1 2 1 Press the POWER button 1 to the in position and slide the Function switch 2 to the CD position and insert a CD as described in the TO INSERT A CD section on page 6. Press the REPEAT button twice, the REPEAT indicator will play the selected track over and over until the... PLAY BACK ALL TRACKS 1 2 3 2 1 21 Press the POWER button 1 to the in position and slide the Function switch 2 to the CD position and insert a CD as described in the TO INSERT A CD section on page 6. Press the PLAY/PAUSE button 1 to begin playback and the unit will light.
... 3 2 1 2 3 1 2 1 Press the POWER button 1 to the in position and slide the Function switch 2 to the CD position and insert a CD as described in the TO INSERT A CD section on page 6. Press the REPEAT button twice, the REPEAT indicator will play the selected track over and over until the... PLAY BACK ALL TRACKS 1 2 3 2 1 21 Press the POWER button 1 to the in position and slide the Function switch 2 to the CD position and insert a CD as described in the TO INSERT A CD section on page 6. Press the PLAY/PAUSE button 1 to begin playback and the unit will light.
User Guide
Page 10
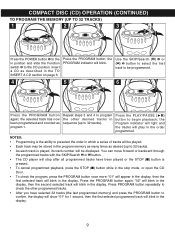
... track will blink in the display. 9 the PROGRAM indicator will blink in the display. Press the PLAY/PAUSE (®p) button to the CD position. Press PROGRAM button repeatedly to check the other desired tracks in sequence (up to be displayed. Press the PROGRAM button; Repeat steps ... PROGRAM button to 32 tracks). the Program indicator will light and the tracks will be programmed. 4 5 6 21 Press the PROGRAM button again; COMPACT DISC (CD) OPERATION (CONTINUED) TO PROGRAM THE MEMORY (UP TO 32 TRACKS) 1 1 2 2 3 21 Press the POWER button 1 to the in position and slide...
... track will blink in the display. 9 the PROGRAM indicator will blink in the display. Press the PLAY/PAUSE (®p) button to the CD position. Press PROGRAM button repeatedly to check the other desired tracks in sequence (up to be displayed. Press the PROGRAM button; Repeat steps ... PROGRAM button to 32 tracks). the Program indicator will light and the tracks will be programmed. 4 5 6 21 Press the PROGRAM button again; COMPACT DISC (CD) OPERATION (CONTINUED) TO PROGRAM THE MEMORY (UP TO 32 TRACKS) 1 1 2 2 3 21 Press the POWER button 1 to the in position and slide...
User Guide
Page 12
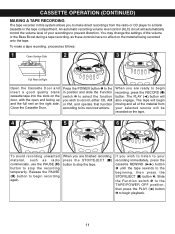
... begin recording, press the RECORD (Q) button. Release the PAUSE (p) button to prevent distortion. You may change the settings of the material from the radio or CD player to stop the recording temporarily. When you are ready to its own instructions. If you wish to record, either... CD, AM or FM, and operate that function according to begin moving and all of the volume or the Bass Boost during a tape recording, as these ...
... begin recording, press the RECORD (Q) button. Release the PAUSE (p) button to prevent distortion. You may change the settings of the material from the radio or CD player to stop the recording temporarily. When you are ready to its own instructions. If you wish to record, either... CD, AM or FM, and operate that function according to begin moving and all of the volume or the Bass Boost during a tape recording, as these ...
User Guide
Page 14
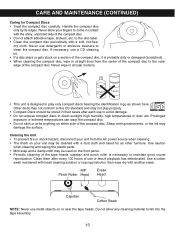
... good sound reproduction. If necessary, use to avoid damage. • Do not expose compact discs to the CD standard and may be cleaned with a soft, lint-free, dry cloth. Clean them after each use a CD cleaning kit. • If a disc skips or gets stuck on the front panel. • Periodic cleaning of...
... good sound reproduction. If necessary, use to avoid damage. • Do not expose compact discs to the CD standard and may be cleaned with a soft, lint-free, dry cloth. Clean them after each use a CD cleaning kit. • If a disc skips or gets stuck on the front panel. • Periodic cleaning of...
User Guide
Page 15
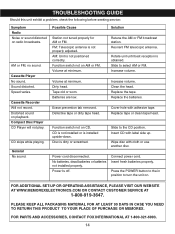
... cord. PLEASE KEEP ALL PACKAGING MATERIAL FOR AT LEAST 90 DAYS IN CASE YOU NEED TO RETURN THIS PRODUCT TO YOUR PLACE OF PURCHASE OR MEMOREX. CD skips while playing. FOR PARTS AND ACCESSORIES, CONTACT FOX INTERNATIONAL AT 1-800-321-6993. 14 TROUBLESHOOTING GUIDE Should this unit exhibit a problem, ... Possible Cause Station not tuned properly for AM or FM. Dirty head. Disc is dirty or scratched. AM or FM, no sound. Insert CD with label side up. Press the POWER button to the in position to turn the unit on radio broadcasts. Insert fresh batteries properly. Increase ...
... cord. PLEASE KEEP ALL PACKAGING MATERIAL FOR AT LEAST 90 DAYS IN CASE YOU NEED TO RETURN THIS PRODUCT TO YOUR PLACE OF PURCHASE OR MEMOREX. CD skips while playing. FOR PARTS AND ACCESSORIES, CONTACT FOX INTERNATIONAL AT 1-800-321-6993. 14 TROUBLESHOOTING GUIDE Should this unit exhibit a problem, ... Possible Cause Station not tuned properly for AM or FM. Dirty head. Disc is dirty or scratched. AM or FM, no sound. Insert CD with label side up. Press the POWER button to the in position to turn the unit on radio broadcasts. Insert fresh batteries properly. Increase ...

User Guide
Page 16
SPECIFICATIONS GENERAL: Power Source 120V,60Hz AC Battery 12V DC (8 x 1.5V "C" Size batteries) Alkaline is recommended for longer life Speaker...2 x 5W 8 Ohms Output Power 2 x 1.5W @ 10% THD RADIO SECTION: Frequency Range (FM 88 - 108 MHz Frequency Range (AM 530 -1710 KHz CD SECTION: Disc Diameter 4.72" (120mm) 3.15" (80mm) Single CD Optical Source Semiconductor Laser Specifications are subject to change without notice. 15
SPECIFICATIONS GENERAL: Power Source 120V,60Hz AC Battery 12V DC (8 x 1.5V "C" Size batteries) Alkaline is recommended for longer life Speaker...2 x 5W 8 Ohms Output Power 2 x 1.5W @ 10% THD RADIO SECTION: Frequency Range (FM 88 - 108 MHz Frequency Range (AM 530 -1710 KHz CD SECTION: Disc Diameter 4.72" (120mm) 3.15" (80mm) Single CD Optical Source Semiconductor Laser Specifications are subject to change without notice. 15


