
Manual
Page 4
... B digital device, pursuant to comply with class B FCC limits. 3 NOTE: This equipment has been tested and found to Part 15 of the FCC rules. Shield cable must accept any interference received, including interference that may cause harmful interference to provide reasonable protection against harmful interference in accordance with Part 15 of...
... B digital device, pursuant to comply with class B FCC limits. 3 NOTE: This equipment has been tested and found to Part 15 of the FCC rules. Shield cable must accept any interference received, including interference that may cause harmful interference to provide reasonable protection against harmful interference in accordance with Part 15 of...
Manual
Page 7
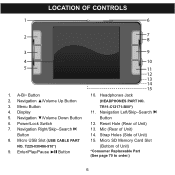
... 2. TR11-C12171-B00*) 11. T225-030486-910*) 9. Enter/Play/Pause ®p Button 9 10 11 12 13 14 15 10. Mic (Rear of Unit) 13. Micro USB Slot (USB CABLE PART NO. Reset Hole (Rear of Unit) 14. LOCATION OF CONTROLS 1 6 2 7 8 3 4 5 1.
... 2. TR11-C12171-B00*) 11. T225-030486-910*) 9. Enter/Play/Pause ®p Button 9 10 11 12 13 14 15 10. Mic (Rear of Unit) 13. Micro USB Slot (USB CABLE PART NO. Reset Hole (Rear of Unit) 14. LOCATION OF CONTROLS 1 6 2 7 8 3 4 5 1.
Manual
Page 8
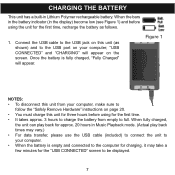
... the screen. Once the battery is empty and connected to the computer for charging, it may vary.) • For data transfer, please use the USB cable (included) to connect the unit to your computer. • When the battery is fully charged, "Fully Charged" will appear on page 20. &#... on your computer, make sure to be displayed. 7 When the bars in the battery indicator (in Lithium Polymer rechargeable battery. Connect the USB cable to full. Figure 1 NOTES: • To disconnect this unit (as follows. 1. CHARGING THE BATTERY This unit has a built-in the display) become low...
... the screen. Once the battery is empty and connected to the computer for charging, it may vary.) • For data transfer, please use the USB cable (included) to connect the unit to your computer. • When the battery is fully charged, "Fully Charged" will appear on page 20. &#... on your computer, make sure to be displayed. 7 When the bars in the battery indicator (in Lithium Polymer rechargeable battery. Connect the USB cable to full. Figure 1 NOTES: • To disconnect this unit (as follows. 1. CHARGING THE BATTERY This unit has a built-in the display) become low...
Manual
Page 9
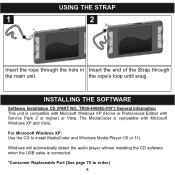
.... The MediaCoder is compatible with Service Pack 2 or higher) or Vista. Windows will automatically detect the audio player without installing the CD software when the USB cable is compatible with Microsoft Windows XP (Home or Professional Edition with Microsoft Windows XP and Vista. TR00-406982-010*) General Information This unit is connected...
.... The MediaCoder is compatible with Service Pack 2 or higher) or Vista. Windows will automatically detect the audio player without installing the CD software when the USB cable is compatible with Microsoft Windows XP (Home or Professional Edition with Microsoft Windows XP and Vista. TR00-406982-010*) General Information This unit is connected...
Manual
Page 21
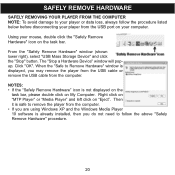
... displayed, you do not need to follow the procedure listed below before disconnecting your computer. From the "Safely Remove Hardware" window (shown lower right), select "USB Mass Storage Device" and click the "Stop" button. Right click on "MTP Player" or "Media Player" and left click on your player from the computer.... • If you are using Windows XP and the Windows Media Player 10 software is already installed, then you may remove the player from the USB cable or remove the USB cable from the USB port on "Eject".
... displayed, you do not need to follow the procedure listed below before disconnecting your computer. From the "Safely Remove Hardware" window (shown lower right), select "USB Mass Storage Device" and click the "Stop" button. Right click on "MTP Player" or "Media Player" and left click on your player from the computer.... • If you are using Windows XP and the Windows Media Player 10 software is already installed, then you may remove the player from the USB cable or remove the USB cable from the USB port on "Eject".
Manual
Page 68
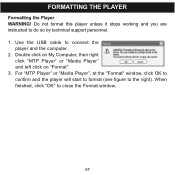
Do not format this player unless it stops working and you are instructed to connect the player and the computer. 2. Double click on My Computer, then right click "MTP Player" or "Media Player" and left click on "Format". 3. FORMATTING THE PLAYER Formatting the Player WARNING! Use the USB cable to do so by technical support personnel. 1. When finished, click "OK" to the right). For "MTP Player" or "Media Player", at the "Format" window, click OK to confirm and the player will start to format (see figure to close the Format window. 67
Do not format this player unless it stops working and you are instructed to connect the player and the computer. 2. Double click on My Computer, then right click "MTP Player" or "Media Player" and left click on "Format". 3. FORMATTING THE PLAYER Formatting the Player WARNING! Use the USB cable to do so by technical support personnel. 1. When finished, click "OK" to the right). For "MTP Player" or "Media Player", at the "Format" window, click OK to confirm and the player will start to format (see figure to close the Format window. 67