
Manual
Page 3
... Instructions 2 Chapter 1 Introducing the LCD TV Key Features ...5 Package Contents ...6 Setting Your LCD TV...7 Your LCD TV...10 Your Remote Control 13 Chapter 2 Installing the LCD TV Connecting a TV Cable or an Antenna 17 Connecting a VCR ...22 Connecting a Video Camera or Game Console 23 Connecting a DVD Player 24 Connecting a Digital TV Cable Box or Digital Satellite Receiver 26 Connecting an AV Equipment...
... Instructions 2 Chapter 1 Introducing the LCD TV Key Features ...5 Package Contents ...6 Setting Your LCD TV...7 Your LCD TV...10 Your Remote Control 13 Chapter 2 Installing the LCD TV Connecting a TV Cable or an Antenna 17 Connecting a VCR ...22 Connecting a Video Camera or Game Console 23 Connecting a DVD Player 24 Connecting a Digital TV Cable Box or Digital Satellite Receiver 26 Connecting an AV Equipment...

Manual
Page 7
Built-in TV tuner to receive HD ATSC ▪ This function allows the reception of HD broadcasting without the addition of combined video and audio in a single cable. ... output terminals (Optical x 1 /Coaxial x 1) ▪ 1 Headphone terminal Built-In Slot-type DVD Player ▪ Supports DVD/CD/CD-R/CD-RW/JPEG/KODAK PICTURE CD/DVD+R/RW/ DVD-R/RW compatibility. ENGLISH Chapter 1 Introducing the LCD TV Chapter 1 Introducing the LCD TV Key Features Various Audio/Video terminals for DVD(1080i, 720p) and digital set-top-box (1080i, 720p) connections. 3D...
Built-in TV tuner to receive HD ATSC ▪ This function allows the reception of HD broadcasting without the addition of combined video and audio in a single cable. ... output terminals (Optical x 1 /Coaxial x 1) ▪ 1 Headphone terminal Built-In Slot-type DVD Player ▪ Supports DVD/CD/CD-R/CD-RW/JPEG/KODAK PICTURE CD/DVD+R/RW/ DVD-R/RW compatibility. ENGLISH Chapter 1 Introducing the LCD TV Chapter 1 Introducing the LCD TV Key Features Various Audio/Video terminals for DVD(1080i, 720p) and digital set-top-box (1080i, 720p) connections. 3D...
Manual
Page 13
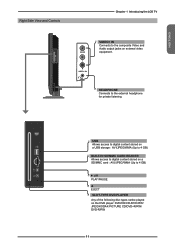
... View and Controls Chapter 1 Introducing the LCD TV VIDEO L R VIDEO1 IN VIDEO1 IN Connects to the composite Video and Audio output jacks on the DVD player: DVD/CD/CD-R/CD-RW/ JPEG/KODAK PICTURE CD/DVD+R/RW/ DVD-R/RW 11 HEADPHONE Connects to 4 GB) / PLAY/PAUSE EJECT SLOT-TYPE DVD PLAYER Any of the following disc types...
... View and Controls Chapter 1 Introducing the LCD TV VIDEO L R VIDEO1 IN VIDEO1 IN Connects to the composite Video and Audio output jacks on the DVD player: DVD/CD/CD-R/CD-RW/ JPEG/KODAK PICTURE CD/DVD+R/RW/ DVD-R/RW 11 HEADPHONE Connects to 4 GB) / PLAY/PAUSE EJECT SLOT-TYPE DVD PLAYER Any of the following disc types...

Manual
Page 14
... S-VIDEO IN L R R YPbPr2 IN AUDIO YPbPr1 IN/YPbPr2 IN Connects to the DVD player, Digital Set-Top-Box, or other AV equipment with component(YPbPr) video and audio output jacks. HDTV/TV AIR/CABLE VHF/UHF IN HDTV/TV AIR/CABLE Connects RF input from VHF/UHF antenna or cable to the... all digital AV equipment with HDMI connector.HDMI supports enhanced, high-definition video and two-channel digital audio. Chapter 1 Introducing the LCD TV Rear View and Jacks VIDEO2 IN Connects to the composite VIDEO and AUDIO(L/R) output jacks on external video equipment. The AUDIO(L/R) of HDMI IN...
... S-VIDEO IN L R R YPbPr2 IN AUDIO YPbPr1 IN/YPbPr2 IN Connects to the DVD player, Digital Set-Top-Box, or other AV equipment with component(YPbPr) video and audio output jacks. HDTV/TV AIR/CABLE VHF/UHF IN HDTV/TV AIR/CABLE Connects RF input from VHF/UHF antenna or cable to the... all digital AV equipment with HDMI connector.HDMI supports enhanced, high-definition video and two-channel digital audio. Chapter 1 Introducing the LCD TV Rear View and Jacks VIDEO2 IN Connects to the composite VIDEO and AUDIO(L/R) output jacks on external video equipment. The AUDIO(L/R) of HDMI IN...

Manual
Page 15
...selection, the channel activates automatically in DVD/USB/SD/MMC function keys 9 OPEN/CLOSE Exits the OSD menu 11 EXIT 12 . 13 10 MENU Displays the OSD menu on the screen. 11 OK Cycles through the LCD TV sleep time: OFF/10/20/30/... VIDEO3 (S-VIDEO) VIDEO4 (YPbPr1) VIDEO5 (YPbPr2) DVD USB CARD READER VIDEO6 (HDMI1) VIDEO7 (HDMI2) COMPUTER(VGA) 13 Pressing again restores audio 3 5 3 0-9 Pressing a number selects a channel. ENGLISH Your Remote Control Chapter 1 Introducing the LCD TV 1 Turns the LCD TV on the LCD TV screen such as input source, channel, program title...
...selection, the channel activates automatically in DVD/USB/SD/MMC function keys 9 OPEN/CLOSE Exits the OSD menu 11 EXIT 12 . 13 10 MENU Displays the OSD menu on the screen. 11 OK Cycles through the LCD TV sleep time: OFF/10/20/30/... VIDEO3 (S-VIDEO) VIDEO4 (YPbPr1) VIDEO5 (YPbPr2) DVD USB CARD READER VIDEO6 (HDMI1) VIDEO7 (HDMI2) COMPUTER(VGA) 13 Pressing again restores audio 3 5 3 0-9 Pressing a number selects a channel. ENGLISH Your Remote Control Chapter 1 Introducing the LCD TV 1 Turns the LCD TV on the LCD TV screen such as input source, channel, program title...

Manual
Page 16
...CC2/CC3/CC4/Text1/Text2/Text3/ Test4 Digital Closed Caption: Allow to 5m away, if pointed directly at the receiver. 14 Chapter 1 Introducing the LCD TV 15 FAV.CH Pressing FAV.CH display favorite channels. 16 CC Cycles through Wide mode settings: NORMAL/FULL/WIDE/ZOOM 19 FREEZE Pressing FREEZE to... S.MODE Selects sound effect options: Surround/ 16 18 Live/Dance/Techno/Classic/Soft/Rock/ Pop/Off. 19 21 20 24 DVD MENU The built-in DVD/USB function keys 22 24 23 Effective range: The remote can control the LCD TV from up to set the digital closed caption 17 CH.LIST In...
...CC2/CC3/CC4/Text1/Text2/Text3/ Test4 Digital Closed Caption: Allow to 5m away, if pointed directly at the receiver. 14 Chapter 1 Introducing the LCD TV 15 FAV.CH Pressing FAV.CH display favorite channels. 16 CC Cycles through Wide mode settings: NORMAL/FULL/WIDE/ZOOM 19 FREEZE Pressing FREEZE to... S.MODE Selects sound effect options: Surround/ 16 18 Live/Dance/Techno/Classic/Soft/Rock/ Pop/Off. 19 21 20 24 DVD MENU The built-in DVD/USB function keys 22 24 23 Effective range: The remote can control the LCD TV from up to set the digital closed caption 17 CH.LIST In...

Manual
Page 17
Pressing 1 again restores audio. 2 VOL+- ENGLISH Chapter 1 Introducing the LCD TV Controlling The Built-in DVD Press the TV button once to activate the built-in DVD" section. 1 Pressing once mutes audio. speed increases with each pressing: 2x/4x/8x/16x/32x 5 While playing, press this button once to 4...4 72 Pressing this button to open or close the disc.a EXIT Exits the OSD menu. 10 . 9 OK Cycles through Built-in DVD OSD options and selects individual menu items. OK confirms option settings 11 10 INFO 12 Displays current information on screen during playback ...
Pressing 1 again restores audio. 2 VOL+- ENGLISH Chapter 1 Introducing the LCD TV Controlling The Built-in DVD Press the TV button once to activate the built-in DVD" section. 1 Pressing once mutes audio. speed increases with each pressing: 2x/4x/8x/16x/32x 5 While playing, press this button once to 4...4 72 Pressing this button to open or close the disc.a EXIT Exits the OSD menu. 10 . 9 OK Cycles through Built-in DVD OSD options and selects individual menu items. OK confirms option settings 11 10 INFO 12 Displays current information on screen during playback ...

Manual
Page 18
Chapter 1 Introducing the LCD TV Controlling The USB Storage and SD/MMC Card Reader(Up to 4 GB) Press the TV button once to activate the built-in a clockwise or 7 counterclockwise. ▲▼ While image displaying, press to flip the image. . 8 P.SIZE Cycles through Wide mode settings: NORMAL/FULL/WIDE/ZOOM 8 9 DVD MENU Press to operate...
Chapter 1 Introducing the LCD TV Controlling The USB Storage and SD/MMC Card Reader(Up to 4 GB) Press the TV button once to activate the built-in a clockwise or 7 counterclockwise. ▲▼ While image displaying, press to flip the image. . 8 P.SIZE Cycles through Wide mode settings: NORMAL/FULL/WIDE/ZOOM 8 9 DVD MENU Press to operate...

Manual
Page 23
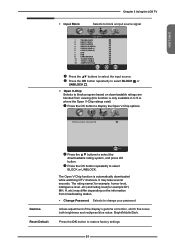
Channel Scan Tuner Mode Channel Skip Favorite List Time Zone TV Cable Eastern Time Enter Select Exit Press the ▼ button to select TV and press the OK button. Or, use the ◄► buttons to select the TV. Use the ▲▼ buttons to select Channel ...SIDE) VIDEO2 (REAR) VIDEO3 (S-VIDEO) VIDEO4 (YPbPr1) VIDEO5 (YPbPr2) DVD USB CARD READER VIDEO6 (HDMI1) VIDEO7 (HDMI2) COMPUTER(VGA) Press the MENU button on the remote to display the Input List. ENGLISH Chapter 2 Installing the LCD TV Press the INPUT button on the remote control to ...
Channel Scan Tuner Mode Channel Skip Favorite List Time Zone TV Cable Eastern Time Enter Select Exit Press the ▼ button to select TV and press the OK button. Or, use the ◄► buttons to select the TV. Use the ▲▼ buttons to select Channel ...SIDE) VIDEO2 (REAR) VIDEO3 (S-VIDEO) VIDEO4 (YPbPr1) VIDEO5 (YPbPr2) DVD USB CARD READER VIDEO6 (HDMI1) VIDEO7 (HDMI2) COMPUTER(VGA) Press the MENU button on the remote to display the Input List. ENGLISH Chapter 2 Installing the LCD TV Press the INPUT button on the remote control to ...

Manual
Page 26
... are sometimes labeled YPbPr, or YCbCr. METHOD D: Use a HDMI cable to connect the DVD player's HDMI output jacks to the LCD TV's S-VIDEO IN input jack. Use an S-Video cable to connect the DVD player's s-video output jack to the LCD TV's HDMI 1 IN or HDMI 2 IN input jacks. METHOD B: Use an audio cable to connect...
... are sometimes labeled YPbPr, or YCbCr. METHOD D: Use a HDMI cable to connect the DVD player's HDMI output jacks to the LCD TV's S-VIDEO IN input jack. Use an S-Video cable to connect the DVD player's s-video output jack to the LCD TV's HDMI 1 IN or HDMI 2 IN input jacks. METHOD B: Use an audio cable to connect...

Manual
Page 27
To watch a DVD, press the INPUT button on the remote, then using the ▲ or ▼ button on the remote to turn on the LCD TV. For best picture quality, if your equipment has component video output, use a component cable instead of the LCD TV or other connected equipment. Chapter 2 Installing the LCD TV Connect...
To watch a DVD, press the INPUT button on the remote, then using the ▲ or ▼ button on the remote to turn on the LCD TV. For best picture quality, if your equipment has component video output, use a component cable instead of the LCD TV or other connected equipment. Chapter 2 Installing the LCD TV Connect...
Manual
Page 33
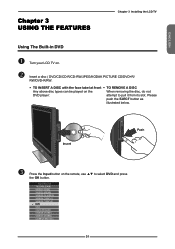
ENGLISH Chapter 3 USING THE FEATURES Chapter 3 Installing the LCD TV Using The Built-in DVD Turn your LCD TV on. Insert a disc ( DVD/CD/CD-R/CD-RW/JPEG/KODAK PICTURE CD/DVD+R/ RW/DVD-R/RW. TO INSERT A DISC with the face label at front TO REMOVE A DISC Any ... the Input button on the When removing the disc, do not DVD player: attempt to select DVD and press the OK button. Input Source TV(CABLE/AIR) VIDEO1 (SIDE) VIDEO2 (REAR) VIDEO3 (S-VIDEO) VIDEO4 (YPbPr1) VIDEO5 (YPbPr2) DVD USB CARD READER VIDEO6 (HDMI1) VIDEO7 (HDMI2) COMPUTER(VGA)...
ENGLISH Chapter 3 USING THE FEATURES Chapter 3 Installing the LCD TV Using The Built-in DVD Turn your LCD TV on. Insert a disc ( DVD/CD/CD-R/CD-RW/JPEG/KODAK PICTURE CD/DVD+R/ RW/DVD-R/RW. TO INSERT A DISC with the face label at front TO REMOVE A DISC Any ... the Input button on the When removing the disc, do not DVD player: attempt to select DVD and press the OK button. Input Source TV(CABLE/AIR) VIDEO1 (SIDE) VIDEO2 (REAR) VIDEO3 (S-VIDEO) VIDEO4 (YPbPr1) VIDEO5 (YPbPr2) DVD USB CARD READER VIDEO6 (HDMI1) VIDEO7 (HDMI2) COMPUTER(VGA)...

Manual
Page 34
... USING THE BUILT-IN DVD SETUP MENU 1. Chapter 3 Using the LCD TV Press GUIDE button on... a personally recorded CD-R/RW disc. Use the on the remote control to to move the light bar to display the File Menu. 32 Press ◄ to back the File Menu. While an image is displayed, press the DVD... pause playback temporarily AUDIO Press to select the Audio effect and Language. SUBTITLE Changes DVD subtitle language. CAMERA ANGLE Press to enter the folder. During playback, the following operations are...
... USING THE BUILT-IN DVD SETUP MENU 1. Chapter 3 Using the LCD TV Press GUIDE button on... a personally recorded CD-R/RW disc. Use the on the remote control to to move the light bar to display the File Menu. 32 Press ◄ to back the File Menu. While an image is displayed, press the DVD... pause playback temporarily AUDIO Press to select the Audio effect and Language. SUBTITLE Changes DVD subtitle language. CAMERA ANGLE Press to enter the folder. During playback, the following operations are...
Manual
Page 35
... to move the light bar to the file you want to play, and press the OK button to play the file. 2. The DVD player will playback all WMA and AVI files in sequence automatically when it is displayed full size, you can pause the slide show by...to play, and press the OK button to display the File Menu. 2. ENGLISH Chapter 3 Using the LCD TV RUNNGING THE WMA & AVI 1. Press files. Slide Show ◄Prev Next► 2. Press the DVD MENU button to play the file. Press ▲▼ on the remote control to previous tracks...
... to move the light bar to the file you want to play, and press the OK button to play the file. 2. The DVD player will playback all WMA and AVI files in sequence automatically when it is displayed full size, you can pause the slide show by...to play, and press the OK button to display the File Menu. 2. ENGLISH Chapter 3 Using the LCD TV RUNNGING THE WMA & AVI 1. Press files. Slide Show ◄Prev Next► 2. Press the DVD MENU button to play the file. Press ▲▼ on the remote control to previous tracks...
Manual
Page 36
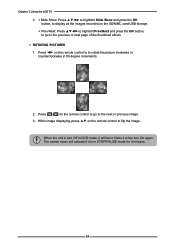
... for 3 minutes. 34 When the unit is turn On again. The screen saver will activate if it will be in Video 4 when turn Off in DVD mode, it is in 90-degree increments. 2. Press on the remote control to go to the previous or next page of the thumbnail album. ...; ROTATING PICTURES 1. Press ◄► on the remote control to flip the image. Chapter 3 Using the LCD TV 3. Slide Show: Press to highlisht Slide Show and press the OK button, to display all the images recorded on the SD/MMC card/USB...
... for 3 minutes. 34 When the unit is turn On again. The screen saver will activate if it will be in Video 4 when turn Off in DVD mode, it is in 90-degree increments. 2. Press on the remote control to go to the previous or next page of the thumbnail album. ...; ROTATING PICTURES 1. Press ◄► on the remote control to flip the image. Chapter 3 Using the LCD TV 3. Slide Show: Press to highlisht Slide Show and press the OK button, to display all the images recorded on the SD/MMC card/USB...
Manual
Page 37
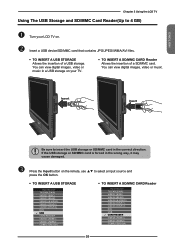
...; TO INSERT A SD/MMC CARD Reader Input Source TV(CABLE/AIR) VIDEO1 (SIDE) VIDEO2 (REAR) VIDEO3 (S-VIDEO) VIDEO4 (YPbPr1) VIDEO5 (YPbPr2) DVD USB CARD READER VIDEO6 (HDMI1) VIDEO7 (HDMI2) COMPUTER(VGA) 35 ENGLISH Chapter 3 Using the LCD TV Using The USB Storage and SD/MMC Card Reader(Up... to 4 GB) Turn your TV. TO INSERT A SD/MMC CARD Reader Allows...
...; TO INSERT A SD/MMC CARD Reader Input Source TV(CABLE/AIR) VIDEO1 (SIDE) VIDEO2 (REAR) VIDEO3 (S-VIDEO) VIDEO4 (YPbPr1) VIDEO5 (YPbPr2) DVD USB CARD READER VIDEO6 (HDMI1) VIDEO7 (HDMI2) COMPUTER(VGA) 35 ENGLISH Chapter 3 Using the LCD TV Using The USB Storage and SD/MMC Card Reader(Up... to 4 GB) Turn your TV. TO INSERT A SD/MMC CARD Reader Allows...
Manual
Page 38
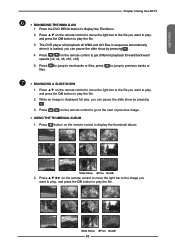
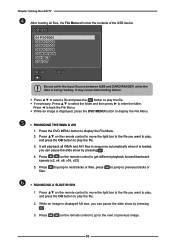
...; If necessary, Press ▲▼ to select the folder and then press ► to previous tracks or RUNNGING A SLIDE SHOW 1. Press the DVD MENU button to display the File Menu. RUNNGING THE WMA & AVI 1. It may cause data loading failure. Press ▲▼ to ...light bar to the file you want to play, and press the OK button to play the file. 2. Chapter 3 Using the LCD TV After loading all WMA and AVI files in sequence automatically when it is loaded, you can pause the slide show by pressing . 3.
...; If necessary, Press ▲▼ to select the folder and then press ► to previous tracks or RUNNGING A SLIDE SHOW 1. Press the DVD MENU button to display the File Menu. RUNNGING THE WMA & AVI 1. It may cause data loading failure. Press ▲▼ to ...light bar to the file you want to play, and press the OK button to play the file. 2. Chapter 3 Using the LCD TV After loading all WMA and AVI files in sequence automatically when it is loaded, you can pause the slide show by pressing . 3.
Manual
Page 39
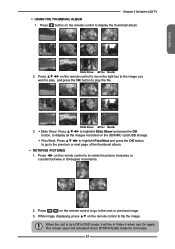
...; Prev/Next: Press to highlisht Prev/Next and press the OK button, to go to flip the image. When the unit is turn Off in DVD mode, it will activate if it is in Video 4 when turn On again. Slide Show ◄Prev Next► 2. Slide Show ◄Prev Next►... saver will be in STOP/PAUSE mode for 3 minutes. 37 Press on the remote control to to play the file. ENGLISH Chapter 3 Using the LCD TV USING THE THUMBNAIL ALBUM 1. Press ◄► on the remote control to move the light bar to the image you want to play, and...
...; Prev/Next: Press to highlisht Prev/Next and press the OK button, to go to flip the image. When the unit is turn Off in DVD mode, it will activate if it is in Video 4 when turn On again. Slide Show ◄Prev Next► 2. Slide Show ◄Prev Next►... saver will be in STOP/PAUSE mode for 3 minutes. 37 Press on the remote control to to play the file. ENGLISH Chapter 3 Using the LCD TV USING THE THUMBNAIL ALBUM 1. Press ◄► on the remote control to move the light bar to the image you want to play, and...
Manual
Page 53
... OK button to display the Open V-Chip options. ENGLISH Input Block Chapter 3 Using the LCD TV Selects to block a Input source signal Input Block 1 TV(CABLE/AIR) 2 VIDEO1 (SIDE) 3 VIDEO2 (REAR) 4 VIDEO3 (S-VIDEO) 5 VIDEO4 (YPbPr1) 6 VIDEO5 (YPbPr2) 7 DVD 8 USB 9 CARD READER 10 VIDEO6 (HDMI1) 11 VIDEO7 (HDMI2) 12 COMPUTER(VGA) Press the...
... OK button to display the Open V-Chip options. ENGLISH Input Block Chapter 3 Using the LCD TV Selects to block a Input source signal Input Block 1 TV(CABLE/AIR) 2 VIDEO1 (SIDE) 3 VIDEO2 (REAR) 4 VIDEO3 (S-VIDEO) 5 VIDEO4 (YPbPr1) 6 VIDEO5 (YPbPr2) 7 DVD 8 USB 9 CARD READER 10 VIDEO6 (HDMI1) 11 VIDEO7 (HDMI2) 12 COMPUTER(VGA) Press the...
Manual
Page 59
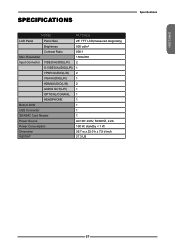
ENGLISH SPECIFICATIONS MODEL MLTD2622 LCD Panel Panel Size 26" TFT LCD(measured diagonally) Brightness 500 cd/m2 Contrast Ratio 800:1 Max. Resolution 1366x768 Input Connector VIDEO/AUDIO(L/R) 2 S-VIDEO/AUDIO(L/R) 1 YPbPr/AUDIO(L/R) 2 VGA/AUDIO(L/R) 1 HDMI/AUDIO(L/R) 2 AUDIO OUT(L/R) 1 OPTICAL/COAXIAL 1 HEADPHONE 1 Built-in DVD 1 USB Connector 1 SD/MMC Card Reader 1 Power Source AC100~240V, 50/60HZ, 2.2A Power Consumption 150 W, standby < 1 W Dimension WEIGHT 26.7 w x 22.0 h x 7.9 d inch 27.3 LB Specifications 57
ENGLISH SPECIFICATIONS MODEL MLTD2622 LCD Panel Panel Size 26" TFT LCD(measured diagonally) Brightness 500 cd/m2 Contrast Ratio 800:1 Max. Resolution 1366x768 Input Connector VIDEO/AUDIO(L/R) 2 S-VIDEO/AUDIO(L/R) 1 YPbPr/AUDIO(L/R) 2 VGA/AUDIO(L/R) 1 HDMI/AUDIO(L/R) 2 AUDIO OUT(L/R) 1 OPTICAL/COAXIAL 1 HEADPHONE 1 Built-in DVD 1 USB Connector 1 SD/MMC Card Reader 1 Power Source AC100~240V, 50/60HZ, 2.2A Power Consumption 150 W, standby < 1 W Dimension WEIGHT 26.7 w x 22.0 h x 7.9 d inch 27.3 LB Specifications 57


