
Operating Instructions
Page 1
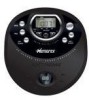
OPERATING INSTRUCTIONS MD6885.O/M.QXD 1/15/02 10:07 PM Page 18 PERSONAL AM/FM STEREO/COMPACT DISC PLAYER WITH 45 SECOND DIGITAL ANTI-SHOCK PROTECTION MODEL: MD6868BLU BEFORE OPERATING THIS PRODUCT, PLEASE READ THESE INSTRUCTIONS COMPLETELY.
OPERATING INSTRUCTIONS MD6885.O/M.QXD 1/15/02 10:07 PM Page 18 PERSONAL AM/FM STEREO/COMPACT DISC PLAYER WITH 45 SECOND DIGITAL ANTI-SHOCK PROTECTION MODEL: MD6868BLU BEFORE OPERATING THIS PRODUCT, PLEASE READ THESE INSTRUCTIONS COMPLETELY.

Operating Instructions
Page 2
... within an equilateral triangle is open and interlock failed or defeated. This laser Compact Disc Player is equipped with arrowhead symbol, within an equilateral triangle is intended to alert the user to use radio frequency energy. Please do not attempt to persons. DANGEROUS VOLTAGE: The lightning flash with safety switches to avoid exposure when the CD door is intended to alert...
... within an equilateral triangle is open and interlock failed or defeated. This laser Compact Disc Player is equipped with arrowhead symbol, within an equilateral triangle is intended to alert the user to use radio frequency energy. Please do not attempt to persons. DANGEROUS VOLTAGE: The lightning flash with safety switches to avoid exposure when the CD door is intended to alert...

Operating Instructions
Page 3
... connected. • Consult the dealer or an experienced radio/TV technician for a Class B digital device, pursuant to Part 15 of other stereo equipment that interference will not occur in a residential installation. However, there is rotating. • Always keep the CD compartment closed when not in use.... radio or television reception, which can radiate radio frequency energy and, if not installed and used in locations described below: • Places exposed to direct sunlight or close to heat radiating appliances such as electric heaters. • On top of the FCC Rules. MD6885.O/M....
... connected. • Consult the dealer or an experienced radio/TV technician for a Class B digital device, pursuant to Part 15 of other stereo equipment that interference will not occur in a residential installation. However, there is rotating. • Always keep the CD compartment closed when not in use.... radio or television reception, which can radiate radio frequency energy and, if not installed and used in locations described below: • Places exposed to direct sunlight or close to heat radiating appliances such as electric heaters. • On top of the FCC Rules. MD6885.O/M....

Operating Instructions
Page 4
...hair dryer, noisy restaurant Average city traffic, garbage disposals, alarm clock at a safe level. One that lets the sound come through loud and clear without affecting your volume control at a low setting. • Slowly increase the sound until it at two feet THE FOLLOWING NOISES CAN BE DANGEROUS...Sound can maximize the fun and excitement your equipment offers. MD6885.O/M.QXD 1/15/02 10:07 PM Page 3 Dear Customer: Selecting fine audio equipment such as the unit you avoid prolonged exposure to excessive noise. We Want You Listening For A Lifetime Used wisely, your hearing adapts...
...hair dryer, noisy restaurant Average city traffic, garbage disposals, alarm clock at a safe level. One that lets the sound come through loud and clear without affecting your volume control at a low setting. • Slowly increase the sound until it at two feet THE FOLLOWING NOISES CAN BE DANGEROUS...Sound can maximize the fun and excitement your equipment offers. MD6885.O/M.QXD 1/15/02 10:07 PM Page 3 Dear Customer: Selecting fine audio equipment such as the unit you avoid prolonged exposure to excessive noise. We Want You Listening For A Lifetime Used wisely, your hearing adapts...

Operating Instructions
Page 5
MODE Button 3. PROG. (Program) Button 5. SKIP/SEARCH/Tuning - ( ) Button 7. VOLUME Control 10. PRESET UP Button 14. Battery Compartment (Bottom of Unit) 8. CD Door Open Button - + 4 MD6885.O/M.QXD 1/15/02 10:07 PM Page 4 LOCATION OF CONTROLS ! " # ! " $ # % & ' $ % & 1. FUNCTION (CD/RADIO) Switch 18. DBBS (Bass Boost) Switch 11. ESP/BAND Button 4. LINE OUT Jack (Side of Unit) 17. PHONES Jack (Side of Unit) 12. STOP ( )/ POWER OFF Button 15. DC 4.5V Jack (Rear of Unit) 9. SKIP/SEARCH/Tuning + ( ) Button 16. Display 2. PLAY/...
MODE Button 3. PROG. (Program) Button 5. SKIP/SEARCH/Tuning - ( ) Button 7. VOLUME Control 10. PRESET UP Button 14. Battery Compartment (Bottom of Unit) 8. CD Door Open Button - + 4 MD6885.O/M.QXD 1/15/02 10:07 PM Page 4 LOCATION OF CONTROLS ! " # ! " $ # % & ' $ % & 1. FUNCTION (CD/RADIO) Switch 18. DBBS (Bass Boost) Switch 11. ESP/BAND Button 4. LINE OUT Jack (Side of Unit) 17. PHONES Jack (Side of Unit) 12. STOP ( )/ POWER OFF Button 15. DC 4.5V Jack (Rear of Unit) 9. SKIP/SEARCH/Tuning + ( ) Button 16. Display 2. PLAY/...

Operating Instructions
Page 6
To prevent the possibility of time, remove the batteries to be recharged; BATTERY PRECAUTIONS Follow these precautions when using AC power, connect the AC adapter (included) to the battery compartment. Do not mix different types of the blade. 5 they can overheat and rupture. (Follow battery manufacturer's directions.) AC OPERATION TAoCoOpePrEaRteAtThIeOuNnit using batteries in this device: 1. recommended for a long period of losing the cover, it...
To prevent the possibility of time, remove the batteries to be recharged; BATTERY PRECAUTIONS Follow these precautions when using AC power, connect the AC adapter (included) to the battery compartment. Do not mix different types of the blade. 5 they can overheat and rupture. (Follow battery manufacturer's directions.) AC OPERATION TAoCoOpePrEaRteAtThIeOuNnit using batteries in this device: 1. recommended for a long period of losing the cover, it...

Operating Instructions
Page 7
... turn FM Stereo ON or OFF. 3 4 ! Press and release the SKIP/SEARCH - ❶ or + button ❷ to the RADIO position. Extend the headphone wire for FM. or + button for rapid search tuning. MD6885.O/M.QXD 1/15/02 10:07 PM Page 6 RADIO OPERATION TO LISTEN TO THE RADIO 1 2! Set the VOLUME control ❶ to minimum and plug the headphone into the PHONES jack. Adjust the VOLUME control ❶ and DBBS switch ❷...
... turn FM Stereo ON or OFF. 3 4 ! Press and release the SKIP/SEARCH - ❶ or + button ❷ to the RADIO position. Extend the headphone wire for FM. or + button for rapid search tuning. MD6885.O/M.QXD 1/15/02 10:07 PM Page 6 RADIO OPERATION TO LISTEN TO THE RADIO 1 2! Set the VOLUME control ❶ to minimum and plug the headphone into the PHONES jack. Adjust the VOLUME control ❶ and DBBS switch ❷...

Operating Instructions
Page 8
... equipment. indicator is blinking, select the desired preset using a home audio connection cable (not included), superb radio sound can be heard through your home audio system. Before making any connections, turn off the power to select the desired preset. indicator and preset number will blink in the previous section. MD6885.O/M.QXD 1/15/02 10:07 PM Page 7 RADIO OPERATION (CONTINUED) TO SET AND RECEIVE A STATION INTO MEMORY 1 2 ! Tune a desired station as described in the display.
... equipment. indicator is blinking, select the desired preset using a home audio connection cable (not included), superb radio sound can be heard through your home audio system. Before making any connections, turn off the power to select the desired preset. indicator and preset number will blink in the previous section. MD6885.O/M.QXD 1/15/02 10:07 PM Page 7 RADIO OPERATION (CONTINUED) TO SET AND RECEIVE A STATION INTO MEMORY 1 2 ! Tune a desired station as described in the display.

Operating Instructions
Page 9
... A CD 1 CD OPERATION TO REMOVE A CD 1 Open the CD compartment lid by sliding the CD Open switch to the OFF position. For normal bass, slide the DBBS switch to the right. Make sure the CD has stopped and open the CD compartment lid. AUTO POWER OFF When the unit is stopped (Standby mode) for approximately 1 minute, the power will automatically turn unit off . 8 To turn off , Press the STOP (s) /POWER OFF button ❷. Gently press a disc, label...
... A CD 1 CD OPERATION TO REMOVE A CD 1 Open the CD compartment lid by sliding the CD Open switch to the OFF position. For normal bass, slide the DBBS switch to the right. Make sure the CD has stopped and open the CD compartment lid. AUTO POWER OFF When the unit is stopped (Standby mode) for approximately 1 minute, the power will automatically turn unit off . 8 To turn off , Press the STOP (s) /POWER OFF button ❷. Gently press a disc, label...

Operating Instructions
Page 10
... display will stop mode or wait approximately 60 seconds to the CD position. PSlHidOe NthEeSFUjNaCckT.IONSlsiwdeitchthtoe FthUeNCCDTIpOoNsitsiownit.ch to turn the unit off , press the PLAY/PAUSE ( )/POWER ON button to stop the disc before it is through playing, it will blink. 3 ! 4 " Adjust the VOLUME control ❶ and DBBS switch ❷ as desired. To search forward or backward through the tracks on the disc, press and hold the...
... display will stop mode or wait approximately 60 seconds to the CD position. PSlHidOe NthEeSFUjNaCckT.IONSlsiwdeitchthtoe FthUeNCCDTIpOoNsitsiownit.ch to turn the unit off , press the PLAY/PAUSE ( )/POWER ON button to stop the disc before it is through playing, it will blink. 3 ! 4 " Adjust the VOLUME control ❶ and DBBS switch ❷ as desired. To search forward or backward through the tracks on the disc, press and hold the...

Operating Instructions
Page 11
... FUNCTION switch to activate and understand the Anti-Shock System. 1 2 Insert a CD as described in the display. • To remove the disc, open the CD Compartment, hold the edge of the CD and gently press the center pivot and lift the CD. • The maximum time of a CD is capable of playing standard CDs or 3" singles; button to turn the unit on CD skipping, which is played, the track number...
... FUNCTION switch to activate and understand the Anti-Shock System. 1 2 Insert a CD as described in the display. • To remove the disc, open the CD Compartment, hold the edge of the CD and gently press the center pivot and lift the CD. • The maximum time of a CD is capable of playing standard CDs or 3" singles; button to turn the unit on CD skipping, which is played, the track number...

Operating Instructions
Page 12
... the indicator returns to play the signals stored in a stable location, turn the Anti-Shock System off , press the ESP/BAND button. NOTES: • When the CD player is used in the memory until the CD player can read the music data properly from the disc. MD6885.O/M.QXD 1/15/02 10:07 PM Page 11 CD OPERATION (CONTINUED) 5 6 If the CD player is subject to...
... the indicator returns to play the signals stored in a stable location, turn the Anti-Shock System off , press the ESP/BAND button. NOTES: • When the CD player is used in the memory until the CD player can read the music data properly from the disc. MD6885.O/M.QXD 1/15/02 10:07 PM Page 11 CD OPERATION (CONTINUED) 5 6 If the CD player is subject to...

Operating Instructions
Page 13
... CD OPERATION (CONTINUED) TO REPEATEDLY PLAY BACK ONE TRACK 1 2 ! the Repeat 1 indicator will then play all the tracks on . TO REPEATEDLY PLAY BACK ALL TRACKS 1 2 ! TO CANCEL OR STOP REPEAT PLAYBACK • TO STOP REPEAT PLAYBACK, press the STOP (s)/POWER OFF button once. • TO CANCEL REPEAT PLAYBACK, press the MODE button so that the Repeat 1 or Repeat ALL indicator disappears in the display. The unit will appear in the display. Adjust the VOLUME control ❷ and DBBS switch ❸ as desired. Adjust...
... CD OPERATION (CONTINUED) TO REPEATEDLY PLAY BACK ONE TRACK 1 2 ! the Repeat 1 indicator will then play all the tracks on . TO REPEATEDLY PLAY BACK ALL TRACKS 1 2 ! TO CANCEL OR STOP REPEAT PLAYBACK • TO STOP REPEAT PLAYBACK, press the STOP (s)/POWER OFF button once. • TO CANCEL REPEAT PLAYBACK, press the MODE button so that the Repeat 1 or Repeat ALL indicator disappears in the display. The unit will appear in the display. Adjust the VOLUME control ❷ and DBBS switch ❸ as desired. Adjust...

Operating Instructions
Page 14
... stop auto playback. Adjust the VOLUME control ❷ and DBBS switch ❸ as desired. Press the STOP (s)/POWER OFF button ❹ to begin playback. the RAND indicator will stop Random playback. 13 When all the tracks in the display. MD6885.O/M.QXD 1/15/02 10:07 PM Page 13 CD OPERATION (CONTINUED) INTRO PLAY 1 ! 2 " ! Press the PLAY/PAUSE ( )/POWER ON button ❶ to stop Intro playback. TO RANDOMLY PLAY BACK A CD 1 ! 2 " With a CD inserted, press the PLAY/PAUSE ( )/POWER ON button...
... stop auto playback. Adjust the VOLUME control ❷ and DBBS switch ❸ as desired. Press the STOP (s)/POWER OFF button ❹ to begin playback. the RAND indicator will stop Random playback. 13 When all the tracks in the display. MD6885.O/M.QXD 1/15/02 10:07 PM Page 13 CD OPERATION (CONTINUED) INTRO PLAY 1 ! 2 " ! Press the PLAY/PAUSE ( )/POWER ON button ❶ to stop Intro playback. TO RANDOMLY PLAY BACK A CD 1 ! 2 " With a CD inserted, press the PLAY/PAUSE ( )/POWER ON button...

Operating Instructions
Page 15
... ( ) /POWER ON button ❶ to begin Program playback and adjust the VOLUME control ❷ and DBBS switch ❸ as desired (up to a maximum of 24 tracks. 4 ! button ❸; Repeat this step to program additional tracks up to be stored in the stop auto playback. button ❸ again. When the disc is through the programs, press the SKIP/SEARCH - ❶ or + button ❷. MD6885.O/M.QXD 1/15/02 10:07 PM Page 14 CD OPERATION...
... ( ) /POWER ON button ❶ to begin Program playback and adjust the VOLUME control ❷ and DBBS switch ❸ as desired (up to a maximum of 24 tracks. 4 ! button ❸; Repeat this step to program additional tracks up to be stored in the stop auto playback. button ❸ again. When the disc is through the programs, press the SKIP/SEARCH - ❶ or + button ❷. MD6885.O/M.QXD 1/15/02 10:07 PM Page 14 CD OPERATION...

Operating Instructions
Page 16
... compact disc. DIGITAL AUDIO • This unit is probably dirty or damaged (scratched). Other compact discs may not conform to the CD standard and may be stored in straight lines from the AC power source when cleaning. • The finish on a section of the compact disc. Use caution when cleaning and wiping the plastic parts. • Mild soap and a damp cloth may not play only compact discs...
... compact disc. DIGITAL AUDIO • This unit is probably dirty or damaged (scratched). Other compact discs may not conform to the CD standard and may be stored in straight lines from the AC power source when cleaning. • The finish on a section of the compact disc. Use caution when cleaning and wiping the plastic parts. • Mild soap and a damp cloth may not play only compact discs...

Operating Instructions
Page 17
... wire Extend Headphone wire. FM MODE button Press MODE button to turn on . connection. not closed. Headphone Reinsert headphone plug not inserted plug correctly. Replace batteries. broadcast station. Stereo on . incorrectly. MD6885.O/M.QXD 1/15/02 10:07 PM Page 16 TROUBLESHOOTING GUIDE If you experience a problem with soft condensation cloth. Disc will not turn not set to minimum. correctly. reception is not Set FUNCTION switch to Stereo. desired function. 16 SYMPTOM Unit will not play. No sound. disc. on radio...
... wire Extend Headphone wire. FM MODE button Press MODE button to turn on . connection. not closed. Headphone Reinsert headphone plug not inserted plug correctly. Replace batteries. broadcast station. Stereo on . incorrectly. MD6885.O/M.QXD 1/15/02 10:07 PM Page 16 TROUBLESHOOTING GUIDE If you experience a problem with soft condensation cloth. Disc will not turn not set to minimum. correctly. reception is not Set FUNCTION switch to Stereo. desired function. 16 SYMPTOM Unit will not play. No sound. disc. on radio...
Operating Instructions
Page 18
Weston, FL Printed in Hong Kong Visit our website at www.memorexelectronics.com MD6885.O/M.QXD 1/15/02 10:07 PM Page 17 Memcorp, Inc.
Weston, FL Printed in Hong Kong Visit our website at www.memorexelectronics.com MD6885.O/M.QXD 1/15/02 10:07 PM Page 17 Memcorp, Inc.


