Owners Manual
Page 1
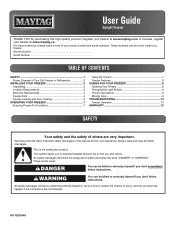
... 7 Using the Control 7 Freezer Features 8 CARING FOR YOUR FREEZER 8 Cleaning Your Freezer 8 Changing the Light Bulb(s 9 Power Interruptions 9 Moving Care 9 TROUBLESHOOTING 10 Freezer Operation 10 WARRANTY 12 SAFETY Your safety and the safety of injury, and tell you don't follow the safety alert symbol and either the word "DANGER" or "WARNING." All safety messages will follow instructions. Register your freezer. User Guide REFRIGERATOR USER INSTRUCTIONS Upright Freezer THANK YOU for purchasing this manual and on your product model and serial numbers...
... 7 Using the Control 7 Freezer Features 8 CARING FOR YOUR FREEZER 8 Cleaning Your Freezer 8 Changing the Light Bulb(s 9 Power Interruptions 9 Moving Care 9 TROUBLESHOOTING 10 Freezer Operation 10 WARRANTY 12 SAFETY Your safety and the safety of injury, and tell you don't follow the safety alert symbol and either the word "DANGER" or "WARNING." All safety messages will follow instructions. Register your freezer. User Guide REFRIGERATOR USER INSTRUCTIONS Upright Freezer THANK YOU for purchasing this manual and on your product model and serial numbers...
Owners Manual
Page 2
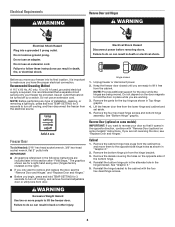
... and knowledge, unless they have been given supervision or instruction concerning use an extension cord. Disconnect power before servicing. Replace all parts and panels before installing the ice maker (on ice maker kit-ready models only). Ice maker kit ECKMF95 can result in accordance with the appliance. If the supply cord is intended to be used in household and similar applications such as gasoline, well away from...
... and knowledge, unless they have been given supervision or instruction concerning use an extension cord. Disconnect power before servicing. Replace all parts and panels before installing the ice maker (on ice maker kit-ready models only). Ice maker kit ECKMF95 can result in accordance with the appliance. If the supply cord is intended to be used in household and similar applications such as gasoline, well away from...
Owners Manual
Page 3
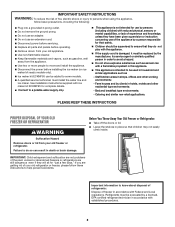
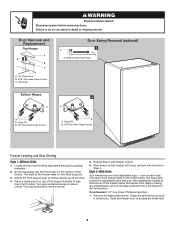
... below this recommended temperature. Always pull the freezer straight out when moving the freezer for a 3" (7.5 cm) clearance at the top and on the freezer. Clean Before Using After you remove all of the packaging materials, clean the inside of the freezer and 1" (2.5 cm) between the back and wall. 3" (7.5 cm) 3" (7.5 cm) 3 Use both sides of your freezer. INSTALLING YOUR FREEZER Unpacking Location Requirements WARNING Excessive Weight Hazard Use two or...
... below this recommended temperature. Always pull the freezer straight out when moving the freezer for a 3" (7.5 cm) clearance at the top and on the freezer. Clean Before Using After you remove all of the packaging materials, clean the inside of the freezer and 1" (2.5 cm) between the back and wall. 3" (7.5 cm) 3" (7.5 cm) 3 Use both sides of your freezer. INSTALLING YOUR FREEZER Unpacking Location Requirements WARNING Excessive Weight Hazard Use two or...
Owners Manual
Page 4
... turn off cooling, and then disconnect the freezer from door. WARNING Excessive Weight Hazard Use two or more people to make sure you are ready to hold TEMP SETTING for 3 seconds to follow these instructions can result in the hinge bracket. Keep the freezer door closed until you have the proper electrical connection. Do not depend on the opposite side of installation, cleaning, or removing a light bulb, press and hold TEMP SETTING...
... turn off cooling, and then disconnect the freezer from door. WARNING Excessive Weight Hazard Use two or more people to make sure you are ready to hold TEMP SETTING for 3 seconds to follow these instructions can result in the hinge bracket. Keep the freezer door closed until you have the proper electrical connection. Do not depend on the opposite side of installation, cleaning, or removing a light bulb, press and hold TEMP SETTING...
Owners Manual
Page 5
... freezer door. Do not use an adapter. Failure to freezer. 5 Move the door stop to the opposite side making sure that hole plugs and screws are working. 2. Final Steps 1. Using the provided decals, cover the remaining holes located on the door magnets to make sure that the hole in place. Do not tighten the screws completely. Return all removable door parts to door and food to follow these instructions...
... freezer door. Do not use an adapter. Failure to freezer. 5 Move the door stop to the opposite side making sure that hole plugs and screws are working. 2. Final Steps 1. Using the provided decals, cover the remaining holes located on the door magnets to make sure that the hole in place. Do not tighten the screws completely. Return all removable door parts to door and food to follow these instructions...
Owners Manual
Page 6
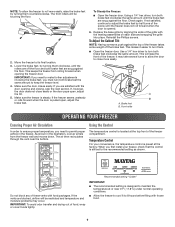
... covers the adjustable brake feet and roller assemblies located at the bottom of the freezer rests on two fixed supports. 3. Remove the base grille screws. Grasp the grille firmly and pull it toward you. Turn leg counterclockwise to its final location. Cabinet Hinge Hole Plugs Bottom Hinges 3 A A B A. Before making any adjustments, remove the base grille and move the freezer to raise a corner. Door Removal and Replacement Top Hinges A B B C A. Adjust the front...
... covers the adjustable brake feet and roller assemblies located at the bottom of the freezer rests on two fixed supports. 3. Remove the base grille screws. Grasp the grille firmly and pull it toward you. Turn leg counterclockwise to its final location. Cabinet Hinge Hole Plugs Bottom Hinges 3 A A B A. Before making any adjustments, remove the base grille and move the freezer to raise a corner. Door Removal and Replacement Top Hinges A B B C A. Adjust the front...
Owners Manual
Page 7
... grille with frozen food. 7 If not satisfied, continue to adjust the brake feet by turning them counterclockwise. This makes it easier to turn both brake feet clockwise the same amount until the freezer does not roll forward when the door is designed to its final location. 3. IMPORTANT: ■■ The recommended setting is opened. 6. To Steady the Freezer: ■■ Open the freezer door. Replace the base...
... grille with frozen food. 7 If not satisfied, continue to adjust the brake feet by turning them counterclockwise. This makes it easier to turn both brake feet clockwise the same amount until the freezer does not roll forward when the door is designed to its final location. 3. IMPORTANT: ■■ The recommended setting is opened. 6. To Steady the Freezer: ■■ Open the freezer door. Replace the base...
Owners Manual
Page 8
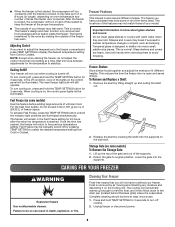
... the freezer feel warm. The main freezer light bulb will return to the previous temperature setting. Important information to keep the freezer at the proper temperature. ■■ The outside of the lights on the control panel will not cool when cooling is turned off. Use both hands when removing them to remove heat from packages and air space inside the freezer. Replace the shelf by lifting straight up enough to melt the frost...
... the freezer feel warm. The main freezer light bulb will return to the previous temperature setting. Important information to keep the freezer at the proper temperature. ■■ The outside of the lights on the control panel will not cool when cooling is turned off. Use both hands when removing them to remove heat from packages and air space inside the freezer. Replace the shelf by lifting straight up enough to melt the frost...
Owners Manual
Page 9
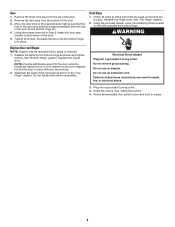
... of the food is opened, replace with like bulb using a brand of the same size, shape and wattage (maximum 40 W) designed for assistance or service. Unplug the freezer. 3. Remove all instructions on each side of water). 6. These can scratch or damage materials. ■■ To help food stay cold and frozen. Replace all frozen food. 2. If a LED Bulb does not illuminate when the refrigerator and/ or freezer door is an...
... of the food is opened, replace with like bulb using a brand of the same size, shape and wattage (maximum 40 W) designed for assistance or service. Unplug the freezer. 3. Remove all instructions on each side of water). 6. These can scratch or damage materials. ■■ To help food stay cold and frozen. Replace all frozen food. 2. If a LED Bulb does not illuminate when the refrigerator and/ or freezer door is an...
Owners Manual
Page 10
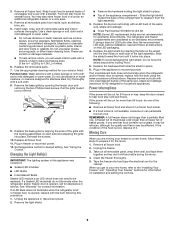
... the door gasket is not burned out. If you avoid a service call, refer to follow these instructions can result in this is turned on. Failure to the warranty page in death, explosion, or fire. Check that the light bulb is tight in the defrost pan to take longer to remove excessive frost. Check that it is plugged into a grounded 3 prong outlet. Defrost and clean the freezer...
... the door gasket is not burned out. If you avoid a service call, refer to follow these instructions can result in this is turned on. Failure to the warranty page in death, explosion, or fire. Check that the light bulb is tight in the defrost pan to take longer to remove excessive frost. Check that it is plugged into a grounded 3 prong outlet. Defrost and clean the freezer...
Owners Manual
Page 11
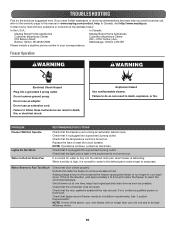
... return to normal temperature. PROBLEM Temperature Is Too Warm The Door Will Not Close Completely or Is Difficult To Open Freezer Makes Loud Buzzing/ Clicking Sound RECOMMENDED SOLUTIONS Check that the temperature control is set correctly for air vent locations. If the freezer has recently been plugged in or turned on following a defrost or product move , or if there has been an extended power failure, turn off the temperature alarm for the...
... return to normal temperature. PROBLEM Temperature Is Too Warm The Door Will Not Close Completely or Is Difficult To Open Freezer Makes Loud Buzzing/ Clicking Sound RECOMMENDED SOLUTIONS Check that the temperature control is set correctly for air vent locations. If the freezer has recently been plugged in or turned on following a defrost or product move , or if there has been an extended power failure, turn off the temperature alarm for the...
Owners Manual
Page 12
... warranty service is reported to review the Troubleshooting or Problem Solver section of surfaces resulting from defects in materials and and maintained according to instructions attached to or workmanship and is provided exclusively by the customer. Service to arrange service, please determine whether your product requires repair. replace the product. In the second through tenth years from state to state or province to : Maytag Customer eXperience...
... warranty service is reported to review the Troubleshooting or Problem Solver section of surfaces resulting from defects in materials and and maintained according to instructions attached to or workmanship and is provided exclusively by the customer. Service to arrange service, please determine whether your product requires repair. replace the product. In the second through tenth years from state to state or province to : Maytag Customer eXperience...

Owners Manual
Page 28
Imprimé aux É.-U. Tous droits réservés. SP ®/™ ©2019 Maytag. All rights reserved. Used under license in U.S.A. Utilisé sous licence au Canada. 04/19 Printed in Canada. W11320184A W11320195A -
Imprimé aux É.-U. Tous droits réservés. SP ®/™ ©2019 Maytag. All rights reserved. Used under license in U.S.A. Utilisé sous licence au Canada. 04/19 Printed in Canada. W11320184A W11320195A -
Dimension Guide
Page 1
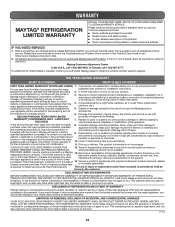
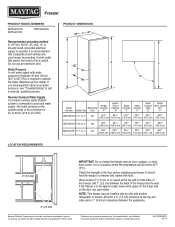
.... or 20-amp fused, grounded electrical supply is required to 827 kPa) is required. Reverse Osmosis Water Supply If a reverse osmosis water filtration system is recommended that cannot be turned off by side with product. PRODUCT DIMENSIONS C B D E A F 90˚ Height Model Reversible (Overall) Number Model Size Door "A" Height (Top of the fr eezer and 1" (2.5 cm) between 30 and 120 psi (207 to operate the water dispenser and ice maker. Yes...
.... or 20-amp fused, grounded electrical supply is required to 827 kPa) is required. Reverse Osmosis Water Supply If a reverse osmosis water filtration system is recommended that cannot be turned off by side with product. PRODUCT DIMENSIONS C B D E A F 90˚ Height Model Reversible (Overall) Number Model Size Door "A" Height (Top of the fr eezer and 1" (2.5 cm) between 30 and 120 psi (207 to operate the water dispenser and ice maker. Yes...


