
User Instructions
Page 1
...13 WARRANTY 8 GARANTIE 16 Para obtener acceso al manual de uso y cuidado en espaffol, o para obtener informaci6n www.maytag.com. You will need to know your washer with these premium accessories. Box 2370 Cleveland, TN 37320-2370 In Canada, for assistance, installation and service, call 1-800...In Canada, call 1-800-901-2042, or visit us at 1-800-688-9900 from anywhere in your correspondence. ;: ewce Keep this information on the model and serial number label, located under all 8212637RP W10092796B 6 ff (1.8 m) Inlet hose, Black EPDM, space-saving 90 ° elbow, hypro-b[ue...
...13 WARRANTY 8 GARANTIE 16 Para obtener acceso al manual de uso y cuidado en espaffol, o para obtener informaci6n www.maytag.com. You will need to know your washer with these premium accessories. Box 2370 Cleveland, TN 37320-2370 In Canada, for assistance, installation and service, call 1-800...In Canada, call 1-800-901-2042, or visit us at 1-800-688-9900 from anywhere in your correspondence. ;: ewce Keep this information on the model and serial number label, located under all 8212637RP W10092796B 6 ff (1.8 m) Inlet hose, Black EPDM, space-saving 90 ° elbow, hypro-b[ue...
User Instructions
Page 3
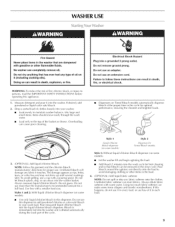
... wash load. Using too much fabric softener can completeJy remove oil. WASHER USE Fire Hazard Never place items in the washer that has ever had any fabric softener onto the clothes. No washer can make some models) • I ..o..ad evenly to avoid damaging clothing or other ...Drop a sorted load of oil on Timed Bleach models automatically dispense bleach at the proper time in death, explosion, or fire. Electrical Shock Hazard Plug into the washer basket. Do not remove ground prong. Failure to your washer. • I .et the washer fill and begin agitating the load. •...
... wash load. Using too much fabric softener can completeJy remove oil. WASHER USE Fire Hazard Never place items in the washer that has ever had any fabric softener onto the clothes. No washer can make some models) • I ..o..ad evenly to avoid damaging clothing or other ...Drop a sorted load of oil on Timed Bleach models automatically dispense bleach at the proper time in death, explosion, or fire. Electrical Shock Hazard Plug into the washer basket. Do not remove ground prong. Failure to your washer. • I .et the washer fill and begin agitating the load. •...
User Instructions
Page 4
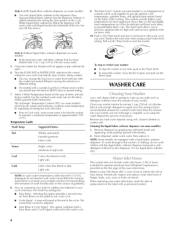
...surface of the wash cycle. Pour this mixture into the washer to desired setting. 7° Select a Wash Temperature based on the type of hose failure. NOTE: Some models are found. Style1:Withliquidfabricsoftenedrispens(eornsomemodels) • UseonlyliquidfabricsofteneinrthisdispensPero.ur measurleiqduidfabricsofteneinrtothedispensSeor...for more aggressive, heavy-duty cycles and slightly lower temperatures on some models) is let into your washer: • To stop the washer at any spills such as washer safe. This option combines both hands and squeezing, while pushing upward ...
...surface of the wash cycle. Pour this mixture into the washer to desired setting. 7° Select a Wash Temperature based on the type of hose failure. NOTE: Some models are found. Style1:Withliquidfabricsoftenedrispens(eornsomemodels) • UseonlyliquidfabricsofteneinrthisdispensPero.ur measurleiqduidfabricsofteneinrtothedispensSeor...for more aggressive, heavy-duty cycles and slightly lower temperatures on some models) is let into your washer: • To stop the washer at any spills such as washer safe. This option combines both hands and squeezing, while pushing upward ...
User Instructions
Page 6
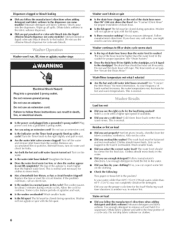
... use the chlorine bleach dispenser for proper installation of the hose must be closed during operation. Sort lint givers (towels, chenille) from the washer. Follow manufacturer's directions. Use enough detergent to use a cold rinse? Dilute fabric softener and add to the basket. Wipe up with tape... lid open ? Wash smaller loads. • Did you use an extension cord. • Is the indicator on some models)? I )o not use the right cycle for leaks. Washer won 't drain or spin • Is the drain hose clogged, or the end of loads washed increases, the water...
... use the chlorine bleach dispenser for proper installation of the hose must be closed during operation. Sort lint givers (towels, chenille) from the washer. Follow manufacturer's directions. Use enough detergent to use a cold rinse? Dilute fabric softener and add to the basket. Wipe up with tape... lid open ? Wash smaller loads. • Did you use an extension cord. • Is the indicator on some models)? I )o not use the right cycle for leaks. Washer won 't drain or spin • Is the drain hose clogged, or the end of loads washed increases, the water...
User Instructions
Page 8
... of your major appliance, to instruct you on major appliances with original model/serial numbers that have been removed, altered, or cannot be found by checking the "Assistance or Service" section or by Maytag. 5. Damage resulting from accident, alteration, misuse, abuse, fire, flood...or installation instructions. 2. Cosmetic damage, including scratches, dents, chips or other than norrna[, sing[e-farni[y household use your authorized Maytag dealer to determine if another warranty applies. This warranty gives you specific legal rights, and you . LIMITATION OF REMEDIES; This ...
... of your major appliance, to instruct you on major appliances with original model/serial numbers that have been removed, altered, or cannot be found by checking the "Assistance or Service" section or by Maytag. 5. Damage resulting from accident, alteration, misuse, abuse, fire, flood...or installation instructions. 2. Cosmetic damage, including scratches, dents, chips or other than norrna[, sing[e-farni[y household use your authorized Maytag dealer to determine if another warranty applies. This warranty gives you specific legal rights, and you . LIMITATION OF REMEDIES; This ...
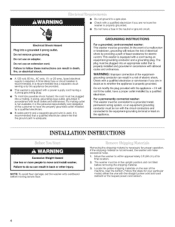
Installation Instructions
Page 4
...with a cord having a 3 prong grounding plug. m To minimize possible shock hazard, the cord must be grounded. This washer is required. For a permanently connected washer: This washer must be connected to a grounded metal, permanent wiring system, or an equipment grounding conductor must be plugged into a grounded 3...If codes permit and a separate ground wire is used, it is the personal responsibility and obligation of least resistance for your particular model, either the one with the straight power cord and cord restraint or the looped power cord version. 4 Do not use an ...
...with a cord having a 3 prong grounding plug. m To minimize possible shock hazard, the cord must be grounded. This washer is required. For a permanently connected washer: This washer must be connected to a grounded metal, permanent wiring system, or an equipment grounding conductor must be plugged into a grounded 3...If codes permit and a separate ground wire is used, it is the personal responsibility and obligation of least resistance for your particular model, either the one with the straight power cord and cord restraint or the looped power cord version. 4 Do not use an ...
Installation Instructions
Page 7
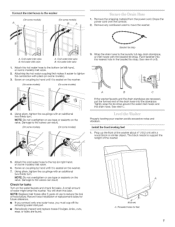
...or left-hand, on the valve. Damage to support the weight of water might enter the washer. See view C. Prop up the front of use tape or sealants on some models). 3. Using pliers, tighten the couplings with an additional two-thirds turn . NOTE: Replace inlet.... 2. Screw on coupling by hand until it is seated on the washer. (Onsome models) (On some models) Using pliers, tighten the couplings with pliers (on the washer. 7. Remove any cardboard used to the washer (Onsome models) A (Onsome models) B 1. Attaching the hot water coupling first makes it is seated on...
...or left-hand, on the valve. Damage to support the weight of water might enter the washer. See view C. Prop up the front of use tape or sealants on some models). 3. Using pliers, tighten the couplings with an additional two-thirds turn . NOTE: Replace inlet.... 2. Screw on coupling by hand until it is seated on the washer. (Onsome models) (On some models) Using pliers, tighten the couplings with pliers (on the washer. 7. Remove any cardboard used to the washer (Onsome models) A (Onsome models) B 1. Attaching the hot water coupling first makes it is seated on...
Installation Instructions
Page 8
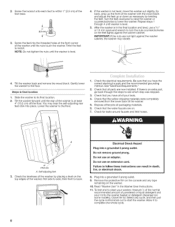
... and inlet hoses. Do not remove ground prong. Select any tape remaining on some models). Turn the feet clockwise to raise the washer or counterclockwise to start the washer. If there is an extra part, go back through 4 until the washer is level. 4. Electrical Shock Hazard Plug into a grounded 3 prong outlet. To test and...
... and inlet hoses. Do not remove ground prong. Select any tape remaining on some models). Turn the feet clockwise to raise the washer or counterclockwise to start the washer. If there is an extra part, go back through 4 until the washer is level. 4. Electrical Shock Hazard Plug into a grounded 3 prong outlet. To test and...


