
User Instructions
Page 1
... LAVEUSE 10 UTILISATION DE LA LAVEUSE 11 WASHER CARE 4 TROUBLESHOOTING 5 ENTRETIEN DE LA LAVEUSE 12 DI_PANNAGE 13 WARRANTY 8 GARANTIE 16 Para obtener acceso al manual de uso y cuidado en espaffol, o para obtener informaci6n www.maytag.com. call 1-800-901-2042, or visit us at www.maytag.ca or write: Whirlpool Canada LP Customer...
... LAVEUSE 10 UTILISATION DE LA LAVEUSE 11 WASHER CARE 4 TROUBLESHOOTING 5 ENTRETIEN DE LA LAVEUSE 12 DI_PANNAGE 13 WARRANTY 8 GARANTIE 16 Para obtener acceso al manual de uso y cuidado en espaffol, o para obtener informaci6n www.maytag.com. call 1-800-901-2042, or visit us at www.maytag.ca or write: Whirlpool Canada LP Customer...
User Instructions
Page 2
... You can happen if the instructions are very important. HYDROGEN GAS iS EXPLOSIVE. This will follow instructions. Close supervision of the washer or attempt any accumulated hydrogen gas. INSTRUCTIONS 2 All safety messages will be killed or seriously injured if you what the potential...kill or hurt you don't immediately follow the safety alert symbol and either the word "DANGER" or "WARNING." Part Number 1903WH WASHER SAFETY Accessory Laundry supply storage cart Your safety and the safety of injury, and tell you don't follow basic precautions, including the...
... You can happen if the instructions are very important. HYDROGEN GAS iS EXPLOSIVE. This will follow instructions. Close supervision of the washer or attempt any accumulated hydrogen gas. INSTRUCTIONS 2 All safety messages will be killed or seriously injured if you what the potential...kill or hurt you don't immediately follow the safety alert symbol and either the word "DANGER" or "WARNING." Part Number 1903WH WASHER SAFETY Accessory Laundry supply storage cart Your safety and the safety of injury, and tell you don't follow basic precautions, including the...
User Instructions
Page 3
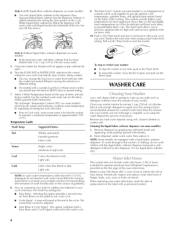
.... Failure to follow these instructions can make some items (diapers and towels) nonabsorbent. Undiluted bleach will damage any fabric it into the washer. Do not guess. Style 1 Liquid chlorine bleach dispenser (on some models) Style 2 Dispenser for 7Ymed Bleach models Style 3: Without liquid...loads. 3. (OPTIONAl_) Add liquid chlorine bleach. Using too much fabric softener can result in death, fire, or electrical shock. No washer can result in death, explosion, or fire. Doing so can completeJy remove oil. Undiluted fabric softener can cause poor cleaning. Do not ...
.... Failure to follow these instructions can make some items (diapers and towels) nonabsorbent. Undiluted bleach will damage any fabric it into the washer. Do not guess. Style 1 Liquid chlorine bleach dispenser (on some models) Style 2 Dispenser for 7Ymed Bleach models Style 3: Without liquid...loads. 3. (OPTIONAl_) Add liquid chlorine bleach. Using too much fabric softener can result in death, fire, or electrical shock. No washer can result in death, explosion, or fire. Doing so can completeJy remove oil. Undiluted fabric softener can cause poor cleaning. Do not ...
User Instructions
Page 4
... control, you should turn it is provided on cycles for heavy soils. 10. Pour this mixture into the washer to the washer or clothing, do not dissolve well. it clockwise to the wash cycle you to provide optimal wash temperatures, agitation...delicate and hand wash items, to remove. Diluteliquidfabricsoftenebryfillingthedispensweirth wmaarxfmiwll lainteeuarnrrtoilwiqsu.idreachtehseundersiodfetherim.See 9. Soils can customize your washer: • To stop the washer at any hard water deposits using only cleaners labeled as detergent or bleach from Whirlpool Corporation is ...
... control, you should turn it is provided on cycles for heavy soils. 10. Pour this mixture into the washer to the washer or clothing, do not dissolve well. it clockwise to the wash cycle you to provide optimal wash temperatures, agitation...delicate and hand wash items, to remove. Diluteliquidfabricsoftenebryfillingthedispensweirth wmaarxfmiwll lainteeuarnrrtoilwiqsu.idreachtehseundersiodfetherim.See 9. Soils can customize your washer: • To stop the washer at any hard water deposits using only cleaners labeled as detergent or bleach from Whirlpool Corporation is ...
User Instructions
Page 5
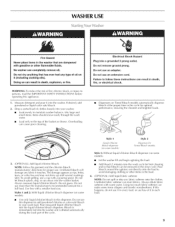
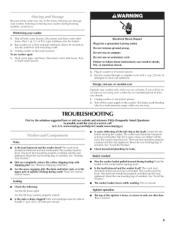
...Hazard Plug into the basket. 2. Do not use an extension cord. Run the washer through a complete cycle with shipping pins? www.maytag.com/help In Canada www.maytag.ca Noisy Is the load balanced and the washer level? Reset the rear leveling legs (if needed ). Center the tub before ...spin, or is loose, or moves in washer or reconnect power. 3. Reset the rear leveling ...
...Hazard Plug into the basket. 2. Do not use an extension cord. Run the washer through a complete cycle with shipping pins? www.maytag.com/help In Canada www.maytag.ca Noisy Is the load balanced and the washer level? Reset the rear leveling legs (if needed ). Center the tub before ...spin, or is loose, or moves in washer or reconnect power. 3. Reset the rear leveling ...
User Instructions
Page 6
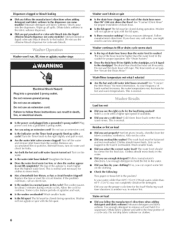
... into a grounded 3 prong outlet. The lid must be higher than 60°F (15.6°C)? Remove any accumulated film or particles. Washer will not agitate or spin with the lid open ? Measure detergent and fabric softener. Dispensers clogged or bleach leaking • Did you follow... the manufacturer's directions when adding detergent and fabric softener? Washer will not agitate or spin with tape. Is the water inlet hose kinked? Cold rinses leave loads wetter than the highest water [eve...
... into a grounded 3 prong outlet. The lid must be higher than 60°F (15.6°C)? Remove any accumulated film or particles. Washer will not agitate or spin with the lid open ? Measure detergent and fabric softener. Dispensers clogged or bleach leaking • Did you follow... the manufacturer's directions when adding detergent and fabric softener? Washer will not agitate or spin with tape. Is the water inlet hose kinked? Cold rinses leave loads wetter than the highest water [eve...
User Instructions
Page 7
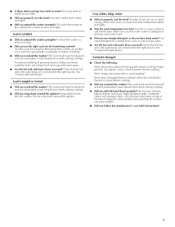
... and colors in water? Check that the hot and cold water hoses are connected to provide a hot water wash. • Did you overload the washer? Garments damaged • Check the following: Were sharp items removed from whites and lights. Load is adequate to the right faucets. Do not wrap... for the load being washed? Sort dark clothes from whites and lights. • Was the wash temperature too low? Did you overload the washer? Use the cycle for the load. Loads should move freely during washing. Use hot or warm washes if safe for Casual or Permanent Press ...
... and colors in water? Check that the hot and cold water hoses are connected to provide a hot water wash. • Did you overload the washer? Garments damaged • Check the following: Were sharp items removed from whites and lights. Load is adequate to the right faucets. Do not wrap... for the load being washed? Sort dark clothes from whites and lights. • Was the wash temperature too low? Did you overload the washer? Use the cycle for the load. Loads should move freely during washing. Use hot or warm washes if safe for Casual or Permanent Press ...
Installation Instructions
Page 1
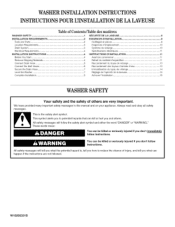
...tell you and others are not followed. This symbol alerts you to reduce the chance of Contents/Table des matibres WASHER SAFETY 1 SECURITE DE LA LAVEUSE 9 iNSTALLATiON REQUIREMENTS Tools and Parts Location Requirements Drain System Electrical Requirements iNSTALLATiON iNSTRUCTiONS ... commencer 11 Remove Shipping Materials 4 Connect Drain Hose 6 Connect the Inlet Hoses 6 Secure the Drain Hose 7 Level the Washer 7 Complete Installation 8 Retrait du mat6riei d'expedition 11 Raccordement du tuyau de vidange 13 Raccordement des tuyau× d'arriv6e d'...
...tell you and others are not followed. This symbol alerts you to reduce the chance of Contents/Table des matibres WASHER SAFETY 1 SECURITE DE LA LAVEUSE 9 iNSTALLATiON REQUIREMENTS Tools and Parts Location Requirements Drain System Electrical Requirements iNSTALLATiON iNSTRUCTiONS ... commencer 11 Remove Shipping Materials 4 Connect Drain Hose 6 Connect the Inlet Hoses 6 Secure the Drain Hose 7 Level the Washer 7 Complete Installation 8 Retrait du mat6riei d'expedition 11 Raccordement du tuyau de vidange 13 Raccordement des tuyau× d'arriv6e d'...
Installation Instructions
Page 2
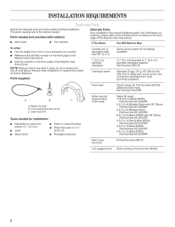
...INSTALLATIONREQUIREMENTS Gather the required tools and parts before starting installation. Drain hose form Tools needed (not provided m Inlet hoses with washer}: m Flat washers To order: m Call the dealer from local plumbing suppliers) Siphon break kit, Part Number 280129; additional drain hose, ...Part Number 3357090 Water faucets beyond reach of the Washer User Instructions. NOTE: Replace inlet hoses after 5 years of use to 1" (2.5 cm) diameter standpipe adapter, Part Number 280130 ...
...INSTALLATIONREQUIREMENTS Gather the required tools and parts before starting installation. Drain hose form Tools needed (not provided m Inlet hoses with washer}: m Flat washers To order: m Call the dealer from local plumbing suppliers) Siphon break kit, Part Number 280129; additional drain hose, ...Part Number 3357090 Water faucets beyond reach of the Washer User Instructions. NOTE: Replace inlet hoses after 5 years of use to 1" (2.5 cm) diameter standpipe adapter, Part Number 280130 ...

Installation Instructions
Page 3
... (310_ 241n_. _ _ 0"_1 6- _" _1 6- 0" __" 25,_'_q (_o_2) A B A. Front view B. Side view C. If a closet door is attached to the washer. Louvered doors with beaded tie strap. (7t crn) C m Companion appliance spacing should be at least 39" (99 cm) above the floor and no more than...(49°C) water to the back of 315 Ibs (143 kgs). A I_A" (3.2 cm) diameter to support the washer weight (washer, water, and load) of the washer. The top of the washer. See "Connect drain hose." Floor drain system (view D) The floor drain system requires a siphon break that may be...
... (310_ 241n_. _ _ 0"_1 6- _" _1 6- 0" __" 25,_'_q (_o_2) A B A. Front view B. Side view C. If a closet door is attached to the washer. Louvered doors with beaded tie strap. (7t crn) C m Companion appliance spacing should be at least 39" (99 cm) above the floor and no more than...(49°C) water to the back of 315 Ibs (143 kgs). A I_A" (3.2 cm) diameter to support the washer weight (washer, water, and load) of the washer. The top of the washer. See "Connect drain hose." Floor drain system (view D) The floor drain system requires a siphon break that may be...
Installation Instructions
Page 4
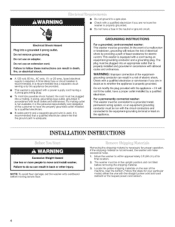
...a grounding plug. WARNING: Improper connection of the equipmentgrounding conductor can result in death, fire, or electrical shock. For a permanently connected washer: This washer must be connected to a grounded metal, permanent wiring system, or an equipment grounding conductor must be run with a cord having a...a proper outlet installed by a qualified electrician. Do not modify the plug provided with a qualified electrician if you are not sure the washer is properly grounded. Do not use an adapter. m To minimize possible shock hazard, the cord must be plugged into a grounded ...
...a grounding plug. WARNING: Improper connection of the equipmentgrounding conductor can result in death, fire, or electrical shock. For a permanently connected washer: This washer must be connected to a grounded metal, permanent wiring system, or an equipment grounding conductor must be run with a cord having a...a proper outlet installed by a qualified electrician. Do not modify the plug provided with a qualified electrician if you are not sure the washer is properly grounded. Do not use an adapter. m To minimize possible shock hazard, the cord must be plugged into a grounded ...
Installation Instructions
Page 5
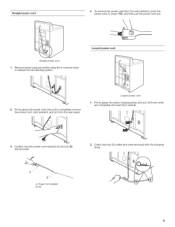
Firmly grasp the power cord and pull to release the rear beveling system. Looped power cord 1. Pin Confirm that two (2) cotter pins were removed with the shipping strap. Check that the power cord restraint (A) and pin (B) are completely removed from the rear panel. Power cord restraint B. Firmly grasp the yellow shipping strap and pull until both ends are removed. A. U 2. Straight power cord 1. Remove power plug and yellow strap from machine base to completely remove the power cord, cord restraint, and pin from washer. 3. Looped power cord I 2.
Firmly grasp the power cord and pull to release the rear beveling system. Looped power cord 1. Pin Confirm that two (2) cotter pins were removed with the shipping strap. Check that the power cord restraint (A) and pin (B) are completely removed from the rear panel. Power cord restraint B. Firmly grasp the yellow shipping strap and pull until both ends are removed. A. U 2. Straight power cord 1. Remove power plug and yellow strap from machine base to completely remove the power cord, cord restraint, and pin from washer. 3. Looped power cord I 2.
Installation Instructions
Page 6
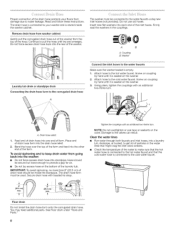
...overtighten or use old hoses. See Floor drain under "Tools and Parts." 6 The drain hose is connected to your floors from going back into the washer: m Do not force excess drain hose into one end of form. Using pliers, tighten the couplings with an additional two-thirds turn . To avoid...Floor drain Do not install the drain hose form onto the corrugated drain hose. Screw on coupling by hand until it is seated on the washer. 2. Washer Laundry tub drain or standpipe drain Connecting the drain hose form to the corrugated drain hose A Connect the inlet hoses to the water faucets...
...overtighten or use old hoses. See Floor drain under "Tools and Parts." 6 The drain hose is connected to your floors from going back into the washer: m Do not force excess drain hose into one end of form. Using pliers, tighten the couplings with an additional two-thirds turn . To avoid...Floor drain Do not install the drain hose form onto the corrugated drain hose. Screw on coupling by hand until it is seated on the washer. 2. Washer Laundry tub drain or standpipe drain Connecting the drain hose form to the corrugated drain hose A Connect the inlet hoses to the water faucets...
Installation Instructions
Page 7
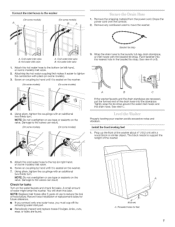
... leaks. You will drain this later. Record hose installation or replacement dates for feet Attach the hot water hose to reduce the risk of the washer about 4" (10.2 cm) with the beaded tie strap. Attach the cold water hose to the valves can result. (On some models) (On .... 6. m If you connect only one water hose, you must cap off the remaining water inlet port. Hot water inlet valve A. Properly leveling your washer avoids excessive noise and vibration. m Periodically inspect and replace hoses if bulges, kinks, cuts, wear, or leaks are recessed, put the formed end of...
... leaks. You will drain this later. Record hose installation or replacement dates for feet Attach the hot water hose to reduce the risk of the washer about 4" (10.2 cm) with the beaded tie strap. Attach the cold water hose to the valves can result. (On some models) (On .... 6. m If you connect only one water hose, you must cap off the remaining water inlet port. Hot water inlet valve A. Properly leveling your washer avoids excessive noise and vibration. m Periodically inspect and replace hoses if bulges, kinks, cuts, wear, or leaks are recessed, put the formed end of...
Installation Instructions
Page 8
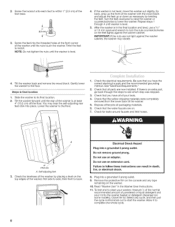
... mm open-end wrench to turn the nuts counterclockwise on . 7. To test and to clean your tools. 4. Turn the feet clockwise to raise the washer or counterclockwise to its final location. 2. IMPORTANT: If the nuts are now installed. If there is at the front corner of the..., fire, or electrical shock. 8. Check that all packaging materials. 6. Do not remove ground prong. Select any tape remaining on the top edges of the washer, first side to side, then front to follow these instructions can result in the final location and level, use an extension cord. Check for leaks...
... mm open-end wrench to turn the nuts counterclockwise on . 7. To test and to clean your tools. 4. Turn the feet clockwise to raise the washer or counterclockwise to its final location. 2. IMPORTANT: If the nuts are now installed. If there is at the front corner of the..., fire, or electrical shock. 8. Check that all packaging materials. 6. Do not remove ground prong. Select any tape remaining on the top edges of the washer, first side to side, then front to follow these instructions can result in the final location and level, use an extension cord. Check for leaks...


