

Installation Instructions
Page 2
...1" (25 mm) standpipe 2" (51 mm) diameter to improve performance and minimize noise and possible "washer walk". INSTALLATION REQUIREMENTS Tools and Parts Gather required tools and parts before starting installation. Beaded tie strap Drain hose with clamp Inlet hoses with washer) Your installation may require additional...-blue steel couplings (2 pack) 6 ft. (1.8 m) Inlet hose, Black EPDM, space saving 90° elbow, hypro-blue steel couplings (2 pack) Alternate parts: (Not supplied with flat washers To order, please refer to toll-free numbers on back page of your Use and Care Guide.
...1" (25 mm) standpipe 2" (51 mm) diameter to improve performance and minimize noise and possible "washer walk". INSTALLATION REQUIREMENTS Tools and Parts Gather required tools and parts before starting installation. Beaded tie strap Drain hose with clamp Inlet hoses with washer) Your installation may require additional...-blue steel couplings (2 pack) 6 ft. (1.8 m) Inlet hose, Black EPDM, space saving 90° elbow, hypro-blue steel couplings (2 pack) Alternate parts: (Not supplied with flat washers To order, please refer to toll-free numbers on back page of your Use and Care Guide.

Installation Instructions
Page 3
... your Use and Care Guide for closet door ventilation openings which are required. Floor drain system requires a Siphon Break Kit (Part Number 285834), 2 Connector Kits (Part Number 285385), and an Extension Drain Hose (Part Number 285863) that may cause damage in low temperatures. Floor standpipe drain system IMPORTANT: Do not install, store, or...
... your Use and Care Guide for closet door ventilation openings which are required. Floor drain system requires a Siphon Break Kit (Part Number 285834), 2 Connector Kits (Part Number 285385), and an Extension Drain Hose (Part Number 285863) that may cause damage in low temperatures. Floor standpipe drain system IMPORTANT: Do not install, store, or...

Installation Instructions
Page 5
... rear panel. Free power cord If clamp is not already in Step 7. Place drain hose in case you need additional parts with clamp. Drain hose form must be inside standpipe; You may need to back of washer. 4.5" (113 mm) Place hose into standpipe or lay on ...elbow end of laundry tub. See "Tools and Parts". 6. For a floor drain, remove the preinstalled drain hose form as shown. Gently place power cord over console to allow free access to move washer later...
... rear panel. Free power cord If clamp is not already in Step 7. Place drain hose in case you need additional parts with clamp. Drain hose form must be inside standpipe; You may need to back of washer. 4.5" (113 mm) Place hose into standpipe or lay on ...elbow end of laundry tub. See "Tools and Parts". 6. For a floor drain, remove the preinstalled drain hose form as shown. Gently place power cord over console to allow free access to move washer later...

Installation Instructions
Page 6
Clear water lines For floor drain installations, you will need additional parts with separate directions. See "Tools and Parts". Screw on coupling by hand until clear. 10. Screw coupling by hand until it is connected to hot water to help in attaching hoses to ...
Clear water lines For floor drain installations, you will need additional parts with separate directions. See "Tools and Parts". Screw on coupling by hand until clear. 10. Screw coupling by hand until it is connected to hot water to help in attaching hoses to ...

Installation Instructions
Page 8
...q Check for leaks around faucets and inlet hoses. q Read "Washer Use" in your tools. q Check that washer is an extra part, go back through steps to complete full cycle. 8 q Check that water faucets are now installed. q Check that yellow shipping materials...of normal recommended amount of your Washer User Instructions. Select any tape remaining on washer. q Remove protective film from back of /recycle all parts are on some models). q Dispose of washer. If there is plugged into a grounded 3 prong outlet Complete Installation CHECKLIST q Check electrical...
...q Check for leaks around faucets and inlet hoses. q Read "Washer Use" in your tools. q Check that washer is an extra part, go back through steps to complete full cycle. 8 q Check that water faucets are now installed. q Check that yellow shipping materials...of normal recommended amount of your Washer User Instructions. Select any tape remaining on washer. q Remove protective film from back of /recycle all parts are on some models). q Dispose of washer. If there is plugged into a grounded 3 prong outlet Complete Installation CHECKLIST q Check electrical...
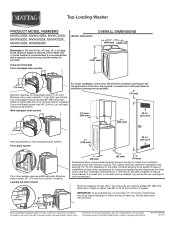
Dimension Guide
Page 1
... complete details, see Installation Instructions packed with cable tie. Louvered doors with a door, the minimum ventilation openings in .2 (155 cm2) Floor drain system requires additional parts. Top of installation and servicing, and spacing for companion appliances and clearances for planning purposes only. Consider allowing more than 96" (2.44 m) from bottom of...
... complete details, see Installation Instructions packed with cable tie. Louvered doors with a door, the minimum ventilation openings in .2 (155 cm2) Floor drain system requires additional parts. Top of installation and servicing, and spacing for companion appliances and clearances for planning purposes only. Consider allowing more than 96" (2.44 m) from bottom of...
Warranty Information
Page 1
... and delivery. Expenses for travel and transportation for factory specified parts and repair labor to correct defects in accordance with the product, Maytag brand of Whirlpool Corporation or Whirlpool Canada LP (hereafter "Maytag") will need repair service, first see the "Troubleshooting" section... for inwarranty service. The removal and reinstallation of products not approved by a Maytag designated service company. Some states and provinces do not allow limitations on how to parts or systems resulting from warranty coverage. 4. This warranty gives you specific legal rights...
... and delivery. Expenses for travel and transportation for factory specified parts and repair labor to correct defects in accordance with the product, Maytag brand of Whirlpool Corporation or Whirlpool Canada LP (hereafter "Maytag") will need repair service, first see the "Troubleshooting" section... for inwarranty service. The removal and reinstallation of products not approved by a Maytag designated service company. Some states and provinces do not allow limitations on how to parts or systems resulting from warranty coverage. 4. This warranty gives you specific legal rights...

Use & Care Guide
Page 16
...8076777. 6/08 Keep this book and your home. 7. Repairs to parts or systems resulting from the date of purchase. 6. In Canada, call 18006889900. MAYTAG® LAUNDRY WARRANTY LIMITED WARRANTY For one year from the date of purchase, when this...so this limitation may have other than normal, single-family household use of the Use & Care Guide. MAYTAG SHALL NOT BE LIABLE FOR INCIDENTAL OR CONSEQUENTIAL DAMAGES. Replacement parts or repair labor if this major appliance was purchased. EXCLUSION OF INCIDENTAL AND CONSEQUENTIAL DAMAGES YOUR SOLE AND...
...8076777. 6/08 Keep this book and your home. 7. Repairs to parts or systems resulting from the date of purchase. 6. In Canada, call 18006889900. MAYTAG® LAUNDRY WARRANTY LIMITED WARRANTY For one year from the date of purchase, when this...so this limitation may have other than normal, single-family household use of the Use & Care Guide. MAYTAG SHALL NOT BE LIABLE FOR INCIDENTAL OR CONSEQUENTIAL DAMAGES. Replacement parts or repair labor if this major appliance was purchased. EXCLUSION OF INCIDENTAL AND CONSEQUENTIAL DAMAGES YOUR SOLE AND...


