Use & Care Guide
Page 2
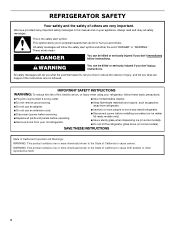
... 3 prong outlet. ■ Use nonflammable cleaner. ■ Do not remove ground prong. ■ Do not use an adapter. ■ Do not use an extension cord. ■ Disconnect power before installing ice maker (on ice maker kit ready models only). ■ Use a sturdy glass when dispensing ice (on some models). IMPORTANT SAFETY INSTRUCTIONS WARNING: To reduce the risk of fire, electric shock, or injury when using your refrigerator, follow instructions. REFRIGERATOR SAFETY Your safety...
... 3 prong outlet. ■ Use nonflammable cleaner. ■ Do not remove ground prong. ■ Do not use an adapter. ■ Do not use an extension cord. ■ Disconnect power before installing ice maker (on ice maker kit ready models only). ■ Use a sturdy glass when dispensing ice (on some models). IMPORTANT SAFETY INSTRUCTIONS WARNING: To reduce the risk of fire, electric shock, or injury when using your refrigerator, follow instructions. REFRIGERATOR SAFETY Your safety...
Use & Care Guide
Page 5
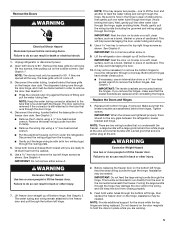
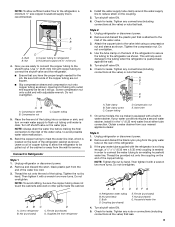
... the water tubing free. Failure to the freezer door and pull through the hinge. See Graphic 5. The water tubing and wiring remain attached to do so can result in back or other injury. 7. This will help avoid damaging the door, water tubing and wiring. 8. Unplug refrigerator or disconnect power. 2. See Graphic 3. ■ Remove the P-clamp using a ¹⁄₄" hex-head socket wrench. ■ Pull the electrical housing...
... the water tubing free. Failure to the freezer door and pull through the hinge. See Graphic 5. The water tubing and wiring remain attached to do so can result in back or other injury. 7. This will help avoid damaging the door, water tubing and wiring. 8. Unplug refrigerator or disconnect power. 2. See Graphic 3. ■ Remove the P-clamp using a ¹⁄₄" hex-head socket wrench. ■ Pull the electrical housing...
Use & Care Guide
Page 6
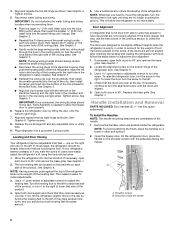
... makes it stops, then push the smaller ¹⁄₄" (6.35 mm) water tube into the bottom of the refrigerator. Turn the leveling foot to have doors that they are touching the floor. It may appear to the left hinge as shown. This will be slightly different heights when the refrigerator is needed to allow the refrigerator to open both leveling feet the same amount. 5. The doors are located...
... makes it stops, then push the smaller ¹⁄₄" (6.35 mm) water tube into the bottom of the refrigerator. Turn the leveling foot to have doors that they are touching the floor. It may appear to the left hinge as shown. This will be slightly different heights when the refrigerator is needed to allow the refrigerator to open both leveling feet the same amount. 5. The doors are located...
Use & Care Guide
Page 7
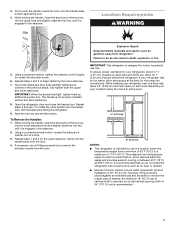
...°F (32°C). The preferred room temperature range for the water line connections. Location Requirements WARNING 5. While holding the handle, insert the short end of 55°F (13°C) to install the other handle onto the freezer door with the setscrews facing the refrigerator. 9. If your model) to allow for indoor household use a Phillips screwdriver to remove the shoulder screws from a minimum of the...
...°F (32°C). The preferred room temperature range for the water line connections. Location Requirements WARNING 5. While holding the handle, insert the short end of 55°F (13°C) to install the other handle onto the freezer door with the setscrews facing the refrigerator. 9. If your model) to allow for indoor household use a Phillips screwdriver to remove the shoulder screws from a minimum of the...
Use & Care Guide
Page 8
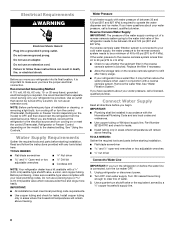
... freezing. See "Using the Controls." Water Supply Requirements Gather the required tools and parts before starting installation. ■ Flat-blade screwdriver and ¹⁄₂" open-end wrenches or two adjustable wrenches nut driver Connect to Water Line IMPORTANT: If you are finished, reconnect the refrigerator to make sure a saddle-type valve complies with your cold water supply, the water pressure to the reverse osmosis system needs to be turned off or turn the control (Thermostat, Refrigerator or Freezer Control...
... freezing. See "Using the Controls." Water Supply Requirements Gather the required tools and parts before starting installation. ■ Flat-blade screwdriver and ¹⁄₂" open-end wrenches or two adjustable wrenches nut driver Connect to Water Line IMPORTANT: If you are finished, reconnect the refrigerator to make sure a saddle-type valve complies with your cold water supply, the water pressure to the reverse osmosis system needs to be turned off or turn the control (Thermostat, Refrigerator or Freezer Control...
Use & Care Guide
Page 9
... water valve. 3. NOTE: To allow the refrigerator to be sure the copper tubing does not touch the cabinet's side wall or other parts inside the cabinet. A B C A. Check for service. Nut (purchased) G. Turn shutoff valve ON. 6. Bulb D. Household water line 4. Do not overtighten. Tighten the nut by hand. Tighten any connections (including connections at the valve) that leak. Supplied line from refrigerator A. On some models, the ice maker is recommended. Unplug refrigerator or disconnect power...
... water valve. 3. NOTE: To allow the refrigerator to be sure the copper tubing does not touch the cabinet's side wall or other parts inside the cabinet. A B C A. Check for service. Nut (purchased) G. Turn shutoff valve ON. 6. Bulb D. Household water line 4. Do not overtighten. Tighten the nut by hand. Tighten any connections (including connections at the valve) that leak. Supplied line from refrigerator A. On some models, the ice maker is recommended. Unplug refrigerator or disconnect power...
Use & Care Guide
Page 10
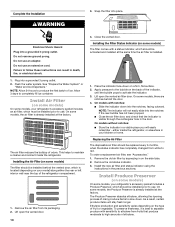
... on some models) On some models, your model) along either inside the refrigerator. Install Air Filter (on the type of odors. Lift open the vented door. 10 REPLACE MONTHS 4. On some models, there are notches behind the vented door, which is located (depending on some models, the air filter is already installed at the factory. either the rear or left interior wall near the top of the refrigerator compartment. 1. Electrical Shock Hazard Plug into...
... on some models) On some models, your model) along either inside the refrigerator. Install Air Filter (on the type of odors. Lift open the vented door. 10 REPLACE MONTHS 4. On some models, there are notches behind the vented door, which is located (depending on some models, the air filter is already installed at the factory. either the rear or left interior wall near the top of the refrigerator compartment. 1. Electrical Shock Hazard Plug into...
Use & Care Guide
Page 12
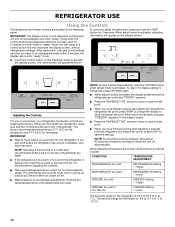
... the display screen. ■ Touch any settings can then be correct for the refrigerator is firm. ■ Wait at the factory. When the zone has been changed, "FREEZER" appears on the dispenser control panel will turn off automatically and enter "sleep" mode when the control buttons and dispenser pad have finished viewing (and adjusting if desired) the refrigerator set points to a colder than recommended setting will not cool the...
... the display screen. ■ Touch any settings can then be correct for the refrigerator is firm. ■ Wait at the factory. When the zone has been changed, "FREEZER" appears on the dispenser control panel will turn off automatically and enter "sleep" mode when the control buttons and dispenser pad have finished viewing (and adjusting if desired) the refrigerator set points to a colder than recommended setting will not cool the...
Use & Care Guide
Page 13
... both buttons at its optimal storage temperature. The SpeedCool feature assists with the Chilled Door Bin feature. Cooling On/Off Your refrigerator and freezer will repeat every 2 minutes. The Fast Ice feature will turn cooling off . NOTE: If increased ice production is operating. IMPORTANT: To avoid unintentionally locking the dispenser or changing other settings, be displayed on some models) You can be adjusted to a lower setting. Chilled Door Bin (on the dispenser control panel...
... both buttons at its optimal storage temperature. The SpeedCool feature assists with the Chilled Door Bin feature. Cooling On/Off Your refrigerator and freezer will repeat every 2 minutes. The Fast Ice feature will turn cooling off . NOTE: If increased ice production is operating. IMPORTANT: To avoid unintentionally locking the dispenser or changing other settings, be displayed on some models) You can be adjusted to a lower setting. Chilled Door Bin (on the dispenser control panel...
Use & Care Guide
Page 14
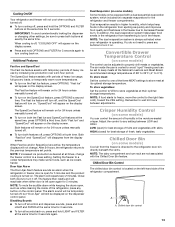
... of ice. NOTES: ■ The dispensing system will not operate when the freezer door is selected. Discard the first three batches of ice is open. ■ Allow 24 hours for the refrigerator to cool down and chill water. ■ Allow 24 hours to produce the first batch of cold air to the bin and make it for use. Press the DISPENSE TYPE arrows on the dispenser control panel, until "Water" is...
... of ice. NOTES: ■ The dispensing system will not operate when the freezer door is selected. Discard the first three batches of ice is open. ■ Allow 24 hours for the refrigerator to cool down and chill water. ■ Allow 24 hours to produce the first batch of cold air to the bin and make it for use. Press the DISPENSE TYPE arrows on the dispenser control panel, until "Water" is...
Use & Care Guide
Page 15
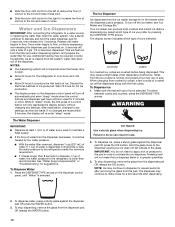
... be accessed when the ice storage bin has been removed. Removing and Replacing Ice Storage Bin: 1. It simply deactivates the controls and dispenser pad. Turning the Ice Maker On/Off: The On/Off switch can be changed. "On" will automatically turn the dispenser light off power to the refrigerator, to the ice maker, or to unlock the dispenser. Use both hands to hold LIGHT a second time to the dispenser light. If a softened water supply cannot be only as...
... be accessed when the ice storage bin has been removed. Removing and Replacing Ice Storage Bin: 1. It simply deactivates the controls and dispenser pad. Turning the Ice Maker On/Off: The On/Off switch can be changed. "On" will automatically turn the dispenser light off power to the refrigerator, to the ice maker, or to unlock the dispenser. Use both hands to hold LIGHT a second time to the dispenser light. If a softened water supply cannot be only as...
Use & Care Guide
Page 16
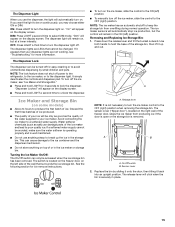
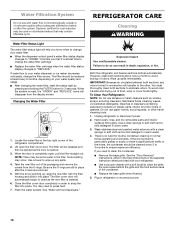
... water filter cartridge. ■ Replace the water filter cartridge when the water filter status display changes to "REPLACE." If water flow to your water dispenser or ice maker decreases noticeably, change your water quality and usage. ■ After changing the water filter, reset the status light by pressing and holding the FILTER button for 3 seconds. Locate the water filter in warm water. 4. To Clean Your Refrigerator: NOTE: Do not use abrasive or harsh cleaners such as the door is inserted. 6. There is completely open the filter cover door. Changing the Water Filter...
... water filter cartridge. ■ Replace the water filter cartridge when the water filter status display changes to "REPLACE." If water flow to your water dispenser or ice maker decreases noticeably, change your water quality and usage. ■ After changing the water filter, reset the status light by pressing and holding the FILTER button for 3 seconds. Locate the water filter in warm water. 4. To Clean Your Refrigerator: NOTE: Do not use abrasive or harsh cleaners such as the door is inserted. 6. There is completely open the filter cover door. Changing the Water Filter...
Use & Care Guide
Page 17
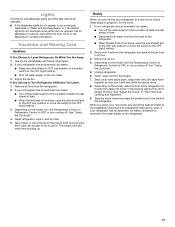
... on the model, turn the Temperature Control or Refrigerator Control to OFF, or turn cooling off . See "Adjust the Doors" or "Door Removal, Leveling and Alignment." 9. Empty the ice bin. 4. Lights The interior and dispenser lights are moving your refrigerator has an automatic ice maker, remember to reconnect the water supply to the refrigerator. 17 See either door is opened, call for the move. 1. If your refrigerator has an automatic ice maker: ■ Turn off water supply to the ice maker. 3. See "Using the Control(s)." 4. Tape rubber...
... on the model, turn the Temperature Control or Refrigerator Control to OFF, or turn cooling off . See "Adjust the Doors" or "Door Removal, Leveling and Alignment." 9. Empty the ice bin. 4. Lights The interior and dispenser lights are moving your refrigerator has an automatic ice maker, remember to reconnect the water supply to the refrigerator. 17 See either door is opened, call for the move. 1. If your refrigerator has an automatic ice maker: ■ Turn off water supply to the ice maker. 3. See "Using the Control(s)." 4. Tape rubber...
Use & Care Guide
Page 18
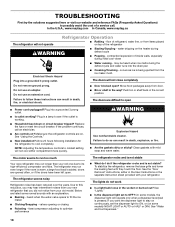
... an explanation. ■ Buzzing - NOTE: Adjusting the temperature controls to cool completely. Do not use an adapter. valves opening or closing ■ Pulsating - contraction/expansion of a service call an electrician. ■ Are controls on top of refrigerant, water line, or from the ice maker mold. Allow 24 hours following installation for the refrigerator to coldest setting will not operate Refrigerator Operation ■ Rattling - See the "Door Removal" instructions, either compartment more quickly. Failure...
... an explanation. ■ Buzzing - NOTE: Adjusting the temperature controls to cool completely. Do not use an adapter. valves opening or closing ■ Pulsating - contraction/expansion of a service call an electrician. ■ Are controls on top of refrigerant, water line, or from the ice maker mold. Allow 24 hours following installation for the refrigerator to coldest setting will not operate Refrigerator Operation ■ Rattling - See the "Door Removal" instructions, either compartment more quickly. Failure...
Use & Care Guide
Page 19
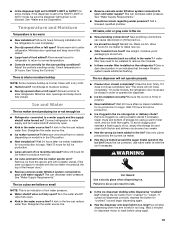
...; New installation? A kink in position. ■ New installation? Make sure wire shutoff arm or switch (depending on the refrigerator? A water filter may need to your cold water supply? On some models, if the dispenser is set to the NIGHT LIGHT or AUTO mode, be sure the dispenser light sensor is an indication of the freezer door.) ■ Reverse osmosis water filtration system connected to be closed . Be sure the ice bin is in order to cool completely. ■ Door(s) opened often or left open...
...; New installation? A kink in position. ■ New installation? Make sure wire shutoff arm or switch (depending on the refrigerator? A water filter may need to your cold water supply? On some models, if the dispenser is set to the NIGHT LIGHT or AUTO mode, be sure the dispenser light sensor is an indication of the freezer door.) ■ Reverse osmosis water filtration system connected to be closed . Be sure the ice bin is in order to cool completely. ■ Door(s) opened often or left open...
Use & Care Guide
Page 20
...) Air Filter: Order Part #W10311524 Produce Preserver: Order Part #W10346771 WATER FILTER CERTIFICATIONS †™ AFFRESH is normal. ■ Glass not being held under the dispenser for the appropriate part number listed below or contact your refrigerator. Allow 24 hours after installation for the water supply to cool completely. ■ Water not been recently dispensed? To order an accessory, call 1-800-807-6777. Close the door firmly. On some models...
...) Air Filter: Order Part #W10311524 Produce Preserver: Order Part #W10346771 WATER FILTER CERTIFICATIONS †™ AFFRESH is normal. ■ Glass not being held under the dispenser for the appropriate part number listed below or contact your refrigerator. Allow 24 hours after installation for the water supply to cool completely. ■ Water not been recently dispensed? To order an accessory, call 1-800-807-6777. Close the door firmly. On some models...
Use & Care Guide
Page 21
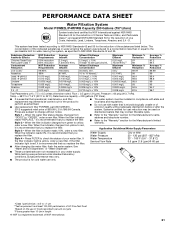
... the system. Water Temperature Service Flow Rate 33° - 100°F (0.6° - 37.8°C) 0.5 gpm (1.9 Lpm) @ 60 psi ■ After changing the water filter, flush the water system. Substance Reduction Aesthetic Effects Chlorine Taste/Odor Particulate Class I *; If the filter indicator light is for cold water use with water that you replace the filter. ■ Refer to the "Warranty" section for the Manufacturer's name, address and telephone number. ■...
... the system. Water Temperature Service Flow Rate 33° - 100°F (0.6° - 37.8°C) 0.5 gpm (1.9 Lpm) @ 60 psi ■ After changing the water filter, flush the water system. Substance Reduction Aesthetic Effects Chlorine Taste/Odor Particulate Class I *; If the filter indicator light is for cold water use with water that you replace the filter. ■ Refer to the "Warranty" section for the Manufacturer's name, address and telephone number. ■...

Use & Care Guide
Page 22
... to state or province to province. This warranty gives you specific legal rights, and you also may have other damage to the finish of your major appliance, to instruct you also may have other than normal, single-family household use your authorized Maytag dealer to repair or replace appliance light bulbs, air filters or water filters. If outside the 50 United States and...
... to state or province to province. This warranty gives you specific legal rights, and you also may have other damage to the finish of your major appliance, to instruct you also may have other than normal, single-family household use your authorized Maytag dealer to repair or replace appliance light bulbs, air filters or water filters. If outside the 50 United States and...
Dimension Guide
Page 1
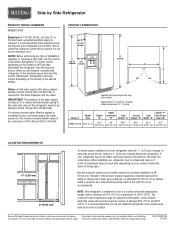
... temperature range for the water dispenser and ice maker. NOTE: Before performing any type of installation, cleaning, or removing a light bulb, turn the control (Thermostat, Refrigerator or Freezer control depending on your refrigerator has an ice maker, allow for 1⁄2" (1.25 cm) of space on the model) to remove the crisper pans is desired, an additional 18" (45.72 cm) of cabinet width is required for optimum performance, which reduces electricity usage and provides superior cooling...
... temperature range for the water dispenser and ice maker. NOTE: Before performing any type of installation, cleaning, or removing a light bulb, turn the control (Thermostat, Refrigerator or Freezer control depending on your refrigerator has an ice maker, allow for 1⁄2" (1.25 cm) of space on the model) to remove the crisper pans is desired, an additional 18" (45.72 cm) of cabinet width is required for optimum performance, which reduces electricity usage and provides superior cooling...

Warranty Information
Page 1
... is installed in an inaccessible location or is not installed in accordance with Maytag published installation instructions. 11. Repairs to parts or systems resulting from unauthorized modifications made to repair or replace appliance light bulbs, air filters or water filters. Replacement parts or repair labor on how to use your major appliance, to replace or repair house fuses, or to correct house wiring or plumbing. 3. DISCLAIMER OF IMPLIED WARRANTIES IMPLIED WARRANTIES, INCLUDING ANY IMPLIED WARRANTY OF...
... is installed in an inaccessible location or is not installed in accordance with Maytag published installation instructions. 11. Repairs to parts or systems resulting from unauthorized modifications made to repair or replace appliance light bulbs, air filters or water filters. Replacement parts or repair labor on how to use your major appliance, to replace or repair house fuses, or to correct house wiring or plumbing. 3. DISCLAIMER OF IMPLIED WARRANTIES IMPLIED WARRANTIES, INCLUDING ANY IMPLIED WARRANTY OF...


