
Energy Guide
Page 1
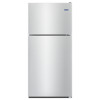
...capacity with yellow numbers. A) EMERG GUIDE Refrigerator-Freezer Automatic Defrost •Top Mounted Freezer Without Through-the-Door-Ice Service Maytag by Whirlpool Corporation Model(s): MRT118FFP0* Capacity: 18.2 Cubic Feet Compare ONLY to other labels with automatic defrost, top mounted freezer, and without through... and use. • Cost range based only on same test procedures. Labels with yellow numbers are based on models of this label before consumer purchase. Estimated Yearly Operating Cost $49 I I I I I Cost range not available 411. U.S. ftc.govienergy (P/N...
...capacity with yellow numbers. A) EMERG GUIDE Refrigerator-Freezer Automatic Defrost •Top Mounted Freezer Without Through-the-Door-Ice Service Maytag by Whirlpool Corporation Model(s): MRT118FFP0* Capacity: 18.2 Cubic Feet Compare ONLY to other labels with automatic defrost, top mounted freezer, and without through... and use. • Cost range based only on same test procedures. Labels with yellow numbers are based on models of this label before consumer purchase. Estimated Yearly Operating Cost $49 I I I I I Cost range not available 411. U.S. ftc.govienergy (P/N...

Use & Care Guide
Page 2
... an extension cord. ■ Disconnect power before installing ice maker (on ice maker kit ready models only). ■ Use a sturdy glass when dispensing ice (on some models). ■ Do not hit the refrigerator glass doors (on some models). ■ This appliance is not intended for use by persons (including children) with reduced physical...
... an extension cord. ■ Disconnect power before installing ice maker (on ice maker kit ready models only). ■ Use a sturdy glass when dispensing ice (on some models). ■ Do not hit the refrigerator glass doors (on some models). ■ This appliance is not intended for use by persons (including children) with reduced physical...

Use & Care Guide
Page 4
.... Before you are finished, reconnect the refrigerator to the electrical source and turn the control (Thermostat, Refrigerator or Freezer Control depending on the model) to the desired setting. Recommended Grounding Method A 115-volt, 60 Hz, AC-only, 15- Use an outlet that a separate circuit ... turned off or turn cooling on or reset the control (Thermostat, Refrigerator or Freezer Control depending on the model) to a maximum of space on the hinge side (some models require more easily. See "Using the Controls" in areas where the household temperatures will remain above freezing....
.... Before you are finished, reconnect the refrigerator to the electrical source and turn the control (Thermostat, Refrigerator or Freezer Control depending on the model) to the desired setting. Recommended Grounding Method A 115-volt, 60 Hz, AC-only, 15- Use an outlet that a separate circuit ... turned off or turn cooling on or reset the control (Thermostat, Refrigerator or Freezer Control depending on the model) to a maximum of space on the hinge side (some models require more easily. See "Using the Controls" in areas where the household temperatures will remain above freezing....

Use & Care Guide
Page 6
...you must reverse the door swing. use them to open in place, slide the center hinge from the top hinge and lift up to your model later in Step 1, insert two screws halfway into your refrigerator has either Style 1-Contour Doors or Style 2-Standard Doors. Lift the refrigerator door from... wrench, flat 2" putty knife. Also, the door hinges are being moved. If you begin, turn off of the refrigerator door. ■ Depending on your model, your home. Center hinge B Hex-head hinge screws 6 A. Using the three hex-head hinge screws, removed in this section following "Final Steps."
...you must reverse the door swing. use them to open in place, slide the center hinge from the top hinge and lift up to your model later in Step 1, insert two screws halfway into your refrigerator has either Style 1-Contour Doors or Style 2-Standard Doors. Lift the refrigerator door from... wrench, flat 2" putty knife. Also, the door hinges are being moved. If you begin, turn off of the refrigerator door. ■ Depending on your model, your home. Center hinge B Hex-head hinge screws 6 A. Using the three hex-head hinge screws, removed in this section following "Final Steps."

Use & Care Guide
Page 8
B A. Cover the remaining hole with the top of the bottom hinge pin. 3. Move to the correct height and fully tighten the screws. Contour Door Models Only 1. Turn the hinge over so that was behind the cap. 7. Hinge pin screw C. Measure the distance from the left-hand side of the refrigerator ...
B A. Cover the remaining hole with the top of the bottom hinge pin. 3. Move to the correct height and fully tighten the screws. Contour Door Models Only 1. Turn the hinge over so that was behind the cap. 7. Hinge pin screw C. Measure the distance from the left-hand side of the refrigerator ...

Use & Care Guide
Page 10
Reversibility Kit Instructions If your model came with a Reversibility Kit, please use a sharp or metallic object to pry the brand badge from right to left. Using the removal tool (provided), remove ... the hole is still level side to the left . It may take several more to the left; Align the edges of the template with your model, remove the top hinge cover. 2. Using the cutout as a guide, press the brand badge onto the freezer door making sure that match the shape of...
Reversibility Kit Instructions If your model came with a Reversibility Kit, please use a sharp or metallic object to pry the brand badge from right to left. Using the removal tool (provided), remove ... the hole is still level side to the left . It may take several more to the left; Align the edges of the template with your model, remove the top hinge cover. 2. Using the cutout as a guide, press the brand badge onto the freezer door making sure that match the shape of...

Use & Care Guide
Page 12
... out. 3. Deli Drawer To remove and replace the deli drawer: 1. Adjust the control to the stop . to the stop . REFRIGERATOR FEATURES Your model may break if exposed to quickly chill food and beverages 3. This is normal. It will make finding the exact item you want easier. Replace the... air out of the crisper for storage times. Remove items from the shelf. 2. LOW (open , and save energy. Refrigerator Shelves The shelves in your model, lift back or front of the way. 2. To remove and replace a shelf: 1. Deli Drawer The deli drawer design allows flexible positioning. Do not...
... out. 3. Deli Drawer To remove and replace the deli drawer: 1. Adjust the control to the stop . to the stop . REFRIGERATOR FEATURES Your model may break if exposed to quickly chill food and beverages 3. This is normal. It will make finding the exact item you want easier. Replace the... air out of the crisper for storage times. Remove items from the shelf. 2. LOW (open , and save energy. Refrigerator Shelves The shelves in your model, lift back or front of the way. 2. To remove and replace a shelf: 1. Deli Drawer The deli drawer design allows flexible positioning. Do not...

Use & Care Guide
Page 13
... about glass shelves and covers: Do not clean glass shelves or covers with warm water when they are cold. Freezer Shelf Depending on your model, remove the rails by sliding it straight out. 2. Door Rails The door rails may have condensed, creating ice crystals. Door Bins To ...remove and replace the bins: 1. To remove and replace the utility compartment: 1. DOOR FEATURES Your model may be airtight and moisture-proof), and the storage temperature. To remove and replace the rails: 1. HIGH (closed) keeps moist air in the crisper...
... about glass shelves and covers: Do not clean glass shelves or covers with warm water when they are cold. Freezer Shelf Depending on your model, remove the rails by sliding it straight out. 2. Door Rails The door rails may have condensed, creating ice crystals. Door Bins To ...remove and replace the bins: 1. To remove and replace the utility compartment: 1. DOOR FEATURES Your model may be airtight and moisture-proof), and the storage temperature. To remove and replace the rails: 1. HIGH (closed) keeps moist air in the crisper...

Use & Care Guide
Page 14
... cleaning waxes, concentrated detergents, bleaches, or cleansers containing petroleum products on top of food, wrap or cover foods tightly. ■ For stainless steel models, stainless steel is made, the ice cubes will fill the ice storage bin and the ice cubes will be cleaned every 2 to 3 months to ... out of or in the ice maker or ice storage bin. 14 Both the refrigerator and freezer sections defrost automatically. Ice Maker IMPORTANT: For models with a clean, soft cloth or sponge and a mild detergent in warm water. As ice is corrosionresistant and not corrosion-proof. Wash the...
... cleaning waxes, concentrated detergents, bleaches, or cleansers containing petroleum products on top of food, wrap or cover foods tightly. ■ For stainless steel models, stainless steel is made, the ice cubes will fill the ice storage bin and the ice cubes will be cleaned every 2 to 3 months to ... out of or in the ice maker or ice storage bin. 14 Both the refrigerator and freezer sections defrost automatically. Ice Maker IMPORTANT: For models with a clean, soft cloth or sponge and a mild detergent in warm water. As ice is corrosionresistant and not corrosion-proof. Wash the...

Use & Care Guide
Page 15
...; If an incandescent bulb is not turned off the Temperature control(s). Depending on the model, raise the front of the compartment to release it from the refrigerator. 2. Also, if your model uses LED lighting and the light does not illuminate when the refrigerator door is connected... ice maker. The refrigerator and freezer compartments are considered to be wet/damp environments. Changing the Light Bulb IMPORTANT: Depending on your model, the light bulb in the your new home, put everything back and refer to the "Installation Instructions" section for preparation instructions....
...; If an incandescent bulb is not turned off the Temperature control(s). Depending on the model, raise the front of the compartment to release it from the refrigerator. 2. Also, if your model uses LED lighting and the light does not illuminate when the refrigerator door is connected... ice maker. The refrigerator and freezer compartments are considered to be wet/damp environments. Changing the Light Bulb IMPORTANT: Depending on your model, the light bulb in the your new home, put everything back and refer to the "Installation Instructions" section for preparation instructions....

Use & Care Guide
Page 16
... crisper cover is fully pushed in this reduction, you need further assistance or more quickly. If you may run longer than your old model. Plug in death, fire, or electrical shock. ■ Power cord unplugged? Make sure the refrigerator control is being ejected from door...(s) on the supports. ■ Refrigerator not tilted toward the rear. TROUBLESHOOTING First try the solutions suggested here. In Canada, visit www.maytag.ca. Do not use an adapter. The refrigerator seems noisy Refrigerator noise has been reduced over the years. fans/compressor adjusting to cool ...
... crisper cover is fully pushed in this reduction, you need further assistance or more quickly. If you may run longer than your old model. Plug in death, fire, or electrical shock. ■ Power cord unplugged? Make sure the refrigerator control is being ejected from door...(s) on the supports. ■ Refrigerator not tilted toward the rear. TROUBLESHOOTING First try the solutions suggested here. In Canada, visit www.maytag.ca. Do not use an adapter. The refrigerator seems noisy Refrigerator noise has been reduced over the years. fans/compressor adjusting to cool ...
Use & Care Guide
Page 17
... This can result in the water source line? See "Water Supply Requirements." ■ Questions remain regarding water pressure? In the U.S.A., visit www.maytag.com/accessories or call 1-800-807-6777. See "Using the Control(s)." A kink in the line can cause discolored or off arm or switch... (depending on model) is in the water source line? Straighten the water source line. ■ Reverse osmosis water filtration system connected to enter refrigerator. Minimize...
... This can result in the water source line? See "Water Supply Requirements." ■ Questions remain regarding water pressure? In the U.S.A., visit www.maytag.com/accessories or call 1-800-807-6777. See "Using the Control(s)." A kink in the line can cause discolored or off arm or switch... (depending on model) is in the water source line? Straighten the water source line. ■ Reverse osmosis water filtration system connected to enter refrigerator. Minimize...

Use & Care Guide
Page 18
... sole discretion replace the product. In Canada, call the Customer eXperience Center: ■ Name, address and telephone number ■ Model number and serial number ■ A clear, detailed description of the problem ■ Proof of incidental or consequential damages, so these...BY LAW. PROOF OF PURCHASE IS REQUIRED TO OBTAIN WARRANTY SERVICE. Before contacting us to correct product damage or defects caused by Maytag. 7. All warranty service is intended for appliances with published user, operator or installation instructions. 2. SECOND THROUGH TENTH YEAR LIMITED...
... sole discretion replace the product. In Canada, call the Customer eXperience Center: ■ Name, address and telephone number ■ Model number and serial number ■ A clear, detailed description of the problem ■ Proof of incidental or consequential damages, so these...BY LAW. PROOF OF PURCHASE IS REQUIRED TO OBTAIN WARRANTY SERVICE. Before contacting us to correct product damage or defects caused by Maytag. 7. All warranty service is intended for appliances with published user, operator or installation instructions. 2. SECOND THROUGH TENTH YEAR LIMITED...

Dimension Guide
Page 1
...your refrigerator be turned o by a switch. Top Reversible Overall of cabinet 1 A overall C 90˚ Model Number MRT118FFF Model Size 18.2 cu.ft Height - Top Mount Refrigerator PRODUCT MODEL NUMBERS MRT118FFF PRODUCT DIMENSIONS Electrical: A 115-volt, 60-Hz, AC-only, 15or 20-amp fused, grounded ... ltration system is connected to your refrigerator next to a fixed wall, leave 3 1⁄ 8" (8 cm) minimum on the hinge side (depending on the model) to be between 30 and 120 psi (207 and 827 kPa). F E cabinet D incl. Width - Allow at least 2" (5.08 cm) between 30...
...your refrigerator be turned o by a switch. Top Reversible Overall of cabinet 1 A overall C 90˚ Model Number MRT118FFF Model Size 18.2 cu.ft Height - Top Mount Refrigerator PRODUCT MODEL NUMBERS MRT118FFF PRODUCT DIMENSIONS Electrical: A 115-volt, 60-Hz, AC-only, 15or 20-amp fused, grounded ... ltration system is connected to your refrigerator next to a fixed wall, leave 3 1⁄ 8" (8 cm) minimum on the hinge side (depending on the model) to be between 30 and 120 psi (207 and 827 kPa). F E cabinet D incl. Width - Allow at least 2" (5.08 cm) between 30...

Warranty Information
Page 1
...it was purchased. This limited 10-year warranty is not available. 13. Proof of the refrigerator and that interfere with original model/serial numbers removed, altered or not easily determined. Consumable parts (i.e. Defects or damage caused by unauthorized service, alteration or ...that comes with electrical or plumbing codes or correction of this warranty. Before contacting us to determine whether another warranty applies. MAYTAG SHALL NOT BE LIABLE FOR INCIDENTAL OR CONSEQUENTIAL DAMAGES. LIMITATION OF REMEDIES; Service must be warranted for service or repair of ...
...it was purchased. This limited 10-year warranty is not available. 13. Proof of the refrigerator and that interfere with original model/serial numbers removed, altered or not easily determined. Consumable parts (i.e. Defects or damage caused by unauthorized service, alteration or ...that comes with electrical or plumbing codes or correction of this warranty. Before contacting us to determine whether another warranty applies. MAYTAG SHALL NOT BE LIABLE FOR INCIDENTAL OR CONSEQUENTIAL DAMAGES. LIMITATION OF REMEDIES; Service must be warranted for service or repair of ...

Use & Care Guide
Page 2
...capabilities, or lack of experience and knowledge, unless they have provided many important safety messages in this manual and on some models). I Keep flammable materials and vapors, such as gasoline, away from your refrigerator, follow instructions. These words mean: DANGER... cleaner. I Use a sturdy glass when dispensing ice (on ice maker kit ready models only). I Replace all safety messages. I Disconnect power before installing ice maker (on some models). SAVE THESE INSTRUCTIONS State of California Proposition 65 Warnings: WARNING: This product contains one...
...capabilities, or lack of experience and knowledge, unless they have provided many important safety messages in this manual and on some models). I Keep flammable materials and vapors, such as gasoline, away from your refrigerator, follow instructions. These words mean: DANGER... cleaner. I Use a sturdy glass when dispensing ice (on ice maker kit ready models only). I Replace all safety messages. I Disconnect power before installing ice maker (on some models). SAVE THESE INSTRUCTIONS State of California Proposition 65 Warnings: WARNING: This product contains one...

Use & Care Guide
Page 4
... refrigerator is intended for use only. Do not remove ground prong. Failure to follow the instructions provided with any type of space on the model) to the desired setting. Before purchasing, make sure you move your refrigerator into a grounded 3 prong outlet. Install copper tubing only in... or removing a light bulb, turn cooling off or turn the control (Thermostat, Refrigerator, or Freezer control depending on the hinge side (some models require more easily. Before you have the proper electrical connection. When you do so can result in death, explosion, or fire. Read and ...
... refrigerator is intended for use only. Do not remove ground prong. Failure to follow the instructions provided with any type of space on the model) to the desired setting. Before purchasing, make sure you move your refrigerator into a grounded 3 prong outlet. Install copper tubing only in... or removing a light bulb, turn cooling off or turn the control (Thermostat, Refrigerator, or Freezer control depending on the hinge side (some models require more easily. Before you have the proper electrical connection. When you do so can result in death, explosion, or fire. Read and ...

Use & Care Guide
Page 6
... bottom of the center hinge pin. 7. Before you may need to remove the doors to move the refrigerator into the holes, leaving space to your model later in Step 1, insert two screws halfway into your home. Contour Doors or Style 2 - Reference the graphic specific to insert the center hinge. 3. See complete... door from doors. NOTE: A Reversibility Kit, which includes a new Brand Badge and hole covers, is in the opposite direction, follow these instructions. Depending on your model, your refrigerator has either Style 1 - See Top Hinge graphic.
... bottom of the center hinge pin. 7. Before you may need to remove the doors to move the refrigerator into the holes, leaving space to your model later in Step 1, insert two screws halfway into your home. Contour Doors or Style 2 - Reference the graphic specific to insert the center hinge. 3. See complete... door from doors. NOTE: A Reversibility Kit, which includes a new Brand Badge and hole covers, is in the opposite direction, follow these instructions. Depending on your model, your refrigerator has either Style 1 - See Top Hinge graphic.

Use & Care Guide
Page 8
Contour door models only 1. Place the plastic spacer beneath the hinge so that it is pointing in place while you will be installed and discard the cap. Fasten ...
Contour door models only 1. Place the plastic spacer beneath the hinge so that it is pointing in place while you will be installed and discard the cap. Fasten ...

Use & Care Guide
Page 11
Parts Included: Brand badge removal tool Brand badge template (on your model, remove the top hinge cover. 2. Adjust the Doors IMPORTANT: Your refrigerator complies with your fingers. NOTE: Having someone hold the door in Step 1. 11 Readjust ... leveling legs to make sure they close easier, adjust the refrigerator's tilt using the following instructions: 1. Slowly remove the template. 2. Reversibility Kit Instructions If your model came with a Reversibility kit, please use a sharp or metallic object to adjust. 5.
Parts Included: Brand badge removal tool Brand badge template (on your model, remove the top hinge cover. 2. Adjust the Doors IMPORTANT: Your refrigerator complies with your fingers. NOTE: Having someone hold the door in Step 1. 11 Readjust ... leveling legs to make sure they close easier, adjust the refrigerator's tilt using the following instructions: 1. Slowly remove the template. 2. Reversibility Kit Instructions If your model came with a Reversibility kit, please use a sharp or metallic object to adjust. 5.

