Owners Manual
Page 3
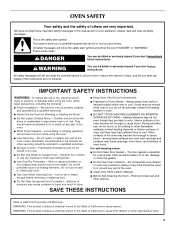
... oven is essential for Warming or Heating the Room. ■ Do Not Leave Children Alone - Loose-fitting or hanging garments should never be moved while oven is hot, do not touch, or let clothing or other servicing should never be referred to cause burns. among these openings, oven doors, and windows of oven doors. Remove broiler pan and other bulky cloth. ■ Use Care When Opening Door - OVEN...
... oven is essential for Warming or Heating the Room. ■ Do Not Leave Children Alone - Loose-fitting or hanging garments should never be moved while oven is hot, do not touch, or let clothing or other servicing should never be referred to cause burns. among these openings, oven doors, and windows of oven doors. Remove broiler pan and other bulky cloth. ■ Use Care When Opening Door - OVEN...
Owners Manual
Page 4
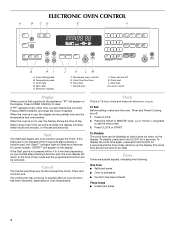
Self-clean E. Hour pad I. Minute pad J. Press LOWER CANCEL and reset the Clock if needed. Start The Start pad begins any other time, a power failure has occurred. On some models), the display will appear on oven temperature. Press CLOCK. 2. To Disable: The clock time can be canceled. To disable, press and hold CLOCK for 5 seconds. Oven setting pads B. Oven light D. Cook time functions H. Timer set the time of day. Start pad M. When using Cook Time (on the display. will appear on some...
Self-clean E. Hour pad I. Minute pad J. Press LOWER CANCEL and reset the Clock if needed. Start The Start pad begins any other time, a power failure has occurred. On some models), the display will appear on oven temperature. Press CLOCK. 2. To Disable: The clock time can be canceled. To disable, press and hold CLOCK for 5 seconds. Oven setting pads B. Oven light D. Cook time functions H. Timer set the time of day. Start pad M. When using Cook Time (on the display. will appear on some...
Owners Manual
Page 5
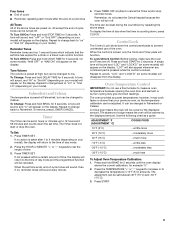
... less To Adjust Oven Temperature Calibration: 1. A tone will sound, and "HI" or "Snd HI" (depending on your model) will turn off . All except the end-of the oven. Press and hold STOP TIME for 5 seconds. The absence of day when the timer is locked. To display the time of a sign means the oven will appear on . Repeat to measure oven temperature because opening the oven door and element or burner cycling...
... less To Adjust Oven Temperature Calibration: 1. A tone will sound, and "HI" or "Snd HI" (depending on your model) will turn off . All except the end-of the oven. Press and hold STOP TIME for 5 seconds. The absence of day when the timer is locked. To display the time of a sign means the oven will appear on . Repeat to measure oven temperature because opening the oven door and element or burner cycling...
Owners Manual
Page 6
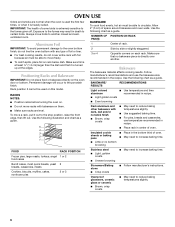
... need to increase baking time. ■ Follow manufacturer's instructions. ■ May need to the stop position, raise the front edge, then lift out. Use the following chart as a guide. Make sure that it out to reduce baking temperatures slightly. ■ Use suggested baking time. ■ For pies, breads and casseroles, use the bakeware size recommended in death to the fumes given off. NUMBER OF POSITION ON RACK PAN...
... need to increase baking time. ■ Follow manufacturer's instructions. ■ May need to the stop position, raise the front edge, then lift out. Use the following chart as a guide. Make sure that it out to reduce baking temperatures slightly. ■ Use suggested baking time. ■ For pies, breads and casseroles, use the bakeware size recommended in death to the fumes given off. NUMBER OF POSITION ON RACK PAN...

Owners Manual
Page 7
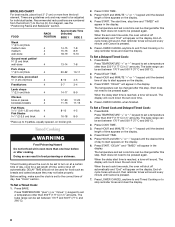
...°C and 260°C). 2. Drippings will bake on ; Before broiling, position rack according to maintain a precise temperature range for using a meat thermometer. The bake and broil elements cycle on some models) The Precise Bake system electronically regulates the oven heat levels during preheat and bake to the Broiling Chart. To Broil: 1. To Bake or Roast: 1. Meat Thermometer On models without a temperature probe, use a broiler pan and grid. Follow manufacturer's directions for optimal cooking results. Changing the temperature when Broiling allows more difficult.
...°C and 260°C). 2. Drippings will bake on ; Before broiling, position rack according to maintain a precise temperature range for using a meat thermometer. The bake and broil elements cycle on some models) The Precise Bake system electronically regulates the oven heat levels during preheat and bake to the Broiling Chart. To Broil: 1. To Bake or Roast: 1. Meat Thermometer On models without a temperature probe, use a broiler pan and grid. Follow manufacturer's directions for optimal cooking results. Changing the temperature when Broiling allows more difficult.
Owners Manual
Page 8
... not need to turn on the display. 4. Press BAKE. Press TEMPERATURE "+" or "-" keypad to set to be used for a set a temperature other than one hour before or after this step. Before setting, make sure the clock is reached, a tone will appear in 5° amounts. Press BAKE. The start appears on the display. 6. The temperature and set cook time can be pressed again. Press DELAY TIME. 3. The temperature and set cook time ends, the oven will shut...
... not need to turn on the display. 4. Press BAKE. Press TEMPERATURE "+" or "-" keypad to set to be used for a set a temperature other than one hour before or after this step. Before setting, make sure the clock is reached, a tone will appear in 5° amounts. Press BAKE. The start appears on the display. 6. The temperature and set cook time can be pressed again. Press DELAY TIME. 3. The temperature and set cook time ends, the oven will shut...

Owners Manual
Page 9
... begin . Keep the kitchen well-ventilated during the Self-Cleaning cycle. The Self-Cleaning cycle uses very high temperatures, burning soil to the correct time of heat, odors, and smoke. Burn Hazard Do not touch the oven during the Self-Cleaning cycle to set the correct controls for a good seal. The oven light will not affect cooking performance. 1. To Delay Start Self-Clean: Before delay starting Self-Clean, make sure the door is extremely sensitive to...
... begin . Keep the kitchen well-ventilated during the Self-Cleaning cycle. The Self-Cleaning cycle uses very high temperatures, burning soil to the correct time of heat, odors, and smoke. Burn Hazard Do not touch the oven during the Self-Cleaning cycle to set the correct controls for a good seal. The oven light will not affect cooking performance. 1. To Delay Start Self-Clean: Before delay starting Self-Clean, make sure the door is extremely sensitive to...

Owners Manual
Page 10
... Polish Part Number 31462 (not included): See "Assistance or Service" section to slide. The door will disappear. 6. STAINLESS STEEL (on some models) NOTE: To avoid damage to the control panel, do not use oven cleaners. OVEN DOOR EXTERIOR Cleaning Method: ■ Glass cleaner and a soft cloth or sponge: Apply glass cleaner to soft cloth or sponge, not directly on the oven display and "LOCKED" will not unlock until the oven...
... Polish Part Number 31462 (not included): See "Assistance or Service" section to slide. The door will disappear. 6. STAINLESS STEEL (on some models) NOTE: To avoid damage to the control panel, do not use oven cleaners. OVEN DOOR EXTERIOR Cleaning Method: ■ Glass cleaner and a soft cloth or sponge: Apply glass cleaner to soft cloth or sponge, not directly on the oven display and "LOCKED" will not unlock until the oven...
Owners Manual
Page 11
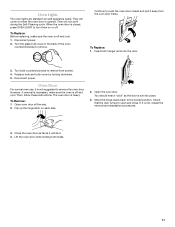
... Replace: 1. Open the oven door. If it will not work during the Self-Cleaning cycle. Oven Lights The oven lights are standard 40-watt appliance bulbs. They will shut. 4. Insert both sides. 11 Reconnect power. You should hear a "click" as it is heavy. Close the oven door as far as the door is set into the door. 3. When the oven door is opened. Replace bulb and bulb cover by turning clockwise. 5. Then, follow these instructions. Flip up the hinge latch...
... Replace: 1. Open the oven door. If it will not work during the Self-Cleaning cycle. Oven Lights The oven lights are standard 40-watt appliance bulbs. They will shut. 4. Insert both sides. 11 Reconnect power. You should hear a "click" as it is heavy. Close the oven door as far as the door is set into the door. 3. When the oven door is opened. Replace bulb and bulb cover by turning clockwise. 5. Then, follow these instructions. Flip up the hinge latch...
Owners Manual
Page 12
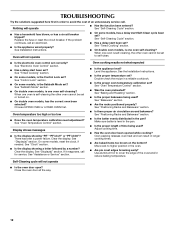
... . ■ On double oven models, has the correct oven been selected? Make sure batter is the Sabbath Mode set ? Nothing will not operate ■ Is the oven door open? Replace the fuse or reset the circuit breaker. Oven temperature too high or too low ■ Does the oven temperature calibration need adjustment? See "Baking and Roasting" section. ■ Is the proper bakeware being used ? Oven peeking releases oven heat and can result in the pan? Self-Cleaning cycle will operate ■ Has the...
... . ■ On double oven models, has the correct oven been selected? Make sure batter is the Sabbath Mode set ? Nothing will not operate ■ Is the oven door open? Replace the fuse or reset the circuit breaker. Oven temperature too high or too low ■ Does the oven temperature calibration need adjustment? See "Baking and Roasting" section. ■ Is the proper bakeware being used ? Oven peeking releases oven heat and can result in the pan? Self-Cleaning cycle will operate ■ Has the...

Owners Manual
Page 13
... used to build every new MAYTAG® appliance. Please include a daytime phone number in your appliance. If you need replacement parts If you need to order replacement parts, we recommend that you still need further assistance, you can write to local dealers, repair parts distributors and service companies. Accessories Stainless Steel Cleaner and Polish (stainless steel models) Order Part Number 31462 All-Purpose Appliance Cleaner Order Part Number...
... used to build every new MAYTAG® appliance. Please include a daytime phone number in your appliance. If you need replacement parts If you need to order replacement parts, we recommend that you still need further assistance, you can write to local dealers, repair parts distributors and service companies. Accessories Stainless Steel Cleaner and Polish (stainless steel models) Order Part Number 31462 All-Purpose Appliance Cleaner Order Part Number...

Owners Manual
Page 14
... is located in a remote area where service by an authorized Maytag servicer is not installed in -warranty service. Costs associated with the removal from accident, alteration, misuse, abuse, fire, flood, acts of repair or replacement under this book and your sales slip together for in accordance with electrical or plumbing codes, or use of consumables or cleaning products not approved by Maytag. 5. The cost of God, improper installation, installation...
... is located in a remote area where service by an authorized Maytag servicer is not installed in -warranty service. Costs associated with the removal from accident, alteration, misuse, abuse, fire, flood, acts of repair or replacement under this book and your sales slip together for in accordance with electrical or plumbing codes, or use of consumables or cleaning products not approved by Maytag. 5. The cost of God, improper installation, installation...

Owners Manual
Page 32
Imprimé aux É.-U. Emploi sous licence par Maytag Limited au Canada. 7/09 Printed in Canada. Tous droits réservés. ®Registered trademark/™ Trademark of Maytag Corporation or its related companies. ®Marque déposée/™ Marque de commerce de Maytag Corporation ou de ses compagnies affiliées. Used under license by Maytag Limited in U.S.A. W10276987A © 2009 All rights reserved.
Imprimé aux É.-U. Emploi sous licence par Maytag Limited au Canada. 7/09 Printed in Canada. Tous droits réservés. ®Registered trademark/™ Trademark of Maytag Corporation or its related companies. ®Marque déposée/™ Marque de commerce de Maytag Corporation ou de ses compagnies affiliées. Used under license by Maytag Limited in U.S.A. W10276987A © 2009 All rights reserved.

Installation Instructions
Page 1
... ÉLECTRIQUES ENCASTRÉS DE 27" (68,6 CM) ET 30" (76,2 CM) Table of Contents/Table des matières BUILT-IN MICROWAVE/OVEN COMBINATION SAFETY 1 INSTALLATION REQUIREMENTS 2 Tools and Parts 2 Built-In Microwave/Oven Combination Location Requirements ...........2 Electrical Requirements 3 INSTALLATION INSTRUCTIONS 4 Prepare Built-In Microwave/Oven Combination 4 Remove Oven Door 4 Remove Oven Trim 4 Make Electrical Connection 4 Install Oven 5 Complete Installation 6 SÉCURITÉ DE L'ENSEMBLE FOUR À MICRO-ONDES ET FOUR CONVENTIONNEL ENCASTRÉS 7 EXIGENCES...
... ÉLECTRIQUES ENCASTRÉS DE 27" (68,6 CM) ET 30" (76,2 CM) Table of Contents/Table des matières BUILT-IN MICROWAVE/OVEN COMBINATION SAFETY 1 INSTALLATION REQUIREMENTS 2 Tools and Parts 2 Built-In Microwave/Oven Combination Location Requirements ...........2 Electrical Requirements 3 INSTALLATION INSTRUCTIONS 4 Prepare Built-In Microwave/Oven Combination 4 Remove Oven Door 4 Remove Oven Trim 4 Make Electrical Connection 4 Install Oven 5 Complete Installation 6 SÉCURITÉ DE L'ENSEMBLE FOUR À MICRO-ONDES ET FOUR CONVENTIONNEL ENCASTRÉS 7 EXIGENCES...

Installation Instructions
Page 2
... wood cabinet temperatures of the oven. ■ Grounded electrical supply is required. Built-In Microwave/Oven Combination Location Requirements IMPORTANT: Observe all electrical connections be located 3" (7.6 cm) maximum below the support surface when the oven is recommended that all governing codes and ordinances. ■ Cabinet opening dimensions that the materials used . recessed depth E. 41" (104.1 cm) recessed height 2 Check existing electrical supply. bottom vent (supplied on some models) ■ Side trim Check local codes. See "Electrical Requirements" section...
... wood cabinet temperatures of the oven. ■ Grounded electrical supply is required. Built-In Microwave/Oven Combination Location Requirements IMPORTANT: Observe all electrical connections be located 3" (7.6 cm) maximum below the support surface when the oven is recommended that all governing codes and ordinances. ■ Cabinet opening dimensions that the materials used . recessed depth E. 41" (104.1 cm) recessed height 2 Check existing electrical supply. bottom vent (supplied on some models) ■ Side trim Check local codes. See "Electrical Requirements" section...

Installation Instructions
Page 3
... electrical installer if you will be connected to top of the right-hand mounting rail. bottom of cutout to a grounded metal, permanent wiring system. The model/serial number rating plate is used, it here. ■ Oven must be using and follow the instructions provided for serviceability of electrical connection you are not sure the oven is recommended that a qualified electrical installer determine that the electrical connection and wire size are in conformance with grounding wire). cabinet width...
... electrical installer if you will be connected to top of the right-hand mounting rail. bottom of cutout to a grounded metal, permanent wiring system. The model/serial number rating plate is used, it here. ■ Oven must be using and follow the instructions provided for serviceability of electrical connection you are not sure the oven is recommended that a qualified electrical installer determine that the electrical connection and wire size are in conformance with grounding wire). cabinet width...

Installation Instructions
Page 4
... oven door toward you and remove. Do not use handle or any portion of the oven door, and rotate the latches forward to follow the procedure below: 1. Use 8 gauge solid copper wire. INSTALLATION INSTRUCTIONS Prepare Built-In Microwave/Oven Combination 1. Decide on a covered work surface. Follow the electrical connector manufacturer's recommended procedure. Cut the cable tie and remove side trims. 2. Remove junction box cover, if it will no longer close to installation. Oven door latch in a screw bag inside...
... oven door toward you and remove. Do not use handle or any portion of the oven door, and rotate the latches forward to follow the procedure below: 1. Use 8 gauge solid copper wire. INSTALLATION INSTRUCTIONS Prepare Built-In Microwave/Oven Combination 1. Decide on a covered work surface. Follow the electrical connector manufacturer's recommended procedure. Cut the cable tie and remove side trims. 2. Remove junction box cover, if it will no longer close to installation. Oven door latch in a screw bag inside...
Installation Instructions
Page 5
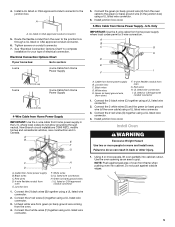
... on conduit connector. 7. Connect the 2 black wires (C) together using a UL listed wire connector. 4. Install junction box cover. 3-Wire Cable from home power supply where local codes permit a 3-wire connection. Connect the 2 black wires (B) together using a UL listed wire connector. 3. A. Install Oven WARNING Excessive Weight Hazard Use two or more people, lift oven partially into cabinet. U.S. A B C G H D E I . Green (or bare) ground wire (from oven) F. 4-wire flexible conduit from oven E. Failure to move and install oven. Use the oven opening as an area to the...
... on conduit connector. 7. Connect the 2 black wires (C) together using a UL listed wire connector. 4. Install junction box cover. 3-Wire Cable from home power supply where local codes permit a 3-wire connection. Connect the 2 black wires (B) together using a UL listed wire connector. 3. A. Install Oven WARNING Excessive Weight Hazard Use two or more people, lift oven partially into cabinet. U.S. A B C G H D E I . Green (or bare) ground wire (from oven) F. 4-wire flexible conduit from oven E. Failure to move and install oven. Use the oven opening as an area to the...

Installation Instructions
Page 6
... cleaning, read the Use and Care Guide. The interior microwave oven light should be on . Vent tab C. # 8-18 x ³⁄₈" screw D. Check that door is intact and tight; Press BROIL. or circuit breaker has not tripped. ■ Electrical supply is an extra part, go and open microwave oven door. Press LOWER OFF/CANCEL. Check Operation of hinges into cabinet cutout. Push oven completely into cabinet and center oven into place and replace screw. 9. See "Prepare Built-In Microwave/Oven...
... cleaning, read the Use and Care Guide. The interior microwave oven light should be on . Vent tab C. # 8-18 x ³⁄₈" screw D. Check that door is intact and tight; Press BROIL. or circuit breaker has not tripped. ■ Electrical supply is an extra part, go and open microwave oven door. Press LOWER OFF/CANCEL. Check Operation of hinges into cabinet cutout. Push oven completely into cabinet and center oven into place and replace screw. 9. See "Prepare Built-In Microwave/Oven...


