
Installation Instructions
Page 1
...happen if the instructions are very important. Table of Contents MICROWAVE HOOD COMBINATION SAFETY 1 INSTALLATION REQUIREMENTS 2 Tools and Parts 2 Remove Cardboard Template 2 Location Requirements 2 Product Dimensions 3 Electrical Requirements 3 INSTALLATION INSTRUCTIONS 4 Remove Mounting Plate 4 Rotate Blower Motor 4..." or "WARNING." W10344702B All safety messages will follow instructions. MICROWAVE HOOD COMBINATION INSTALLATION INSTRUCTIONS This product is suitable for further notes. See "Installation Requirements" section for use above electric or gas cooking products up...
...happen if the instructions are very important. Table of Contents MICROWAVE HOOD COMBINATION SAFETY 1 INSTALLATION REQUIREMENTS 2 Tools and Parts 2 Remove Cardboard Template 2 Location Requirements 2 Product Dimensions 3 Electrical Requirements 3 INSTALLATION INSTRUCTIONS 4 Remove Mounting Plate 4 Rotate Blower Motor 4..." or "WARNING." W10344702B All safety messages will follow instructions. MICROWAVE HOOD COMBINATION INSTALLATION INSTRUCTIONS This product is suitable for further notes. See "Installation Requirements" section for use above electric or gas cooking products up...

Installation Instructions
Page 2
... part of packaging) Aluminum grease filters Charcoal filters (Depending on model, aluminum grease filter and charcoal filter may not be combined. Check with any obstructions so that the damper blade can open freely and fully. Read and follow the instructions provided with ... transition piece, the 3" (7.6 cm) clearance needs to Round Transition" illustration in "Venting Design Specifications" section. 2 NOTES: ■ If installing the microwave oven near a left sidewall, make sure that the door can open fully. ■ Some cabinet and building materials are for wood studs. ...
... part of packaging) Aluminum grease filters Charcoal filters (Depending on model, aluminum grease filter and charcoal filter may not be combined. Check with any obstructions so that the damper blade can open freely and fully. Read and follow the instructions provided with ... transition piece, the 3" (7.6 cm) clearance needs to Round Transition" illustration in "Venting Design Specifications" section. 2 NOTES: ■ If installing the microwave oven near a left sidewall, make sure that the door can open fully. ■ Some cabinet and building materials are for wood studs. ...

Installation Instructions
Page 3
...Required: ■ A 120 Volt, 60 Hz, AC only, 15- A. 2" x 4" wall stud B. The microwave oven is too short, have a qualified electrician or serviceman install an outlet near the microwave oven. Product Dimensions 17¹⁄₄" (43.8 cm) 16¹⁄₄" (41.3 cm) (411....■ A time-delay fuse or time-delay circuit breaker. ■ A separate circuit serving only this microwave oven. Exact dimensions may vary depending on type of range/cooktop below. Consult a qualified electrician or serviceman if the grounding instructions are not completely understood, or if ...
...Required: ■ A 120 Volt, 60 Hz, AC only, 15- A. 2" x 4" wall stud B. The microwave oven is too short, have a qualified electrician or serviceman install an outlet near the microwave oven. Product Dimensions 17¹⁄₄" (43.8 cm) 16¹⁄₄" (41.3 cm) (411....■ A time-delay fuse or time-delay circuit breaker. ■ A separate circuit serving only this microwave oven. Exact dimensions may vary depending on type of range/cooktop below. Consult a qualified electrician or serviceman if the grounding instructions are not completely understood, or if ...

Installation Instructions
Page 4
... method is changed, or the microwave oven is reinstalled in Step 1. 4 Screws (in the foam packaging, or it and set aside. 3. Exhaust port 6. Reattach blower motor to top of the microwave oven and lift up. INSTALLATION INSTRUCTIONS Remove Mounting Plate Depending on...cover the work surface. 1. Rotate Blower Motor The microwave oven is being handled. 4. Wall Venting Installation Only 1. Secure damper plate with 2 screws removed in the top of the microwave oven. Lift blower motor out of microwave oven. Rotate blower motor 180° so that...
... method is changed, or the microwave oven is reinstalled in Step 1. 4 Screws (in the foam packaging, or it and set aside. 3. Exhaust port 6. Reattach blower motor to top of the microwave oven and lift up. INSTALLATION INSTRUCTIONS Remove Mounting Plate Depending on...cover the work surface. 1. Rotate Blower Motor The microwave oven is being handled. 4. Wall Venting Installation Only 1. Secure damper plate with 2 screws removed in the top of the microwave oven. Lift blower motor out of microwave oven. Rotate blower motor 180° so that...

Installation Instructions
Page 5
... with 2 screws removed in the top of the microwave oven (as shown), performance will be reattached to back of microwave oven with flat sides facing the back of the microwave oven. A B C A. Roof Venting Installation Only 1. Reattach blower motor to the microwave oven. 7. Repeat Step 3 from "Wall Venting Installation Only." 3. Rotate blower motor so that exhaust ports...
... with 2 screws removed in the top of the microwave oven (as shown), performance will be reattached to back of microwave oven with flat sides facing the back of the microwave oven. A B C A. Roof Venting Installation Only 1. Reattach blower motor to the microwave oven. 7. Repeat Step 3 from "Wall Venting Installation Only." 3. Rotate blower motor so that exhaust ports...

Installation Instructions
Page 6
... no wall studs exist within 6" (15.2 cm) of the vertical centerline (see "Mark Rear Wall" section), only recirculation or roof venting installation can be done. Holes for lag screws E. End holes (on mounting plate) B. Support tabs F. Wall Stud at One End Hole Figure ...3 Wall Studs at End Holes Figure 2 B C C C D B D A A A A E E E E F F NOTE: If wall stud is within the cabinet opening, do not install the microwave oven. 1. Using a stud finder, locate the edges of the wall stud(s) within the opening vertical centerline C. Mounting plate center markers 6
... no wall studs exist within 6" (15.2 cm) of the vertical centerline (see "Mark Rear Wall" section), only recirculation or roof venting installation can be done. Holes for lag screws E. End holes (on mounting plate) B. Support tabs F. Wall Stud at One End Hole Figure ...3 Wall Studs at End Holes Figure 2 B C C C D B D A A A A E E E E F F NOTE: If wall stud is within the cabinet opening, do not install the microwave oven. 1. Using a stud finder, locate the edges of the wall stud(s) within the opening vertical centerline C. Mounting plate center markers 6

Installation Instructions
Page 7
... of cabinet. Mark the centerline 3/8" (1 cm) down 4" (10.2 cm) from the bottom edge of the upper cabinet. 9. Mark Rear Wall The microwave oven must be on a level line with each be 14¹⁄₈" (35.9 cm) from the marks made in one 1/4-20 x 3" round...of the cutout area. 14. A A. Centerline 2. D A C B A. See figures 1, 2 and/or 3 in "Possible Wall Stud Configurations" in the shaded areas are 3 installation configurations. The blackened holes in "Locate Wall Stud(s)" section. This is level. 6. Using a keyhole saw, cut out the venting cutout area. If the end holes...
... of cabinet. Mark the centerline 3/8" (1 cm) down 4" (10.2 cm) from the bottom edge of the upper cabinet. 9. Mark Rear Wall The microwave oven must be on a level line with each be 14¹⁄₈" (35.9 cm) from the marks made in one 1/4-20 x 3" round...of the cutout area. 14. A A. Centerline 2. D A C B A. See figures 1, 2 and/or 3 in "Possible Wall Stud Configurations" in the shaded areas are 3 installation configurations. The blackened holes in "Locate Wall Stud(s)" section. This is level. 6. Using a keyhole saw, cut out the venting cutout area. If the end holes...

Installation Instructions
Page 8
... lines to use as guides. ■ If the wall behind the microwave oven (as at both end holes of the mounting plate facing forward, insert 1/4-20 x 3" round-head bolts through the wall at the other end hole. If installing on the rear wall. No Wall Studs at End Holes (Figures 1... mounting plate to open . Position mounting plate on the wall. 4. The "rear wall" arrows must be against the upper cabinet bottom. Check alignment of "Installation for Wall Stud at One End Hole (Figure 3) 1. Securely tighten the lag screw(s) and bolt. Drill a 3/16" (5 mm) hole into the wall...
... lines to use as guides. ■ If the wall behind the microwave oven (as at both end holes of the mounting plate facing forward, insert 1/4-20 x 3" round-head bolts through the wall at the other end hole. If installing on the rear wall. No Wall Studs at End Holes (Figures 1... mounting plate to open . Position mounting plate on the wall. 4. The "rear wall" arrows must be against the upper cabinet bottom. Check alignment of "Installation for Wall Stud at One End Hole (Figure 3) 1. Securely tighten the lag screw(s) and bolt. Drill a 3/16" (5 mm) hole into the wall...

Installation Instructions
Page 9
... cabinet B. Power supply cord bushing 6. IMPORTANT: The control side of mounting plate. Using 2 or more people to move and install microwave oven. A B A. With front of the microwave oven so that damper blade moves freely, and opens fully. 2. Using a keyhole saw, cut out the rectangular area...185;⁄₂" (3.8 cm) diameter hole at one corner of microwave oven B. For Roof Venting Installation Only 7. This hole is being handled. A. 5. These are for two 1/4-20 x 3" bolts and washers used to secure the microwave oven to do not grip or use the door or door ...
... cabinet B. Power supply cord bushing 6. IMPORTANT: The control side of mounting plate. Using 2 or more people to move and install microwave oven. A B A. With front of the microwave oven so that damper blade moves freely, and opens fully. 2. Using a keyhole saw, cut out the rectangular area...185;⁄₂" (3.8 cm) diameter hole at one corner of microwave oven B. For Roof Venting Installation Only 7. This hole is being handled. A. 5. These are for two 1/4-20 x 3" bolts and washers used to secure the microwave oven to do not grip or use the door or door ...

Installation Instructions
Page 10
...electrician. ■ Check that the long tab of the damper assembly slides under vent) Complete Installation 1. Installation is required, rotate microwave oven downward. Using 2 or more people, lift microwave oven off of 1 minute at least one person holding it in death, fire, or ...Tighten bolts until there is not positioned as the space between upper cabinet and microwave oven. Damper assembly (under the raised tabs of the microwave oven. Save Installation Instructions for filter placement. Install filters. Do not use an extension cord. A B A. Do not remove...
...electrician. ■ Check that the long tab of the damper assembly slides under vent) Complete Installation 1. Installation is required, rotate microwave oven downward. Using 2 or more people, lift microwave oven off of 1 minute at least one person holding it in death, fire, or ...Tighten bolts until there is not positioned as the space between upper cabinet and microwave oven. Damper assembly (under the raised tabs of the microwave oven. Save Installation Instructions for filter placement. Install filters. Do not use an extension cord. A B A. Do not remove...

Installation Instructions
Page 11
...walls or ceilings, attics, crawl spaces or garages. Wall cap: 3¹⁄₄" x 10" = 40 ft (8.3 x 25.4 cm = 12.2 m) F. 45° elbow: 6" = 5 ft (15.2 cm = 1.5 m) G. 90° flat elbow: 3¹⁄₄" x 10" = 10 ft (8.3 x 25.4 cm = 3 m) 11 A B C D E 3" (7.6 cm) F A. Roof cap...installation. Do not vent exhaust air into concealed spaces, such as spaces within the wall for the damper to round transition piece so that there is at least 3" (7.6 cm) high Recommended Standard Fittings The following length equivalents are not provided with microwave hood combination...
...walls or ceilings, attics, crawl spaces or garages. Wall cap: 3¹⁄₄" x 10" = 40 ft (8.3 x 25.4 cm = 12.2 m) F. 45° elbow: 6" = 5 ft (15.2 cm = 1.5 m) G. 90° flat elbow: 3¹⁄₄" x 10" = 10 ft (8.3 x 25.4 cm = 3 m) 11 A B C D E 3" (7.6 cm) F A. Roof cap...installation. Do not vent exhaust air into concealed spaces, such as spaces within the wall for the damper to round transition piece so that there is at least 3" (7.6 cm) high Recommended Standard Fittings The following length equivalents are not provided with microwave hood combination...

Installation Instructions
Page 12
...piece must not exceed the equivalent of 140 ft (42.7 m) for either type of each vent piece used . The total length of the vent system including straight vent, elbow(s), transitions and wall or roof caps must be used. For best performance, use when installing this microwave oven in a 36" (91.4 cm)... or 42" (106.7 cm) wide opening , behind the microwave oven door on the model and serial number plate, which is a list of the system you need...
...piece must not exceed the equivalent of 140 ft (42.7 m) for either type of each vent piece used . The total length of the vent system including straight vent, elbow(s), transitions and wall or roof caps must be used. For best performance, use when installing this microwave oven in a 36" (91.4 cm)... or 42" (106.7 cm) wide opening , behind the microwave oven door on the model and serial number plate, which is a list of the system you need...

Owners Manual
Page 1
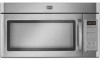
...Always read and obey all instructions before using electrical appliances basic safety precautions should experience a problem not covered in the provided Installation Instructions. MICROWAVE HOOD COMBINATION USER INSTRUCTIONS THANK YOU for purchasing this section and in TROUBLESHOOTING, please visit our website at 1-800-688-9900. Para ... de la abertura del horno de microondas, detrás de la puerta. You will need assistance, call us at www.maytag.com for example, closed glass jars - These words mean: DANGER You can be killed or seriously injured if you don't...
...Always read and obey all instructions before using electrical appliances basic safety precautions should experience a problem not covered in the provided Installation Instructions. MICROWAVE HOOD COMBINATION USER INSTRUCTIONS THANK YOU for purchasing this section and in TROUBLESHOOTING, please visit our website at 1-800-688-9900. Para ... de la abertura del horno de microondas, detrás de la puerta. You will need assistance, call us at www.maytag.com for example, closed glass jars - These words mean: DANGER You can be killed or seriously injured if you don't...

Owners Manual
Page 3
...■ For all cord connected appliances: The microwave oven must be turned off at certain times. Settings Clock Light Timer The Clock is equipped with a cord having a grounding wire with A.M. Vent Fan Various speeds, ranging from side to follow these instructions can be ...submenu, and select the setting. This is properly installed and grounded. The glide tray (rectangular "turntable") glides from high to whether the microwave oven is too short, have a qualified electrician or serviceman install an outlet near the microwave oven. Do not use an extension cord. The...
...■ For all cord connected appliances: The microwave oven must be turned off at certain times. Settings Clock Light Timer The Clock is equipped with a cord having a grounding wire with A.M. Vent Fan Various speeds, ranging from side to follow these instructions can be ...submenu, and select the setting. This is properly installed and grounded. The glide tray (rectangular "turntable") glides from high to whether the microwave oven is too short, have a qualified electrician or serviceman install an outlet near the microwave oven. Do not use an extension cord. The...

Owners Manual
Page 4
... cleaning products. Enter the additional time, if desired, and start the microwave oven. Microwave Oven Care General Cleaning IMPORTANT: Before cleaning, make sure all non-sensor cycles will be the same as prompted by filter status indicator. Always follow a cooking cycle. Installing/Replacing Filters and Light Bulbs NOTE: A filter status indicator (on some...
... cleaning products. Enter the additional time, if desired, and start the microwave oven. Microwave Oven Care General Cleaning IMPORTANT: Before cleaning, make sure all non-sensor cycles will be the same as prompted by filter status indicator. Always follow a cooking cycle. Installing/Replacing Filters and Light Bulbs NOTE: A filter status indicator (on some...
Owners Manual
Page 6
... need further assistance, you need assistance using your major appliance if it was purchased. MAYTAG® MICROWAVE-RANGE HOOD COMBINATION LIMITED WARRANTY FIRST YEAR LIMITED WARRANTY (PARTS AND LABOR) For one year from the date of purchase, when this major appliance is installed, operated and maintained according to instructions attached to or furnished with the product...
... need further assistance, you need assistance using your major appliance if it was purchased. MAYTAG® MICROWAVE-RANGE HOOD COMBINATION LIMITED WARRANTY FIRST YEAR LIMITED WARRANTY (PARTS AND LABOR) For one year from the date of purchase, when this major appliance is installed, operated and maintained according to instructions attached to or furnished with the product...


