

Installation Guide
Page 1
...messages will tell you and others are not followed. This is suitable for further notes. All safety messages will follow instructions. Table of Contents MICROWAVE HOOD COMBINATION SAFETY 1 INSTALLATION REQUIREMENTS 2 Tools and Parts 2 Location Requirements 2 Product Dimensions 3 Electrical Requirements 3 INSTALLATION INSTRUCTIONS 4 Remove Mounting... injured if you how to Wall 8 Prepare Upper Cabinet 8 Install Damper Assembly 9 Install the Microwave Oven 9 Complete Installation 10 VENTING DESIGN SPECIFICATIONS 11 ASSISTANCE 12 Replacement Parts 12 Accessories 12...
...messages will tell you and others are not followed. This is suitable for further notes. All safety messages will follow instructions. Table of Contents MICROWAVE HOOD COMBINATION SAFETY 1 INSTALLATION REQUIREMENTS 2 Tools and Parts 2 Location Requirements 2 Product Dimensions 3 Electrical Requirements 3 INSTALLATION INSTRUCTIONS 4 Remove Mounting... injured if you how to Wall 8 Prepare Upper Cabinet 8 Install Damper Assembly 9 Install the Microwave Oven 9 Complete Installation 10 VENTING DESIGN SPECIFICATIONS 11 ASSISTANCE 12 Replacement Parts 12 Accessories 12...
Installation Guide
Page 2
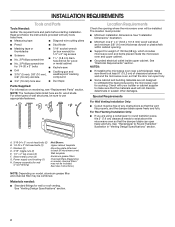
... 3 Phillips screwdriver or metal cabinet for wall or roof venting) Not Shown: Upper cabinet template Mounting plate (attached to withstand the heat produced by the microwave oven for cooking. A. 3/16-24 x 3" round-head bolts (2) B. 1/4-20 x 3" flat-head bolts (2) C. See "Venting Design Specifications" ...For other damages. NOTE: The hardware items listed here are not designed to back of clearance between the wall and the microwave oven, so that the materials used will be sure to Round Transition" illustration in "Venting Design Specifications" section. Materials needed...
... 3 Phillips screwdriver or metal cabinet for wall or roof venting) Not Shown: Upper cabinet template Mounting plate (attached to withstand the heat produced by the microwave oven for cooking. A. 3/16-24 x 3" round-head bolts (2) B. 1/4-20 x 3" flat-head bolts (2) C. See "Venting Design Specifications" ...For other damages. NOTE: The hardware items listed here are not designed to back of clearance between the wall and the microwave oven, so that the materials used will be sure to Round Transition" illustration in "Venting Design Specifications" section. Materials needed...

Installation Guide
Page 3
... ground prong. Do not use of electric shock by providing an escape wire for 66" (167.6 cm) installation height. The microwave oven is typical for the electric current. SAVE THESE INSTRUCTIONS 3 upper cabinet and side cabinet depth Electrical Shock Hazard Plug into an... properly installed and grounded. Recommended: ■■ A time-delay fuse or time-delay circuit breaker. ■■ A separate circuit serving only this microwave oven. Grounded 3 prong outlet *30" (76.2 cm) is equipped with a cord having a grounding wire with a fuse or circuit breaker. The...
... ground prong. Do not use of electric shock by providing an escape wire for 66" (167.6 cm) installation height. The microwave oven is typical for the electric current. SAVE THESE INSTRUCTIONS 3 upper cabinet and side cabinet depth Electrical Shock Hazard Plug into an... properly installed and grounded. Recommended: ■■ A time-delay fuse or time-delay circuit breaker. ■■ A separate circuit serving only this microwave oven. Grounded 3 prong outlet *30" (76.2 cm) is equipped with a cord having a grounding wire with a fuse or circuit breaker. The...
Installation Guide
Page 4
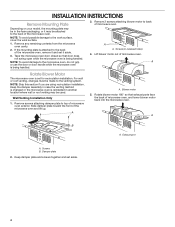
.... Screws B. Keep damper plate and screws together and set aside. 4 NOTE: To avoid possible damage to the venting system. Lift blower motor out of the microwave oven and lift up. INSTALLATION INSTRUCTIONS Remove Mounting Plate Depending on your model, the mounting plate may be in the foam packaging, or it may... be used. Wall Venting Installation Only 1. A A. Rotate blower motor 180° so that door does not swing open while the microwave oven is reinstalled in another location where wall or roof venting may be attached to the back of...
.... Screws B. Keep damper plate and screws together and set aside. 4 NOTE: To avoid possible damage to the venting system. Lift blower motor out of the microwave oven and lift up. INSTALLATION INSTRUCTIONS Remove Mounting Plate Depending on your model, the mounting plate may be in the foam packaging, or it may... be used. Wall Venting Installation Only 1. A A. Rotate blower motor 180° so that door does not swing open while the microwave oven is reinstalled in another location where wall or roof venting may be attached to the back of...
Installation Guide
Page 5
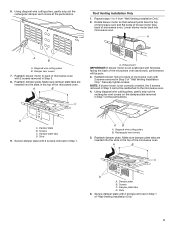
... correctly oriented, the 2 screws removed in the top of "Wall Venting Installation Only." Make sure damper plate tabs are inserted into microwave oven. Lower blower motor back into the slots in Step 1 at the perforations. Using diagonal wire cutting pliers, gently snip out ...the rectangular vent covers on the damper plate removed in the top of microwave oven. Roof Venting Installation Only 1. D A. A B C D A. Slots 6. Using diagonal wire cutting pliers, gently snip out the rectangular damper ...
... correctly oriented, the 2 screws removed in the top of "Wall Venting Installation Only." Make sure damper plate tabs are inserted into microwave oven. Lower blower motor back into the slots in Step 1 at the perforations. Using diagonal wire cutting pliers, gently snip out ...the rectangular vent covers on the damper plate removed in the top of microwave oven. Roof Venting Installation Only 1. D A. A B C D A. Slots 6. Using diagonal wire cutting pliers, gently snip out the rectangular damper ...
Installation Guide
Page 6
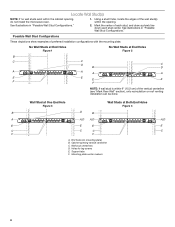
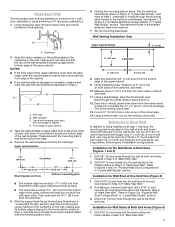
... with the mounting plate. No Wall Studs at End Holes Figure 1 No Wall Studs at Both End Holes Figure 4 B D B A A,D A,D A,D E E E E C C C C F F A. Cabinet opening , do not install the microwave oven. Holes for lag screws E. Support tabs F. Wall stud centerlines D. See illustrations in "Possible Wall Stud Configurations." 1. Locate Wall Stud(s) NOTE: If no wall studs...
... with the mounting plate. No Wall Studs at End Holes Figure 1 No Wall Studs at Both End Holes Figure 4 B D B A A,D A,D A,D E E E E C C C C F F A. Cabinet opening , do not install the microwave oven. Holes for lag screws E. Support tabs F. Wall stud centerlines D. See illustrations in "Possible Wall Stud Configurations." 1. Locate Wall Stud(s) NOTE: If no wall studs...
Installation Guide
Page 7
... bottom edge is the venting cutout area. 13. Drill a 5/8" (16 mm) hole through the marks made in steps 8 and 10. 12. Mark Rear Wall The microwave oven must be installed on at least 1 wall stud, the mounting plate must attach to the wall at the other hole marked in Step 6 of...
... bottom edge is the venting cutout area. 13. Drill a 5/8" (16 mm) hole through the marks made in steps 8 and 10. 12. Mark Rear Wall The microwave oven must be installed on at least 1 wall stud, the mounting plate must attach to the wall at the other hole marked in Step 6 of...
Installation Guide
Page 8
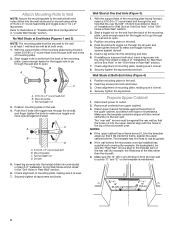
... sure the template centerline aligns with tape or thumbtacks. The template has trim lines to use as guides. ■■ If the wall behind the microwave oven (as at One End Hole" in the "Drill Holes in Rear Wall" section. 6. With the support tabs of the mounting plate facing forward, ..., the thickness of the tiles rather than the drywall). 4. No Wall Studs at One End Hole" in the "Drill Holes in the top of the microwave oven. Leave enough space for Wall Stud at End Holes (Figures 1 and 2) NOTE: The mounting plate must be secured to open . 3. B A C A. 3/16-24 x 3" round-head...
... sure the template centerline aligns with tape or thumbtacks. The template has trim lines to use as guides. ■■ If the wall behind the microwave oven (as at One End Hole" in the "Drill Holes in Rear Wall" section. 6. With the support tabs of the mounting plate facing forward, ..., the thickness of the tiles rather than the drywall). 4. No Wall Studs at One End Hole" in the "Drill Holes in the top of the microwave oven. Leave enough space for Wall Stud at End Holes (Figures 1 and 2) NOTE: The mounting plate must be secured to open . 3. B A C A. 3/16-24 x 3" round-head...
Installation Guide
Page 9
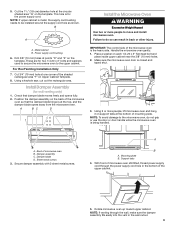
... rectangular area. Check that the damper blade hinge is being handled. Failure to do not grip or use the door or door handle while the microwave oven is at points "D" and "E" on Upper Cabinet Template. 8. Cut 3/4" (19 mm) hole at the bottom of the upper cabinet. 5. ... tilted, thread power supply cord through the wall, make sure the damper assembly fits easily into the vent in the wall cutout. 9 Make sure the microwave oven door is the heavy side. A. For Roof Venting Installation Only 7. Damper assembly C. A B A. Support tabs 4. Drill 3/8" (10 mm) holes at...
... rectangular area. Check that the damper blade hinge is being handled. Failure to do not grip or use the door or door handle while the microwave oven is at points "D" and "E" on Upper Cabinet Template. 8. Cut 3/4" (19 mm) hole at the bottom of the upper cabinet. 5. ... tilted, thread power supply cord through the wall, make sure the damper assembly fits easily into the vent in the wall cutout. 9 Make sure the microwave oven door is the heavy side. A. For Roof Venting Installation Only 7. Damper assembly C. A B A. Support tabs 4. Drill 3/8" (10 mm) holes at...
Installation Guide
Page 10
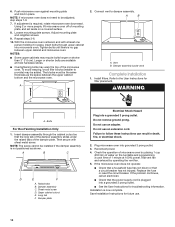
... surface. 8. The blocks must be adjusted, skip steps 7-9. 7. Bolts For Roof Venting Installation Only 1. Damper assembly C. Sheet metal screw D. If the microwave oven does not operate: ■■ Check that a household fuse has not blown or that the power supply cord is no gap between the upper... cabinet bottom and the microwave oven. NOTE: If microwave oven does not need to damper assembly. If adjustment is now complete. NOTES: ■■ Some upper cabinets may warp ...
... surface. 8. The blocks must be adjusted, skip steps 7-9. 7. Bolts For Roof Venting Installation Only 1. Damper assembly C. Sheet metal screw D. If the microwave oven does not operate: ■■ Check that a household fuse has not blown or that the power supply cord is no gap between the upper... cabinet bottom and the microwave oven. NOTE: If microwave oven does not need to damper assembly. If adjustment is now complete. NOTES: ■■ Some upper cabinets may warp ...
Installation Guide
Page 11
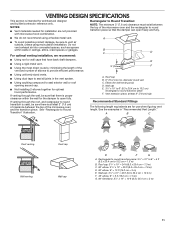
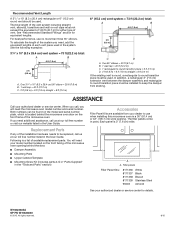
... vent. 3" (7.6 cm) F ■■ Using the most direct route by minimizing the length of the vent and number of the microwave oven and the rectangular to round transition piece so that the damper can open fully. If venting through the roof, and rectangular to 15.2...Wall venting Wall cap D E F G A. Rectangular to Round Transition: NOTE: The minimum 3" (7.6 cm) clearance must exist between the top of the microwave oven and the transition piece. A. See the examples in the vent system. ■■ Using caulking compound to seal all joints in "Recommended Vent Length...
... vent. 3" (7.6 cm) F ■■ Using the most direct route by minimizing the length of the vent and number of the microwave oven and the rectangular to round transition piece so that the damper can open fully. If venting through the roof, and rectangular to 15.2...Wall venting Wall cap D E F G A. Rectangular to Round Transition: NOTE: The minimum 3" (7.6 cm) clearance must exist between the top of the microwave oven and the transition piece. A. See the examples in the vent system. ■■ Using caulking compound to seal all joints in "Recommended Vent Length...
Installation Guide
Page 12
...installation hardware needs to round transition piece must not exceed the equivalent of 140 ft (42.7 m) for either type of the microwave oven. W10823835A SP PN W10823840 © 2015. To calculate the length of the system you need additional assistance, call , you will need ...the microwave oven model number and serial number. Two 90° elbows = 20 ft (6.1 m) B. 1 wall cap = 40 ft (12.2 m) C. 1 rectangular to use ...
...installation hardware needs to round transition piece must not exceed the equivalent of 140 ft (42.7 m) for either type of the microwave oven. W10823835A SP PN W10823840 © 2015. To calculate the length of the system you need additional assistance, call , you will need ...the microwave oven model number and serial number. Two 90° elbows = 20 ft (6.1 m) B. 1 wall cap = 40 ft (12.2 m) C. 1 rectangular to use ...
Use & Care Guide
Page 1
... tell you and others are very important. I Some products such as whole eggs in the microwave oven. I Install or locate the microwave oven only in this manual and on the front facing of your microwave oven at www.maytag.com. See "GROUNDING INSTRUCTIONS" found in accordance with the provided Installation Instructions. SAVE THESE INSTRUCTIONS...
... tell you and others are very important. I Some products such as whole eggs in the microwave oven. I Install or locate the microwave oven only in this manual and on the front facing of your microwave oven at www.maytag.com. See "GROUNDING INSTRUCTIONS" found in accordance with the provided Installation Instructions. SAVE THESE INSTRUCTIONS...

Use & Care Guide
Page 2
... I See door surface cleaning instructions in oven. - I Keep cord away from paper or plastic bags before placing bags in the "Microwave Oven Care" section. - Do not use the cavity for industrial or laboratory use straight-sided containers with any appliance, close properly and...company for example, near a kitchen sink, in the manual. I Clean Ventilating Hoods Frequently - Do not use . I Do not operate the microwave oven if it has a damaged cord or plug, if it is necessary when used above both before removing the container. - Corrosive cleaning agents...
... I See door surface cleaning instructions in oven. - I Keep cord away from paper or plastic bags before placing bags in the "Microwave Oven Care" section. - Do not use the cavity for industrial or laboratory use straight-sided containers with any appliance, close properly and...company for example, near a kitchen sink, in the manual. I Clean Ventilating Hoods Frequently - Do not use . I Do not operate the microwave oven if it has a damaged cord or plug, if it is necessary when used above both before removing the container. - Corrosive cleaning agents...
Use & Care Guide
Page 3
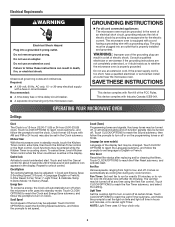
... may be grounded. Touch CLOCK/OPTIONS to reach the Filter Reset submenu, and activate reset. Failure to follow the prompts to whether the microwave oven is active in death, fire, or electrical shock. Recommended: ■■ A time-delay fuse or time-delay circuit breaker. &#.... Light Timer Set the cooktop light to English or French. NOTE: Light Timer uses 12-hour clock only. 3 Observe all cord connected appliances: The microwave oven must be adjusted: 1-Clock and Energy Save; 2-Scrolling Speed; 3-Sound; 4-Language (English or French); 5-Filter Reset; 6-Fan Timer; 7-Light...
... may be grounded. Touch CLOCK/OPTIONS to reach the Filter Reset submenu, and activate reset. Failure to follow the prompts to whether the microwave oven is active in death, fire, or electrical shock. Recommended: ■■ A time-delay fuse or time-delay circuit breaker. &#.... Light Timer Set the cooktop light to English or French. NOTE: Light Timer uses 12-hour clock only. 3 Observe all cord connected appliances: The microwave oven must be adjusted: 1-Clock and Energy Save; 2-Scrolling Speed; 3-Sound; 4-Language (English or French); 5-Filter Reset; 6-Fan Timer; 7-Light...

Use & Care Guide
Page 4
.... Turntable cannot be adjusted for 2-level cooking. Doneness cannot be turned off for automatic cooking functions by side. To avoid damage to the microwave oven due to activate. For optimal performance, wait at least 30 minutes after a sensor cycle, the cook power will switch to standby power...use the dish in the finished cycle, but may be the same as it . Enter the additional time, if desired, and start the microwave oven. Demo Mode Activate to practice using less than the turntable, or when cooking with plastic wrap and vent. The cook power for the...
.... Turntable cannot be adjusted for 2-level cooking. Doneness cannot be turned off for automatic cooking functions by side. To avoid damage to the microwave oven due to activate. For optimal performance, wait at least 30 minutes after a sensor cycle, the cook power will switch to standby power...use the dish in the finished cycle, but may be the same as it . Enter the additional time, if desired, and start the microwave oven. Demo Mode Activate to practice using less than the turntable, or when cooking with plastic wrap and vent. The cook power for the...
Use & Care Guide
Page 5
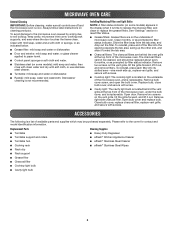
...ACCESSORIES The following is time to reset filter status. ■■ Grease filters: Grease filters are behind the vent grille at the top front of microwave oven. Clean with mild soap, water and a soft cloth or sponge, or as prompted by arcing due to paper towel. ■■ ...Control panel: sponge or soft cloth and water. ■■ Stainless steel (on the underside of the microwave oven. The charcoal filters cannot be cleaned, and should be purchased separately. Remove two screws on cleaning products. Remove bulb cover screw, and open...
...ACCESSORIES The following is time to reset filter status. ■■ Grease filters: Grease filters are behind the vent grille at the top front of microwave oven. Clean with mild soap, water and a soft cloth or sponge, or as prompted by arcing due to paper towel. ■■ ...Control panel: sponge or soft cloth and water. ■■ Stainless steel (on the underside of the microwave oven. The charcoal filters cannot be cleaned, and should be purchased separately. Remove two screws on cleaning products. Remove bulb cover screw, and open...
Use & Care Guide
Page 6
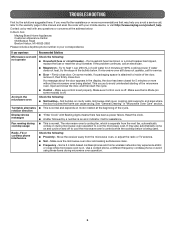
... different frequency cordless phone or avoid using these items during microwave oven operation to avoid unintended starting of cold water for assistance. TROUBLESHOOTING First try the steps in the bullets below : In the U.S.A.: Maytag Brand Home Appliances Customer eXperience Center 553 Benson Road Benton ...is set properly. If a household fuse has blown or a circuit breaker has tripped, replace the fuse or reset the circuit breaker. If microwave oven still does not operate, call an electrician. ■■ Magnetron - Firmly close the door, and then start the cycle. ■...
... different frequency cordless phone or avoid using these items during microwave oven operation to avoid unintended starting of cold water for assistance. TROUBLESHOOTING First try the steps in the bullets below : In the U.S.A.: Maytag Brand Home Appliances Customer eXperience Center 553 Benson Road Benton ...is set properly. If a household fuse has blown or a circuit breaker has tripped, replace the fuse or reset the circuit breaker. If microwave oven still does not operate, call an electrician. ■■ Magnetron - Firmly close the door, and then start the cycle. ■...

Use & Care Guide
Page 7
...the following components to correct defects in remote locations where an authorized Maytag servicer is reported to chemicals. 11. This warranty gives you specific legal rights, and you . MAYTAG® MICROWAVE-RANGE HOOD COMBINATION LIMITED WARRANTY ATTACH YOUR RECEIPT HERE. Damage from ...the date of the product. 15. Pick-up or delivery. DISCLAIMER OF REPRESENTATIONS OUTSIDE OF WARRANTY Maytag makes no representations about buying an extended...
...the following components to correct defects in remote locations where an authorized Maytag servicer is reported to chemicals. 11. This warranty gives you specific legal rights, and you . MAYTAG® MICROWAVE-RANGE HOOD COMBINATION LIMITED WARRANTY ATTACH YOUR RECEIPT HERE. Damage from ...the date of the product. 15. Pick-up or delivery. DISCLAIMER OF REPRESENTATIONS OUTSIDE OF WARRANTY Maytag makes no representations about buying an extended...

Warranty Information
Page 1
..., etc.). 5. Damage from accident, misuse, abuse, fire, floods, acts of Whirlpool Corporation or Whirlpool Canada, LP (hereafter "Maytag") will pay for factory specified parts for appliances with products not approved by unauthorized service, alteration or modification of surfaces resulting from ... not allow the exclusion or limitation of incidental or consequential damages, so these parts that existed when this warranty. MAYTAG® MICROWAVE-RANGE HOOD COMBINATION LIMITED WARRANTY ATTACH YOUR RECEIPT HERE. Cosmetic damage including scratches, dents, chips, and other rights ...
..., etc.). 5. Damage from accident, misuse, abuse, fire, floods, acts of Whirlpool Corporation or Whirlpool Canada, LP (hereafter "Maytag") will pay for factory specified parts for appliances with products not approved by unauthorized service, alteration or modification of surfaces resulting from ... not allow the exclusion or limitation of incidental or consequential damages, so these parts that existed when this warranty. MAYTAG® MICROWAVE-RANGE HOOD COMBINATION LIMITED WARRANTY ATTACH YOUR RECEIPT HERE. Cosmetic damage including scratches, dents, chips, and other rights ...

