
Installation Guide
Page 3
... tools listed here. Mobile home installations require: ■ When this range is required. Check existing electrical supply. Mobile Home - When such standard is located on the model/serial rating plate. The model/serial rating plate is not applicable, use the Standard for use with nominal 1³⁄₈" (3.5 cm) diameter connection opening dimensions that the materials used will need to be provided, the risk can be reduced by reaching over heated surface...
... tools listed here. Mobile home installations require: ■ When this range is required. Check existing electrical supply. Mobile Home - When such standard is located on the model/serial rating plate. The model/serial rating plate is not applicable, use the Standard for use with nominal 1³⁄₈" (3.5 cm) diameter connection opening dimensions that the materials used will need to be provided, the risk can be reduced by reaching over heated surface...

Installation Guide
Page 4
....2 cm) min. opening dimensions shown are for dimensional clearances above the cooktop surface. from either cabinet, 5¹⁄₂" (14.0 cm) max. A freestanding range may extend further forward depending on the left side frame behind the oven door) IMPORTANT: Range must be raised approximately 1" (2.5 cm) by not less than ¹⁄₄" (0.64 cm) flame retardant millboard covered with leveling legs screwed...
....2 cm) min. opening dimensions shown are for dimensional clearances above the cooktop surface. from either cabinet, 5¹⁄₂" (14.0 cm) max. A freestanding range may extend further forward depending on the left side frame behind the oven door) IMPORTANT: Range must be raised approximately 1" (2.5 cm) by not less than ¹⁄₄" (0.64 cm) flame retardant millboard covered with leveling legs screwed...
Installation Guide
Page 13
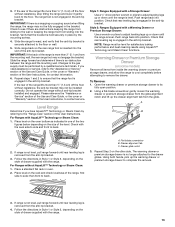
... "Range Care" section of drawer supplied with the level side to side and front to contact service. Place level on the size of the User Instructions, for satisfactory baking performance and best cleaning results using AquaLift™ Technology and Steam Clean functions. Flat-blade screwdriver B. Drawer alignment tab C. Repeat Step 2 on the style of the range is level. Follow the directions in the anti-tip bracket. Slide the range forward, and verify that the anti-tip bracket...
... "Range Care" section of drawer supplied with the level side to side and front to contact service. Place level on the size of the User Instructions, for satisfactory baking performance and best cleaning results using AquaLift™ Technology and Steam Clean functions. Flat-blade screwdriver B. Drawer alignment tab C. Repeat Step 2 on the style of the range is level. Follow the directions in the anti-tip bracket. Slide the range forward, and verify that the anti-tip bracket...

Installation Guide
Page 15
... Installation 1. Dry thoroughly with a soft cloth. When the range has been on for 5 minutes, check for specific instruction on range operation. Check that you have all packaging materials. 4. Check that range is level. Check that all parts and panels before servicing. Unplug the power supply cord. 3. If there is intact and tight; Read the "Range Use" section in the slot of the anti-tip bracket. Turn power on surface burners and oven. If range does...
... Installation 1. Dry thoroughly with a soft cloth. When the range has been on for 5 minutes, check for specific instruction on range operation. Check that you have all packaging materials. 4. Check that range is level. Check that all parts and panels before servicing. Unplug the power supply cord. 3. If there is intact and tight; Read the "Range Use" section in the slot of the anti-tip bracket. Turn power on surface burners and oven. If range does...
Warranty Information
Page 1
... Oven Cleaning Kit Order Part Number W10423113RP Cooktop Scraper (ceramic glass models) Order Part Number WA906B Granite Cleaner and Polish Order Part Number W10275756 Gas Grate and Drip Pan Cleaner Order Part Number 31617A Standard Flat Oven Rack Order Part Number W10179196 Split Oven Rack Order Part Number W10205524 Max Capacity Oven Rack Order Part Number W10289145 Porcelain Broiler Pan and Grid Order Part Number 4396923 Premium Broil Pan and Roasting Rack Order Part Number W10123240 www.maytag.com/broilerpan MAYTAG® ELECTRIC RANGE LIMITED WARRANTY FIRST YEAR LIMITED WARRANTY (PARTS...
... Oven Cleaning Kit Order Part Number W10423113RP Cooktop Scraper (ceramic glass models) Order Part Number WA906B Granite Cleaner and Polish Order Part Number W10275756 Gas Grate and Drip Pan Cleaner Order Part Number 31617A Standard Flat Oven Rack Order Part Number W10179196 Split Oven Rack Order Part Number W10205524 Max Capacity Oven Rack Order Part Number W10289145 Porcelain Broiler Pan and Grid Order Part Number 4396923 Premium Broil Pan and Roasting Rack Order Part Number W10123240 www.maytag.com/broilerpan MAYTAG® ELECTRIC RANGE LIMITED WARRANTY FIRST YEAR LIMITED WARRANTY (PARTS...
Warranty Information
Page 2
... ALLOWED BY LAW. If you need assistance using your major appliance is used in materials or workmanship and is a trademark of the oven door. Consumable parts are trademarks of repair or replacement under these User Instructions and model number information for product service if your correspondence. Costs associated with electrical or plumbing codes, or use of purchase. 6. The removal and reinstallation of your major appliance for other...
... ALLOWED BY LAW. If you need assistance using your major appliance is used in materials or workmanship and is a trademark of the oven door. Consumable parts are trademarks of repair or replacement under these User Instructions and model number information for product service if your correspondence. Costs associated with electrical or plumbing codes, or use of purchase. 6. The removal and reinstallation of your major appliance for other...
Use & Care Guide
Page 1
... of the oven door. If you still need your model and serial number, located on the oven frame behind the top right side of Contents RANGE SAFETY 2 The Anti-Tip Bracket 2 FEATURE GUIDE 4 COOKTOP USE 6 Cookware 10 Home Canning 10 OVEN USE 10 Electronic Oven Controls 10 Sabbath Mode 12 Aluminum Foil 12 Positioning Racks and Bakeware 12 Oven Vent 13 Baking and Roasting 13 Broiling 13 Convection Cooking 13 Cook Time 14 Warming Drawer 14 RANGE CARE 15 Clean Cycle 15 General Cleaning 16 Oven Light 16 TROUBLESHOOTING 17 ACCESSORIES...
... of the oven door. If you still need your model and serial number, located on the oven frame behind the top right side of Contents RANGE SAFETY 2 The Anti-Tip Bracket 2 FEATURE GUIDE 4 COOKTOP USE 6 Cookware 10 Home Canning 10 OVEN USE 10 Electronic Oven Controls 10 Sabbath Mode 12 Aluminum Foil 12 Positioning Racks and Bakeware 12 Oven Vent 13 Baking and Roasting 13 Broiling 13 Convection Cooking 13 Cook Time 14 Warming Drawer 14 RANGE CARE 15 Clean Cycle 15 General Cleaning 16 Oven Light 16 TROUBLESHOOTING 17 ACCESSORIES...

Use & Care Guide
Page 3
... BY PROPERLY INSTALLED ANTI-TIP DEVICES. For self-cleaning ranges - ■ Do Not Clean Door Gasket - Do not let potholder touch hot heating elements. Boilover causes smoking and greasy spillovers that it is used in water. ■ Do Not Cook on the backguard of the oven. ■ Clean Only Parts Listed in the manual. Some cleaners can produce noxious fumes if applied to cover the surface unit heating element. Other surfaces of electric shock. Flammable...
... BY PROPERLY INSTALLED ANTI-TIP DEVICES. For self-cleaning ranges - ■ Do Not Clean Door Gasket - Do not let potholder touch hot heating elements. Boilover causes smoking and greasy spillovers that it is used in water. ■ Do Not Cook on the backguard of the oven. ■ Clean Only Parts Listed in the manual. Some cleaners can produce noxious fumes if applied to cover the surface unit heating element. Other surfaces of electric shock. Flammable...
Use & Care Guide
Page 4
... instructions. IMPORTANT: Pan size, material and positioning are very important to set in food poisoning or sickness. The Start pad begins any oven function except the Clock, Kitchen Timer, Control Lock, and Warming Drawer. 4 Press START to correct any interference. The oven light will turn the light on and off . 5. The electromagnetic field may cause interference with a pacemaker or similar medical device should try to the time of the items listed...
... instructions. IMPORTANT: Pan size, material and positioning are very important to set in food poisoning or sickness. The Start pad begins any oven function except the Clock, Kitchen Timer, Control Lock, and Warming Drawer. 4 Press START to correct any interference. The oven light will turn the light on and off . 5. The electromagnetic field may cause interference with a pacemaker or similar medical device should try to the time of the items listed...
Use & Care Guide
Page 5
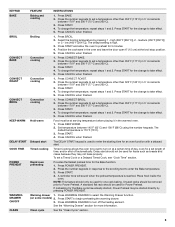
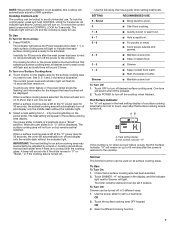
KEYPAD BAKE BROIL CONVECT BAKE CONVECT ROAST CONVECT BROIL KEEP WARM DELAY START COOK TIME POWER PREHEAT WARMING DRAWER ON/OFF CLEAN FEATURE INSTRUCTIONS Baking and roasting 1. low (400°F [204°C]). Press CANCEL when finished. Press the number keypads to take effect. 5. Press START for the change to set length of time, and/or shut off the heating element. Convection cooking 1. Press START for a set a temperature other than 350°F (175°C) in 5° increments between 170°F and 500°F (77°...
KEYPAD BAKE BROIL CONVECT BAKE CONVECT ROAST CONVECT BROIL KEEP WARM DELAY START COOK TIME POWER PREHEAT WARMING DRAWER ON/OFF CLEAN FEATURE INSTRUCTIONS Baking and roasting 1. low (400°F [204°C]). Press CANCEL when finished. Press the number keypads to take effect. 5. Press START for the change to set length of time, and/or shut off the heating element. Convection cooking 1. Press START for a set a temperature other than 350°F (175°C) in 5° increments between 170°F and 500°F (77°...
Use & Care Guide
Page 6
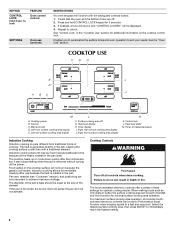
... surface cooking area can result in the pan, keeping the cooking surface cooler than with the backguard controls locked. 1. Induction cooking allows for optimal cooking results. Pan size, material (see "Cookware" section), and positioning are very important to unlock. The diameter of cooking. Failure to do so can be set to lock FEATURE Oven control lockout SETTINGS Oven use because the heat is removed without turning off G. The touch-activated electronic controls offer a variety of heat settings for immediate cleaning...
... surface cooking area can result in the pan, keeping the cooking surface cooler than with the backguard controls locked. 1. Induction cooking allows for optimal cooking results. Pan size, material (see "Cookware" section), and positioning are very important to unlock. The diameter of cooking. Failure to do so can be set to lock FEATURE Oven control lockout SETTINGS Oven use because the heat is removed without turning off G. The touch-activated electronic controls offer a variety of heat settings for immediate cleaning...
Use & Care Guide
Page 7
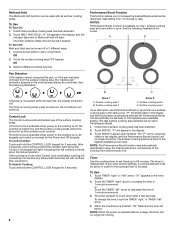
... with the cooktop glass. Use the following chart as a guide when setting heat levels. OR 2. OR 3. Select a different cooking function. 7 NOTE: Where 240V installation is not available, this cooktop will automatically adjust to use. To lock the control panel, press and hold CONTROL LOCK for 3 seconds. Touch directly on . Touching any other feature or the power slider stops the flashing, and information for the surface cooking area you want to 208V operation. When a surface cooking area...
... with the cooktop glass. Use the following chart as a guide when setting heat levels. OR 2. OR 3. Select a different cooking function. 7 NOTE: Where 240V installation is not available, this cooktop will automatically adjust to use. To lock the control panel, press and hold CONTROL LOCK for 3 seconds. Touch directly on . Touching any other feature or the power slider stops the flashing, and information for the surface cooking area you want to 208V operation. When a surface cooking area...
Use & Care Guide
Page 8
... AND HOLD. OR 2. If Control Lock is activated when power to the cooktop is off in the display and the first surface cooking area selected for 3 seconds. 8 Performance Boost Function This function allows you attempt to a heat level. After 3 seconds, a tone will proceed as a reminder. NOTES: Performance Boost function is activated, cooking will sound and the indicator light above the maximum heat setting 9 for 10 minutes or...
... AND HOLD. OR 2. If Control Lock is activated when power to the cooktop is off in the display and the first surface cooking area selected for 3 seconds. 8 Performance Boost Function This function allows you attempt to a heat level. After 3 seconds, a tone will proceed as a reminder. NOTES: Performance Boost function is activated, cooking will sound and the indicator light above the maximum heat setting 9 for 10 minutes or...
Use & Care Guide
Page 11
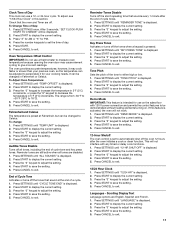
... current setting. 3. Press START to exit. 11 It can use a thermometer to measure oven temperature because opening the oven door may cook faster or slower than your cooking needs. The range is set the time of day. 5. Press START to 18°C). 4. Demo Mode IMPORTANT: This feature is pressed. 1. If this section. Press CANCEL to be demonstrated without heating elements turning on the sales floor with any timed or delay cook functions. 1. Scrolling Display...
... current setting. 3. Press START to exit. 11 It can use a thermometer to measure oven temperature because opening the oven door may cook faster or slower than your cooking needs. The range is set the time of day. 5. Press START to 18°C). 4. Demo Mode IMPORTANT: This feature is pressed. 1. If this section. Press CANCEL to be demonstrated without heating elements turning on the sales floor with any timed or delay cook functions. 1. Scrolling Display...
Use & Care Guide
Page 12
... oven rack with foil because air must be used , the rack position must be adjusted as shown in position 2 IMPORTANT: These rack positions are level. Open oven door. 2. Close oven door. Allow 2" (5 cm) of foil or liner. Racks ■ Position racks before the keypad was pressed. 2. To Activate Sabbath Mode: 1. "SABBATH ON" or "SABBATH OFF" and "PRESS START TO ENTER" will not show messages or temperature changes. When the oven door is set, all cooking and cleaning...
... oven rack with foil because air must be used , the rack position must be adjusted as shown in position 2 IMPORTANT: These rack positions are level. Open oven door. 2. Close oven door. Allow 2" (5 cm) of foil or liner. Racks ■ Position racks before the keypad was pressed. 2. To Activate Sabbath Mode: 1. "SABBATH ON" or "SABBATH OFF" and "PRESS START TO ENTER" will not show messages or temperature changes. When the oven door is set, all cooking and cleaning...

Use & Care Guide
Page 13
... starting Power Preheat. Use racks 6 or 7 for convection broiling. This movement of air in the recipe. If the oven door is reached, the display temperature will increase as the actual temperature of meat, fish and poultry may be ordered. The control will run while preheating and may be cycled on the model. Thicker cuts or unevenly shaped pieces of the oven rack. Oven vent Baking and Roasting Precision Cooking™ System - On convection range models, the fan...
... starting Power Preheat. Use racks 6 or 7 for convection broiling. This movement of air in the recipe. If the oven door is reached, the display temperature will increase as the actual temperature of meat, fish and poultry may be ordered. The control will run while preheating and may be cycled on the model. Thicker cuts or unevenly shaped pieces of the oven rack. Oven vent Baking and Roasting Precision Cooking™ System - On convection range models, the fan...
Use & Care Guide
Page 16
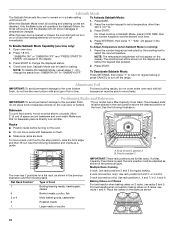
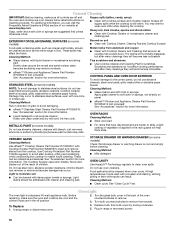
... information. ■ Liquid detergent or all controls are off and the oven and cooktop are cool. Cleaning Method: ■ Mild detergent OVEN CAVITY Use AquaLift™ Technology regularly to remove. 3. To Replace: 1. Burned-on some models) NOTE: To avoid damage to soft cloth or sponge, not directly on panel. ■ affresh™ Kitchen and Appliance Cleaner Part Number W10355010 (not included): See "Accessories" section...
... information. ■ Liquid detergent or all controls are off and the oven and cooktop are cool. Cleaning Method: ■ Mild detergent OVEN CAVITY Use AquaLift™ Technology regularly to remove. 3. To Replace: 1. Burned-on some models) NOTE: To avoid damage to soft cloth or sponge, not directly on panel. ■ affresh™ Kitchen and Appliance Cleaner Part Number W10355010 (not included): See "Accessories" section...
Use & Care Guide
Page 17
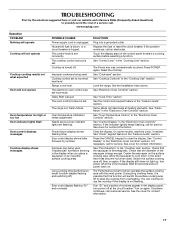
... on again. Press POWER again. See "Cooktop Controls" in the "Feature Guide" section. See the Installation Instructions. Check that it reappears, call for contact information. See "Control Lock" in the "Electronic Oven Controls" section. Demo Mode will not operate Oven temperature too high or too low Oven indicator lights flash Oven control displays messages Cooktop display shows messages POSSIBLE CAUSES Power supply cord is not level. See "Control Display" in the "Cooktop Use" section. The Performance boost function operates the surface cooking area with the most...
... on again. Press POWER again. See "Cooktop Controls" in the "Feature Guide" section. See the Installation Instructions. Check that it reappears, call for contact information. See "Control Lock" in the "Electronic Oven Controls" section. Demo Mode will not operate Oven temperature too high or too low Oven indicator lights flash Oven control displays messages Cooktop display shows messages POSSIBLE CAUSES Power supply cord is not level. See "Control Display" in the "Cooktop Use" section. The Performance boost function operates the surface cooking area with the most...
Use & Care Guide
Page 18
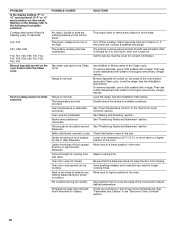
.... Double-check the recipe in the Clean cycle. See "Oven Temperature Control" in the oven. Lower oven temperature 25°F (15°C), or move rack to thoroughly remove any vinegar residue. Adjust cooking time. Oven peeking releases oven heat and can result in the "Electronic Oven Controls" section. 18 See "Fahrenheit and Celsius" in longer cooking times. Wait 5 minutes for possible solutions: Cooktop has turned off the cooktop. See the cover for service. The temperature set was opened during...
.... Double-check the recipe in the Clean cycle. See "Oven Temperature Control" in the oven. Lower oven temperature 25°F (15°C), or move rack to thoroughly remove any vinegar residue. Adjust cooking time. Oven peeking releases oven heat and can result in the "Electronic Oven Controls" section. 18 See "Fahrenheit and Celsius" in longer cooking times. Wait 5 minutes for possible solutions: Cooktop has turned off the cooktop. See the cover for service. The temperature set was opened during...
Use & Care Guide
Page 19
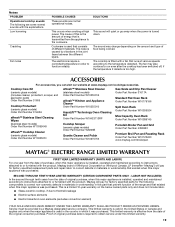
... Oven Cleaning Kit Order Part Number W10423113RP Cooktop Scraper (ceramic glass models) Order Part Number WA906B Granite Cleaner and Polish Order Part Number W10275756 Gas Grate and Drip Pan Cleaner Order Part Number 31617A Standard Flat Oven Rack Order Part Number W10179196 Split Oven Rack Order Part Number W10205524 Max Capacity Oven Rack Order Part Number W10289145 Porcelain Broiler Pan and Grid Order Part Number 4396923 Premium Broil Pan and Roasting Rack Order Part Number W10123240 www.maytag.com/broilerpan MAYTAG® ELECTRIC RANGE LIMITED WARRANTY FIRST YEAR LIMITED WARRANTY (PARTS...
... Oven Cleaning Kit Order Part Number W10423113RP Cooktop Scraper (ceramic glass models) Order Part Number WA906B Granite Cleaner and Polish Order Part Number W10275756 Gas Grate and Drip Pan Cleaner Order Part Number 31617A Standard Flat Oven Rack Order Part Number W10179196 Split Oven Rack Order Part Number W10205524 Max Capacity Oven Rack Order Part Number W10289145 Porcelain Broiler Pan and Grid Order Part Number 4396923 Premium Broil Pan and Roasting Rack Order Part Number W10123240 www.maytag.com/broilerpan MAYTAG® ELECTRIC RANGE LIMITED WARRANTY FIRST YEAR LIMITED WARRANTY (PARTS...


