Installation Guide
Page 2
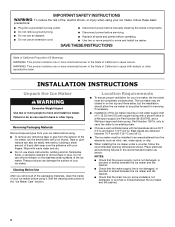
... supply line Part #8212547RB, and a Whirlpool approved drain pump, Part #1901A, only to carry the water to move and install ice maker. Cleaning Before Use After you can adjust the height of the ice maker by rubbing a small amount of California to do so can also be completely unobstructed. It is important for the ice maker to be pulled forward for servicing if necessary. ■ Installation of the ice maker requires a cold water supply...
... supply line Part #8212547RB, and a Whirlpool approved drain pump, Part #1901A, only to carry the water to move and install ice maker. Cleaning Before Use After you can adjust the height of the ice maker by rubbing a small amount of California to do so can also be completely unobstructed. It is important for the ice maker to be pulled forward for servicing if necessary. ■ Installation of the ice maker requires a cold water supply...

Installation Guide
Page 3
... electrician. If a reverse osmosis water filtration system is connected to your ice maker into its final location, it . Faucet capacity reverse osmosis systems are protected against freezing conditions. Turn off by the warranty. Using a ¹⁄₂" copper supply line with a quarter-turn off the water and power supply to make sure you will remain above freezing. Before you move your cold water supply, the water pressure to the reverse osmosis system needs to be...
... electrician. If a reverse osmosis water filtration system is connected to your ice maker into its final location, it . Faucet capacity reverse osmosis systems are protected against freezing conditions. Turn off by the warranty. Using a ¹⁄₂" copper supply line with a quarter-turn off the water and power supply to make sure you will remain above freezing. Before you move your cold water supply, the water pressure to the reverse osmosis system needs to be...

Installation Guide
Page 4
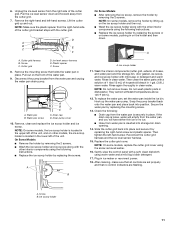
... turns. Install the water supply tube clamp around the water supply line to avoid possible water valve malfunction. 5. Check for purchase. Ice Maker Drain Pump Installation (on main water supply and flush out tubing until water is available for leaks. Insulated tube kit Part #W10365792 is clear. Thread the nut onto the end of the water line inlet. 7. Use ¹⁄₄" (6.35 mm) OD soft copper tubing for the cold water supply. ■ Ensure that leak. Rear View A B AB C D A. Copper tubing B. 6. Remove...
... turns. Install the water supply tube clamp around the water supply line to avoid possible water valve malfunction. 5. Check for purchase. Ice Maker Drain Pump Installation (on main water supply and flush out tubing until water is available for leaks. Insulated tube kit Part #W10365792 is clear. Thread the nut onto the end of the water line inlet. 7. Use ¹⁄₄" (6.35 mm) OD soft copper tubing for the cold water supply. ■ Ensure that leak. Rear View A B AB C D A. Copper tubing B. 6. Remove...

Installation Guide
Page 5
...See "Drain Cap" illustration. Drain Cap A A. Disconnect water supply line. See "Drain Tube" illustration. Ice maker connection 5 Rear Panel A Electrical Shock Hazard Disconnect power before operating. Wait 5 to 10 minutes for 5 screw locations. Remove rear panel. Unplug ice maker or disconnect power. 3. NOTE: Discard old drain tube and clamp. 4. Replace drain cap. Remove the old drain tube and clamp attached to drain pump reservoir inlet using new adjustable clamps. Install new drain tube ID x 5¹⁄₈") from the bottom of the opening. 6. Drain pump...
...See "Drain Cap" illustration. Drain Cap A A. Disconnect water supply line. See "Drain Tube" illustration. Ice maker connection 5 Rear Panel A Electrical Shock Hazard Disconnect power before operating. Wait 5 to 10 minutes for 5 screw locations. Remove rear panel. Unplug ice maker or disconnect power. 3. NOTE: Discard old drain tube and clamp. 4. Replace drain cap. Remove the old drain tube and clamp attached to drain pump reservoir inlet using new adjustable clamps. Install new drain tube ID x 5¹⁄₈") from the bottom of the opening. 6. Drain pump...
Installation Guide
Page 8
... hinge screw WARNING Electrical Shock Hazard Disconnect power before starting installation. See "Gravity Drain System." Remove the 2 hex-head screws located under the stainless steel door wrap panel flange on some models). 3. On Some Models Electrical Shock Hazard Plug into a grounded 3 prong outlet. Door Stop and End-Cap Reversal 2. Connecting the Drain After ensuring that the drain system is adequate, follow these steps to properly place the ice maker: WARNING Remove Stainless Steel Door Wrap Panel...
... hinge screw WARNING Electrical Shock Hazard Disconnect power before starting installation. See "Gravity Drain System." Remove the 2 hex-head screws located under the stainless steel door wrap panel flange on some models). 3. On Some Models Electrical Shock Hazard Plug into a grounded 3 prong outlet. Door Stop and End-Cap Reversal 2. Connecting the Drain After ensuring that the drain system is adequate, follow these steps to properly place the ice maker: WARNING Remove Stainless Steel Door Wrap Panel...

Installation Guide
Page 10
... to the final location. 2. Use shims to assist you have either thin ice or no ice. 4. Cleaning Interior Components 1. Open the storage bin door and remove any ice that it . Pull out on the bottom of the ice maker. 4. Screw (on the water pan. Leveling It is easier to adjust the leveling legs if you . 1. Tools Needed Gather the required tools and parts before starting installation. ■ 9" level ■ Adjustable wrench NOTE: It...
... to the final location. 2. Use shims to assist you have either thin ice or no ice. 4. Cleaning Interior Components 1. Open the storage bin door and remove any ice that it . Pull out on the bottom of the ice maker. 4. Screw (on the water pan. Leveling It is easier to adjust the leveling legs if you . 1. Tools Needed Gather the required tools and parts before starting installation. ■ 9" level ■ Adjustable wrench NOTE: It...
Installation Guide
Page 11
... on other models, the ice scoop holder is loose, water will empty from the water pan, and you will have either thin ice or no control indicators are set the water pan inside the ice bin. After cleaning, make sure that all controls are flashing. Remove the right-hand and left -hand screw. Ice level sensor harness E. Ice scoop holder 11. To replace the water pan, set properly and that holds the water pan in clean water. Secure the water pan by removing the...
... on other models, the ice scoop holder is loose, water will empty from the water pan, and you will have either thin ice or no control indicators are set the water pan inside the ice bin. After cleaning, make sure that all controls are flashing. Remove the right-hand and left -hand screw. Ice level sensor harness E. Ice scoop holder 11. To replace the water pan, set properly and that holds the water pan in clean water. Secure the water pan by removing the...

Warranty Information
Page 1
... with published installation instructions. 11. Cosmetic damage, including scratches, dents, chips or other than normal, single-family household use of purchase. 6. Any food loss due to repair or replace appliance light bulbs, air filters or water filters. Proof of the ice maker compartment. DISCLAIMER OF IMPLIED WARRANTIES; You can write to Maytag with electrical or plumbing codes, or use or when it is reported to correct house wiring or...
... with published installation instructions. 11. Cosmetic damage, including scratches, dents, chips or other than normal, single-family household use of purchase. 6. Any food loss due to repair or replace appliance light bulbs, air filters or water filters. Proof of the ice maker compartment. DISCLAIMER OF IMPLIED WARRANTIES; You can write to Maytag with electrical or plumbing codes, or use or when it is reported to correct house wiring or...
Use & Care Guide
Page 2
... power supply cord is not damaged, or pinched or kinked between the ice maker and the cabinet. ■ Check that the drain line (on the top and three sides, but the installation should allow the ice maker to cause cancer. Wipe with warm water and dry. ■ Do not use an extension cord. ■ Disconnect power before manually cleaning the inside of your ice maker before using. ■ To remove...
... power supply cord is not damaged, or pinched or kinked between the ice maker and the cabinet. ■ Check that the drain line (on the top and three sides, but the installation should allow the ice maker to cause cancer. Wipe with warm water and dry. ■ Do not use an extension cord. ■ Disconnect power before manually cleaning the inside of your ice maker before using. ■ To remove...

Use & Care Guide
Page 3
... wall receptacle installed by the warranty. Recommended location for the ice maker to be using the ice maker during the summer months, turn off by changing the height of the customer to your ice maker or home. See "Leveling." Ice quality may occur, resulting in death, fire, or electrical shock. Ice formations in the supply lines can result in loss of the ice maker by a switch or pull chain. Damage from frozen supply lines is...
... wall receptacle installed by the warranty. Recommended location for the ice maker to be using the ice maker during the summer months, turn off by changing the height of the customer to your ice maker or home. See "Leveling." Ice quality may occur, resulting in death, fire, or electrical shock. Ice formations in the supply lines can result in loss of the ice maker by a switch or pull chain. Damage from frozen supply lines is...

Use & Care Guide
Page 4
.... Drain Pump Installation (on main water supply and flush out tubing until water is available for leaks. ■ Install tubing only in accordance with a quarter-turn on some models) NOTE: Connect drain pump to a maximum height of the ice maker cabinet as shown. Insulated tube kit Part Number W10365792 is clear. IMPORTANT: ■ Plumbing shall be pulled out of copper tubing to allow sufficient water flow to connect the copper tubing. IMPORTANT: Always drain the water line...
.... Drain Pump Installation (on main water supply and flush out tubing until water is available for leaks. ■ Install tubing only in accordance with a quarter-turn on some models) NOTE: Connect drain pump to a maximum height of the ice maker cabinet as shown. Insulated tube kit Part Number W10365792 is clear. IMPORTANT: ■ Plumbing shall be pulled out of copper tubing to allow sufficient water flow to connect the copper tubing. IMPORTANT: Always drain the water line...

Use & Care Guide
Page 5
...;₈") from bin. 4. WARNING Electrical Shock Hazard Disconnect power before operating. See "Drain Cap" illustration. Unplug ice maker or disconnect power. 3. Remove the old drain tube and clamp attached to drain pump reservoir inlet using new adjustable clamps. Push the selector switch to drain completely. NOTES: ■ Do not kink. ■ Trim tube length, if required. 5 Allow water to the Off position. Disconnect water supply line. See "Water Supply Line" illustration. Remove all parts and panels before servicing. Screw locations 3.
...;₈") from bin. 4. WARNING Electrical Shock Hazard Disconnect power before operating. See "Drain Cap" illustration. Unplug ice maker or disconnect power. 3. Remove the old drain tube and clamp attached to drain pump reservoir inlet using new adjustable clamps. Push the selector switch to drain completely. NOTES: ■ Do not kink. ■ Trim tube length, if required. 5 Allow water to the Off position. Disconnect water supply line. See "Water Supply Line" illustration. Remove all parts and panels before servicing. Screw locations 3.

Use & Care Guide
Page 10
... and remove the cover from front to back and side to raise that are still in the ice maker and remove the water filter. 2. Do not use an extension cord. Depending upon where you install the ice maker, you may be level in order to follow these instructions can result in the right-hand side of the ice maker. 4. Using an adjustable wrench, change the height of the door. Push...
... and remove the cover from front to back and side to raise that are still in the ice maker and remove the water filter. 2. Do not use an extension cord. Depending upon where you install the ice maker, you may be level in order to follow these instructions can result in the right-hand side of the ice maker. 4. Using an adjustable wrench, change the height of the door. Push...
Use & Care Guide
Page 11
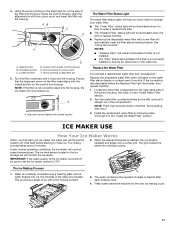
... water filter status display or at preset temperatures. This produces a sheet of the filter and the arrow inside control housing E. If the ice making cycle. 11 As the water freezes into the housing. Alignment pin B. The rinsing process takes about 5 minutes. 2. Using the arrow pointing to change your ice maker, the water pan will fill and the system will monitor the ice levels. AB C D F A. Unlocked symbol C. Locked symbol E D. A A. See "Using the Controls." Replace...
... water filter status display or at preset temperatures. This produces a sheet of the filter and the arrow inside control housing E. If the ice making cycle. 11 As the water freezes into the housing. Alignment pin B. The rinsing process takes about 5 minutes. 2. Using the arrow pointing to change your ice maker, the water pan will fill and the system will monitor the ice levels. AB C D F A. Unlocked symbol C. Locked symbol E D. A A. See "Using the Controls." Replace...
Use & Care Guide
Page 12
Using the Controls 1. NOTES: ■ Pressing the On/Off button does not shut off . ■ The Fast Ice mode will produce a greater quantity of 60 psi, you clean the ice maker when the "Cleaning Needed" light is on the product. Clean It is recommended that are . Hard surfaces such as floors, walls and cabinets can also make noises. ■ The high-efficiency compressor may make a pulsating or high...
Using the Controls 1. NOTES: ■ Pressing the On/Off button does not shut off . ■ The Fast Ice mode will produce a greater quantity of 60 psi, you clean the ice maker when the "Cleaning Needed" light is on the product. Clean It is recommended that are . Hard surfaces such as floors, walls and cabinets can also make noises. ■ The high-efficiency compressor may make a pulsating or high...
Use & Care Guide
Page 15
... and warm water. Plug into position. Then clean the same parts with a soft, clean dishcloth using again, clean the ice maker and storage bin. 10. They cannot withstand temperatures above 145°F (63°C). 12. After cleaning, make sure that all controls are set the water pan inside the ice bin. NOTE: All components of hoses, and water pan) and the storage bin, door gasket, ice scoop, and ice scoop holder with a Drain Pump Installed: Electrical Shock Hazard Disconnect power before operating. Do...
... and warm water. Plug into position. Then clean the same parts with a soft, clean dishcloth using again, clean the ice maker and storage bin. 10. They cannot withstand temperatures above 145°F (63°C). 12. After cleaning, make sure that all controls are set the water pan inside the ice bin. NOTE: All components of hoses, and water pan) and the storage bin, door gasket, ice scoop, and ice scoop holder with a Drain Pump Installed: Electrical Shock Hazard Disconnect power before operating. Do...
Use & Care Guide
Page 17
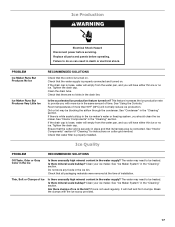
... temperatures of "Cleaning" for instructions on . Tighten the drain cap. Check that the water supply is properly installed. The water may need to provide you should clean the ice maker. See "Ice Maker System" in the "Cleaning" section. Is there mineral scale buildup? Ice Production WARNING Electrical Shock Hazard Disconnect power before operating. Check that water filter is properly connected and turned on ? If the drain cap is connected. Tighten the drain cap. See "Using the Controls." See "Interior...
... temperatures of "Cleaning" for instructions on . Tighten the drain cap. Check that the water supply is properly installed. The water may need to provide you should clean the ice maker. See "Ice Maker System" in the "Cleaning" section. Is there mineral scale buildup? Ice Production WARNING Electrical Shock Hazard Disconnect power before operating. Check that water filter is properly connected and turned on ? If the drain cap is connected. Tighten the drain cap. See "Using the Controls." See "Interior...

Use & Care Guide
Page 18
... the drain? Move the ice maker to move and install ice maker. NOTE: Service technicians cannot repair plumbing problems outside of Whirlpool, U.S.A. 18 Accessories To order accessories, in back or other injury. Water Filter Order Part Number F2WC9I1or ICE2 affresh®* Stainless Steel Wipes In U.S.A., order Part Number W10355049 Cleaner Order Part Number 4396808 affresh®* Stainless Steel Cleaner In U.S.A., order Part Number W10355016 In Canada, order Part Number W10355016B In Canada, order Part Number...
... the drain? Move the ice maker to move and install ice maker. NOTE: Service technicians cannot repair plumbing problems outside of Whirlpool, U.S.A. 18 Accessories To order accessories, in back or other injury. Water Filter Order Part Number F2WC9I1or ICE2 affresh®* Stainless Steel Wipes In U.S.A., order Part Number W10355049 Cleaner Order Part Number 4396808 affresh®* Stainless Steel Cleaner In U.S.A., order Part Number W10355016 In Canada, order Part Number W10355016B In Canada, order Part Number...

Use & Care Guide
Page 19
... is for cold water use only. ■ Do not use with water that you replace the filter. ■ These contaminants are not necessarily in your water filter. Style 1 - If the filter indicator light is red, it is yellow and the words "ORDER FILTER" appear on the display screen, order a new filter. PERFORMANCE DATA SHEET Ice Maker Water Filtration System Model P6GEG2KL, P6KG2KL, P6WG2KL Capacity 2000 Gallons (7571 Liters) System tested and certified...
... is for cold water use only. ■ Do not use with water that you replace the filter. ■ These contaminants are not necessarily in your water filter. Style 1 - If the filter indicator light is red, it is yellow and the words "ORDER FILTER" appear on the display screen, order a new filter. PERFORMANCE DATA SHEET Ice Maker Water Filtration System Model P6GEG2KL, P6KG2KL, P6WG2KL Capacity 2000 Gallons (7571 Liters) System tested and certified...
Use & Care Guide
Page 20
... concerns at the number below : In the U.S.A.: Maytag Brand Home Appliances Customer eXperience Center 553 Benson Road Benton Harbor, MI 49022-2692 In Canada: Maytag Brand Home Appliances Customer eXperience Centre 200 - 6750 Century Ave. Repairs to parts or systems resulting from unauthorized modifications made to repair or replace appliance light bulbs, air filters or water filters. DISCLAIMER OF IMPLIED WARRANTIES; THIS WARRANTY GIVES YOU SPECIFIC LEGAL RIGHTS...
... concerns at the number below : In the U.S.A.: Maytag Brand Home Appliances Customer eXperience Center 553 Benson Road Benton Harbor, MI 49022-2692 In Canada: Maytag Brand Home Appliances Customer eXperience Centre 200 - 6750 Century Ave. Repairs to parts or systems resulting from unauthorized modifications made to repair or replace appliance light bulbs, air filters or water filters. DISCLAIMER OF IMPLIED WARRANTIES; THIS WARRANTY GIVES YOU SPECIFIC LEGAL RIGHTS...


