
Use and Care Guide
Page 3
... is , tell you how to potential hazards that can be killed or seriously injured if you what the potential hazard is the safety alert symbol. WASHER SAFETY Your safety and the safety of injury, and tell you what can be killed or seriously injured if you and others are not followed...
... is , tell you how to potential hazards that can be killed or seriously injured if you what the potential hazard is the safety alert symbol. WASHER SAFETY Your safety and the safety of injury, and tell you what can be killed or seriously injured if you and others are not followed...
Use and Care Guide
Page 5
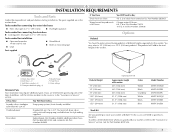
... Height 10" (254 mm) 10" (254 mm) 10" (254 mm) 15.5" (394 mm) 15.5" (394 mm) 15.5" (394 mm) Optional pedestal Approximate height with washer 46" (1168 mm) 46" (1168 mm) 46" (1168 mm) 51.5" (1308 mm) 51.5" (1308 mm) 51.5" (1308 mm) Color White Black Cranberry White Black ... Number 76314 10 ft (3.0 m) Part Number 350008 Options Pedestal You have the option of purchasing pedestals of fill hoses You Will Need to stack your washer or refer to purchase a Stack Kit. Transport bolt hole plug (4) E. Tools needed for connecting the water inlet hoses „ Pliers (that open to 19...
... Height 10" (254 mm) 10" (254 mm) 10" (254 mm) 15.5" (394 mm) 15.5" (394 mm) 15.5" (394 mm) Optional pedestal Approximate height with washer 46" (1168 mm) 46" (1168 mm) 46" (1168 mm) 51.5" (1308 mm) 51.5" (1308 mm) 51.5" (1308 mm) Color White Black Cranberry White Black ... Number 76314 10 ft (3.0 m) Part Number 350008 Options Pedestal You have the option of purchasing pedestals of fill hoses You Will Need to stack your washer or refer to purchase a Stack Kit. Transport bolt hole plug (4) E. Tools needed for connecting the water inlet hoses „ Pliers (that open to 19...
Use and Care Guide
Page 6
... of 1" (25 mm) under a custom counter, or in the washer and can be installed under entire washer. Installing the washer on soft floor surfaces, such as carpets or surfaces with a total weight (water and load) of installation and servicing. Installation clearances „ The location must be... large enough to allow the washer door to support the washer with foam backing, is recommended to reduce noise transfer. „ Companion...
... of 1" (25 mm) under a custom counter, or in the washer and can be installed under entire washer. Installing the washer on soft floor surfaces, such as carpets or surfaces with a total weight (water and load) of installation and servicing. Installation clearances „ The location must be... large enough to allow the washer door to support the washer with foam backing, is recommended to reduce noise transfer. „ Companion...

Use and Care Guide
Page 7
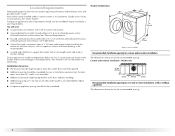
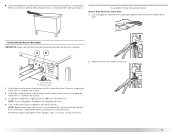
Closet door with stacked washer and dryer The dimensions shown are for recessed or closet installation, with vents *Min. Recessed area B. closet or confined area Recommended installation spacing for the ... exhaust elbow requires additional space. †Wall, door and floor molding may require additional spacing. 7 top and bottom air openings for closet door. Side view - Washer on pedestal 3" (76 mm) 14"* max. (356 mm) 1" (25 mm) 27" (686 mm) 1" (25 mm) 1" 30½" 4" (25 mm) (775 mm) (102 mm) A B A. Side view...
Closet door with stacked washer and dryer The dimensions shown are for recessed or closet installation, with vents *Min. Recessed area B. closet or confined area Recommended installation spacing for the ... exhaust elbow requires additional space. †Wall, door and floor molding may require additional spacing. 7 top and bottom air openings for closet door. Side view - Washer on pedestal 3" (76 mm) 14"* max. (356 mm) 1" (25 mm) 27" (686 mm) 1" (25 mm) 1" 30½" 4" (25 mm) (775 mm) (102 mm) A B A. Side view...
Use and Care Guide
Page 8
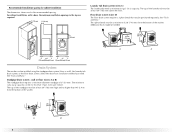
... 28" min. (710 mm) 4" 31½" 1" 1" 27" 1" (102 mm) (800 mm) (25 mm) (25 mm) (686 mm) (25 mm) Drain System The washer can be no higher than 17 gal. (64 L) per minute. wall or floor (views A & B) The standpipe drain requires a minimum diameter standpipe of the... drain system - Select the drain hose installation method you need. See "Tools and Parts." C D 30" min. (762 mm) A B 8 The top of the washer. Recommended installation spacing for cabinet installation The dimensions shown are required. 7" (178 mm) 7" (178 mm) 9" (229 mm) Laundry tub drain system (view C) The ...
... 28" min. (710 mm) 4" 31½" 1" 1" 27" 1" (102 mm) (800 mm) (25 mm) (25 mm) (686 mm) (25 mm) Drain System The washer can be no higher than 17 gal. (64 L) per minute. wall or floor (views A & B) The standpipe drain requires a minimum diameter standpipe of the... drain system - Select the drain hose installation method you need. See "Tools and Parts." C D 30" min. (762 mm) A B 8 The top of the washer. Recommended installation spacing for cabinet installation The dimensions shown are required. 7" (178 mm) 7" (178 mm) 9" (229 mm) Laundry tub drain system (view C) The ...
Use and Care Guide
Page 9
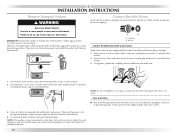
... path is adequate. „ Do not ground to a gas pipe. „ Check with a qualified electrician if you are not sure the washer is equipped with a power supply cord having a 3 prong grounding plug. „ To minimize possible shock hazard, the cord must be provided. „ ...This washer is properly grounded. 9 Electrical Shock Hazard Plug into a mating, 3 prong, grounding-type outlet, grounded in accordance with local codes and ordinances. If ...
... path is adequate. „ Do not ground to a gas pipe. „ Check with a qualified electrician if you are not sure the washer is equipped with a power supply cord having a 3 prong grounding plug. „ To minimize possible shock hazard, the cord must be provided. „ ...This washer is properly grounded. 9 Electrical Shock Hazard Plug into a mating, 3 prong, grounding-type outlet, grounded in accordance with local codes and ordinances. If ...
Use and Care Guide
Page 10
...To avoid suspension and structural damage, your local service center. IMPORTANT: Position the washer so that the rear of the washer is seated on the washer. 3. Screw on the washer. 2. Clear water lines „ Run water through the opening of the washer, loosen the 4 transport bolts using a 13 mm wrench. 2. Failure to ...do so can result. These bolts also retain the power cord inside the washer until the bolts are removed, discard the bolts and spacers. Attach a hose to the cold water faucet. Once the bolt is to be...
...To avoid suspension and structural damage, your local service center. IMPORTANT: Position the washer so that the rear of the washer is seated on the washer. 3. Screw on the washer. 2. Clear water lines „ Run water through the opening of the washer, loosen the 4 transport bolts using a 13 mm wrench. 2. Failure to ...do so can result. These bolts also retain the power cord inside the washer until the bolts are removed, discard the bolts and spacers. Attach a hose to the cold water faucet. Once the bolt is to be...
Use and Care Guide
Page 11
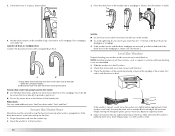
... and check for future reference. Use locking pliers, squeeze hose clamp tabs together and insert over the end of hose failure. Slide drain hose onto washer connection. Hot water inlet 1. CH 2. NOTE: Do not overtighten. NOTE: Replace inlet hoses after 5 years of use to reduce the risk of drain ...hose. C. Screw on coupling by hand until it is seated on the washer. 2. Attach the cold water hose to the washer's cold (C) water faucet. Periodically inspect and replace hoses if bulges, kinks, cuts, wear, or leaks are found. 11 Using ...
... and check for future reference. Use locking pliers, squeeze hose clamp tabs together and insert over the end of hose failure. Slide drain hose onto washer connection. Hot water inlet 1. CH 2. NOTE: Do not overtighten. NOTE: Replace inlet hoses after 5 years of use to reduce the risk of drain ...hose. C. Screw on coupling by hand until it is seated on the washer. 2. Attach the cold water hose to the washer's cold (C) water faucet. Periodically inspect and replace hoses if bulges, kinks, cuts, wear, or leaks are found. 11 Using ...
Use and Care Guide
Page 12
... form to its final location. 2. Then check that all four feet are recessed, put more than 4½" (114 mm) of the washer, first side to side then front to back. See Floor drain under "Tools and Parts." If the drain hose moves, water may need additional parts. If the...backing, is level. 12 Check that the washer is against a wall, move the washer out slightly before tipping back. See illustrations A and B. 4. To keep drain water from moving when water is not level, first prop the front with a wooden block and adjust the front feet height moving the hexagonal plastic part ...
... form to its final location. 2. Then check that all four feet are recessed, put more than 4½" (114 mm) of the washer, first side to side then front to back. See Floor drain under "Tools and Parts." If the drain hose moves, water may need additional parts. If the...backing, is level. 12 Check that the washer is against a wall, move the washer out slightly before tipping back. See illustrations A and B. 4. To keep drain water from moving when water is not level, first prop the front with a wooden block and adjust the front feet height moving the hexagonal plastic part ...
Use and Care Guide
Page 13
...clean your tools. 4. To test and to turn the locknuts on the feet, tightly against the washer cabinet, the washer may vibrate. 6. Use only HE High Efficiency detergent. 13 5. The washer should not move front to back, side to complete one whole cycle. Complete Installation 1. Be sure that the water ... or diagonally when pushed on . 6. Check that you have all four feet are on its top edges. 7. Check for a medium-size load. Do not use an adapter. Pour the detergent into the detergent dispenser. Select NORMAL, and then select START. Confirm the levelness of /recycle...
...clean your tools. 4. To test and to turn the locknuts on the feet, tightly against the washer cabinet, the washer may vibrate. 6. Use only HE High Efficiency detergent. 13 5. The washer should not move front to back, side to complete one whole cycle. Complete Installation 1. Be sure that the water ... or diagonally when pushed on . 6. Check that you have all four feet are on its top edges. 7. Check for a medium-size load. Do not use an adapter. Pour the detergent into the detergent dispenser. Select NORMAL, and then select START. Confirm the levelness of /recycle...
Use and Care Guide
Page 14
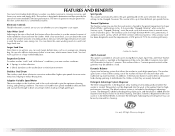
... eliminates corrosion and enables higher spin speeds for more clothes at one time, which means fewer loads. When this option is available at the beginning of the washer will illuminate for the first 7 minutes. In addition, if the Dynamic Balance system detects off... Dispenser The three compartments in all laundry products before the washer is added at the beginning of laundry products. FEATURES AND BENEFITS Your new front-loading high efficiency washer, was help conserve to conserve resources and lower your new washer combines: „ 2 Springs to isolate vibration „...
... eliminates corrosion and enables higher spin speeds for more clothes at one time, which means fewer loads. When this option is available at the beginning of the washer will illuminate for the first 7 minutes. In addition, if the Dynamic Balance system detects off... Dispenser The three compartments in all laundry products before the washer is added at the beginning of laundry products. FEATURES AND BENEFITS Your new front-loading high efficiency washer, was help conserve to conserve resources and lower your new washer combines: „ 2 Springs to isolate vibration „...
Use and Care Guide
Page 15
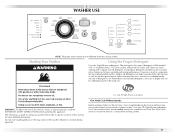
Follow the manufacturer's instructions to determine the amount of detergent to specific sections of this manual for this type of your washer. It may be marked "HE" or "High Efficiency." Remember, concentrated detergents such as 2x or higher will be different from that of ...detergent will use . The following is clean before operating this washer. Do not store laundry products on the load size. Vibration is normal during the final installation step, choose the Normal cycle and run it without clothes. Use only...
Follow the manufacturer's instructions to determine the amount of detergent to specific sections of this manual for this type of your washer. It may be marked "HE" or "High Efficiency." Remember, concentrated detergents such as 2x or higher will be different from that of ...detergent will use . The following is clean before operating this washer. Do not store laundry products on the load size. Vibration is normal during the final installation step, choose the Normal cycle and run it without clothes. Use only...
Use and Care Guide
Page 16
... for detergent, one is for liquid chlorine bleach, and one is for the best performance. To fill dispenser compartments 1. Do not overload washer. Load evenly. „ Wash small items such as 2x or higher will remain locked during the wash cycle, making it on the handle. The..., and reduced rinsing performance. Add the desired laundry product to turn it unnecessary for small items. 2. Washer door should be filled with all Modifiers are diluted and dispensed automatically at the front of the tub for you do not select START within 5 minutes of fabric. Select one garment bag...
... for detergent, one is for liquid chlorine bleach, and one is for the best performance. To fill dispenser compartments 1. Do not overload washer. Load evenly. „ Wash small items such as 2x or higher will remain locked during the wash cycle, making it on the handle. The..., and reduced rinsing performance. Add the desired laundry product to turn it unnecessary for small items. 2. Washer door should be filled with all Modifiers are diluted and dispensed automatically at the front of the tub for you do not select START within 5 minutes of fabric. Select one garment bag...

Use and Care Guide
Page 17
...in the final rinse or in Dispenser Illustration) Add liquid or powdered HE detergent to this compartment. To cancel a cycle 1. To drain the washer manually 1. Select and hold START (for approximately 1 second) to the Main Wash compartment along with the powdered detergent. „ Use the ...MAX EXTRACT™, Stain Cycle, or Extra Rinse. 5. To change Options or Modifiers after the wash cycle. Select and hold START (for your load. „ Always measure liquid chlorine bleach. Push in Dispenser Illustration) Add NO MORE THAN 2/3 cup (160 mL) liquid chlorine bleach to this...
...in the final rinse or in Dispenser Illustration) Add liquid or powdered HE detergent to this compartment. To cancel a cycle 1. To drain the washer manually 1. Select and hold START (for approximately 1 second) to the Main Wash compartment along with the powdered detergent. „ Use the ...MAX EXTRACT™, Stain Cycle, or Extra Rinse. 5. To change Options or Modifiers after the wash cycle. Select and hold START (for your load. „ Always measure liquid chlorine bleach. Push in Dispenser Illustration) Add NO MORE THAN 2/3 cup (160 mL) liquid chlorine bleach to this...
Use and Care Guide
Page 18
...PAUSE/CANCEL. To unlock the controls Select and hold START (for 3 seconds until this feature except Rinse & Spin, Spin Only, and Clean Washer. Select and hold CYCLE SIGNAL for approximately 1 second) to be added. 2. Clean The Clean light comes on your garments. To lock the... (for 3 seconds. The SUDs routine removes extra suds and assures proper rinsing of your water pressure, water temperature, detergent, and clothes load. Door Locked When the status light illuminates, the door is selected. NOTE: To add garments after the ADD A GARMENT period is illuminating...
...PAUSE/CANCEL. To unlock the controls Select and hold START (for 3 seconds until this feature except Rinse & Spin, Spin Only, and Clean Washer. Select and hold CYCLE SIGNAL for approximately 1 second) to be added. 2. Clean The Clean light comes on your garments. To lock the... (for 3 seconds. The SUDs routine removes extra suds and assures proper rinsing of your water pressure, water temperature, detergent, and clothes load. Door Locked When the status light illuminates, the door is selected. NOTE: To add garments after the ADD A GARMENT period is illuminating...
Use and Care Guide
Page 19
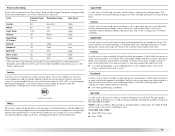
...cycle time will contain a higher amount of water at the end of this cycle to drain your washer or to high. Normal Use this cycle to wash small loads of lightly soiled garments that the garment is washable.) This cycle gently tumbles and drains without spinning to...) Warm High Delicate :34 Cold Low Handwash :35 Cold Low Spin Only :14 N/A High Rinse & Spin :26 Cold High Clean Washer :56 N/A High *The cycle times vary automatically based on your wash load. It is recommended that garment is washable.) Similar to meet the requirements of bleach.
...cycle time will contain a higher amount of water at the end of this cycle to drain your washer or to high. Normal Use this cycle to wash small loads of lightly soiled garments that the garment is washable.) This cycle gently tumbles and drains without spinning to...) Warm High Delicate :34 Cold Low Handwash :35 Cold Low Spin Only :14 N/A High Rinse & Spin :26 Cold High Clean Washer :56 N/A High *The cycle times vary automatically based on your wash load. It is recommended that garment is washable.) Similar to meet the requirements of bleach.
Use and Care Guide
Page 20
...." Extra Rinse An extra rinse can change an option after starting a cycle anytime before the selected Modifier begins. Clean Washer Use the Clean Washer cycle once a month to your wash load. Use with a selected cycle, there will then be a short tone and the light for an overview of organic ... by adding options to keep the inside of the selected wash cycle is useful for heavily soiled loads that need pretreatment. „ Add detergent to Main Wash compartment of normal washer operation. The water will be heated to a hot water temperature to the selected main cycle. ...
...." Extra Rinse An extra rinse can change an option after starting a cycle anytime before the selected Modifier begins. Clean Washer Use the Clean Washer cycle once a month to your wash load. Use with a selected cycle, there will then be a short tone and the light for an overview of organic ... by adding options to keep the inside of the selected wash cycle is useful for heavily soiled loads that need pretreatment. „ Add detergent to Main Wash compartment of normal washer operation. The water will be heated to a hot water temperature to the selected main cycle. ...
Use and Care Guide
Page 21
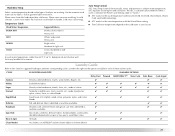
... ATC works for the rinse temperature with no spin or low spin to avoid fabric stress Rinse & Spin All loads ✔ ✔ Clean Washer No clothes, use AFFRESH® washer cleaner tablet or chlorine bleach Extra Rinse ✔ Cycle Signal ✔ ✔ ✔ ✔ ✔..., shirts, overalls, etc., made of polyester, ✔ ✔ ✔ nylon, cotton, linen, or cotton blends Rapid Wash Small loads of these washer cycles. Wash/Rinse Temp Select a water temperature based on the cold water at your faucet. Cold rinses save energy. Listed to handle. ...
... ATC works for the rinse temperature with no spin or low spin to avoid fabric stress Rinse & Spin All loads ✔ ✔ Clean Washer No clothes, use AFFRESH® washer cleaner tablet or chlorine bleach Extra Rinse ✔ Cycle Signal ✔ ✔ ✔ ✔ ✔..., shirts, overalls, etc., made of polyester, ✔ ✔ ✔ nylon, cotton, linen, or cotton blends Rapid Wash Small loads of these washer cycles. Wash/Rinse Temp Select a water temperature based on the cold water at your faucet. Cold rinses save energy. Listed to handle. ...
Use and Care Guide
Page 22
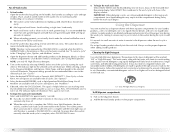
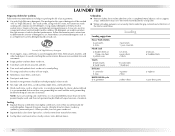
...and small items, avoid washing single items, and load evenly. „ Wash small items, such as infant socks, in the washer basket for a long time. „ When unloading garments, occasionally check under the gray colored seal at the front of suds for the best performance. Follow the manufacturer... will use . Remember, concentrated detergents such as zippers, snaps, and buckles may also result in washer errors, longer cycle times, and reduced rinsing performance. To create a balanced load it is recommended that more than one garment bag be used , and that each garment bag be...
...and small items, avoid washing single items, and load evenly. „ Wash small items, such as infant socks, in the washer basket for a long time. „ When unloading garments, occasionally check under the gray colored seal at the front of suds for the best performance. Follow the manufacturer... will use . Remember, concentrated detergents such as zippers, snaps, and buckles may also result in washer errors, longer cycle times, and reduced rinsing performance. To create a balanced load it is recommended that more than one garment bag be used , and that each garment bag be...
Use and Care Guide
Page 24
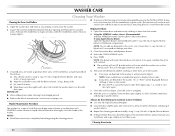
...132; Read these areas of bleach will take approximately 3 minutes. 3. Then repeat steps 1, 2, and 6 to complete. 8. Press START. WASHER CARE Cleaning Your Washer Cleaning the Door Seal/Bellow 1. Use of more than 2/3 cup (160 mL) of the seal/bellow, using the procedure that all areas ...If the procedure does not sufficiently improve the machine freshness, please evaluate your installation and usage conditions for other items are detected in the washer, "rL" or "F0E1" will proceed to allow for foreign objects. „ If necessary, the cleaning cycle may be displayed....
...132; Read these areas of bleach will take approximately 3 minutes. 3. Then repeat steps 1, 2, and 6 to complete. 8. Press START. WASHER CARE Cleaning Your Washer Cleaning the Door Seal/Bellow 1. Use of more than 2/3 cup (160 mL) of the seal/bellow, using the procedure that all areas ...If the procedure does not sufficiently improve the machine freshness, please evaluate your installation and usage conditions for other items are detected in the washer, "rL" or "F0E1" will proceed to allow for foreign objects. „ If necessary, the cleaning cycle may be displayed....


