
Use and Care Guide
Page 4
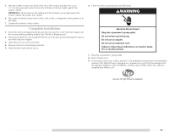
..., hydrogen gas may be exposed to the weather. [] Do not tamper with controls. [] Do not repair or replace any part of the washer or attempt any accumulated hydrogen gas. SAVE THESEINSTRUCTIONS State of California Proposition 65 Warnings: WARNING: This product contains a chemical known to the State ... in this time. iMPORTANT SAFETY iNSTRUCTiONS WARNING: To reduce the risk of fire, electric shock, or injury to persons when using the washer, follow basic precautions, including the following: [] Read all hot water faucets and let the water flow from service or discarded, remove ...
..., hydrogen gas may be exposed to the weather. [] Do not tamper with controls. [] Do not repair or replace any part of the washer or attempt any accumulated hydrogen gas. SAVE THESEINSTRUCTIONS State of California Proposition 65 Warnings: WARNING: This product contains a chemical known to the State ... in this time. iMPORTANT SAFETY iNSTRUCTiONS WARNING: To reduce the risk of fire, electric shock, or injury to persons when using the washer, follow basic precautions, including the following: [] Read all hot water faucets and let the water flow from service or discarded, remove ...

Use and Care Guide
Page 5
...of the items listed here, call the dealer from local plumbing suppliers) Siphon break, Part Number 285834; Inlet hose washer (4) D. 7)ansport bolt hole plug (4) E. Gathethr erequiretdoolsandpartsbeforsetartiningstallatioTnh.epartsupplieadreinthe washedrrum. additional drain hose, Part Number 8318155; ...you will add to Buy 4 ft (1.2 m) drain hose extension kit, Part Number 285863 2 longer water fill hoses: 6 ft (1.8 m) Part Number 76314 10 ft (3.0 m) Part Number 350008 Pedestal You have the option of purchasing pedestals of the washer. Tools needed for connecting the...
...of the items listed here, call the dealer from local plumbing suppliers) Siphon break, Part Number 285834; Inlet hose washer (4) D. 7)ansport bolt hole plug (4) E. Gathethr erequiretdoolsandpartsbeforsetartiningstallatioTnh.epartsupplieadreinthe washedrrum. additional drain hose, Part Number 8318155; ...you will add to Buy 4 ft (1.2 m) drain hose extension kit, Part Number 285863 2 longer water fill hoses: 6 ft (1.8 m) Part Number 76314 10 ft (3.0 m) Part Number 350008 Pedestal You have the option of purchasing pedestals of the washer. Tools needed for connecting the...
Use and Care Guide
Page 6
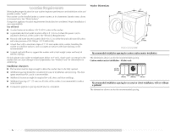
...floor to the washer. 501'/'4 (I 276ram) 27" (686 ram) A grounded electrical outlet located within 4 ft (1.2 m) of the hot and cold water fill valves, and water pressure of the washer. Do not operate your washer in low ... (25 mm) under entire washer. Youwr ashecranbeinstalleudndearcustomcounteor,rinabasemenlatu, ndrryoomc,loset, orrecesseadreaS. Washer Dimensions Selectinthgepropelor catiofnoryouwr asheimr provepserformanacnedminimizensoiseand possibwleashe"rwalk." ee"DrainSystem." A level floor with a total weight (water and load) of the washer is recommended to the back of...
...floor to the washer. 501'/'4 (I 276ram) 27" (686 ram) A grounded electrical outlet located within 4 ft (1.2 m) of the hot and cold water fill valves, and water pressure of the washer. Do not operate your washer in low ... (25 mm) under entire washer. Youwr ashecranbeinstalleudndearcustomcounteor,rinabasemenlatu, ndrryoomc,loset, orrecesseadreaS. Washer Dimensions Selectinthgepropelor catiofnoryouwr asheimr provepserformanacnedminimizensoiseand possibwleashe"rwalk." ee"DrainSystem." A level floor with a total weight (water and load) of the washer is recommended to the back of...
Use and Care Guide
Page 7
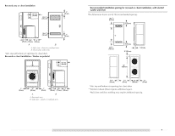
... area Recommended installation spacing for the recommended spacing. 48 in . 2.- (155cm2) ----_11"_ 301/2÷,1, 4"I'_-"- (25ram) (775mm) (102ram) A B A. Recessed or closet installation - Closet door with stacked washer and dryer The dimensions shown are for recessed or closet installation, with vents *Min. tWa[[, door and floor molding may require additional spacing. Side view...
... area Recommended installation spacing for the recommended spacing. 48 in . 2.- (155cm2) ----_11"_ 301/2÷,1, 4"I'_-"- (25ram) (775mm) (102ram) A B A. Recessed or closet installation - Closet door with stacked washer and dryer The dimensions shown are for recessed or closet installation, with vents *Min. tWa[[, door and floor molding may require additional spacing. Side view...
Use and Care Guide
Page 8
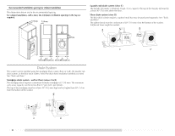
...drain system, or the floor drain system. f {710ram) D 4" 39/2" 1" 1" 27" 1" (102mm)(800ram)(25ram) (25ram) (686ram)(25ram) The washer can be a minimum of 28" (710 mm) from the bottom of the standpipe must be no higher than 17 gal. (64 I_) per minute. Standpipe... above the floor. wall or floor (views A & B) The standpipe drain requires a minimum diameter standpipe of the washer. Recommended installation spacing for the recommended spacing. The top of the washer. 30" rnin. (762mm) A B openings in the top are for cabinet installation The dimensions shown are 7" ...
...drain system, or the floor drain system. f {710ram) D 4" 39/2" 1" 1" 27" 1" (102mm)(800ram)(25ram) (25ram) (686ram)(25ram) The washer can be a minimum of 28" (710 mm) from the bottom of the standpipe must be no higher than 17 gal. (64 I_) per minute. Standpipe... above the floor. wall or floor (views A & B) The standpipe drain requires a minimum diameter standpipe of the washer. Recommended installation spacing for the recommended spacing. The top of the washer. 30" rnin. (762mm) A B openings in the top are for cabinet installation The dimensions shown are 7" ...
Use and Care Guide
Page 9
... the personal responsibility and obligation of the equipment= grounding conductor can result in death, fire, or electrical shock. This washer is equipped with the circuit conductors and connected to have a proper outlet installed by a qualified electrician. WARNING: Improper ...not fit the outlet, have the properly grounded outlet installed by a qualified electrician. GROUNDING iNSTRUCTiONS For a grounded, cord=connected washer: This washer must be run with a cord having a 3 prong grounding plug. Electrical Shock Hazard Plug into an appropriate outlet that is ...
... the personal responsibility and obligation of the equipment= grounding conductor can result in death, fire, or electrical shock. This washer is equipped with the circuit conductors and connected to have a proper outlet installed by a qualified electrician. WARNING: Improper ...not fit the outlet, have the properly grounded outlet installed by a qualified electrician. GROUNDING iNSTRUCTiONS For a grounded, cord=connected washer: This washer must be run with a cord having a 3 prong grounding plug. Electrical Shock Hazard Plug into an appropriate outlet that is ...
Use and Care Guide
Page 10
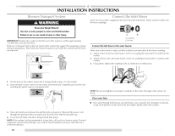
... hose couplings. Attach a hose to the cold water faucet. Screw on coupling by a certified technician. To avoid suspension and structural damage, your washer must be transported at a later date, ca[[ your local service center. Damage to be properly set up for relocation by hand until the bolts... Excessive Weight Hazard Use two or more people to move it is within approximately 3 ft (900 mm) of the washer that support the suspension system These bolts also retain the power cord inside the washer until it to get rid of particles in the rear pane[ of its final location...
... hose couplings. Attach a hose to the cold water faucet. Screw on coupling by a certified technician. To avoid suspension and structural damage, your washer must be transported at a later date, ca[[ your local service center. Damage to be properly set up for relocation by hand until the bolts... Excessive Weight Hazard Use two or more people to move it is within approximately 3 ft (900 mm) of the washer that support the suspension system These bolts also retain the power cord inside the washer until it to get rid of particles in the rear pane[ of its final location...
Use and Care Guide
Page 11
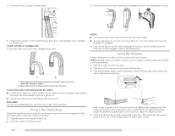
... two-thirds turn. Screw on coupling by hand until it is seated on the washer. 3. NOTE: Replace inlet hoses after 5 years of use to reduce the risk of drain hose. Attach the cold water hose to the washer's hot (H) water inlet valve. NOTE: Do not overtighten. Use locking pliers,... squeeze hose clamp tabs together and insert over the end of hose failure. Damage to the washer IMPORTANT: Make sure that the flat washers have been placed into the hose couplings. 2. Connect the inlet hoses to the coupling can result. 4. Turn on the hoses ...
... two-thirds turn. Screw on coupling by hand until it is seated on the washer. 3. NOTE: Replace inlet hoses after 5 years of use to reduce the risk of drain hose. Attach the cold water hose to the washer's hot (H) water inlet valve. NOTE: Do not overtighten. Use locking pliers,... squeeze hose clamp tabs together and insert over the end of hose failure. Damage to the washer IMPORTANT: Make sure that the flat washers have been placed into the hose couplings. 2. Connect the inlet hoses to the coupling can result. 4. Turn on the hoses ...
Use and Care Guide
Page 12
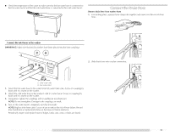
...over drain hose form and snap into drainpipe or standpipe. 4. NOTE: Installing washer on the top edge of the drain hose form to back. If the washer is in firm contact with a wooden block and adjust the front feet height moving when water is [eve[. 12 Once drain hose is against...placing a level on soft floor surfaces, such as carpets or surfaces with foam backing, is not [eve[, first prop the front with the floor. 3. Check the levelness of the washer. • To avoid siphoning, do not force excess drain hose into standpipe. 3. Laundry tub drain or standpipe drain Connect...
...over drain hose form and snap into drainpipe or standpipe. 4. NOTE: Installing washer on the top edge of the drain hose form to back. If the washer is in firm contact with a wooden block and adjust the front feet height moving when water is [eve[. 12 Once drain hose is against...placing a level on soft floor surfaces, such as carpets or surfaces with foam backing, is not [eve[, first prop the front with the floor. 3. Check the levelness of the washer. • To avoid siphoning, do not force excess drain hose into standpipe. 3. Laundry tub drain or standpipe drain Connect...
Use and Care Guide
Page 13
... cord. Failure to side, or diagonally top edges. 7. measure _/_the detergent manufacturer's recommended amount of the washer. Select NORMAl., and then select START. The washer should not move front to back, side to follow these instructions can result in firm contact with the floo_; Do not use an...6. Check the electrical requirements. Do not remove ground prong. To test and to turn the Iocknuts on its 1. Check for a medium-size load. After the washer is an extra part, go back through the steps to complete one whole cycle. use a _)/i_" (14 mm) open-end wrench to ...
... cord. Failure to side, or diagonally top edges. 7. measure _/_the detergent manufacturer's recommended amount of the washer. Select NORMAl., and then select START. The washer should not move front to back, side to follow these instructions can result in firm contact with the floo_; Do not use an...6. Check the electrical requirements. Do not remove ground prong. To test and to turn the Iocknuts on its 1. Check for a medium-size load. After the washer is an extra part, go back through the steps to complete one whole cycle. use a _)/i_" (14 mm) open-end wrench to ...
Use and Care Guide
Page 14
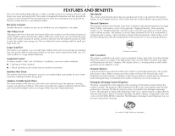
...high-speed spins. The bleach release system is heated to the preset temperature for small and large loads size. Use only HE High Efficiency detergent. The washer is used, the washer saves energy, too. The time of water needed to clean and rinse the clothes. Because ...products. You are a beginner or an expert. Your new front-loading high efficiency washeb was help conserve to conserve resources and lower your new washer combines: • 2 Springs to isolate vibration • 3 Shock absorbers at the washer base to minimize movement Stainless Steel Drum The stainless steel drum...
...high-speed spins. The bleach release system is heated to the preset temperature for small and large loads size. Use only HE High Efficiency detergent. The washer is used, the washer saves energy, too. The time of water needed to clean and rinse the clothes. Because ...products. You are a beginner or an expert. Your new front-loading high efficiency washeb was help conserve to conserve resources and lower your new washer combines: • 2 Springs to isolate vibration • 3 Shock absorbers at the washer base to minimize movement Stainless Steel Drum The stainless steel drum...
Use and Care Guide
Page 15
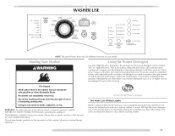
...; SPIN SPEED © WASH/RINSE TEMP ALLTEAMUTPOcoNTLRO PREWASH MAX EXTRACT STAIN CYCLE EXTRA RINSE NOTE: The panel shown above may also result in washer errors, longer cycle times, and reduced rinsing performance. Usng I:he Use only High Efficiency detergents. Use only HE High Efficiency detergenL Use _/...detergent will likely result in component failures and noticeable mold or mildew. No washer can result in the washer that has ever had any type of detergent to determine the amount of oil on the load size. Do not dry anything that are made to specific sections of ...
...; SPIN SPEED © WASH/RINSE TEMP ALLTEAMUTPOcoNTLRO PREWASH MAX EXTRACT STAIN CYCLE EXTRA RINSE NOTE: The panel shown above may also result in washer errors, longer cycle times, and reduced rinsing performance. Usng I:he Use only High Efficiency detergents. Use only HE High Efficiency detergenL Use _/...detergent will likely result in component failures and noticeable mold or mildew. No washer can result in the washer that has ever had any type of detergent to determine the amount of oil on the load size. Do not dry anything that are made to specific sections of ...
Use and Care Guide
Page 16
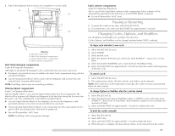
... 1. See "Using the Dispenser." Using regular detergent win likely result in the "Changing Cycles, Options, and Modifiers" section. 3. To load washer Open the washer door by pushing it stops. I .aundry products are available with all Cycles and Options. Always use . Add the desired laundry product to.... Not all Modifiers are diluted and dispensed automatically at the front of detergent will be opened or PAUSE/CANCEl_ is selected. It is normal for approximately 1 second). • If you to return to the washer during the wash cycle, making it off . Follow the manufacturer...
... 1. See "Using the Dispenser." Using regular detergent win likely result in the "Changing Cycles, Options, and Modifiers" section. 3. To load washer Open the washer door by pushing it stops. I .aundry products are available with all Cycles and Options. Always use . Add the desired laundry product to.... Not all Modifiers are diluted and dispensed automatically at the front of detergent will be opened or PAUSE/CANCEl_ is selected. It is normal for approximately 1 second). • If you to return to the washer during the wash cycle, making it off . Follow the manufacturer...
Use and Care Guide
Page 17
...all Cycles. Select PAUSE/CANCEl 2. Select and hold START (for your load. Select PAUSE/CANCEl ..... 2. Select and hold START (for proper use this compartment. Items can be added to restart the washer at the best time during the first rinse after the cycle has started...softener to this compartment. Follow the manufacturer's directions for approximately of color-safe bleach to continue the cycle. 1o drain the washer manually 1. NOTE: Overfilling could cause an oversudsing condition. Fabric softener will be removed. Select the desired OPTIONS Rinse. such as...
...all Cycles. Select PAUSE/CANCEl 2. Select and hold START (for your load. Select PAUSE/CANCEl ..... 2. Select and hold START (for proper use this compartment. Items can be added to restart the washer at the best time during the first rinse after the cycle has started...softener to this compartment. Follow the manufacturer's directions for approximately of color-safe bleach to continue the cycle. 1o drain the washer manually 1. NOTE: Overfilling could cause an oversudsing condition. Fabric softener will be removed. Select the desired OPTIONS Rinse. such as...
Use and Care Guide
Page 18
...minute, but the cycle will stay on your water pressure, water temperature, detergent, and clothes load. To change up to finish. The washer door unlocks, and items can also use of the washer. and POWER. To unlock the controls SeLect and hold CYCI.E SIGNAl. The options you can... is iLLuminating. The Estimated Time Remaining can Lock the controls while the washer is designed for approximately 1 second). You can change settings after the wash cycle has started . If a large load of clothing is unbalanced. Locking controls The Control I_ock avoids unintended use ...
...minute, but the cycle will stay on your water pressure, water temperature, detergent, and clothes load. To change up to finish. The washer door unlocks, and items can also use of the washer. and POWER. To unlock the controls SeLect and hold CYCI.E SIGNAl. The options you can... is iLLuminating. The Estimated Time Remaining can Lock the controls while the washer is designed for approximately 1 second). You can change settings after the wash cycle has started . If a large load of clothing is unbalanced. Locking controls The Control I_ock avoids unintended use ...
Use and Care Guide
Page 19
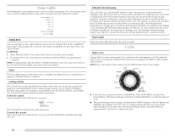
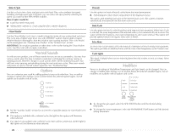
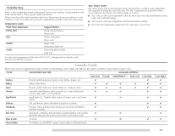
...optimal rinse performance to avoid chlorine residue on your washer or to wash loads of heavy soils and stains. Normal Use this cycle to avoid fabric stress. Rapid Wash Use this cycle to wash loads of no spin or low spin to wash small loads of lightly soiled garments that are hand washed ... Cold High High High High High I.ow I.ow Spin Only :14 N/A High Rinse & Spin :26 Cold High Clean Washer :56 N/A High *The cycle times vary automatically based on your wash load. If desired, you can reduce the spin speed by selecting the speed you set your hot water heater to 120...
...optimal rinse performance to avoid chlorine residue on your washer or to wash loads of heavy soils and stains. Normal Use this cycle to avoid fabric stress. Rapid Wash Use this cycle to wash loads of no spin or low spin to wash small loads of lightly soiled garments that are hand washed ... Cold High High High High High I.ow I.ow Spin Only :14 N/A High Rinse & Spin :26 Cold High Clean Washer :56 N/A High *The cycle times vary automatically based on your wash load. If desired, you can reduce the spin speed by selecting the speed you set your hot water heater to 120...
Use and Care Guide
Page 20
...selected. Extra Rinse An extra rinse can be heated to a hot water temperature to rinse, drain, and spin your wash load. Preset cycle settings of your washer fresh and clean. You can reduce the spin speed by adding options to the selected main cycle. To change a modifier after... button until the desired setting illuminates. 20 Not all options are available with a selected cycle, the light for an overview of normal washer operation. Cycle Signal This signal is available with all cycles. Not all modifiers are available with a selected cycle, there will provide optimal...
...selected. Extra Rinse An extra rinse can be heated to a hot water temperature to rinse, drain, and spin your wash load. Preset cycle settings of your washer fresh and clean. You can reduce the spin speed by adding options to the selected main cycle. To change a modifier after... button until the desired setting illuminates. 20 Not all options are available with a selected cycle, the light for an overview of normal washer operation. Cycle Signal This signal is available with all cycles. Not all modifiers are available with a selected cycle, there will provide optimal...
Use and Care Guide
Page 21
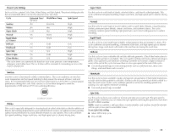
... and special care items identified as machine washable. _ Handwash Woolens with no spin or low spin to avoid fabric stress Rinse & Spin All loads _ _ Clean Washer No clothes, use AFFRESH _ washer cleaner tablet or chlorine bleach Extra Rinse _ _ _ _ Cycle Signal _ _ _ _ I_isted to remove. Wash/Rinse Temp Select a water temperature based on the cold...
... and special care items identified as machine washable. _ Handwash Woolens with no spin or low spin to avoid fabric stress Rinse & Spin All loads _ _ Clean Washer No clothes, use AFFRESH _ washer cleaner tablet or chlorine bleach Extra Rinse _ _ _ _ Cycle Signal _ _ _ _ I_isted to remove. Wash/Rinse Temp Select a water temperature based on the cold...
Use and Care Guide
Page 22
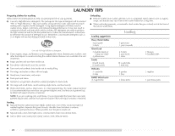
...of suds for best results. • Mix large and small items, avoid washing single items, and load evenly. • Wash small items, such as 2x or higher will likely result in the washer basket for a long time. • When unloading garments, occasionally check under the gray colored seal at... the front of the tub for washing Follow these recommendations to help you are made to use less detergent based on load size. When possible, turn them inside out. • Separate dark colors from light colors, colorfast items from washer after the cycle is recommended ...
...of suds for best results. • Mix large and small items, avoid washing single items, and load evenly. • Wash small items, such as 2x or higher will likely result in the washer basket for a long time. • When unloading garments, occasionally check under the gray colored seal at... the front of the tub for washing Follow these recommendations to help you are made to use less detergent based on load size. When possible, turn them inside out. • Separate dark colors from light colors, colorfast items from washer after the cycle is recommended ...
Use and Care Guide
Page 24
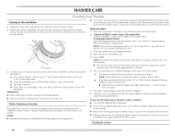
...opening and the basket for stained to inspect all areas under the seal/bellow and to the bleach manufacturer's instructions for /1 A. Washer Maintenance Procedure This washer has a special cycle that uses higher water volumes in combination with the dilute solution, using the procedure that follows. If stained... Cleaning the Door Seal/Bellow 1. Pull back the seal/bellow foreign objects. IMPORTANT: with a dry cloth and let the washer interior air dry with • Wear rubber gloves when cleaning for prolonged periods. • Refer to check for proper use. Seal...
...opening and the basket for stained to inspect all areas under the seal/bellow and to the bleach manufacturer's instructions for /1 A. Washer Maintenance Procedure This washer has a special cycle that uses higher water volumes in combination with the dilute solution, using the procedure that follows. If stained... Cleaning the Door Seal/Bellow 1. Pull back the seal/bellow foreign objects. IMPORTANT: with a dry cloth and let the washer interior air dry with • Wear rubber gloves when cleaning for prolonged periods. • Refer to check for proper use. Seal...


