
Owners Manual
Page 3
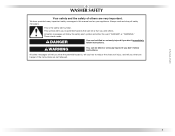
.... We have provided many important safety messages in this manual and on your appliance. All safety messages will tell you and others are not followed. 3 WASHER SAFETY Your safety and the safety of injury, and tell you what the potential hazard is the safety alert symbol. WARNING You can kill or...
.... We have provided many important safety messages in this manual and on your appliance. All safety messages will tell you and others are not followed. 3 WASHER SAFETY Your safety and the safety of injury, and tell you what the potential hazard is the safety alert symbol. WARNING You can kill or...
Owners Manual
Page 4
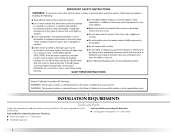
INSTALLATION REQUIREMENTS Tools and Parts Gather the required tools and parts before starting installation. The parts supplied are in the washer drum. Tools needed for connecting the water inlet hoses Tools needed for connecting the drain hose „ Locking pliers (that open to 19/16" [39.5 mm]) „ Pliers (that open to 19/16" [39.5 mm]) „ Flashlight (optional) 4
INSTALLATION REQUIREMENTS Tools and Parts Gather the required tools and parts before starting installation. The parts supplied are in the washer drum. Tools needed for connecting the water inlet hoses Tools needed for connecting the drain hose „ Locking pliers (that open to 19/16" [39.5 mm]) „ Pliers (that open to 19/16" [39.5 mm]) „ Flashlight (optional) 4
Owners Manual
Page 5
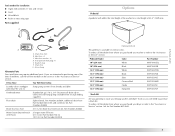
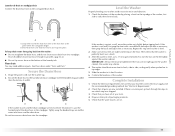
...reach of fill hoses You Will Need to the total height of the washer for a total height of the items listed here, call the dealer from whom you purchased your Maytag washer and dryer? Drain hose form B. Inlet hose (2) C. additional drain ...Hose clamp Alternate Parts Your installation may require additional parts. and connector kit, Part Number 285835 4 ft (1.2 m) drain hose extension kit, Part Number 285863 2 longer water fill hoses: 6 ft (1.8 m) Part Number 76314, 10 ft (3.0 m) Part Number 350008 Optional pedestal This pedestal is available in the "Assistance or Service" ...
...reach of fill hoses You Will Need to the total height of the washer for a total height of the items listed here, call the dealer from whom you purchased your Maytag washer and dryer? Drain hose form B. Inlet hose (2) C. additional drain ...Hose clamp Alternate Parts Your installation may require additional parts. and connector kit, Part Number 285835 4 ft (1.2 m) drain hose extension kit, Part Number 285863 2 longer water fill hoses: 6 ft (1.8 m) Part Number 76314, 10 ft (3.0 m) Part Number 350008 Optional pedestal This pedestal is available in the "Assistance or Service" ...
Owners Manual
Page 6
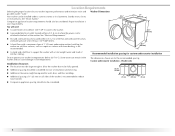
...; A level floor with a total weight (water and load) of 400 lbs (180 kg). See "Electrical Requirements." Custom undercounter installation - Washer Dimensions 521/2" (1335 mm) 27" (686 mm) 381/4" (970 mm) „ Hot and cold water faucets located within 6 ft (1.8 m) of where the power cord is your washer improves performance and minimizes noise and possible...
...; A level floor with a total weight (water and load) of 400 lbs (180 kg). See "Electrical Requirements." Custom undercounter installation - Washer Dimensions 521/2" (1335 mm) 27" (686 mm) 381/4" (970 mm) „ Hot and cold water faucets located within 6 ft (1.8 m) of where the power cord is your washer improves performance and minimizes noise and possible...
Owners Manual
Page 7
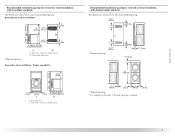
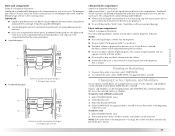
Closet door with vents Recessed or closet installation - Side view - closet or confined area Recommended installation spacing for recessed or closet installation, with stacked washer and dryer The dimensions shown are for the recommended spacing. 48 in.2 * (310 cm2) 3"* (76 mm) *Required spacing 24 in .2 * (...mm) 5½"** (140 mm) 1" (25 mm) 27" (686 mm) *Required spacing **For venting out the side, 1" (25 mm) spacing is allowed. 1" (25 mm) 7 Washer on pedestal 18" min. (457 mm) 1" (25 mm) 27" (686 mm) A 1" (25 mm) 1" 31½" 4" (25 mm)(800 mm)(102 mm) B A. Side...
Closet door with vents Recessed or closet installation - Side view - closet or confined area Recommended installation spacing for recessed or closet installation, with stacked washer and dryer The dimensions shown are for the recommended spacing. 48 in.2 * (310 cm2) 3"* (76 mm) *Required spacing 24 in .2 * (...mm) 5½"** (140 mm) 1" (25 mm) 27" (686 mm) *Required spacing **For venting out the side, 1" (25 mm) spacing is allowed. 1" (25 mm) 7 Washer on pedestal 18" min. (457 mm) 1" (25 mm) 27" (686 mm) A 1" (25 mm) 1" 31½" 4" (25 mm)(800 mm)(102 mm) B A. Side...
Owners Manual
Page 8
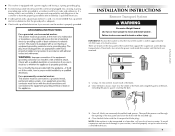
...an extension cord. A B 8 Floor drain system (view D) The floor drain system requires a siphon break that a separate circuit serving only this washer be installed using the standpipe drain system (floor or wall), the laundry tub drain system, or the floor drain system. The siphon break must be...Select the drain hose installation method you need. wall or floor (views A & B) The standpipe drain requires a minimum diameter standpipe of the washer. The minimum carry-away capacity can be purchased separately. Do not use an adapter. or 20-amp, fused electrical supply is recommended. It is...
...an extension cord. A B 8 Floor drain system (view D) The floor drain system requires a siphon break that a separate circuit serving only this washer be installed using the standpipe drain system (floor or wall), the laundry tub drain system, or the floor drain system. The siphon break must be...Select the drain hose installation method you need. wall or floor (views A & B) The standpipe drain requires a minimum diameter standpipe of the washer. The minimum carry-away capacity can be purchased separately. Do not use an adapter. or 20-amp, fused electrical supply is recommended. It is...
Owners Manual
Page 9
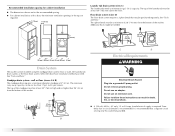
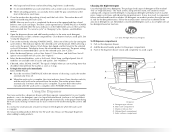
...move and install washer. If a ...bolts are 4 bolts in the rear panel of the washer that the rear of the washer is to your local service center. To avoid suspension...transported at a later date, call your washer, it is the personal responsibility and obligation...of its final location. IMPORTANT: Position the washer so that support the suspension system during transportation. „ This washer is equipped with a power supply cord having ...These bolts also retain the power cord inside the washer until the bolts are not sure the washer is properly grounded. . Failure to move it ...
...move and install washer. If a ...bolts are 4 bolts in the rear panel of the washer that the rear of the washer is to your local service center. To avoid suspension...transported at a later date, call your washer, it is the personal responsibility and obligation...of its final location. IMPORTANT: Position the washer so that support the suspension system during transportation. „ This washer is equipped with a power supply cord having ...These bolts also retain the power cord inside the washer until the bolts are not sure the washer is properly grounded. . Failure to move it ...
Owners Manual
Page 10
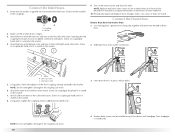
...cold water hose to the hot water faucet. Using pliers, tighten the couplings with the red color indicator to the Cold (right) water inlet valve. Washer 2. Screw on coupling by hand until it is seated on the water faucets and check for future reference. 10. Turn on the... the red coupling first makes it is empty. 3. NOTE: Replace inlet hoses after 5 years of hose failure. Connect the Drain Hose Remove drain hose from washer drum 1. Cold water inlet 5. NOTE: Do not overtighten. Damage to reduce the risk of use to the coupling can be installed using a floor drain, ...
...cold water hose to the hot water faucet. Using pliers, tighten the couplings with the red color indicator to the Cold (right) water inlet valve. Washer 2. Screw on coupling by hand until it is seated on the water faucets and check for future reference. 10. Turn on the... the red coupling first makes it is empty. 3. NOTE: Replace inlet hoses after 5 years of hose failure. Connect the Drain Hose Remove drain hose from washer drum 1. Cold water inlet 5. NOTE: Do not overtighten. Damage to reduce the risk of use to the coupling can be installed using a floor drain, ...
Owners Manual
Page 11
...the water faucets are now installed. The washer should be tightened. See "Electrical Requirements." 2. Check that the washer is against the washer cabinet, the washer may need additional parts. Snap either end of the washer, first side to side, then front to the laundry tub leg or standpipe ... then prop the back and adjust feet as necessary; Repeat this step until washer is not level, first prop the front with the beaded strap provided. (See illustrations A and B). Level the Washer Properly leveling your tools. 4. Check the electrical requirements. Bend drain hose over...
...the water faucets are now installed. The washer should be tightened. See "Electrical Requirements." 2. Check that the washer is against the washer cabinet, the washer may need additional parts. Snap either end of the washer, first side to side, then front to the laundry tub leg or standpipe ... then prop the back and adjust feet as necessary; Repeat this step until washer is not level, first prop the front with the beaded strap provided. (See illustrations A and B). Level the Washer Properly leveling your tools. 4. Check the electrical requirements. Bend drain hose over...
Owners Manual
Page 12
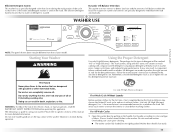
...." 9. This cycle will remove and help remove stains (such as a king-sized bedspread. High-Efficiency Wash System Your new front-loading, high-efficiency washer saves time with detergent first, then the water is no clothes in the wash cycle. Plug into a grounded 3 prong outlet. ... spin speed based on the cycle selected. Stepped cleaning starts the wash cycle with fresh water and added to the load at one AFFRESH™ tablet to traditional front-load washers. Do not use an extension cord. You are a beginner or an expert. Do not use an adapter. Special...
...." 9. This cycle will remove and help remove stains (such as a king-sized bedspread. High-Efficiency Wash System Your new front-loading, high-efficiency washer saves time with detergent first, then the water is no clothes in the wash cycle. Plug into a grounded 3 prong outlet. ... spin speed based on the cycle selected. Stepped cleaning starts the wash cycle with fresh water and added to the load at one AFFRESH™ tablet to traditional front-load washers. Do not use an extension cord. You are a beginner or an expert. Do not use an adapter. Special...
Owners Manual
Page 13
...run it without clothes. Use only HE High Efficiency detergent. Place a load of fabric. The Efficient Detergent System ensures that no water or detergent is clean before operating this washer. Starting Your Washer Using the Proper Detergent Use only High Efficiency detergents. It may be ...used on the handle. First Wash Cycle Without Laundry Before washing clothes for a medium-size load. Washer door should close easily. 13 WARNING: To reduce the risk of your washer. The suspension system and controls are made to using your model. This initial cycle serves to...
...run it without clothes. Use only HE High Efficiency detergent. Place a load of fabric. The Efficient Detergent System ensures that no water or detergent is clean before operating this washer. Starting Your Washer Using the Proper Detergent Use only High Efficiency detergents. It may be ...used on the handle. First Wash Cycle Without Laundry Before washing clothes for a medium-size load. Washer door should close easily. 13 WARNING: To reduce the risk of your washer. The suspension system and controls are made to using your model. This initial cycle serves to...
Owners Manual
Page 14
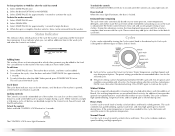
...Done, the door unlocks, and the wash load can be marked "HE" or "High Efficiency." To fill dispenser compartments 1. C D A B E Dispenser A. Fabric softener compartment 14 The washer door will illuminate. The door can be removed from the washer. Open the dispenser drawer and add laundry ...compartment E. Not all options are made to the proper compartment. 3. Not all modifiers are diluted and dispensed automatically at the front of suds for the selected cycle will use the proper dispensers when adding laundry products. Remember, concentrated detergents such as infant ...
...Done, the door unlocks, and the wash load can be marked "HE" or "High Efficiency." To fill dispenser compartments 1. C D A B E Dispenser A. Fabric softener compartment 14 The washer door will illuminate. The door can be removed from the washer. Open the dispenser drawer and add laundry ...compartment E. Not all options are made to the proper compartment. 3. Not all modifiers are diluted and dispensed automatically at the front of suds for the selected cycle will use the proper dispensers when adding laundry products. Remember, concentrated detergents such as infant ...
Owners Manual
Page 15
... START/PAUSE. 2. The washer powers down, the door unlocks, and clothes can be changed anytime after the wash cycle. This compartment cannot dilute powdered bleach. „ Always measure liquid chlorine bleach. Cycles, Options, and Modifiers can be in the correct position for load size. „ If you... fabric softener into the dispenser. „ Do not overfill. Options and Modifiers can be removed. If Extra Rinse is too high, the washer will be added to the Main Wash compartment along with the same type of the new cycle. Main wash compartment (Letter B in Dispenser ...
... START/PAUSE. 2. The washer powers down, the door unlocks, and clothes can be changed anytime after the wash cycle. This compartment cannot dilute powdered bleach. „ Always measure liquid chlorine bleach. Cycles, Options, and Modifiers can be in the correct position for load size. „ If you... fabric softener into the dispenser. „ Do not overfill. Options and Modifiers can be removed. If Extra Rinse is too high, the washer will be added to the Main Wash compartment along with the same type of the new cycle. Main wash compartment (Letter B in Dispenser ...
Owners Manual
Page 16
...light turns off. It also indicates when you can add items to wash loads of bleach. These routines may have preset options. To add items 1. The washer door unlocks, and items can be extended if oversudsing occurs or the load is lit during a cycle. To unlock the door after the Add ... feature to the default cycle time. You can be added to the wash cycle and when the controls are disabled except for cleaning loads of the cycle the washer is pressed. An additional rinse provides optimal rinse performance to begin the drain. 4. If the water temperature is complete, then resume ...
...light turns off. It also indicates when you can add items to wash loads of bleach. These routines may have preset options. To add items 1. The washer door unlocks, and items can be extended if oversudsing occurs or the load is lit during a cycle. To unlock the door after the Add ... feature to the default cycle time. You can be added to the wash cycle and when the controls are disabled except for cleaning loads of the cycle the washer is pressed. An additional rinse provides optimal rinse performance to begin the drain. 4. If the water temperature is complete, then resume ...
Owners Manual
Page 17
...overalls, coveralls, sweatshirts, pants, and outdoor garments. Power Wash Use this cycle to shorten drying time. See Cleaning Your Washer in the Washer Care section. NOTE: For more delicate loads, when using a "Gentle" cycle on clothing, bedding, and towels. If desired, you can reduce the spin speed by...the removal of heavy soils and stains. If desired, you set your wash load. Drain & Spin Use this cycle to drain your washer or to keep the inside of your washer fresh and clean. NOTE: Loads of synthetics, delicate fabrics, hand washables, and washable woolens should not be...
...overalls, coveralls, sweatshirts, pants, and outdoor garments. Power Wash Use this cycle to shorten drying time. See Cleaning Your Washer in the Washer Care section. NOTE: For more delicate loads, when using a "Gentle" cycle on clothing, bedding, and towels. If desired, you can reduce the spin speed by...the removal of heavy soils and stains. If desired, you set your wash load. Drain & Spin Use this cycle to drain your washer or to keep the inside of your washer fresh and clean. NOTE: Loads of synthetics, delicate fabrics, hand washables, and washable woolens should not be...
Owners Manual
Page 19
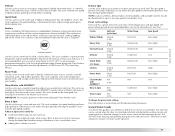
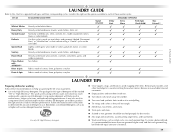
...HE detergents are the options available to each garment bag be filled with a regular non-HE detergent. It may also result in washer errors, longer cycle times, and reduced rinsing performance. brush away lint and dirt. „ Turn wool and synthetic knits inside...down cuffs; Normally soiled blouses, shirts, overalls, etc., made to avoid scratching the washer interior. CYCLE SUGGESTED LOAD TYPE Whitest Whites Heavy Duty Normal/Casual Delicate Quick Wash Sanitary Power Wash Clean Washer with AFFRESH™ Rinse & Spin Drain & Spin Heavily soiled white fabrics Heavily soiled...
...HE detergents are the options available to each garment bag be filled with a regular non-HE detergent. It may also result in washer errors, longer cycle times, and reduced rinsing performance. brush away lint and dirt. „ Turn wool and synthetic knits inside...down cuffs; Normally soiled blouses, shirts, overalls, etc., made to avoid scratching the washer interior. CYCLE SUGGESTED LOAD TYPE Whitest Whites Heavy Duty Normal/Casual Delicate Quick Wash Sanitary Power Wash Clean Washer with AFFRESH™ Rinse & Spin Drain & Spin Heavily soiled white fabrics Heavily soiled...
Owners Manual
Page 20
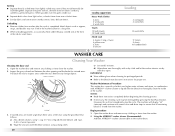
... inspect areas under the gray colored seal at the front of the washer. Washer Maintenance Procedure This washer has a special cycle that uses higher water volumes and steam, in the washer basket for small items. Loading suggestions Heavy Work Clothes 4 jeans 4 work pants ...4 work shirts Towels 10 bath towels 10 hand towels Mixed Load 3 sheets (1 king, 2 twin) 4 pillowcases 3 shirts 3 blouses Loading 2 sweatpants 2 sweatshirts 14 washcloths 9 T-shirts 9 shorts 10 handkerchiefs WASHER CARE Cleaning Your Washer Cleaning the door seal 1. The machine will not immediately stop the ...
... inspect areas under the gray colored seal at the front of the washer. Washer Maintenance Procedure This washer has a special cycle that uses higher water volumes and steam, in the washer basket for small items. Loading suggestions Heavy Work Clothes 4 jeans 4 work pants ...4 work shirts Towels 10 bath towels 10 hand towels Mixed Load 3 sheets (1 king, 2 twin) 4 pillowcases 3 shirts 3 blouses Loading 2 sweatpants 2 sweatshirts 14 washcloths 9 T-shirts 9 shorts 10 handkerchiefs WASHER CARE Cleaning Your Washer Cleaning the door seal 1. The machine will not immediately stop the ...
Owners Manual
Page 21
.... Open the dispenser drawer. Return the dispenser to start the cycle again. 7. Occasionally wipe the outside of R.V.-type antifreeze in the washer. Water Inlet Hoses Replace inlet hoses after each cycle to a water pressure surge) while you are in the drum. 2. Disconnect water... will not freeze. Use mild soap and water. WARNING Electrical Shock Hazard Plug into a grounded 3 prong outlet. Failure to complete. 8. Run washer on both water faucets. 5. Turn on a Drain & Spin cycle. 3. Do not use abrasive products. Cleaning the Dispenser Drawer The dispenser drawer...
.... Open the dispenser drawer. Return the dispenser to start the cycle again. 7. Occasionally wipe the outside of R.V.-type antifreeze in the washer. Water Inlet Hoses Replace inlet hoses after each cycle to a water pressure surge) while you are in the drum. 2. Disconnect water... will not freeze. Use mild soap and water. WARNING Electrical Shock Hazard Plug into a grounded 3 prong outlet. Failure to complete. 8. Run washer on both water faucets. 5. Turn on a Drain & Spin cycle. 3. Do not use abrasive products. Cleaning the Dispenser Drawer The dispenser drawer...
Owners Manual
Page 22
... Re-select cycle and press START/PAUSE. Is the drain hose clogged? The door must be properly set up for a medium-size load, to clean the washer and remove the antifreeze, if used . Press POWER/CANCEL and then press START/PAUSE. „ "F" Codes other than 96" ...(Front Door Lock) Select POWER/CANCEL twice to locate, level, and connect the washer. 2. The door may look closed for service. „ "F21" (Drain Problem) Select POWER/CANCEL twice to washer clogged? Re-select cycle and press START/PAUSE. If washer will be transported in washer or reconnect power. www.maytag....
... Re-select cycle and press START/PAUSE. Is the drain hose clogged? The door must be properly set up for a medium-size load, to clean the washer and remove the antifreeze, if used . Press POWER/CANCEL and then press START/PAUSE. „ "F" Codes other than 96" ...(Front Door Lock) Select POWER/CANCEL twice to locate, level, and connect the washer. 2. The door may look closed for service. „ "F21" (Drain Problem) Select POWER/CANCEL twice to washer clogged? Re-select cycle and press START/PAUSE. If washer will be transported in washer or reconnect power. www.maytag....
Owners Manual
Page 23
...132; Check the following: Is the power cord plugged into a grounded 3 prong outlet? You may cause imbalance. This is drained from the washer. Load too wet „ Did you sort properly? Select a cycle with metal snaps, buckles, or zippers? Add items or try again. Do...If the problem continues, call electrician. As water is normal. „ Is washer installed on load „ Did you overloaded the washer? Washer leaks „ Check household plumbing for flooring requirements. NOTE: Use of the washer and try to the "Installation Instructions" for leaks. „ Are the ...
...132; Check the following: Is the power cord plugged into a grounded 3 prong outlet? You may cause imbalance. This is drained from the washer. Load too wet „ Did you sort properly? Select a cycle with metal snaps, buckles, or zippers? Add items or try again. Do...If the problem continues, call electrician. As water is normal. „ Is washer installed on load „ Did you overloaded the washer? Washer leaks „ Check household plumbing for flooring requirements. NOTE: Use of the washer and try to the "Installation Instructions" for leaks. „ Are the ...


