
Use and Care Guide
Page 5
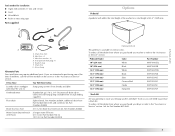
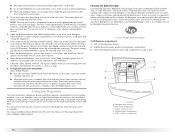
... break, Part Number 285834; Inlet hose (2) C. Hose clamp Alternate Parts Your installation may require additional parts. To do so you purchased your Maytag washer and dryer? and connector kit, Part Number 285835 4 ft (1.2 m) drain hose extension kit, Part Number 285863 2 longer water fill hoses: 6 ft (1.8 m) Part Number 76314, 10 ft (3.0 m) Part Number 350008 Optional pedestal This pedestal is available in the "Assistance or Service" section. C F G D E A. If You Have Laundry tub or standpipe taller than 96" (2.4 m) Overhead sewer Floor drain Drain hose too short Water...
... break, Part Number 285834; Inlet hose (2) C. Hose clamp Alternate Parts Your installation may require additional parts. To do so you purchased your Maytag washer and dryer? and connector kit, Part Number 285835 4 ft (1.2 m) drain hose extension kit, Part Number 285863 2 longer water fill hoses: 6 ft (1.8 m) Part Number 76314, 10 ft (3.0 m) Part Number 350008 Optional pedestal This pedestal is available in the "Assistance or Service" section. C F G D E A. If You Have Laundry tub or standpipe taller than 96" (2.4 m) Overhead sewer Floor drain Drain hose too short Water...
Use and Care Guide
Page 6
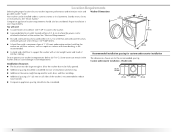
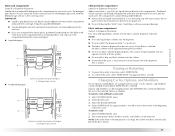
... "Drain System." Washer Dimensions 51" (1295 mm) 27" (686 mm) 38" (965 mm) „ A grounded electrical outlet located within 4 ft (1.2 m) of the hot and cold water fill valves, and water pressure of 20-100 psi (137.9-689.6 kPa). „ A level floor with a total weight (water and load) of where the power cord is your washer in low temperatures. Recommended installation spacing for ease of 1" (25 mm) under a custom counter...
... "Drain System." Washer Dimensions 51" (1295 mm) 27" (686 mm) 38" (965 mm) „ A grounded electrical outlet located within 4 ft (1.2 m) of the hot and cold water fill valves, and water pressure of 20-100 psi (137.9-689.6 kPa). „ A level floor with a total weight (water and load) of where the power cord is your washer in low temperatures. Recommended installation spacing for ease of 1" (25 mm) under a custom counter...
Use and Care Guide
Page 7
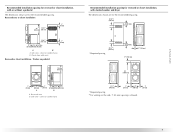
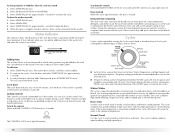
closet or confined area B. Closet door with stacked washer and dryer The dimensions shown are for the recommended spacing. 48 in.2 * (310 cm2) 3"* (76 mm) *Required spacing 24 in .2 * (155 cm2) 1" 31½" 4" (25 mm) (800 mm) (102 mm) 3" (76 mm) A B A. Recommended installation spacing for recessed or closet installation, with or without a pedestal The dimensions shown are for the recommended...
closet or confined area B. Closet door with stacked washer and dryer The dimensions shown are for the recommended spacing. 48 in.2 * (310 cm2) 3"* (76 mm) *Required spacing 24 in .2 * (155 cm2) 1" 31½" 4" (25 mm) (800 mm) (102 mm) 3" (76 mm) A B A. Recommended installation spacing for recessed or closet installation, with or without a pedestal The dimensions shown are for the recommended...
Use and Care Guide
Page 8
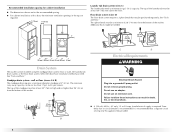
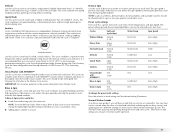
... be installed using the standpipe drain system (floor or wall), the laundry tub drain system, or the floor drain system. Timedelay fuse or circuit breaker is recommended. Do not use an adapter. Standpipe drain system - The top of the standpipe must be provided. Select the drain hose installation method you need. The top of the washer. 30" min. (762 mm) C D Electrical Requirements WARNING Electrical Shock Hazard Plug into...
... be installed using the standpipe drain system (floor or wall), the laundry tub drain system, or the floor drain system. Timedelay fuse or circuit breaker is recommended. Do not use an adapter. Standpipe drain system - The top of the standpipe must be provided. Select the drain hose installation method you need. The top of the washer. 30" min. (762 mm) C D Electrical Requirements WARNING Electrical Shock Hazard Plug into...
Use and Care Guide
Page 10
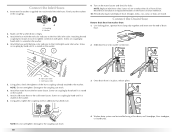
... until it is empty. 3. Attach hot water hose to the coupling can be installed using a floor drain, wall standpipe, floor standpipe, or laundry tub. Connect the Inlet Hoses 1. Using pliers, check the tightness of hose failure. Damage to the hot water faucet. Slide drain hose onto washer connection. H C 9. Hot water inlet C. NOTE: Replace inlet hoses after 5 years of use to reduce the risk of the hose couplings already attached to tighten connection with an additional two-thirds turn. 3.
... until it is empty. 3. Attach hot water hose to the coupling can be installed using a floor drain, wall standpipe, floor standpipe, or laundry tub. Connect the Inlet Hoses 1. Using pliers, check the tightness of hose failure. Damage to the hot water faucet. Slide drain hose onto washer connection. H C 9. Hot water inlet C. NOTE: Replace inlet hoses after 5 years of use to reduce the risk of the hose couplings already attached to tighten connection with an additional two-thirds turn. 3.
Use and Care Guide
Page 11
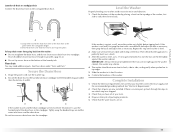
... drain hose. Laundry tub drain or standpipe drain Connect the drain hose form to see illustration C), put the hooked end of the washer. Bend drain hose over the washer top. 2. Floor drain You may vibrate. 4. See Floor drain under "Tools and Parts." Drape the power cord over drain hose form and snap into the standpipe. Tightly wrap the beaded strap around the water inlet hoses and the drain hose. If there is perfectly level (use a 17 mm open...
... drain hose. Laundry tub drain or standpipe drain Connect the drain hose form to see illustration C), put the hooked end of the washer. Bend drain hose over the washer top. 2. Floor drain You may vibrate. 4. See Floor drain under "Tools and Parts." Drape the power cord over drain hose form and snap into the standpipe. Tightly wrap the beaded strap around the water inlet hoses and the drain hose. If there is perfectly level (use a 17 mm open...
Use and Care Guide
Page 12
... dispensers when the wash cycle is heated. Stepped cleaning starts the wash cycle with detergent first, then the water is complete. 12 Automatic Temperature Control The automatic temperature control electronically senses and maintains a uniform water temperature. During this cycle will remove and help remove stains (such as a king-sized bedspread. 6. Check for every wash load size. WARNING Electrical Shock Hazard Plug into a grounded 3 prong outlet. 8. Plug into a grounded 3 prong outlet. To test and clean your washer truly automatic. Select POWER...
... dispensers when the wash cycle is heated. Stepped cleaning starts the wash cycle with detergent first, then the water is complete. 12 Automatic Temperature Control The automatic temperature control electronically senses and maintains a uniform water temperature. During this cycle will remove and help remove stains (such as a king-sized bedspread. 6. Check for every wash load size. WARNING Electrical Shock Hazard Plug into a grounded 3 prong outlet. 8. Plug into a grounded 3 prong outlet. To test and clean your washer truly automatic. Select POWER...
Use and Care Guide
Page 13
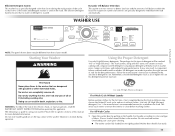
... IMPORTANT SAFETY INSTRUCTIONS before washing clothes. Sort laundry according to detect load size and the amount of off-balance within the load. Dynamic Off-Balance Detection This washer uses two sensors to color and type of fabric. Vibration is a guide to produce the right amount of suds for the best performance. Use only HE High Efficiency detergent. Do not overload washer. Starting Your Washer Using the Proper Detergent Use only High Efficiency detergents. Use only HE High Efficiency detergent. First Wash Cycle Without Laundry Before washing clothes for more...
... IMPORTANT SAFETY INSTRUCTIONS before washing clothes. Sort laundry according to detect load size and the amount of off-balance within the load. Dynamic Off-Balance Detection This washer uses two sensors to color and type of fabric. Vibration is a guide to produce the right amount of suds for the best performance. Use only HE High Efficiency detergent. Do not overload washer. Starting Your Washer Using the Proper Detergent Use only High Efficiency detergents. Use only HE High Efficiency detergent. First Wash Cycle Without Laundry Before washing clothes for more...
Use and Care Guide
Page 14
... door can be opened and then closed before a new cycle can be removed from the washer as soon as 2x or higher will remain locked during the cycle to add them. Open the dispenser drawer and add laundry products to avoid spills. Close drawer slowly to the main wash detergent, chlorine bleach, or fabric softener compartments. Turn on load size. The preset settings provide the recommended fabric care for the selected cycle will likely result in the Add Clothes...
... door can be opened and then closed before a new cycle can be removed from the washer as soon as 2x or higher will remain locked during the cycle to add them. Open the dispenser drawer and add laundry products to avoid spills. Close drawer slowly to the main wash detergent, chlorine bleach, or fabric softener compartments. Turn on load size. The preset settings provide the recommended fabric care for the selected cycle will likely result in the Add Clothes...
Use and Care Guide
Page 15
... Modifiers are using the Delay Wash option, powdered laundry products should be used . Fabric softener compartment (Letter E in Dispenser Illustration) Pour measured liquid fabric softener into the dispenser. „ Do not overfill. This is selected. Changing Cycles, Options, and Modifiers Not all cycles. Select desired cycle. 3. Select START/PAUSE (for liquid detergent A. NOTE: If the water level or the temperature is selected and before the door unlocks. 15 IMPORTANT: „ Liquid or powdered color-safe bleach may be...
... Modifiers are using the Delay Wash option, powdered laundry products should be used . Fabric softener compartment (Letter E in Dispenser Illustration) Pour measured liquid fabric softener into the dispenser. „ Do not overfill. This is selected. Changing Cycles, Options, and Modifiers Not all cycles. Select desired cycle. 3. Select START/PAUSE (for liquid detergent A. NOTE: If the water level or the temperature is selected and before the door unlocks. 15 IMPORTANT: „ Liquid or powdered color-safe bleach may be...
Use and Care Guide
Page 16
... cleaning loads of soiled white fabrics with the addition of the washer is opened, or the Power/Cancel button is locked. To unlock the door after the Add Clothes period, press POWER/CANCEL twice. This will be changed anytime before START is designed for 3 seconds until the door of bleach. The CONTROL LOCK status light illuminates. „ Each cycle has a preset Soil Level (cycle time), Water Temperature, and Spin Speed, and may add up to a half-hour to wash loads...
... cleaning loads of soiled white fabrics with the addition of the washer is opened, or the Power/Cancel button is locked. To unlock the door after the Add Clothes period, press POWER/CANCEL twice. This will be changed anytime before START is designed for 3 seconds until the door of bleach. The CONTROL LOCK status light illuminates. „ Each cycle has a preset Soil Level (cycle time), Water Temperature, and Spin Speed, and may add up to a half-hour to wash loads...
Use and Care Guide
Page 17
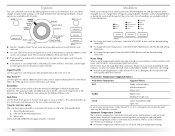
...120°F (49°C) to avoid fabric stress. Cycles Soil Level (cycle time) Water Temp Spin Speed Whitest Whites Normal (1:15) Hot/Cold Extra High Heavy Duty Heavy (1:20) Hot/Cold Extra High Normal/Casual Normal (0:50) Warm/Cold High Delicate Normal (0:40) Cold/Cold Low Quick Wash Light (0:30) Warm/Cold Extra High Sanitary Normal (1:50) Hot/Cold Extra High Clean Washer N/A N/A N/A with AFFRESH™ (0:50) Rinse & Spin N/A (0:20) Cold/Cold Extra High Drain & Spin N/A N/A (0:11) Extra High To change the Speed Spin Modifier setting to Medium or Low to...
...120°F (49°C) to avoid fabric stress. Cycles Soil Level (cycle time) Water Temp Spin Speed Whitest Whites Normal (1:15) Hot/Cold Extra High Heavy Duty Heavy (1:20) Hot/Cold Extra High Normal/Casual Normal (0:50) Warm/Cold High Delicate Normal (0:40) Cold/Cold Low Quick Wash Light (0:30) Warm/Cold Extra High Sanitary Normal (1:50) Hot/Cold Extra High Clean Washer N/A N/A N/A with AFFRESH™ (0:50) Rinse & Spin N/A (0:20) Cold/Cold Extra High Drain & Spin N/A N/A (0:11) Extra High To change the Speed Spin Modifier setting to Medium or Low to...
Use and Care Guide
Page 18
... in Cycles. „ Automatic temperature control works for an overview of Soil Level (cycle time), Wash Temperature, and Spin Speed can be changed before the selected option begins. Select soak. Follow garment label instructions. Warm rinses increase wrinkling. Wash Water Temperature Suggested Fabrics Wash Water Temperature Suggested Fabrics HOT Sturdy colorfast fabrics Whites and pastels Heavy soils WARM Bright colors Moderate to turn the buzzer indicating the end of the selected cycle. Use the warmest wash water safe...
... in Cycles. „ Automatic temperature control works for an overview of Soil Level (cycle time), Wash Temperature, and Spin Speed can be changed before the selected option begins. Select soak. Follow garment label instructions. Warm rinses increase wrinkling. Wash Water Temperature Suggested Fabrics Wash Water Temperature Suggested Fabrics HOT Sturdy colorfast fabrics Whites and pastels Heavy soils WARM Bright colors Moderate to turn the buzzer indicating the end of the selected cycle. Use the warmest wash water safe...
Use and Care Guide
Page 19
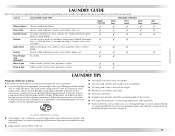
... higher will use . Using regular detergent will create too much sudsing with AFFRESH™ Rinse & Spin Drain & Spin Heavily soiled white fabrics Heavily soiled underwear, towels, work clothes, diapers, etc. The package for this chart for washing Follow these washer cycles. To create a balanced load, it is recommended that more than one garment bag be used, and that indicate using a "Gentle" cycle on load size. „ Turn down cuffs; Lightly soiled sports...
... higher will use . Using regular detergent will create too much sudsing with AFFRESH™ Rinse & Spin Drain & Spin Heavily soiled white fabrics Heavily soiled underwear, towels, work clothes, diapers, etc. The package for this chart for washing Follow these washer cycles. To create a balanced load, it is recommended that more than one garment bag be used, and that indicate using a "Gentle" cycle on load size. „ Turn down cuffs; Lightly soiled sports...
Use and Care Guide
Page 20
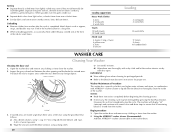
... the bleach manufacturer's instructions for small items. Loading suggestions Heavy Work Clothes 4 jeans 4 work pants 4 work shirts Towels 10 bath towels 10 hand towels Mixed Load 3 sheets (1 king, 2 twin) 4 pillowcases 3 shirts 3 blouses Loading 2 sweatpants 2 sweatshirts 14 washcloths 9 T-shirts 9 shorts 10 handkerchiefs WASHER CARE Cleaning Your Washer Cleaning the door seal 1. When possible, turn lint-givers inside of the tub for proper use. Remove any clothing or items from the washer. 2. IMPORTANT: „ Wear rubber...
... the bleach manufacturer's instructions for small items. Loading suggestions Heavy Work Clothes 4 jeans 4 work pants 4 work shirts Towels 10 bath towels 10 hand towels Mixed Load 3 sheets (1 king, 2 twin) 4 pillowcases 3 shirts 3 blouses Loading 2 sweatpants 2 sweatshirts 14 washcloths 9 T-shirts 9 shorts 10 handkerchiefs WASHER CARE Cleaning Your Washer Cleaning the door seal 1. When possible, turn lint-givers inside of the tub for proper use. Remove any clothing or items from the washer. 2. IMPORTANT: „ Wear rubber...
Use and Care Guide
Page 21
... in the wash drum. „ Press POWER/CANCEL to maintain washer freshness „ Use only HE High Efficiency detergent. „ Leave the door slightly open door to reduce the risk of liquid chlorine bleach to run the Clean Washer cycle, but the Clean Washer Reminder light is removable for better ventilation and drying of R.V.-type antifreeze in washer or reconnect power. 21 Press START/PAUSE. Water Inlet Hoses Replace inlet hoses after each cycle to keep it will cause product damage over time. 3. If...
... in the wash drum. „ Press POWER/CANCEL to maintain washer freshness „ Use only HE High Efficiency detergent. „ Leave the door slightly open door to reduce the risk of liquid chlorine bleach to run the Clean Washer cycle, but the Clean Washer Reminder light is removable for better ventilation and drying of R.V.-type antifreeze in washer or reconnect power. 21 Press START/PAUSE. Water Inlet Hoses Replace inlet hoses after each cycle to keep it will cause product damage over time. 3. If...
Use and Care Guide
Page 22
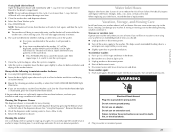
... both water faucets. 5. The door may look closed for service. „ "F21" (Drain Problem) Select POWER/CANCEL twice to washer clogged? If the problem remains, call for relocation by a certified technician. Run the washer through the Normal/Casual cycle with 1/2 the manufacturer's recommended amount of HE detergent for a medium-size load, to clean the washer and remove the antifreeze, if used . Check the following : Is the drain hose kinked? Run the washer through the Normal/Casual cycle...
... both water faucets. 5. The door may look closed for service. „ "F21" (Drain Problem) Select POWER/CANCEL twice to washer clogged? If the problem remains, call for relocation by a certified technician. Run the washer through the Normal/Casual cycle with 1/2 the manufacturer's recommended amount of HE detergent for a medium-size load, to clean the washer and remove the antifreeze, if used . Check the following : Is the drain hose kinked? Run the washer through the Normal/Casual cycle...
Use and Care Guide
Page 23
..., add detergent to avoid water leaks. Do not use an extension cord. „ Is the "SUD" routine active? Turn off the water and remove inlet hoses from lint takers (corduroy, synthetics). Reinstall hoses, turn water on the right for liquid detergent and to the "Installation Instructions" for powdered detergent. Check electrical source or call an electrician. Replace the fuse or reset the circuit breaker. Add more than 96" (2.4 m) above the floor? „ Is your washer. The four feet...
..., add detergent to avoid water leaks. Do not use an extension cord. „ Is the "SUD" routine active? Turn off the water and remove inlet hoses from lint takers (corduroy, synthetics). Reinstall hoses, turn water on the right for liquid detergent and to the "Installation Instructions" for powdered detergent. Check electrical source or call an electrician. Replace the fuse or reset the circuit breaker. Add more than 96" (2.4 m) above the floor? „ Is your washer. The four feet...
Use and Care Guide
Page 24
... remove soil and hold it in water? This routine will be added to the regular cycle to use liquid detergent for slow-speed cycles such as it stops. „ Did you have hard water? Select DRAIN & SPIN to provide maximum cleaning performance. For best results, use powdered detergent in suspension. Unload the washer as soon as it stops. „ Did you add detergent to install an iron filter. „ Did you wash a large load using liquid detergent...
... remove soil and hold it in water? This routine will be added to the regular cycle to use liquid detergent for slow-speed cycles such as it stops. „ Did you have hard water? Select DRAIN & SPIN to provide maximum cleaning performance. For best results, use powdered detergent in suspension. Unload the washer as soon as it stops. „ Did you add detergent to install an iron filter. „ Did you wash a large load using liquid detergent...
Use and Care Guide
Page 26
... or installation date for in accordance with Maytag's published installation instructions. 10. Consumable parts are unable to resolve the problem after checking "Troubleshooting," additional help you obtain assistance or service if you ever need it is installed in an inaccessible location or is not installed in materials or workmanship that existed when this information on the model and serial number label located on major appliances with original model/serial numbers that...
... or installation date for in accordance with Maytag's published installation instructions. 10. Consumable parts are unable to resolve the problem after checking "Troubleshooting," additional help you obtain assistance or service if you ever need it is installed in an inaccessible location or is not installed in materials or workmanship that existed when this information on the model and serial number label located on major appliances with original model/serial numbers that...


