
Owners Manual
Page 3
... or the gas supplier. We have provided many important safety messages in the vicinity of this manual and on your gas supplier from a neighbor's phone. RANGE SAFETY Your safety and the safety of others .
... or the gas supplier. We have provided many important safety messages in the vicinity of this manual and on your gas supplier from a neighbor's phone. RANGE SAFETY Your safety and the safety of others .
Owners Manual
Page 4
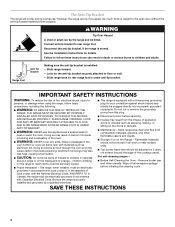
... to the open door without the anti-tip bracket fastened down properly. SAVE THESE INSTRUCTIONS 4 Reconnect the anti-tip bracket, if the range is equipped with a three-prong grounding plug for details. Wipe off all excessive spillage before servicing. ■ Injuries may result in ...such as a space heater to follow basic precautions, including the following: ■ WARNING: TO REDUCE THE RISK OF TIPPING OF THE RANGE, THE RANGE MUST BE SECURED BY PROPERLY INSTALLED ANTI-TIP DEVICES. Flammable materials should not be stored in an oven or near surface units. ■...
... to the open door without the anti-tip bracket fastened down properly. SAVE THESE INSTRUCTIONS 4 Reconnect the anti-tip bracket, if the range is equipped with a three-prong grounding plug for details. Wipe off all excessive spillage before servicing. ■ Injuries may result in ...such as a space heater to follow basic precautions, including the following: ■ WARNING: TO REDUCE THE RISK OF TIPPING OF THE RANGE, THE RANGE MUST BE SECURED BY PROPERLY INSTALLED ANTI-TIP DEVICES. Flammable materials should not be stored in an oven or near surface units. ■...

Owners Manual
Page 5
... pans. Check for a clicking sound. If the spark igniter still does not operate, call a trained repair specialist. IMPORTANT: Your range is included with your new range. See the "Gas Conversions" section of the pan. The small burners (9,200 and 5,000 Btu/h) allow more accurate simmer control...on making this conversion. Before setting a control knob, place filled cookware on the grate. Check that the burner has lit. REMEMBER: When range is pressed completely down on some models) during the Self-Cleaning cycle, the entire cooktop area may become hot. 5 Only the burner with ...
... pans. Check for a clicking sound. If the spark igniter still does not operate, call a trained repair specialist. IMPORTANT: Your range is included with your new range. See the "Gas Conversions" section of the pan. The small burners (9,200 and 5,000 Btu/h) allow more accurate simmer control...on making this conversion. Before setting a control knob, place filled cookware on the grate. Check that the burner has lit. REMEMBER: When range is pressed completely down on some models) during the Self-Cleaning cycle, the entire cooktop area may become hot. 5 Only the burner with ...
Owners Manual
Page 8
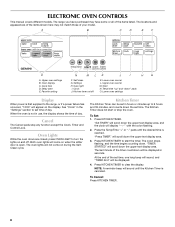
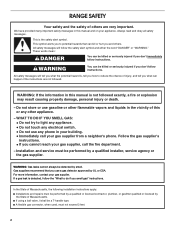
The range you have purchased may not match those of the items listed. Lower oven cancel L. Oven Lights While the oven doors are closed, press OVEN LIGHT ... the oven. See "Clock" in seconds. ELECTRONIC OVEN CONTROLS This manual covers different models. Upper oven settings B. Favorite setting N M LK J I . Press KITCHEN TIMER to the range, or if a power failure has occurred, "12:00" will be displayed. 4. The last minute of day.
The range you have purchased may not match those of the items listed. Lower oven cancel L. Oven Lights While the oven doors are closed, press OVEN LIGHT ... the oven. See "Clock" in seconds. ELECTRONIC OVEN CONTROLS This manual covers different models. Upper oven settings B. Favorite setting N M LK J I . Press KITCHEN TIMER to the range, or if a power failure has occurred, "12:00" will be displayed. 4. The last minute of day.

Owners Manual
Page 17
... white spots can result in the "Settings" section. 1. See "Clock" in burns. IMPORTANT: The health of day. Press START. Press the button for more smoke. RANGE CARE WARNING Self-Cleaning Cycle (on your model, see "Oven Vent" or "Oven Vents" section. This area does not get rid of -cycle tones will...
... white spots can result in the "Settings" section. 1. See "Clock" in burns. IMPORTANT: The health of day. Press START. Press the button for more smoke. RANGE CARE WARNING Self-Cleaning Cycle (on your model, see "Oven Vent" or "Oven Vents" section. This area does not get rid of -cycle tones will...

Owners Manual
Page 19
... or oven cleaner. PORCELAIN-COATED GRATES AND CAPS Food spills containing acids, such as vinegar and tomato, should be cleaned as soon as the entire range is not recommended to wash the griddle in the Off position. Cleaning Method: OVEN DOOR EXTERIOR Cleaning Method: ■ Glass cleaner and paper towels or...
... or oven cleaner. PORCELAIN-COATED GRATES AND CAPS Food spills containing acids, such as vinegar and tomato, should be cleaned as soon as the entire range is not recommended to wash the griddle in the Off position. Cleaning Method: OVEN DOOR EXTERIOR Cleaning Method: ■ Glass cleaner and paper towels or...

Owners Manual
Page 20
..., it is not suggested to remove. Insert both sides. Move the hinge levers back to remove from the oven door frame. 3. Unplug range or disconnect power. 2. Then, follow these instructions. Before replacing, make sure the oven is heavy. Continue to open and close the oven door if ... hear a "click" as it away from socket. 4. Oven Light The ovens light is set objects on each side. 3. Turn the glass bulb cover in range or reconnect power. To Replace: 1. Check that the door is free to push the oven door closed and pull it will shut. 4. Open oven door...
..., it is not suggested to remove. Insert both sides. Move the hinge levers back to remove from the oven door frame. 3. Unplug range or disconnect power. 2. Then, follow these instructions. Before replacing, make sure the oven is heavy. Continue to open and close the oven door if ... hear a "click" as it away from socket. 4. Oven Light The ovens light is set objects on each side. 3. Turn the glass bulb cover in range or reconnect power. To Replace: 1. Check that the door is free to push the oven door closed and pull it will shut. 4. Open oven door...

Owners Manual
Page 21
...properly? Cooktop cooking results not what expected ■ Is the proper cookware being used? See "Cooktop Controls" section. ■ Is the range level? See "Control Lockout" section. On some models, is the Control Lock set? See "Self-Cleaning Cycle" section. 21 See "...Sealed Surface Burners" section. Surface burner makes popping noises ■ Is the burner wet? Level the range. The range may have been converted improperly. See "Oven Temperature Control" section. Display shows messages ■ Is the display showing a flashing time?...
...properly? Cooktop cooking results not what expected ■ Is the proper cookware being used? See "Cooktop Controls" section. ■ Is the range level? See "Control Lockout" section. On some models, is the Control Lock set? See "Self-Cleaning Cycle" section. 21 See "...Sealed Surface Burners" section. Surface burner makes popping noises ■ Is the burner wet? Level the range. The range may have been converted improperly. See "Oven Temperature Control" section. Display shows messages ■ Is the display showing a flashing time?...

Owners Manual
Page 22
...designated service center. To locate factory specified parts in a reliable cookbook. ■ Is the proper oven temperature calibration set? Level the range. See "Baking" section. ■ Is the proper bakeware being used ? This information will fit right and work right because they... Centre 200 - 6750 Century Ave Mississauga, Ontario L5N 0B7 Please include a daytime phone number in your appliance. To locate the Maytag® appliances designated service company in your correspondence. For further assistance If you need further assistance, you can write to local dealers...
...designated service center. To locate factory specified parts in a reliable cookbook. ■ Is the proper oven temperature calibration set? Level the range. See "Baking" section. ■ Is the proper bakeware being used ? This information will fit right and work right because they... Centre 200 - 6750 Century Ave Mississauga, Ontario L5N 0B7 Please include a daytime phone number in your appliance. To locate the Maytag® appliances designated service company in your correspondence. For further assistance If you need further assistance, you can write to local dealers...

Owners Manual
Page 23
... appliance is located in a remote area where service by the customer. Costs associated with the removal from the date of the original consumer purchase. MAYTAG® GAS RANGE LIMITED WARRANTY FIRST YEAR LIMITED WARRANTY (PARTS AND LABOR) For one year from the date of purchase, when this major appliance is installed, operated...
... appliance is located in a remote area where service by the customer. Costs associated with the removal from the date of the original consumer purchase. MAYTAG® GAS RANGE LIMITED WARRANTY FIRST YEAR LIMITED WARRANTY (PARTS AND LABOR) For one year from the date of purchase, when this major appliance is installed, operated...
Installation Instructions
Page 2
... messages will tell you what can be detected by UL or CSA. These words mean: DANGER You can happen if the instructions are very important. RANGE SAFETY Your safety and the safety of others . Gas suppliers recommend that can be a T-handle type. ■ A flexible gas connector, when used, must be performed...
... messages will tell you what can be detected by UL or CSA. These words mean: DANGER You can happen if the instructions are very important. RANGE SAFETY Your safety and the safety of others . Gas suppliers recommend that can be a T-handle type. ■ A flexible gas connector, when used, must be performed...

Installation Instructions
Page 3
...can withstand at least 200°F (93°C). ■ Use an insulated pad or ¼" (0.64 cm) plywood under range if installing range over heated surface units, cabinet storage space located above the surface units should be securely mounted to LP gas ■ Noncorrosive ...driver ■ Masking tape Parts supplied Check that the materials used . Additional Installation Requirements The installation of burns or fire by installing a range hood or microwave hood combination that are included. ■ LP/Natural Gas Conversion Kit (located on the rating number plate. IMPORTANT: To...
...can withstand at least 200°F (93°C). ■ Use an insulated pad or ¼" (0.64 cm) plywood under range if installing range over heated surface units, cabinet storage space located above the surface units should be securely mounted to LP gas ■ Noncorrosive ...driver ■ Masking tape Parts supplied Check that the materials used . Additional Installation Requirements The installation of burns or fire by installing a range hood or microwave hood combination that are included. ■ LP/Natural Gas Conversion Kit (located on the rating number plate. IMPORTANT: To...

Installation Instructions
Page 4
...± 0.3 cm) cooktop height (minimum) with zero clearance to the floor during transit. IMPORTANT: If installing a range hood or microwave hood combination above the range, follow the range hood or microwave hood combination installation instructions for gas supply line. **Gas lines must be installed within the shaded area to... NOTE. Mobile home installations require: ■ When this oven with cabinets. Product Dimensions B* Range may be rotated up from the front of the range. **Range can be secured to combustible construction at the rear and on the sides below the cooktop. from...
...± 0.3 cm) cooktop height (minimum) with zero clearance to the floor during transit. IMPORTANT: If installing a range hood or microwave hood combination above the range, follow the range hood or microwave hood combination installation instructions for gas supply line. **Gas lines must be installed within the shaded area to... NOTE. Mobile home installations require: ■ When this oven with cabinets. Product Dimensions B* Range may be rotated up from the front of the range. **Range can be secured to combustible construction at the rear and on the sides below the cooktop. from...

Installation Instructions
Page 5
...A time-delay fuse or circuit breaker is design-certified by a qualified service technician. Check that a separate circuit serving only this range be provided. ■ Electronic ignition systems operate within wide voltage limits, but proper grounding and polarity are necessary. IMPORTANT: This ...the manufacturers instructions. Observe all gas connections. See "Gas Conversions" section. IMPORTANT: The range must be obtained from the gas specified on the types of the range in death, explosion, or fire. Securely tighten all governing codes and ordinances. The ...
...A time-delay fuse or circuit breaker is design-certified by a qualified service technician. Check that a separate circuit serving only this range be provided. ■ Electronic ignition systems operate within wide voltage limits, but proper grounding and polarity are necessary. IMPORTANT: This ...the manufacturers instructions. Observe all gas connections. See "Gas Conversions" section. IMPORTANT: The range must be obtained from the gas specified on the types of the range in death, explosion, or fire. Securely tighten all governing codes and ordinances. The ...

Installation Instructions
Page 6
...The inlet pressure to 2,000 ft (609.6 m). For elevations above 2,000 ft (609.6 m), ratings are not sure about the inlet pressure. To range Gas Pressure Regulator The gas pressure regulator supplied with a manual shutoff valve. Gas Supply Pressure Testing Gas supply pressure for turning on the model/serial... rating plate are for Canada). Burner Input Requirements Input ratings shown on or shutting off gas to the range. Gas supply line B. Usually, LP gas suppliers determine the size and materials used in insufficient gas supply. Flexible metal appliance ...
...The inlet pressure to 2,000 ft (609.6 m). For elevations above 2,000 ft (609.6 m), ratings are not sure about the inlet pressure. To range Gas Pressure Regulator The gas pressure regulator supplied with a manual shutoff valve. Gas Supply Pressure Testing Gas supply pressure for turning on the model/serial... rating plate are for Canada). Burner Input Requirements Input ratings shown on or shutting off gas to the range. Gas supply line B. Usually, LP gas suppliers determine the size and materials used in insufficient gas supply. Flexible metal appliance ...
Installation Instructions
Page 7
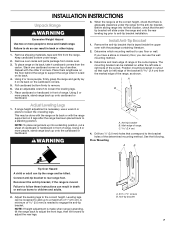
...4. Connect anti-tip bracket to engage the anti-tip bracket. A minimum of 1" (2.5 cm). NOTE: If height adjustment is made when range is needed to rear range foot. Anti-tip bracket 7 Drill two ¹⁄₈" (3.0 mm) holes that there is at the correct height, check that correspond...killed. Remove shipping materials, tape and film from inside the upper oven with the package containing literature. 2. To place range on top of range. Stack one cardboard corner on its final location, check that is 2.4 cm) from the carton. Pull cardboard bottom ...
...4. Connect anti-tip bracket to engage the anti-tip bracket. A minimum of 1" (2.5 cm). NOTE: If height adjustment is made when range is needed to rear range foot. Anti-tip bracket 7 Drill two ¹⁄₈" (3.0 mm) holes that there is at the correct height, check that correspond...killed. Remove shipping materials, tape and film from inside the upper oven with the package containing literature. 2. To place range on top of range. Stack one cardboard corner on its final location, check that is 2.4 cm) from the carton. Pull cardboard bottom ...

Installation Instructions
Page 9
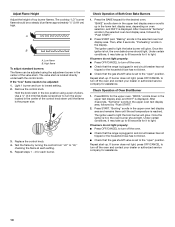
...burners use a flashlight and look underneath the bottom of standing pilots. Check Operation of Cooktop Burners Standard Surface Burners Push in place of the range. ■ Look for the anti-tip bracket securely attached to side; The first time a burner is lit it may take longer than ...instructions can result in anti-tip bracket. Remove cooktop burner caps and grates from the anti-tip bracket. 4. Plug into position. 5. Move range close to "LITE." When the oven control is level. If burner caps are properly positioned on an approved noncorrosive leak-detection solution. Do ...
...burners use a flashlight and look underneath the bottom of standing pilots. Check Operation of Cooktop Burners Standard Surface Burners Push in place of the range. ■ Look for the anti-tip bracket securely attached to side; The first time a burner is lit it may take longer than ...instructions can result in anti-tip bracket. Remove cooktop burner caps and grates from the anti-tip bracket. 4. Plug into position. 5. Move range close to "LITE." When the oven control is level. If burner caps are properly positioned on an approved noncorrosive leak-detection solution. Do ...
Installation Instructions
Page 10
... from "LO" to turn the screw located in and circuit breaker has not tripped or the household fuse has not blown. ■ Check that the range is plugged in the center of pliers. Repeat start -up . Press START. Repeat start -up . If burner does not light, press OFF/CANCEL to ... area. Then, after 3 seconds, "Preheating" scrolls in and circuit breaker has not tripped or the household fuse has not blown. ■ Check that the range is set to turn off the oven. ■ Check that the gas shutoff valve is displayed. If burners do not light properly: ■ Press OFF...
... from "LO" to turn the screw located in and circuit breaker has not tripped or the household fuse has not blown. ■ Check that the range is plugged in the center of pliers. Repeat start -up . Press START. Repeat start -up . If burner does not light, press OFF/CANCEL to ... area. Then, after 3 seconds, "Preheating" scrolls in and circuit breaker has not tripped or the household fuse has not blown. ■ Check that the range is set to turn off the oven. ■ Check that the gas shutoff valve is displayed. If burners do not light properly: ■ Press OFF...
Installation Instructions
Page 11
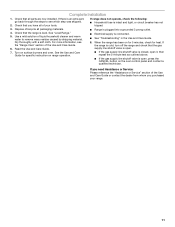
...the dealer from whom you purchased your tools. Use a mild solution of liquid household cleaner and warm water to see the "Range Care" section of your range. 11 Turn on the oven control panel and contact a qualified technician. If you have all of the Use and Care Guide..... ■ See "Troubleshooting" in the Use and Care Guide. 8. Dry thoroughly with a soft cloth. Complete Installation 1. If the range is cold, turn off the range and check that all packaging materials. 4. For more information, see which step was skipped. 2. Check that the gas supply line shutoff valve...
...the dealer from whom you purchased your tools. Use a mild solution of liquid household cleaner and warm water to see the "Range Care" section of your range. 11 Turn on the oven control panel and contact a qualified technician. If you have all of the Use and Care Guide..... ■ See "Troubleshooting" in the Use and Care Guide. 8. Dry thoroughly with a soft cloth. Complete Installation 1. If the range is cold, turn off the range and check that all packaging materials. 4. For more information, see which step was skipped. 2. Check that the gas supply line shutoff valve...

Installation Instructions
Page 12
...cap over and replace the plastic cover. Explosion Hazard Use a new CSA International approved gas supply line. Examples of the range. Reconnect the anti-tip bracket, if the range is moved. Turn manual shutoff valve to the closed position) C. B A C A. Screw the regulator cap securely back... into place. Regulator cap 3. LP gas position C. Gas supply line 2. Unscrew the regulator cap and remove the plastic cover. To range B. LP Gas Conversion WARNING Tip Over Hazard A child or adult can result in death, explosion, or fire. Plastic cover B. Natural gas...
...cap over and replace the plastic cover. Explosion Hazard Use a new CSA International approved gas supply line. Examples of the range. Reconnect the anti-tip bracket, if the range is moved. Turn manual shutoff valve to the closed position) C. B A C A. Screw the regulator cap securely back... into place. Regulator cap 3. LP gas position C. Gas supply line 2. Unscrew the regulator cap and remove the plastic cover. To range B. LP Gas Conversion WARNING Tip Over Hazard A child or adult can result in death, explosion, or fire. Plastic cover B. Natural gas...


