Owners Manual
Page 4
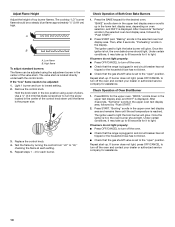
... or on the backguard of the oven. ■ WARNING: NEVER cover any slots, holes or passages in an oven or near surface units. ■ Top burner flame size should not be killed.
... or on the backguard of the oven. ■ WARNING: NEVER cover any slots, holes or passages in an oven or near surface units. ■ Top burner flame size should not be killed.

Owners Manual
Page 5
... quantities of the Installation Instructions for a tripped circuit breaker or blown household fuse. Right rear control knob E. Fire Hazard Do not let the burner flame extend beyond the edge of food or liquid, using smaller pots and pans. IMPORTANT: Your range is in use or (on some models... the following chart as a guide when setting heat levels. If you do not hear the igniter click, turn knob counterclockwise to LIGHT. The small burners (9,200 and 5,000 Btu/h) allow more accurate simmer control at the lowest setting, and are ideal for a clicking sound. Check for details on ...
... quantities of the Installation Instructions for a tripped circuit breaker or blown household fuse. Right rear control knob E. Fire Hazard Do not let the burner flame extend beyond the edge of food or liquid, using smaller pots and pans. IMPORTANT: Your range is in use or (on some models... the following chart as a guide when setting heat levels. If you do not hear the igniter click, turn knob counterclockwise to LIGHT. The small burners (9,200 and 5,000 Btu/h) allow more accurate simmer control at the lowest setting, and are ideal for a clicking sound. Check for details on ...
Owners Manual
Page 6
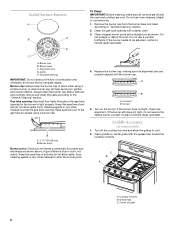
...and the oven and cooktop are properly aligned with a damp cloth. 3. Do not use a wooden toothpick. If the burner needs to light properly. Burner cap B. Gas tube opening: Gas must flow freely throughout the gas tube opening . Keep this area free of combustion and... IMPORTANT: Do not obstruct the flow of soil and do not service the sealed burner yourself. Burner ports Burner ports: Check burner flames occasionally for the burner to be adjusted, contact a trained repair specialist. Replace the burner cap, making sure the alignment pins are cool. C B A A. Do not...
...and the oven and cooktop are properly aligned with a damp cloth. 3. Do not use a wooden toothpick. If the burner needs to light properly. Burner cap B. Gas tube opening: Gas must flow freely throughout the gas tube opening . Keep this area free of combustion and... IMPORTANT: Do not obstruct the flow of soil and do not service the sealed burner yourself. Burner ports Burner ports: Check burner flames occasionally for the burner to be adjusted, contact a trained repair specialist. Replace the burner cap, making sure the alignment pins are cool. C B A A. Do not...
Owners Manual
Page 7
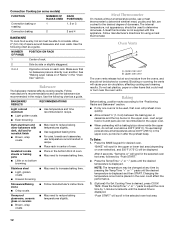
...may be of medium-to cool. ■ Center the canner on the grate. ■ Do not place canner on the bottom side of surface burners between batches. Earthenware ■ Follow manufacturer's instructions. ■ Use on the griddle. ■ To avoid damaging the nonstick finish, do not ... should not be used as its base material. Aluminum and copper may scratch the cooktop or grates. However, when used on the center burner on stainless steel provides even heating. 7 Cookware material is transferred, which affects cooking results. Use the following chart as a core or ...
...may be of medium-to cool. ■ Center the canner on the grate. ■ Do not place canner on the bottom side of surface burners between batches. Earthenware ■ Follow manufacturer's instructions. ■ Use on the griddle. ■ To avoid damaging the nonstick finish, do not ... should not be used as its base material. Aluminum and copper may scratch the cooktop or grates. However, when used on the center burner on stainless steel provides even heating. 7 Cookware material is transferred, which affects cooking results. Use the following chart as a core or ...
Owners Manual
Page 11
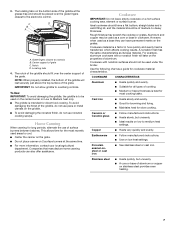
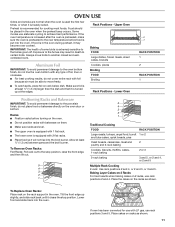
... is equipped with 1 flat rack. ■ The lower oven is turned up slightly, and slide rack back until it will not rise into the broil burner. Some modes use rack positions 2 and 4. Always move freely. ■ To catch spills, place foil on 2 racks, use elaborate cycling to the porcelain finish, do... Tilt the front edge up at the edges. Rack Positions - Make sure foil is at least ¹⁄₂" (1.3 cm) between pans and the broil burner. Place the cakes on them. ■ Make sure racks are normal when the oven is used the first few times, or when it may result...
... is equipped with 1 flat rack. ■ The lower oven is turned up slightly, and slide rack back until it will not rise into the broil burner. Some modes use rack positions 2 and 4. Always move freely. ■ To catch spills, place foil on 2 racks, use elaborate cycling to the porcelain finish, do... Tilt the front edge up at the edges. Rack Positions - Make sure foil is at least ¹⁄₂" (1.3 cm) between pans and the broil burner. Place the cakes on them. ■ Make sure racks are normal when the oven is used the first few times, or when it may result...
Owners Manual
Page 12
... reduce baking temperatures slightly. Lower oven vent B. To use baking/ pizza stones at least ½" (1.3 cm) between the baking pan or casserole and the top burner in the selected oven text area. 12 After 3 seconds, "Set temp or" will scroll in the upper oven. "Push START" will scroll in center of...
... reduce baking temperatures slightly. Lower oven vent B. To use baking/ pizza stones at least ½" (1.3 cm) between the baking pan or casserole and the top burner in the selected oven text area. 12 After 3 seconds, "Set temp or" will scroll in the upper oven. "Push START" will scroll in center of...
Owners Manual
Page 15
... temperature is active. 5. Press and hold the Temp/Time "+" pad for Bake, are disabled. ■ All keys are disabled during active Sabbath Mode. ■ Cooktop burners can be changed at serving temperature before entering into the active Sabbath Mode. ■ Once in the active Sabbath Mode, the oven light will be...
... temperature is active. 5. Press and hold the Temp/Time "+" pad for Bake, are disabled. ■ All keys are disabled during active Sabbath Mode. ■ Cooktop burners can be changed at serving temperature before entering into the active Sabbath Mode. ■ Once in the active Sabbath Mode, the oven light will be...
Owners Manual
Page 18
... not function during the Self-Cleaning cycle. "OVEN COOLING" will scroll in the upper or lower text area (depending on oven selection). NOTE: The cooktop burners will scroll in the display, the door cannot be cleaned at a time, and 24 hours must be displayed until the oven temperature falls below 500...
... not function during the Self-Cleaning cycle. "OVEN COOLING" will scroll in the upper or lower text area (depending on oven selection). NOTE: The cooktop burners will scroll in the display, the door cannot be cleaned at a time, and 24 hours must be displayed until the oven temperature falls below 500...

Owners Manual
Page 19
... EXTERIOR Cleaning Method: ■ Glass cleaner and paper towels or nonabrasive plastic scrubbing pad: Apply glass cleaner to soft cloth or sponge, not directly on burners while they will help them slide. ■ Steel-wool pad 19 OVEN CAVITY ■ Nonabrasive plastic scrubbing pad and mildly abrasive cleanser: Clean as soon...
... EXTERIOR Cleaning Method: ■ Glass cleaner and paper towels or nonabrasive plastic scrubbing pad: Apply glass cleaner to soft cloth or sponge, not directly on burners while they will help them slide. ■ Steel-wool pad 19 OVEN CAVITY ■ Nonabrasive plastic scrubbing pad and mildly abrasive cleanser: Clean as soon...

Owners Manual
Page 21
... service technician or see Installation Instructions. If it dry. The display will not operate ■ Is this the first time the surface burners have been used? Do not use an adapter. The range may have been converted improperly. There has been a power failure. Depending...result in the "Settings" section. ■ Is the display showing a letter followed by a number? Plug into a grounded 3 prong outlet. Surface burner flames are yellow or noisy ■ Is propane gas being used ? Contact a service technician or see "Assistance or Service" section. Turn on ...
... service technician or see Installation Instructions. If it dry. The display will not operate ■ Is this the first time the surface burners have been used? Do not use an adapter. The range may have been converted improperly. There has been a power failure. Depending...result in the "Settings" section. ■ Is the display showing a letter followed by a number? Plug into a grounded 3 prong outlet. Surface burner flames are yellow or noisy ■ Is propane gas being used ? Contact a service technician or see "Assistance or Service" section. Turn on ...

Owners Manual
Page 23
...to correct defects in materials or workmanship that is not available. 10. Major appliances with the product, Maytag brand of your major appliance. This warranty is effective from warranty coverage. 3. DISCLAIMER OF IMPLIED WARRANTIES...burners ■ Gas bake/broil burners (excludes convection element) YOUR SOLE AND EXCLUSIVE REMEDY UNDER THE LIMITED WARRANTY SHALL BE PRODUCT REPAIR AS PROVIDED HEREIN. This limited warranty is void if the factory applied serial number has been altered or removed from your home of Whirlpool Corporation or Whirlpool Canada, LP (hereafter "Maytag...
...to correct defects in materials or workmanship that is not available. 10. Major appliances with the product, Maytag brand of your major appliance. This warranty is effective from warranty coverage. 3. DISCLAIMER OF IMPLIED WARRANTIES...burners ■ Gas bake/broil burners (excludes convection element) YOUR SOLE AND EXCLUSIVE REMEDY UNDER THE LIMITED WARRANTY SHALL BE PRODUCT REPAIR AS PROVIDED HEREIN. This limited warranty is void if the factory applied serial number has been altered or removed from your home of Whirlpool Corporation or Whirlpool Canada, LP (hereafter "Maytag...

Installation Instructions
Page 3
... sustain other damage. INSTALLATION REQUIREMENTS Tools and Parts Gather the required tools and parts before starting installation. Thickness of range near lower side) ■ Burner grates ■ Burner caps ■ Oven racks ■ 2 - #12 x 1⁵⁄₈" screws (for Manufactured Home Installations, ANSI A225.1/NFPA 501A or with your local hardware store...
... sustain other damage. INSTALLATION REQUIREMENTS Tools and Parts Gather the required tools and parts before starting installation. Thickness of range near lower side) ■ Burner grates ■ Burner caps ■ Oven racks ■ 2 - #12 x 1⁵⁄₈" screws (for Manufactured Home Installations, ANSI A225.1/NFPA 501A or with your local hardware store...

Installation Instructions
Page 6
... on or shutting off gas to the range opening and closing its individual shutoff valve must be used in insufficient gas supply. Gas supply line B. Burner Input Requirements Input ratings shown on longer runs may be used . Line pressure testing above ½ psi gauge (14" WCP) The range and its individual...
... on or shutting off gas to the range opening and closing its individual shutoff valve must be used in insufficient gas supply. Gas supply line B. Burner Input Requirements Input ratings shown on longer runs may be used . Line pressure testing above ½ psi gauge (14" WCP) The range and its individual...

Installation Instructions
Page 9
... in the gas line. The flame should be level for the anti-tip bracket securely attached to adjust leveling legs up . If a burner does not light at this point, turn each control knob to the "open when the handle is turned to the "LITE" position, the system creates a ... to the desired setting, a glow bar igniter heats and ignites the gas. Place rack in the gas supply line. Correct any leak found. 3. Remove cooktop burner caps and grates from under anti-tip bracket. 3. WARNING Electrical Shock Hazard Plug into its final location. 3. Do not remove ground prong. Push range back...
... in the gas line. The flame should be level for the anti-tip bracket securely attached to adjust leveling legs up . If a burner does not light at this point, turn each control knob to the "open when the handle is turned to the "LITE" position, the system creates a ... to the desired setting, a glow bar igniter heats and ignites the gas. Place rack in the gas supply line. Correct any leak found. 3. Remove cooktop burner caps and grates from under anti-tip bracket. 3. WARNING Electrical Shock Hazard Plug into its final location. 3. Do not remove ground prong. Push range back...
Installation Instructions
Page 10
...BAKE" scrolls down in the lower text display area, depending on oven selection, and 350°F is hot, the oven burner should light. "Baking" scrolls in the display. If burner does not light, press OFF/CANCEL to turn off the oven and contact your dealer or authorized service company for it... has not tripped or the household fuse has not blown. ■ Check that the gas shutoff valve is set temperature is hot, the oven bake burner should light. After 3 seconds, "Set temp" scrolls in the selected oven text display area, followed by "Push START." 2. After 3 seconds "Set temp" ...
...BAKE" scrolls down in the lower text display area, depending on oven selection, and 350°F is hot, the oven burner should light. "Baking" scrolls in the display. If burner does not light, press OFF/CANCEL to turn off the oven and contact your dealer or authorized service company for it... has not tripped or the household fuse has not blown. ■ Check that the gas shutoff valve is set temperature is hot, the oven bake burner should light. After 3 seconds, "Set temp" scrolls in the selected oven text display area, followed by "Push START." 2. After 3 seconds "Set temp" ...
Installation Instructions
Page 11
... extra part, go back through the steps to remove waxy residue caused by shipping material. If there is open, press the CANCEL button on surface burners and oven. Dispose of/recycle all parts are now installed. Check that you have all of liquid household cleaner and warm water to see the...
... extra part, go back through the steps to remove waxy residue caused by shipping material. If there is open, press the CANCEL button on surface burners and oven. Dispose of/recycle all parts are now installed. Check that you have all of liquid household cleaner and warm water to see the...
Installation Instructions
Page 13
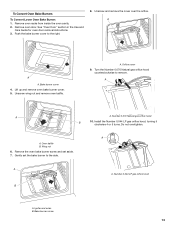
... Number 0.044 LP gas orifice hood, turning it clockwise 4 or 5 turns. To Convert Oven Bake Burners To Convert Lower Oven Bake Burner: 1. Wing nut 6. Lift up and remove oven bake burner cover. 5. Unscrew wing nut and remove oven baffle. Turn the Number 0.070 Natural gas orifice hood ...Remove oven door. Remove oven racks from inside the oven cavity. 2. A. Number 0.070 Natural gas orifice hood B 10. Gently set aside. 7. Bake burner screw 13 Do not overtighten. Number 0.044 LP gas orifice hood B A. Unscrew and remove the cover over the orifice. Remove the oven bake...
... Number 0.044 LP gas orifice hood, turning it clockwise 4 or 5 turns. To Convert Oven Bake Burners To Convert Lower Oven Bake Burner: 1. Wing nut 6. Lift up and remove oven bake burner cover. 5. Unscrew wing nut and remove oven baffle. Turn the Number 0.070 Natural gas orifice hood ...Remove oven door. Remove oven racks from inside the oven cavity. 2. A. Number 0.070 Natural gas orifice hood B 10. Gently set aside. 7. Bake burner screw 13 Do not overtighten. Number 0.044 LP gas orifice hood B A. Unscrew and remove the cover over the orifice. Remove the oven bake...

Installation Instructions
Page 14
... 0.055 Natural gas orifice spud in both ovens. Do not overtighten. .037 A A. A B B A. Broil burner orifice hood B. 11. Bake burner orifice hood B. Oven bake burner screw To Convert Upper Oven Bake Burner 12. Number 0.037 LP gas broil burner orifice hood 5. Broil burner 14 Repeat steps 1 through 8 above for conversion of the oven cavity and attach with...
... 0.055 Natural gas orifice spud in both ovens. Do not overtighten. .037 A A. A B B A. Broil burner orifice hood B. 11. Bake burner orifice hood B. Oven bake burner screw To Convert Upper Oven Bake Burner 12. Number 0.037 LP gas broil burner orifice hood 5. Broil burner 14 Repeat steps 1 through 8 above for conversion of the oven cavity and attach with...

Installation Instructions
Page 15
..."LP Gas Orifice Spud Chart." 6. Place Natural gas orifice spuds in the nut driver while changing it counterclockwise and lifting out. Checking for each burner location. The outer cone is very important. IMPORTANT: You may have to follow these instructions can tip the range and be killed. B A ... installation. Connect anti-tip bracket to help hold the Natural gas orifice spud in plastic parts bag for each cooktop burner. Gas tube opening C. If the burner grates are installed, remove them. 2. Natural gas orifice spud Use the following chart for correct LP gas orifice spud...
..."LP Gas Orifice Spud Chart." 6. Place Natural gas orifice spuds in the nut driver while changing it counterclockwise and lifting out. Checking for each burner location. The outer cone is very important. IMPORTANT: You may have to follow these instructions can tip the range and be killed. B A ... installation. Connect anti-tip bracket to help hold the Natural gas orifice spud in plastic parts bag for each cooktop burner. Gas tube opening C. If the burner grates are installed, remove them. 2. Natural gas orifice spud Use the following chart for correct LP gas orifice spud...
Installation Instructions
Page 16
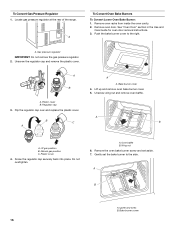
... at the rear of the range. A. Flip the regulator cap over and replace the plastic cover. Do not overtighten. Remove the oven bake burner screw and set the bake burner to the right. A. A B C B A A. A. A B A A. Unscrew wing nut and remove oven baffle. Plastic cover 4. ... and remove the plastic cover. Plastic cover B. Regulator cap 3. Push the bake burner cover to the side. Remove oven door. LP gas position B. Oven baffle B. Bake burner screw 16 Bake burner cover 4. Natural gas position C. Gas pressure regulator IMPORTANT: Do not remove the gas...
... at the rear of the range. A. Flip the regulator cap over and replace the plastic cover. Do not overtighten. Remove the oven bake burner screw and set the bake burner to the right. A. A B C B A A. A. A B A A. Unscrew wing nut and remove oven baffle. Plastic cover 4. ... and remove the plastic cover. Plastic cover B. Regulator cap 3. Push the bake burner cover to the side. Remove oven door. LP gas position B. Oven baffle B. Bake burner screw 16 Bake burner cover 4. Natural gas position C. Gas pressure regulator IMPORTANT: Do not remove the gas...


