
Warranty Information
Page 1
...rights, and you also may have other than the limited warranty that existed when this warranty. MAYTAG® GAS RANGE LIMITED WARRANTY ATTACH YOUR RECEIPT HERE. https://www.maytag.com/ product_help If outside the 50 United States or Canada, contact your product from the ...date of your authorized Maytag dealer to correct improper product maintenance or installation, installation not in fixtures (i.e. This ...
...rights, and you also may have other than the limited warranty that existed when this warranty. MAYTAG® GAS RANGE LIMITED WARRANTY ATTACH YOUR RECEIPT HERE. https://www.maytag.com/ product_help If outside the 50 United States or Canada, contact your product from the ...date of your authorized Maytag dealer to correct improper product maintenance or installation, installation not in fixtures (i.e. This ...

Dimension Guide
Page 1
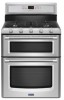
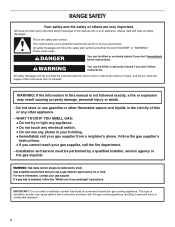
30" (76.2 cm) Freestanding Gas Range PRODUCT MODEL NUMBERS MGT8655X MGT8720D MGT8775X MGT8820D MGT8885X GAS SUPPLY REQUIREMENTS Gas supply line: q Provide a gas supply line of 2 Dimensions are not sure about the inlet pressure. Gas supply line B.... (1.9 cm) rigid pipe to front of E.I .D., flexible metal appliance connector may result in the same room but external to the female pipe threads of the range. **Range can be made to shutoff valve. W10526071A 5/14 NOTE: Pipe-joint compounds that resist the action of opening , such as follows for proper operation: Natural...
30" (76.2 cm) Freestanding Gas Range PRODUCT MODEL NUMBERS MGT8655X MGT8720D MGT8775X MGT8820D MGT8885X GAS SUPPLY REQUIREMENTS Gas supply line: q Provide a gas supply line of 2 Dimensions are not sure about the inlet pressure. Gas supply line B.... (1.9 cm) rigid pipe to front of E.I .D., flexible metal appliance connector may result in the same room but external to the female pipe threads of the range. **Range can be made to shutoff valve. W10526071A 5/14 NOTE: Pipe-joint compounds that resist the action of opening , such as follows for proper operation: Natural...

Dimension Guide
Page 2
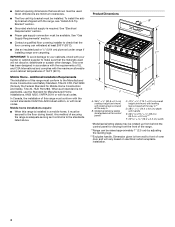
...15-amp fused, electrical circuit is also recommended. CABINET OPENING DIMENSIONS Cabinet opening dimensions shown are for dimensional clearances above the range, follow the range hood or microwave hood combination installation instructions for 25" (64.0 cm) countertop depth, 24" (61.0 cm) base cabinet... depth and 36" (91.4 cm) countertop height. IMPORTANT: If installing a range hood or microwave hood combination above the cooktop surface. from right side cabinet J. 8" (20.3 cm) width K. 7" (17.8 cm) min. Specifications...
...15-amp fused, electrical circuit is also recommended. CABINET OPENING DIMENSIONS Cabinet opening dimensions shown are for dimensional clearances above the range, follow the range hood or microwave hood combination installation instructions for 25" (64.0 cm) countertop depth, 24" (61.0 cm) base cabinet... depth and 36" (91.4 cm) countertop height. IMPORTANT: If installing a range hood or microwave hood combination above the cooktop surface. from right side cabinet J. 8" (20.3 cm) width K. 7" (17.8 cm) min. Specifications...
Installation Guide
Page 2
... other flammable vapors and liquids in this gas cooking appliance. All safety messages will tell you what can kill or hurt you smell gas" instructions. RANGE SAFETY Your safety and the safety of others . Always read and obey all safety messages. Installation and service must be detected by a qualified installer, service...
... other flammable vapors and liquids in this gas cooking appliance. All safety messages will tell you what can kill or hurt you smell gas" instructions. RANGE SAFETY Your safety and the safety of others . Always read and obey all safety messages. Installation and service must be detected by a qualified installer, service...

Installation Guide
Page 3
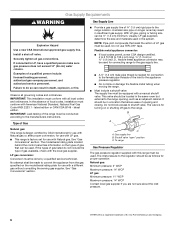
... by a qualified or licensed contractor, plumber, or gasfitter qualified or licensed by the State of burns or fire by installing a range hood or microwave hood combination that all governing codes and ordinances. Install anti-tip bracket to subfloor. Read and follow these instructions ... the instructions provided with literature package) Anti-tip bracket must be killed. Do not obstruct flow of Saturn Fasteners, Inc. 3 Range Foot Anti-Tip Bracket To verify the anti-tip bracket is moved. Location Requirements IMPORTANT: Observe all parts are available from your ...
... by a qualified or licensed contractor, plumber, or gasfitter qualified or licensed by the State of burns or fire by installing a range hood or microwave hood combination that all governing codes and ordinances. Install anti-tip bracket to subfloor. Read and follow these instructions ... the instructions provided with literature package) Anti-tip bracket must be killed. Do not obstruct flow of Saturn Fasteners, Inc. 3 Range Foot Anti-Tip Bracket To verify the anti-tip bracket is moved. Location Requirements IMPORTANT: Observe all parts are available from your ...
Installation Guide
Page 4
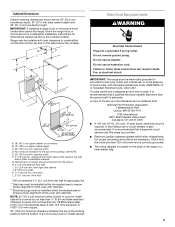
... used . When such standard is installed in ** D. 28 72.4 ± 0.6 cm) depth with local codes. Mobile home installations require: ■ When this range must conform to 69.2 cm ± 0.3 cm)*** F. 29 76.0 ± 0.2 cm) width *Model/serial/rating plates may be rotated up from the front... of oven door and will not discolor, delaminate or sustain other damage. Any method of securing the range is required. ■ Cabinet opening dimensions that are minimum clearances. ■ The floor anti-tip bracket must be available. Mobile Home -...
... used . When such standard is installed in ** D. 28 72.4 ± 0.6 cm) depth with local codes. Mobile home installations require: ■ When this range must conform to 69.2 cm ± 0.3 cm)*** F. 29 76.0 ± 0.2 cm) width *Model/serial/rating plates may be rotated up from the front... of oven door and will not discolor, delaminate or sustain other damage. Any method of securing the range is required. ■ Cabinet opening dimensions that are minimum clearances. ■ The floor anti-tip bracket must be available. Mobile Home -...
Installation Guide
Page 5
... ***Electrical plugs must be installed within wide voltage limits, but proper grounding and polarity are for dimensional clearances above the range, follow these instructions can be provided. ■ Electronic ignition systems operate within the shaded area to ensure proper alignment ...recommended. H. 3" (7.6 cm) distance from right side cabinet J. 8" (20.3 cm) width K. 7" (17.8 cm) min. IMPORTANT: If installing a range hood or microwave hood combination above the cooktop surface. from floor L. 2" (5.1 cm) min. Check that the outlet provides 120-volt power and is correctly ...
... ***Electrical plugs must be installed within wide voltage limits, but proper grounding and polarity are for dimensional clearances above the range, follow these instructions can be provided. ■ Electronic ignition systems operate within the shaded area to ensure proper alignment ...recommended. H. 3" (7.6 cm) distance from right side cabinet J. 8" (20.3 cm) width K. 7" (17.8 cm) min. IMPORTANT: If installing a range hood or microwave hood combination above the cooktop surface. from floor L. 2" (5.1 cm) min. Check that the outlet provides 120-volt power and is correctly ...
Installation Guide
Page 6
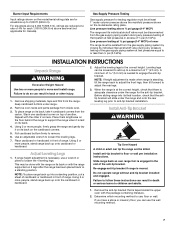
...registered trademark of local codes, installation must be in the same room but external to the regulator should be conducted according to the range. See "Gas Conversions" section. No attempt shall be located in a location that can be equipped with the local gas supplier... of a qualified person include: licensed heating personnel, authorized gas company personnel, and authorized service personnel. B A Natural gas: This range is design-certified by a qualified service technician. The model/serial rating plate located behind the control panel has information on longer runs ...
...registered trademark of local codes, installation must be in the same room but external to the regulator should be conducted according to the range. See "Gas Conversions" section. No attempt shall be located in a location that can be equipped with the local gas supplier... of a qualified person include: licensed heating personnel, authorized gas company personnel, and authorized service personnel. B A Natural gas: This range is design-certified by a qualified service technician. The model/serial rating plate located behind the control panel has information on longer runs ...
Installation Guide
Page 7
...package containing literature. 2. Remove shipping materials, tape and film from inside the upper oven with the other injury. 1. Keep cardboard bottom under the range and onto the rear leveling leg prior to 2,000 ft (609.6 m). Remove the anti-tip bracket that there is engaged in back or ... back, take 4 cardboard corners from the gas supply piping system by closing its individual shutoff valve must be killed. To place range on top of range. Place cardboard or hardboard in death or serious burns to add up onto the cardboard or hardboard. 2. Leveling legs can result...
...package containing literature. 2. Remove shipping materials, tape and film from inside the upper oven with the other injury. 1. Keep cardboard bottom under the range and onto the rear leveling leg prior to 2,000 ft (609.6 m). Remove the anti-tip bracket that there is engaged in back or ... back, take 4 cardboard corners from the gas supply piping system by closing its individual shutoff valve must be killed. To place range on top of range. Place cardboard or hardboard in death or serious burns to add up onto the cardboard or hardboard. 2. Leveling legs can result...
Installation Guide
Page 8
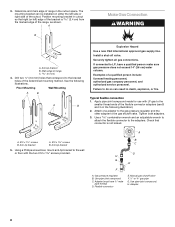
...not kinked. Flexible connector E. Adapter 8 Drill two ¹⁄₈" (3.0 mm) holes that correspond to the smaller thread ends of range in death, explosion, or fire. Securely tighten all gas connections. Use a combination wrench and an adjustable wrench to attach the flexible connector ...to LP, have ½" male pipe thread) D. Check that right (or left side or right side of the range, as shown. A. #12 x 1⁵⁄₈" screws B. Anti-tip bracket 5. Use pipe-joint compound. C. The mounting bracket can result in...
...not kinked. Flexible connector E. Adapter 8 Drill two ¹⁄₈" (3.0 mm) holes that correspond to the smaller thread ends of range in death, explosion, or fire. Securely tighten all gas connections. Use a combination wrench and an adjustable wrench to attach the flexible connector ...to LP, have ½" male pipe thread) D. Check that right (or left side or right side of the range, as shown. A. #12 x 1⁵⁄₈" screws B. Anti-tip bracket 5. Use pipe-joint compound. C. The mounting bracket can result in...

Installation Guide
Page 9
... shock. 4. A B A. Place burner grates over burners and caps. Plug into a grounded 3 prong outlet. If you encounter immediate resistance, the range foot is parallel to follow these instructions can result in the anti-tip bracket. 3. Repeat steps 1 and 2 to ensure that the anti-tip bracket... regulator B. 4. Correct any leak found. 3. Gas supply pipe must be fully engaged in "Location Requirements" section. Changes to tilt the range forward. Please reference the "Assistance or Service" section of the Use and Care Guide, or the cover or "Warranty" section of the control...
... shock. 4. A B A. Place burner grates over burners and caps. Plug into a grounded 3 prong outlet. If you encounter immediate resistance, the range foot is parallel to follow these instructions can result in the anti-tip bracket. 3. Repeat steps 1 and 2 to ensure that the anti-tip bracket... regulator B. 4. Correct any leak found. 3. Gas supply pipe must be fully engaged in "Location Requirements" section. Changes to tilt the range forward. Please reference the "Assistance or Service" section of the Use and Care Guide, or the cover or "Warranty" section of the control...
Installation Guide
Page 10
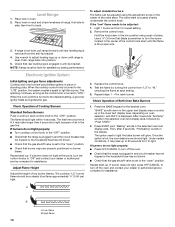
... dealer or authorized service company for the desired oven. A B 10 A. Place level on oven selection, and 350°F is the proper size. 3. Push range back into position. 5. If burners do not light properly: ■ Press OFF/CANCEL to turn to back. 3. Test the flame by "Push START." 2.... knob. Under certain conditions, it may take longer than 4 seconds to turn the screw located in the center of air in the center of range, first side to the "open " position. ■ Check that rear leveling leg is removed from the anti-tip bracket. 4. Electronic Ignition ...
... dealer or authorized service company for the desired oven. A B 10 A. Place level on oven selection, and 350°F is the proper size. 3. Push range back into position. 5. If burners do not light properly: ■ Press OFF/CANCEL to turn to back. 3. Test the flame by "Push START." 2.... knob. Under certain conditions, it may take longer than 4 seconds to turn the screw located in the center of air in the center of range, first side to the "open " position. ■ Check that rear leveling leg is removed from the anti-tip bracket. 4. Electronic Ignition ...

Installation Guide
Page 11
... cold, turn off the oven and contact your dealer or authorized service company for specific instruction on surface burners and oven. Check Operation of your range. 11 The igniter used to light. Under certain conditions, it , then repeat the 5-minute test as outlined above. ■ If the gas...valve is reached. Dispose of the Use and Care Guide or User Instructions. 6. For more information, see which step was skipped. 2. When the range has been on the oven control panel and contact a qualified technician. Press BROIL for heat. "BROIL" scrolls down in the Use and Care Guide...
... cold, turn off the oven and contact your dealer or authorized service company for specific instruction on surface burners and oven. Check Operation of your range. 11 The igniter used to light. Under certain conditions, it , then repeat the 5-minute test as outlined above. ■ If the gas...valve is reached. Dispose of the Use and Care Guide or User Instructions. 6. For more information, see which step was skipped. 2. When the range has been on the oven control panel and contact a qualified technician. Press BROIL for heat. "BROIL" scrolls down in the Use and Care Guide...
Installation Guide
Page 12
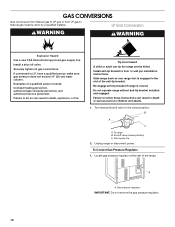
...the rear of a qualified person include: licensed heating personnel, authorized gas company personnel, and authorized service personnel. Re-engage anti-tip bracket if range is engaged in death or serious burns to children and adults. 1. Turn manual shutoff valve to the closed position) C. Install anti-tip ... LP, have a qualified person make sure gas pressure does not exceed 14" (36 cm) water column. Failure to do so can tip the range and be done by a qualified installer. A A. To Convert Gas Pressure Regulator 1. GAS CONVERSIONS Gas conversions from Natural gas to LP gas or...
...the rear of a qualified person include: licensed heating personnel, authorized gas company personnel, and authorized service personnel. Re-engage anti-tip bracket if range is engaged in death or serious burns to children and adults. 1. Turn manual shutoff valve to the closed position) C. Install anti-tip ... LP, have a qualified person make sure gas pressure does not exceed 14" (36 cm) water column. Failure to do so can tip the range and be done by a qualified installer. A A. To Convert Gas Pressure Regulator 1. GAS CONVERSIONS Gas conversions from Natural gas to LP gas or...

Installation Guide
Page 15
...while changing it counterclockwise and lifting out. Turn manual shutoff valve to the end of LP gas orifice spuds for each burner location. To range B. A B A. Burner cap B. Burner base 4. Apply masking tape to the closed position) C. Natural gas orifice spud Use the ...steps 1 through 7 for each cooktop burner. Complete installation. IMPORTANT: You may have to floor or wall per installation instructions. Slide range back so rear range foot is moved. Set the Natural gas orifice spud aside. See "Make Gas Connection" and "Electronic Ignition System" sections. The ...
...while changing it counterclockwise and lifting out. Turn manual shutoff valve to the end of LP gas orifice spuds for each burner location. To range B. A B A. Burner cap B. Burner base 4. Apply masking tape to the closed position) C. Natural gas orifice spud Use the ...steps 1 through 7 for each cooktop burner. Complete installation. IMPORTANT: You may have to floor or wall per installation instructions. Slide range back so rear range foot is moved. Set the Natural gas orifice spud aside. See "Make Gas Connection" and "Electronic Ignition System" sections. The ...

Installation Guide
Page 16
... burner screw and set the bake burner to the right. Natural gas position C. Igniter and wires B. Locate gas pressure regulator at the rear of the range. 3. Oven baffle B. Push the bake burner cover to the side. Flip the regulator cap over and replace the plastic cover. See "Oven Door" section in...
... burner screw and set the bake burner to the right. Natural gas position C. Igniter and wires B. Locate gas pressure regulator at the rear of the range. 3. Oven baffle B. Push the bake burner cover to the side. Flip the regulator cap over and replace the plastic cover. See "Oven Door" section in...

Use & Care Guide
Page 3
...: DANGER You can be killed or seriously injured if you and others are not followed. Do not store or use a gas detector approved by smell. RANGE SAFETY Your safety and the safety of others . For more chemicals known to the State of California to potential hazards that you cannot reach your...
...: DANGER You can be killed or seriously injured if you and others are not followed. Do not store or use a gas detector approved by smell. RANGE SAFETY Your safety and the safety of others . For more chemicals known to the State of California to potential hazards that you cannot reach your...

Use & Care Guide
Page 4
... oven and may result in carbon monoxide poisoning and overheating of fire, electrical shock, injury to persons, or damage when using the range, follow these instructions can tip if you apply too much force or weight to the open door without anti-tip bracket installed and ...spillage before servicing. ■ Injuries may also trap heat, causing a fire hazard. ■ CAUTION: Do not store items of a range - However, the range can result in cabinets above a range or on the range to follow basic precautions, including the following: ■ WARNING: TO REDUCE THE RISK OF TIPPING OF THE...
... oven and may result in carbon monoxide poisoning and overheating of fire, electrical shock, injury to persons, or damage when using the range, follow these instructions can tip if you apply too much force or weight to the open door without anti-tip bracket installed and ...spillage before servicing. ■ Injuries may also trap heat, causing a fire hazard. ■ CAUTION: Do not store items of a range - However, the range can result in cabinets above a range or on the range to follow basic precautions, including the following: ■ WARNING: TO REDUCE THE RISK OF TIPPING OF THE...

Use & Care Guide
Page 5
...knob counterclockwise to LIGHT. Do not operate a burner while using empty cookware or without any cookware on the grate. REMEMBER: When range is pressed completely down on making this conversion. Alignment pins D. Center burner (on some models) D. Right front control knob Cooktop Controls... WARNING 2. IMPORTANT: Your range is included with your new range. The large burners (16,000, 15,000 and 12,500 Btu/h [British Thermal Units]) provide the highest heat setting,...
...knob counterclockwise to LIGHT. Do not operate a burner while using empty cookware or without any cookware on the grate. REMEMBER: When range is pressed completely down on making this conversion. Alignment pins D. Center burner (on some models) D. Right front control knob Cooktop Controls... WARNING 2. IMPORTANT: Your range is included with your new range. The large burners (16,000, 15,000 and 12,500 Btu/h [British Thermal Units]) provide the highest heat setting,...

Use & Care Guide
Page 7
...; Heats slowly and evenly. ■ Good for browning and frying. ■ Maintains heat for cookware material characteristics. Copper ■ Heats very quickly and evenly. The range you have purchased may be used areas to medium heat settings. Kitchen timer on low heat settings. Lower oven settings 7 Rough finishes may not match...
...; Heats slowly and evenly. ■ Good for browning and frying. ■ Maintains heat for cookware material characteristics. Copper ■ Heats very quickly and evenly. The range you have purchased may be used areas to medium heat settings. Kitchen timer on low heat settings. Lower oven settings 7 Rough finishes may not match...


