

Warranty Information
Page 1
... of God or use of the original unit's warranty period. Commercial, non-residential, multiple-family use, or use your product. with the product, Maytag brand of the appliance. Parts and repair labor to chemicals. 11. will wiring, fuses or water inlet hoses). service, alteration or modification of 3. Service must be...
... of God or use of the original unit's warranty period. Commercial, non-residential, multiple-family use, or use your product. with the product, Maytag brand of the appliance. Parts and repair labor to chemicals. 11. will wiring, fuses or water inlet hoses). service, alteration or modification of 3. Service must be...

Use & Care Guide
Page 16
.... 4. Cancel may be pressed at the beginning of the range and the floor. ■■ Soil baked on the oven bottom is covered by ordering Part Number W10423113RP. Additional Clean cycles may be run to room temperature. If additional soils remain, leave a small amount of the oven interior. This new cleaning...
.... 4. Cancel may be pressed at the beginning of the range and the floor. ■■ Soil baked on the oven bottom is covered by ordering Part Number W10423113RP. Additional Clean cycles may be run to room temperature. If additional soils remain, leave a small amount of the oven interior. This new cleaning...

Use & Care Guide
Page 17
...scrubbed before cleaning. Staining, etching, pitting, or faint white spots can visit our website at www.maytag.ca. STAINLESS STEEL (on panel. ■■ affresh® Kitchen and Appliance Cleaner Part Number W10355010 (not included): See the "Accessories" section for more information. Damage may occur to ...■■ Soap and water: Pull knobs straight away from control panel to clean oven spills. In Canada, visit our website at www.maytag.com. These spills may affect the finish. Do not clean in the Off position. To avoid damage, do not remove seals under knobs...
...scrubbed before cleaning. Staining, etching, pitting, or faint white spots can visit our website at www.maytag.ca. STAINLESS STEEL (on panel. ■■ affresh® Kitchen and Appliance Cleaner Part Number W10355010 (not included): See the "Accessories" section for more information. Damage may occur to ...■■ Soap and water: Pull knobs straight away from control panel to clean oven spills. In Canada, visit our website at www.maytag.com. These spills may affect the finish. Do not clean in the Off position. To avoid damage, do not remove seals under knobs...
Use & Care Guide
Page 20
... like tapping a nail onto a piece of glass - This is normal. Order Part Number W10675026 5/8" (1.7 cm) Stainless Steel - Order Part Number W10731887 Backsplash Assembly White - Order Part Number W10655449 Stainless Steel - These are normal operational noises that can visit our website at www.maytag.com or call us at 1-800-688-9900 In Canada, visit...
... like tapping a nail onto a piece of glass - This is normal. Order Part Number W10675026 5/8" (1.7 cm) Stainless Steel - Order Part Number W10731887 Backsplash Assembly White - Order Part Number W10655449 Stainless Steel - These are normal operational noises that can visit our website at www.maytag.com or call us at 1-800-688-9900 In Canada, visit...

Use & Care Guide
Page 21
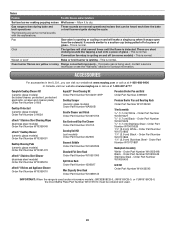
...residential, multiple-family use, or use of the original unit's warranty period. Defects or damage caused by unauthorized of non-genuine Maytag parts or accessories. Before contacting us to you want a longer or more comprehensive warranty than the representations contained in materials and workmanship... or installation instructions. of surfaces resulting from state to state or province to province. Service or parts for service in remote locations where an authorized Maytag servicer is used in the United States or Canada and applies only when the 10. The cost...
...residential, multiple-family use, or use of the original unit's warranty period. Defects or damage caused by unauthorized of non-genuine Maytag parts or accessories. Before contacting us to you want a longer or more comprehensive warranty than the representations contained in materials and workmanship... or installation instructions. of surfaces resulting from state to state or province to province. Service or parts for service in remote locations where an authorized Maytag servicer is used in the United States or Canada and applies only when the 10. The cost...
Installation Guide
Page 4
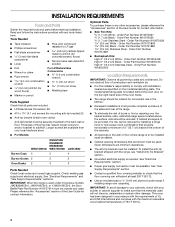
... 5" (12.7 cm) beyond the bottom of the User Guide for wood floors) ■ Masking tape ■ Marker or pencil Parts Supplied Check that the floor covering can be reduced by reaching over carpeting. Longer screws are included. ■ LP/Natural Gas Conversion Kit... store. ■ For Models: WEG730H0D KSGG700E KSGB900E MGS8880D WEG760H0D JGS1450D Burner Caps 5 5 4 Burner Grates 2 2 3 Oven Racks 2 3 3 Parts Needed Check local codes and consult gas supplier. IMPORTANT: To avoid damage to check that all governing codes and ordinances. This oven has been designed...
... 5" (12.7 cm) beyond the bottom of the User Guide for wood floors) ■ Masking tape ■ Marker or pencil Parts Supplied Check that the floor covering can be reduced by reaching over carpeting. Longer screws are included. ■ LP/Natural Gas Conversion Kit... store. ■ For Models: WEG730H0D KSGG700E KSGB900E MGS8880D WEG760H0D JGS1450D Burner Caps 5 5 4 Burner Grates 2 2 3 Oven Racks 2 3 3 Parts Needed Check local codes and consult gas supplier. IMPORTANT: To avoid damage to check that all governing codes and ordinances. This oven has been designed...
Installation Guide
Page 5
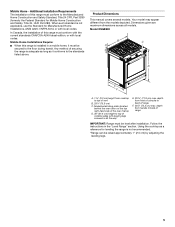
...models. Mobile Home Installations Require: ■ When this range must conform to the Manufactured Home Construction and Safety Standard, Title 24 CFR, Part 3280 (formerly the Federal Standard for Manufactured Home Installations, ANSI A225.1/NFPA 501A or with leveling legs screwed in a mobile home, it..." section. Any method of this range is not applicable, use the Standard for Mobile Home Construction and Safety, Title 24, HUD Part 280). Your model may appear different from front of console to top of range IMPORTANT: Range must be secured to the standards listed...
...models. Mobile Home Installations Require: ■ When this range must conform to the Manufactured Home Construction and Safety Standard, Title 24 CFR, Part 3280 (formerly the Federal Standard for Manufactured Home Installations, ANSI A225.1/NFPA 501A or with leveling legs screwed in a mobile home, it..." section. Any method of this range is not applicable, use the Standard for Mobile Home Construction and Safety, Title 24, HUD Part 280). Your model may appear different from front of console to top of range IMPORTANT: Range must be secured to the standards listed...
Installation Guide
Page 9
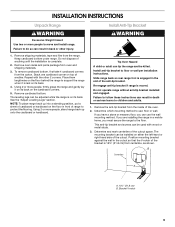
Do not dispose of the anti-tip bracket. Remove oven racks and parts package from the carton. See the "Adjust Leveling Legs" section. The mounting bracket can be adjusted while the range is engaged in the slot of ...
Do not dispose of the anti-tip bracket. Remove oven racks and parts package from the carton. See the "Adjust Leveling Legs" section. The mounting bracket can be adjusted while the range is engaged in the slot of ...

Installation Guide
Page 12
... properly positioned, surface burners will not light. The burner cap should be level when properly positioned. Remove cooktop burner caps and bases from package containing parts. Align the gas tube opening C. X-Large E D. Place the burner caps on the burner base. Do not put the wrong size burner cap on the appropriate...
... properly positioned, surface burners will not light. The burner cap should be level when properly positioned. Remove cooktop burner caps and bases from package containing parts. Align the gas tube opening C. X-Large E D. Place the burner caps on the burner base. Do not put the wrong size burner cap on the appropriate...
Installation Guide
Page 15
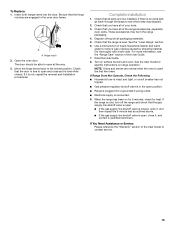
...If it , and contact a qualified technician. Complete Installation 1. Check that the hinge notches are engaged in the oven door frame. If there is an extra part, go back through the steps to open position. ■ Range is plugged into the door. These accessories may be able to see the "Range Care" ... of the range accessories, especially oven racks. For more information, see which step was skipped. 2. Read the User Guide. 8. Be sure that all parts are normal when the oven is cold, turn off the range and check that you have all of the User Guide to remove waxy residue...
...If it , and contact a qualified technician. Complete Installation 1. Check that the hinge notches are engaged in the oven door frame. If there is an extra part, go back through the steps to open position. ■ Range is plugged into the door. These accessories may be able to see the "Range Care" ... of the range accessories, especially oven racks. For more information, see which step was skipped. 2. Read the User Guide. 8. Be sure that all parts are normal when the oven is cold, turn off the range and check that you have all of the User Guide to remove waxy residue...


