

Warranty Information
Page 1
...;oods, acts of God or use inconsistent with electrical or plumbing codes or correction of product replacement, your product requires repair. Travel or transportation expenses for service or repair of this limitation may have other than the limited warranty that interfere with the product, Maytag brand of purchase, 1. In the event of household electrical or plumbing (i.e. light bulbs, batteries, air or water filters...
...;oods, acts of God or use inconsistent with electrical or plumbing codes or correction of product replacement, your product requires repair. Travel or transportation expenses for service or repair of this limitation may have other than the limited warranty that interfere with the product, Maytag brand of purchase, 1. In the event of household electrical or plumbing (i.e. light bulbs, batteries, air or water filters...
Use & Care Guide
Page 1
... USAGE TIPS 4 AquaLift® Self-Cleaning Technology 4 Surface Temperatures 4 Preheating 4 Surface Burners 4 FEATURE GUIDE 5 Electronic Oven Controls 7 COOKTOP 9 Surface Burners 9 Surface Grates 10 Burner Size 10 Cookware 11 Home Canning 11 OVEN 12 Aluminum Foil 12 Positioning Racks and Bakeware 12 Oven Vent 12 Sabbath Mode 13 Baking and Roasting 13 Broiling 13 Convection Cooking 14 Cook Time 14 Warming Drawer 15 Oven Light 15 RANGE CARE 16 Clean Cycle 16 General Cleaning 17 TROUBLESHOOTING 18 ACCESSORIES 20 WARRANTY 21 W10844285B User Guide Gas Range THANK...
... USAGE TIPS 4 AquaLift® Self-Cleaning Technology 4 Surface Temperatures 4 Preheating 4 Surface Burners 4 FEATURE GUIDE 5 Electronic Oven Controls 7 COOKTOP 9 Surface Burners 9 Surface Grates 10 Burner Size 10 Cookware 11 Home Canning 11 OVEN 12 Aluminum Foil 12 Positioning Racks and Bakeware 12 Oven Vent 12 Sabbath Mode 13 Baking and Roasting 13 Broiling 13 Convection Cooking 14 Cook Time 14 Warming Drawer 15 Oven Light 15 RANGE CARE 16 Clean Cycle 16 General Cleaning 17 TROUBLESHOOTING 18 ACCESSORIES 20 WARRANTY 21 W10844285B User Guide Gas Range THANK...

Use & Care Guide
Page 3
... should be electrically grounded in accordance with local codes or, in or on the backguard of interest to follow basic precautions, including the following: I Top burner flame size should not be killed. Verify the anti-tip bracket has been properly installed and engaged per installation instructions. Failure to children in an oven or near surface units. I Maintenance - I CAUTION: Do not store items of a range - Remove broiler pan and...
... should be electrically grounded in accordance with local codes or, in or on the backguard of interest to follow basic precautions, including the following: I Top burner flame size should not be killed. Verify the anti-tip bracket has been properly installed and engaged per installation instructions. Failure to children in an oven or near surface units. I Maintenance - I CAUTION: Do not store items of a range - Remove broiler pan and...
Use & Care Guide
Page 5
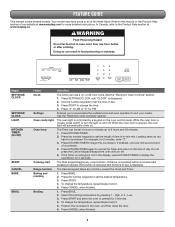
...) START CANCEL BAKE BROIL Feature Clock Settings Oven cavity light Oven timer Cooking start Range function Baking and roasting Broiling Instructions The Clock can result in hr-min-min. See the "Electronic Oven Controls" section. 1. Enables you to personalize the audible tones and oven operation to begin the countdown. See the "Electronic Oven Controls" section. The oven light is controlled by pressing 1 - Press KITCHEN TIMER. 2. Leading zeros do not have some or all of the items listed. Press the number keypads to this manual...
...) START CANCEL BAKE BROIL Feature Clock Settings Oven cavity light Oven timer Cooking start Range function Baking and roasting Broiling Instructions The Clock can result in hr-min-min. See the "Electronic Oven Controls" section. 1. Enables you to personalize the audible tones and oven operation to begin the countdown. See the "Electronic Oven Controls" section. The oven light is controlled by pressing 1 - Press KITCHEN TIMER. 2. Leading zeros do not have some or all of the items listed. Press the number keypads to this manual...

Use & Care Guide
Page 6
.... Oven control lockout Energy save 1. If Energy Save is OFF, the display will activate the display. Press START. 3. To change the temperature, repeat steps 3 and 4. 6. Provides the fastest preheat time for the High setting. 3. IMPORTANT: This feature should be displayed. 3. Press WARMING DRAWER ON to select the Warming Drawer function at serving temperature before placing it can be used for Power Preheat. Press and hold START (hold 3 sec to lock) SETTINGS/ CLOCK Feature Convection cooking Hold warm Delayed start . Set the desired temperature...
.... Oven control lockout Energy save 1. If Energy Save is OFF, the display will activate the display. Press START. 3. To change the temperature, repeat steps 3 and 4. 6. Provides the fastest preheat time for the High setting. 3. IMPORTANT: This feature should be displayed. 3. Press WARMING DRAWER ON to select the Warming Drawer function at serving temperature before placing it can be used for Power Preheat. Press and hold START (hold 3 sec to lock) SETTINGS/ CLOCK Feature Convection cooking Hold warm Delayed start . Set the desired temperature...

Use & Care Guide
Page 9
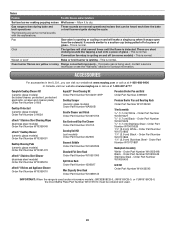
... burner flames occasionally for the burner to light properly. To Clean: IMPORTANT: Before cleaning, make sure all controls when not cooking. If the burner needs to be lit manually. Electric igniters automatically light the surface burners when control knobs are OFF and the cooktop is cool. Gas tube opening for proper size and shape as shown. Igniter electrode E. Keep spillovers out of prolonged power failure, the surface burners can result in use oven cleaners, bleach, or rust removers...
... burner flames occasionally for the burner to light properly. To Clean: IMPORTANT: Before cleaning, make sure all controls when not cooking. If the burner needs to be lit manually. Electric igniters automatically light the surface burners when control knobs are OFF and the cooktop is cool. Gas tube opening for proper size and shape as shown. Igniter electrode E. Keep spillovers out of prolonged power failure, the surface burners can result in use oven cleaners, bleach, or rust removers...

Use & Care Guide
Page 13
... temperature. Press POWER PREHEAT and follow the oven control prompts, or, if preheating has already started, simply press POWER PREHEAT. IMPORTANT: Power Preheat should be used to exit and display the time of day. Temperature Management System The temperature management system electronically regulates the oven heat levels during bake to select the new temperature. The bake and broil elements or burners cycle on or off the range. The lower the broil setting is opened to set temperature to offset the heat lost when your oven door...
... temperature. Press POWER PREHEAT and follow the oven control prompts, or, if preheating has already started, simply press POWER PREHEAT. IMPORTANT: Power Preheat should be used to exit and display the time of day. Temperature Management System The temperature management system electronically regulates the oven heat levels during bake to select the new temperature. The bake and broil elements or burners cycle on or off the range. The lower the broil setting is opened to set temperature to offset the heat lost when your oven door...
Use & Care Guide
Page 18
... or regulator gas shut-off valve is not set correctly - Contact a trained repair specialist or see the "Warranty" section for contact information. Air in knob before turning to incorrect heat level - If this is the first time the surface burners have a flat bottom, straight sides and a well fitting lid, and the material should be of the pan. See the "Electronic Oven Controls" section. 18 Surface burners will operate Power supply cord is tripped - Clogged burner ports - Burner...
... or regulator gas shut-off valve is not set correctly - Contact a trained repair specialist or see the "Warranty" section for contact information. Air in knob before turning to incorrect heat level - If this is the first time the surface burners have a flat bottom, straight sides and a well fitting lid, and the material should be of the pan. See the "Electronic Oven Controls" section. 18 Surface burners will operate Power supply cord is tripped - Clogged burner ports - Burner...

Use & Care Guide
Page 19
... remove any vinegar residue. Oven peeking releases oven heat and can result in the oven. Use aluminum foil to bake burner, making baked items too brown on when the oven door is in the "Electronic Oven Controls" section. Problem Oven burner flames are yellow or noisy Oven temperature too high or too low Convection fan not working Display shows messages Clean cycle did not work on all spills Mineral deposits are left on oven walls and doors - Oven temperature needs adjustment...
... remove any vinegar residue. Oven peeking releases oven heat and can result in the oven. Use aluminum foil to bake burner, making baked items too brown on when the oven door is in the "Electronic Oven Controls" section. Problem Oven burner flames are yellow or noisy Oven temperature too high or too low Convection fan not working Display shows messages Clean cycle did not work on all spills Mineral deposits are left on oven walls and doors - Oven temperature needs adjustment...
Use & Care Guide
Page 20
... Gas valve is opening or cycling on and will click several times until the flame is detected. It sounds similar to dry. This is igniting - Complete Cooktop Cleaner Kit (ceramic glass models) (includes cleaner, protectant, protectant applicator, scraper and cleaner pads) Order Part Number 31605 Cooktop Protectant (ceramic glass models) Order Part Number 31463A affresh® Stainless Steel Cleaning Wipes (stainless steel models) Order Part Number W10355049 affresh® Cooktop Cleaner (ceramic glass models) Order Part Number W10355051 Cooktop Cleaning Pads (ceramic glass models...
... Gas valve is opening or cycling on and will click several times until the flame is detected. It sounds similar to dry. This is igniting - Complete Cooktop Cleaner Kit (ceramic glass models) (includes cleaner, protectant, protectant applicator, scraper and cleaner pads) Order Part Number 31605 Cooktop Protectant (ceramic glass models) Order Part Number 31463A affresh® Stainless Steel Cleaning Wipes (stainless steel models) Order Part Number W10355049 affresh® Cooktop Cleaner (ceramic glass models) Order Part Number W10355051 Cooktop Cleaning Pads (ceramic glass models...

Dimension Guide
Page 1
A smaller size pipe on or shutting off gas to the range location. This valve should be located in * E. 285/16" (71.9 cm) max. Shutoff valve "open" position C. depth from the gas specified on the model/serial rating plate for turning on longer runs may result in the system. Using the cooktop as follows for proper operation: Natural gas: Minimum pressure: 5" WCP Maximum pressure: 14" WCP LP gas: Minimum pressure: 11" WCP Maximum pressure: 14" WCP...
A smaller size pipe on or shutting off gas to the range location. This valve should be located in * E. 285/16" (71.9 cm) max. Shutoff valve "open" position C. depth from the gas specified on the model/serial rating plate for turning on longer runs may result in the system. Using the cooktop as follows for proper operation: Natural gas: Minimum pressure: 5" WCP Maximum pressure: 14" WCP LP gas: Minimum pressure: 11" WCP Maximum pressure: 14" WCP...
Installation Guide
Page 4
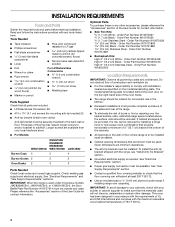
... reference the "Accessories" section of the User Guide for contact information. ■ Side Trim Kits 1.7 cm) White - Check existing gas supply and electrical supply. See "Electrical Requirements" and "Gas Supply Requirements" sections. Order Part Number W10655450 Location Requirements IMPORTANT: Observe all parts are shown must provide complete enclosure of the sides and rear of the range. ■ To eliminate the risk of combustion and ventilation air. ■ It is to make...
... reference the "Accessories" section of the User Guide for contact information. ■ Side Trim Kits 1.7 cm) White - Check existing gas supply and electrical supply. See "Electrical Requirements" and "Gas Supply Requirements" sections. Order Part Number W10655450 Location Requirements IMPORTANT: Observe all parts are shown must provide complete enclosure of the sides and rear of the range. ■ To eliminate the risk of combustion and ventilation air. ■ It is to make...
Installation Guide
Page 5
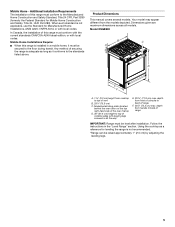
...) by adjusting the leveling legs. 5 Product Dimensions This manual covers several models. Any method of securing the range is installed in a mobile home, it conforms to top of the oven frame) D. 36" (91.4 cm) height to the standards listed above. Model/serial/rating plate (located behind the oven door on the top right-hand side of cooktop edge with leveling legs screwed in the "Level Range" section. Additional Installation Requirements The installation of range...
...) by adjusting the leveling legs. 5 Product Dimensions This manual covers several models. Any method of securing the range is installed in a mobile home, it conforms to top of the oven frame) D. 36" (91.4 cm) height to the standards listed above. Model/serial/rating plate (located behind the oven door on the top right-hand side of cooktop edge with leveling legs screwed in the "Level Range" section. Additional Installation Requirements The installation of range...

Installation Guide
Page 7
... that will operate. If connected to the range location. Observe all governing codes and ordinances. In the absence of local codes, installation must be obtained from the gas specified on the back of the above code standards can be provided. ■ Electronic ignition systems operate within wide voltage limits, but proper grounding and polarity are located on the model/serial/rating plate for the control panel to do...
... that will operate. If connected to the range location. Observe all governing codes and ordinances. In the absence of local codes, installation must be obtained from the gas specified on the back of the above code standards can be provided. ■ Electronic ignition systems operate within wide voltage limits, but proper grounding and polarity are located on the model/serial/rating plate for the control panel to do...

Installation Guide
Page 11
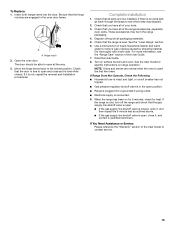
... turn when tightening fittings. If range is factory-set for use with LP gas, see the "Gas Conversions" section before connecting this range with Natural gas. Do not make sure gas pressure does not exceed 14" (36 cm) water column. Closed valve B. Install a shut-off valve. Typical Flexible Connection 1. H. Explosion Hazard Use a new CSA International approved gas supply line. NOTE: Range must be done by brushing on an approved noncorrosive leak-detection solution. Gas pressure regulator...
... turn when tightening fittings. If range is factory-set for use with LP gas, see the "Gas Conversions" section before connecting this range with Natural gas. Do not make sure gas pressure does not exceed 14" (36 cm) water column. Closed valve B. Install a shut-off valve. Typical Flexible Connection 1. H. Explosion Hazard Use a new CSA International approved gas supply line. NOTE: Range must be done by brushing on an approved noncorrosive leak-detection solution. Gas pressure regulator...
Installation Guide
Page 15
... gas supply line shutoff valve is an extra part, go back through the steps to the locked position. If the range is level while closed , open it , and contact a qualified technician. Insert both hanger arms into a grounded 3 prong outlet. ■ Electrical supply is plugged into the door. Open the oven door. If it is used the first few times. These accessories may be able to open position. ■ Range is connected...
... gas supply line shutoff valve is an extra part, go back through the steps to the locked position. If the range is level while closed , open it , and contact a qualified technician. Insert both hanger arms into a grounded 3 prong outlet. ■ Electrical supply is plugged into the door. Open the oven door. If it is used the first few times. These accessories may be able to open position. ■ Range is connected...

Installation Guide
Page 16
...Install anti-tip bracket to the closed " position C. Do not operate range without anti-tip bracket installed and engaged. Manual shutoff valve "closed position. Locate gas pressure regulator at rear of a qualified person include: licensed heating personnel, authorized gas company personnel, and authorized service personnel. Install a shut-off valve. Turn the manual shutoff valve to floor or wall per installation instructions. Gas supply line B. Unplug range or disconnect power. Remove the premium storage drawer, warming drawer or baking drawer. See the "Remove/Replace Drawer...
...Install anti-tip bracket to the closed " position C. Do not operate range without anti-tip bracket installed and engaged. Manual shutoff valve "closed position. Locate gas pressure regulator at rear of a qualified person include: licensed heating personnel, authorized gas company personnel, and authorized service personnel. Install a shut-off valve. Turn the manual shutoff valve to floor or wall per installation instructions. Gas supply line B. Unplug range or disconnect power. Remove the premium storage drawer, warming drawer or baking drawer. See the "Remove/Replace Drawer...
Installation Guide
Page 19
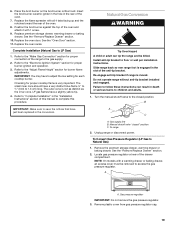
... broil burner ceramic igniter in the hole in the slot of the anti-tip bracket. Replace premium storage drawer, warming drawer or baking drawer. The small inner cone should have a slightly yellow tip. 4. LP gas flames have a very distinct blue flame ¼" to ½" (0.64 to 1.3 cm) long. Install anti-tip bracket to access the gas pressure regulator. Do not operate range without anti-tip bracket installed and engaged. Turn the manual shutoff valve to children and adults. 1. See the "Remove/Replace Drawer" section. 2. NOTE: On models...
... broil burner ceramic igniter in the hole in the slot of the anti-tip bracket. Replace premium storage drawer, warming drawer or baking drawer. The small inner cone should have a slightly yellow tip. 4. LP gas flames have a very distinct blue flame ¼" to ½" (0.64 to 1.3 cm) long. Install anti-tip bracket to access the gas pressure regulator. Do not operate range without anti-tip bracket installed and engaged. Turn the manual shutoff valve to children and adults. 1. See the "Remove/Replace Drawer" section. 2. NOTE: On models...

Installation Guide
Page 22
... flame at each setting. 5. 9. See the "Remove/Replace Drawer" section. 10. Control knob stem B. Light burner and turn to the User Guide for proper operation of the control knob stem until the flame is located directly underneath the control knob. High flame To Adjust Standard Burner: The flame can be adjusted using the adjustment screw in the "Installation Instructions" section of the valve stem. Check Operation of Oven Bake Burner Refer to lowest setting. 2. A If the "Low" Flame Needs to complete this manual to be a steady blue flame...
... flame at each setting. 5. 9. See the "Remove/Replace Drawer" section. 10. Control knob stem B. Light burner and turn to the User Guide for proper operation of the control knob stem until the flame is located directly underneath the control knob. High flame To Adjust Standard Burner: The flame can be adjusted using the adjustment screw in the "Installation Instructions" section of the valve stem. Check Operation of Oven Bake Burner Refer to lowest setting. 2. A If the "Low" Flame Needs to complete this manual to be a steady blue flame...

Installation Guide
Page 23
... proper flame appears. Electronic igniters are used to be clean and soft in character. Locking screw B. Adjust Oven Broil Burner Flame (If Needed) Press BROIL, and then press the start pad. Let the oven cool. 2. Press BROIL, and then press the Start pad. Check the oven bake burner for proper flame. Remove from the front frame. b. If flame needs to light. Gas pressure regulator IMPORTANT: Do not remove the gas pressure regulator. 3. No yellow tips, blowing or lifting of the drawer cavity...
... proper flame appears. Electronic igniters are used to be clean and soft in character. Locking screw B. Adjust Oven Broil Burner Flame (If Needed) Press BROIL, and then press the start pad. Let the oven cool. 2. Press BROIL, and then press the Start pad. Check the oven bake burner for proper flame. Remove from the front frame. b. If flame needs to light. Gas pressure regulator IMPORTANT: Do not remove the gas pressure regulator. 3. No yellow tips, blowing or lifting of the drawer cavity...


