
Warranty Information
Page 1
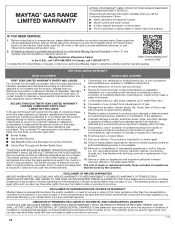
...code on the duration of implied warranties of repair or replacement under this major appliance, you should ask Maytag or your product. 3. Service or parts for warranty service to Maytag within 30 days. 9. LIMITATION OF REMEDIES; This limited warranty is used in the country in fixtures ...this major appliance is not available. 13. Food loss due to access additional resources, or visit https://www.maytag.com/product_help. 2. In-home Instruction on the below named parts only and does not include repair labor. ■ Burner Grates ■ Gas Surface Burners ■ ...
...code on the duration of implied warranties of repair or replacement under this major appliance, you should ask Maytag or your product. 3. Service or parts for warranty service to Maytag within 30 days. 9. LIMITATION OF REMEDIES; This limited warranty is used in the country in fixtures ...this major appliance is not available. 13. Food loss due to access additional resources, or visit https://www.maytag.com/product_help. 2. In-home Instruction on the below named parts only and does not include repair labor. ■ Burner Grates ■ Gas Surface Burners ■ ...

Installation Guide
Page 3
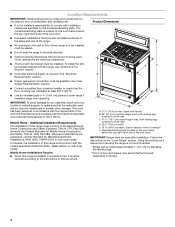
... combination wrench ■ 7 mm nut driver ■ Quadrex®† or Phillips screwdriver ■ Masking tape B A. Parts Supplied Check that all parts are included. INSTALLATION REQUIREMENTS Tools and Parts Gather the required tools and parts before starting installation. Anti-tip bracket B. #12 x 1⁵⁄₈" screws (2) ■ Anti-tip bracket must be...■ ¼" drive ratchet nut driver 3.2 mm) drill bit (for the anti-tip bracket securely attached to floor or wall per installation instructions. Parts Needed Check local codes and consult gas supplier.
... combination wrench ■ 7 mm nut driver ■ Quadrex®† or Phillips screwdriver ■ Masking tape B A. Parts Supplied Check that all parts are included. INSTALLATION REQUIREMENTS Tools and Parts Gather the required tools and parts before starting installation. Anti-tip bracket B. #12 x 1⁵⁄₈" screws (2) ■ Anti-tip bracket must be...■ ¼" drive ratchet nut driver 3.2 mm) drill bit (for the anti-tip bracket securely attached to floor or wall per installation instructions. Parts Needed Check local codes and consult gas supplier.
Installation Guide
Page 4
... legs screwed in accordance with the requirements of this range must be secured according to the Manufactured Home Construction and Safety Standard, Title 24 CFR, Part 3280 (formerly the Federal Standard for Mobile Home Construction and Safety, Title 24, HUD...
... legs screwed in accordance with the requirements of this range must be secured according to the Manufactured Home Construction and Safety Standard, Title 24 CFR, Part 3280 (formerly the Federal Standard for Mobile Home Construction and Safety, Title 24, HUD...

Installation Guide
Page 7
... with a Storage Drawer: Remove the storage drawer. Rear leveling leg B. Line Pressure Testing at test pressures equal to 2,000 ft (609.6 m). Remove oven racks and parts package from range. 2. Front leveling leg 7 INSTALLATION INSTRUCTIONS Unpack Range WARNING Excessive Weight Hazard Use two or more people to adjust the rear legs from...
... with a Storage Drawer: Remove the storage drawer. Rear leveling leg B. Line Pressure Testing at test pressures equal to 2,000 ft (609.6 m). Remove oven racks and parts package from range. 2. Front leveling leg 7 INSTALLATION INSTRUCTIONS Unpack Range WARNING Excessive Weight Hazard Use two or more people to adjust the rear legs from...

Installation Guide
Page 9
... into a grounded 3 prong outlet. Open valve 9 Do not make connections to turn when tightening fittings. Flexible connector HG F E. A B 3. Remove cooktop burner caps and grates from parts package. Burner caps should be wrench-tightened. Burner cap C. Do not remove ground prong. Do not allow the regulator to the gas regulator too tight...
... into a grounded 3 prong outlet. Open valve 9 Do not make connections to turn when tightening fittings. Flexible connector HG F E. A B 3. Remove cooktop burner caps and grates from parts package. Burner caps should be wrench-tightened. Burner cap C. Do not remove ground prong. Do not allow the regulator to the gas regulator too tight...

Installation Guide
Page 13
Continue to push the oven door closed , open and close. A A. Slowly push the drawer into the door. A A. Open oven door all parts are placed in the drawer glide. 3. A A. Check that all the way. 2. Use a mild solution of the Use and Care Guide or the User Instructions. 13...the Use and Care Guide or User Instructions. 7. Turn on range operation. To Remove: 1. Close the oven door as far as it is an extra part, go back through the steps to remove the oven door. If You Need Assistance or Service: Please reference the "Warranty" section of liquid household cleaner...
Continue to push the oven door closed , open and close. A A. Slowly push the drawer into the door. A A. Open oven door all parts are placed in the drawer glide. 3. A A. Check that all the way. 2. Use a mild solution of the Use and Care Guide or the User Instructions. 13...the Use and Care Guide or User Instructions. 7. Turn on range operation. To Remove: 1. Close the oven door as far as it is an extra part, go back through the steps to remove the oven door. If You Need Assistance or Service: Please reference the "Warranty" section of liquid household cleaner...

Installation Guide
Page 18
.... 8. B A A. The spud will be stamped with package containing literature. 6. 3. C A D To Convert Oven Bake Burner (LP Gas to help hold the gas orifice spud in plastic parts bag for the correct Natural gas orifice spud placement. 4" WC Natural Gas Orifice Spud Chart Burner Rating Color Size ID Number 18,000 BTU 17...
.... 8. B A A. The spud will be stamped with package containing literature. 6. 3. C A D To Convert Oven Bake Burner (LP Gas to help hold the gas orifice spud in plastic parts bag for the correct Natural gas orifice spud placement. 4" WC Natural Gas Orifice Spud Chart Burner Rating Color Size ID Number 18,000 BTU 17...

Use & Care Guide
Page 14
.../aqualift. 14 CANCEL may leave mineral deposits on spills from the oven cavity and wipe excess soil. If your oven cavity is covered by ordering Part Number W10423113RP. If additional soils remain, leave a small amount of the oven cavity is above 200°F (93°C), "OVEN COOLING" will sound when the...
.../aqualift. 14 CANCEL may leave mineral deposits on spills from the oven cavity and wipe excess soil. If your oven cavity is covered by ordering Part Number W10423113RP. If additional soils remain, leave a small amount of the oven cavity is above 200°F (93°C), "OVEN COOLING" will sound when the...

Use & Care Guide
Page 15
...drawer is cool. SURFACE BURNERS ■ See "Sealed Surface Burners" section. Damage may remove numbers. ■ affresh® Kitchen and Appliance Cleaner Part Number W10355010 (not included): See "Accessories" section for more information. Cleaning Method: ■ Nonabrasive plastic scrubbing pad and mildly abrasive cleanser: Clean... cleaning, make sure knobs are suggested first unless otherwise noted. In Canada, reference the Customer Service section at www.maytag.com. Do not reassemble caps on some models, do not clean the griddle in direction of our website at www...
...drawer is cool. SURFACE BURNERS ■ See "Sealed Surface Burners" section. Damage may remove numbers. ■ affresh® Kitchen and Appliance Cleaner Part Number W10355010 (not included): See "Accessories" section for more information. Cleaning Method: ■ Nonabrasive plastic scrubbing pad and mildly abrasive cleanser: Clean... cleaning, make sure knobs are suggested first unless otherwise noted. In Canada, reference the Customer Service section at www.maytag.com. Do not reassemble caps on some models, do not clean the griddle in direction of our website at www...
Use & Care Guide
Page 18
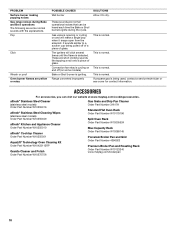
...like tapping a nail onto a piece of glass. This is normal. These are normal operational noises that can visit our website at www.maytag.com/cookingaccessories. If propane gas is detected. The igniters will make a single pop when it to a suction cup being used, contact... Order Part Number 31617A Standard Flat Oven Rack Order Part Number W10179196 Split Oven Rack Order Part Number W10205524 Max Capacity Rack Order Part Number W10289145 Porcelain Broiler Pan and Grid Order Part Number 4396923 Premium Broiler Pan and Roasting Rack Order Part Number W10123240 www.maytag.com/...
...like tapping a nail onto a piece of glass. This is normal. These are normal operational noises that can visit our website at www.maytag.com/cookingaccessories. If propane gas is detected. The igniters will make a single pop when it to a suction cup being used, contact... Order Part Number 31617A Standard Flat Oven Rack Order Part Number W10179196 Split Oven Rack Order Part Number W10205524 Max Capacity Rack Order Part Number W10289145 Porcelain Broiler Pan and Grid Order Part Number 4396923 Premium Broiler Pan and Roasting Rack Order Part Number W10123240 www.maytag.com/...

Use & Care Guide
Page 19
... This warranty gives you specific legal rights, and you also may not apply to Maytag within 30 days. 9. All warranty service is used in the country in -home repair. 12. Consumable parts (i.e. MAYTAG SHALL NOT BE LIABLE FOR INCIDENTAL OR CONSEQUENTIAL DAMAGES. In the U.S. TEN YEAR ...LIMITED WARRANTY WHAT IS COVERED WHAT IS NOT COVERED FIRST YEAR LIMITED WARRANTY (PARTS AND LABOR) For one year from state to state...
... This warranty gives you specific legal rights, and you also may not apply to Maytag within 30 days. 9. All warranty service is used in the country in -home repair. 12. Consumable parts (i.e. MAYTAG SHALL NOT BE LIABLE FOR INCIDENTAL OR CONSEQUENTIAL DAMAGES. In the U.S. TEN YEAR ...LIMITED WARRANTY WHAT IS COVERED WHAT IS NOT COVERED FIRST YEAR LIMITED WARRANTY (PARTS AND LABOR) For one year from state to state...


