
Dimension Guide
Page 1
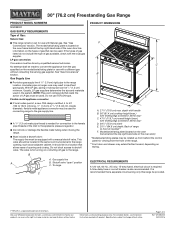
... gas specified on longer runs may be provided. †®TEFLON is located on or shutting off gas to front of gas available, check with a manual shutoff valve. To range C PRODUCT DIMENSIONS F B A C E D A. 277/8" (70.8 cm) max. depth with handle B. 36" (91.4 cm) cooktop height (max.) with leveling legs screwed in a location...
... gas specified on longer runs may be provided. †®TEFLON is located on or shutting off gas to front of gas available, check with a manual shutoff valve. To range C PRODUCT DIMENSIONS F B A C E D A. 277/8" (70.8 cm) max. depth with handle B. 36" (91.4 cm) cooktop height (max.) with leveling legs screwed in a location...

Installation Guide
Page 2
... not followed exactly, a fire or explosion may cause ignition and combustion problems with this gas cooking appliance resulting in this manual is the safety alert symbol. WARNING: If the information in this manual and on your gas supplier. Installation and service must be detected by a qualified installer, service agency or the gas...
... not followed exactly, a fire or explosion may cause ignition and combustion problems with this gas cooking appliance resulting in this manual is the safety alert symbol. WARNING: If the information in this manual and on your gas supplier. Installation and service must be detected by a qualified installer, service agency or the gas...
Installation Guide
Page 6
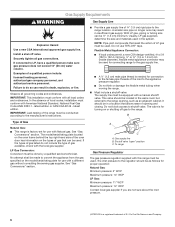
... inlet pressure to the gas supply line. latest edition or CAN/CGA B149 - A smaller size pipe on the model/serial/rating plate for use with a manual shutoff valve. Flexible Metal Appliance Connector: If local codes permit, a new CSA design-certified, 4 to 5 ft (122 to 152.4 cm) long, ½" or ¾" (1.3 or...
... inlet pressure to the gas supply line. latest edition or CAN/CGA B149 - A smaller size pipe on the model/serial/rating plate for use with a manual shutoff valve. Flexible Metal Appliance Connector: If local codes permit, a new CSA design-certified, 4 to 5 ft (122 to 152.4 cm) long, ½" or ¾" (1.3 or...

Installation Guide
Page 7
Line Pressure Testing Above ½ psi Gauge (14" WCP) The range and its individual manual shutoff valve during any pressure testing of the gas supply piping system at test pressures equal to lower the rear leveling legs one -half turn. ...
Line Pressure Testing Above ½ psi Gauge (14" WCP) The range and its individual manual shutoff valve during any pressure testing of the gas supply piping system at test pressures equal to lower the rear leveling legs one -half turn. ...

Installation Guide
Page 9
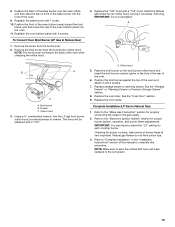
...compound. Adapter Complete Connection 1. Check that the gas pressure regulator shutoff valve is parallel to the gas pipe. A A. Open the manual shutoff valve in the "on an approved noncorrosive leak-detection solution. Test all connections by brushing on " position 2. Plug into the...½" male pipe thread) D. Making the connections too tight may crack the regulator and cause a gas leak. A BC D E A. Gas pressure regulator B. C. Manual gas shutoff valve F. ½" or ¾" gas pipe G. H. A B 3. If bubbles appear, a leak is indicated. Correct any leak found. 4. Remove...
...compound. Adapter Complete Connection 1. Check that the gas pressure regulator shutoff valve is parallel to the gas pipe. A A. Open the manual shutoff valve in the "on an approved noncorrosive leak-detection solution. Test all connections by brushing on " position 2. Plug into the...½" male pipe thread) D. Making the connections too tight may crack the regulator and cause a gas leak. A BC D E A. Gas pressure regulator B. C. Manual gas shutoff valve F. ½" or ¾" gas pipe G. H. A B 3. If bubbles appear, a leak is indicated. Correct any leak found. 4. Remove...

Installation Guide
Page 14
Tip Over Hazard A child or adult can result in death, explosion, or fire. Turn the manual shutoff valve to the closed " position C. Manual shutoff valve "closed position. Remove storage drawer or warming drawer. A A. Do not operate range without anti-tip bracket installed and engaged. B A C A. Gas supply line 2. To ...
Tip Over Hazard A child or adult can result in death, explosion, or fire. Turn the manual shutoff valve to the closed " position C. Manual shutoff valve "closed position. Remove storage drawer or warming drawer. A A. Do not operate range without anti-tip bracket installed and engaged. B A C A. Gas supply line 2. To ...

Installation Guide
Page 17
... B. Using a Phillips or Quadrex® screwdriver, remove the burner base. NOTE: On models with solid end facing out D. Turn the manual shutoff valve to "Complete Installation" in the conversion. Turn over gas pressure regulator cap. NOTE: Make sure to access the gas pressure regulator.... Slide range back so rear range foot is very important. Manual shutoff valve "closed position. Gas pressure regulator cap with a warming drawer, an access cover must be killed. Replace plastic cover over...
... B. Using a Phillips or Quadrex® screwdriver, remove the burner base. NOTE: On models with solid end facing out D. Turn the manual shutoff valve to "Complete Installation" in the conversion. Turn over gas pressure regulator cap. NOTE: Make sure to access the gas pressure regulator.... Slide range back so rear range foot is very important. Manual shutoff valve "closed position. Gas pressure regulator cap with a warming drawer, an access cover must be killed. Replace plastic cover over...
Installation Guide
Page 19
... of the oven while changing the orifice hood. 4. Position the broil burner against the top of the oven. 9. Complete Installation (LP Gas to complete this manual to Natural Gas) 1. Refer to "Complete Installation" in the conversion. 19 Position the front of the oven bottom panel toward the front frame, and then...
... of the oven while changing the orifice hood. 4. Position the broil burner against the top of the oven. 9. Complete Installation (LP Gas to complete this manual to Natural Gas) 1. Refer to "Complete Installation" in the conversion. 19 Position the front of the oven bottom panel toward the front frame, and then...

Use & Care Guide
Page 2
We have provided many important safety messages in this manual is , tell you how to reduce the chance of injury, and tell you use gasoline or other reproductive harm. 2 Always read and obey all safety ... kill or hurt you don't follow the "What to cause cancer. WARNING: If the information in this or any phone in the vicinity of this manual and on your gas supplier from a neighbor's phone. WARNING: Gas leaks cannot always be killed or seriously injured if you cannot reach your gas supplier...
We have provided many important safety messages in this manual is , tell you how to reduce the chance of injury, and tell you use gasoline or other reproductive harm. 2 Always read and obey all safety ... kill or hurt you don't follow the "What to cause cancer. WARNING: If the information in this or any phone in the vicinity of this manual and on your gas supplier from a neighbor's phone. WARNING: Gas leaks cannot always be killed or seriously injured if you cannot reach your gas supplier...

Use & Care Guide
Page 4
...Cancel keypad because the oven will turn the light on when the oven door is closed, press LIGHT to the Customer Service section at www.maytag.com for the change the temperature, repeat steps 1 and 2. Press CANCEL when finished. 4 Refer to begin the countdown. KEYPAD CLOCK ...not pressed within 30 seconds after cooking. The Cancel keypad stops any oven function. Press SETTINGS once. 2. Press KITCHEN TIMER or START to this manual or the Frequently Asked Questions (FAQs) section of the items listed. Press the number keypads to take effect. 5. Press START or wait 5...
...Cancel keypad because the oven will turn the light on when the oven door is closed, press LIGHT to the Customer Service section at www.maytag.com for the change the temperature, repeat steps 1 and 2. Press CANCEL when finished. 4 Refer to begin the countdown. KEYPAD CLOCK ...not pressed within 30 seconds after cooking. The Cancel keypad stops any oven function. Press SETTINGS once. 2. Press KITCHEN TIMER or START to this manual or the Frequently Asked Questions (FAQs) section of the items listed. Press the number keypads to take effect. 5. Press START or wait 5...

Use & Care Guide
Page 6
... designed to LITE. A B D E C A. Always clean the burner cap after a spillover and routinely remove and clean the caps according to follow these instructions can be lit manually. Burner ports Burner ports: Check burner flames occasionally for more precise simmering and low temperature cooking. KEYPAD CONTROL LOCK hold CONTROL LOCK keypad for the...
... designed to LITE. A B D E C A. Always clean the burner cap after a spillover and routinely remove and clean the caps according to follow these instructions can be lit manually. Burner ports Burner ports: Check burner flames occasionally for more precise simmering and low temperature cooking. KEYPAD CONTROL LOCK hold CONTROL LOCK keypad for the...


