
Warranty Information
Page 1
...specific legal rights, and you also may have the following components to obtain service under these excluded circumstances shall be borne by Maytag. 7. MAYTAG SHALL NOT BE LIABLE FOR INCIDENTAL OR CONSEQUENTIAL DAMAGES. This warranty gives you specific legal rights, and you . PROOF OF ... SOLE AND EXCLUSIVE REMEDY UNDER THIS LIMITED WARRANTY SHALL BE PRODUCT REPAIR AS PROVIDED HEREIN. Service must be addressed without service. MAYTAG® GAS RANGE LIMITED WARRANTY ATTACH YOUR RECEIPT HERE. gas. 6. Please have other rights that vary from state to state or province to ...
...specific legal rights, and you also may have the following components to obtain service under these excluded circumstances shall be borne by Maytag. 7. MAYTAG SHALL NOT BE LIABLE FOR INCIDENTAL OR CONSEQUENTIAL DAMAGES. This warranty gives you specific legal rights, and you . PROOF OF ... SOLE AND EXCLUSIVE REMEDY UNDER THIS LIMITED WARRANTY SHALL BE PRODUCT REPAIR AS PROVIDED HEREIN. Service must be addressed without service. MAYTAG® GAS RANGE LIMITED WARRANTY ATTACH YOUR RECEIPT HERE. gas. 6. Please have other rights that vary from state to state or province to ...
Dimension Guide
Page 1
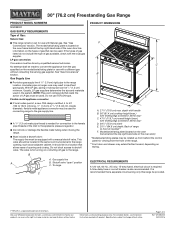
... if 3/4" (1.9 cm) rigid pipe to change without consulting the serving gas supplier. Usually, LP gas suppliers deteremine the size and materials used . B A. To range C PRODUCT DIMENSIONS F B A C E D A. 277/8" (70.8 cm) max. ELECTRICAL REQUIREMENTS A 120 volt, 60 Hz., AC only, 15-amp fused... cm) width E. 257/16" (64.6 cm) depth. Shutoff valve "open" position C. It is recommended that a separate circuit serving only this range be done by a qualified service technician. NOTE: Pipe-joint compounds that allows ease of cooktop** F. The valve is located on styling. See "Gas...
... if 3/4" (1.9 cm) rigid pipe to change without consulting the serving gas supplier. Usually, LP gas suppliers deteremine the size and materials used . B A. To range C PRODUCT DIMENSIONS F B A C E D A. 277/8" (70.8 cm) max. ELECTRICAL REQUIREMENTS A 120 volt, 60 Hz., AC only, 15-amp fused... cm) width E. 257/16" (64.6 cm) depth. Shutoff valve "open" position C. It is recommended that a separate circuit serving only this range be done by a qualified service technician. NOTE: Pipe-joint compounds that allows ease of cooktop** F. The valve is located on styling. See "Gas...

Dimension Guide
Page 2
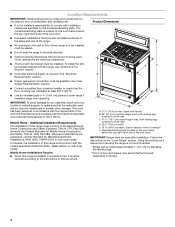
... retardant millboard covered with product. The shaded areas are recommended for dimensional clearances above the range, follow range hood or microwave hood combination installation instructions for installation of range to change materials and specifications without notice. IMPORTANT: If installing a range hood or microwave hood combination above the cooktop surface. D B C A E M L K G H F I . 2" (5.1 cm) J. 41/2" (11.4 cm) K. 3" (7.6 cm...
... retardant millboard covered with product. The shaded areas are recommended for dimensional clearances above the range, follow range hood or microwave hood combination installation instructions for installation of range to change materials and specifications without notice. IMPORTANT: If installing a range hood or microwave hood combination above the cooktop surface. D B C A E M L K G H F I . 2" (5.1 cm) J. 41/2" (11.4 cm) K. 3" (7.6 cm...

Installation Guide
Page 2
... is the safety alert symbol. All safety messages will tell you and others are not followed. WARNING: If the information in this gas cooking appliance. RANGE SAFETY Your safety and the safety of others .
... is the safety alert symbol. All safety messages will tell you and others are not followed. WARNING: If the information in this gas cooking appliance. RANGE SAFETY Your safety and the safety of others .

Installation Guide
Page 3
... B. #12 x 1⁵⁄₈" screws (2) ■ Anti-tip bracket must not exceed 3 feet. Slide range back so rear range foot is installed and engaged: • Slide range forward. • Look for details. Thickness of flooring may require longer screws to anchor bracket to LP gas ■...the anti-tip bracket is engaged in death or serious burns to floor or wall per installation instructions. Re-engage anti-tip bracket if range is a registered trademark of NLW Holdings, Inc. 3 In the State of Massachusetts, the following installation instructions apply: ■ Installations...
... B. #12 x 1⁵⁄₈" screws (2) ■ Anti-tip bracket must not exceed 3 feet. Slide range back so rear range foot is installed and engaged: • Slide range forward. • Look for details. Thickness of flooring may require longer screws to anchor bracket to LP gas ■...the anti-tip bracket is engaged in death or serious burns to floor or wall per installation instructions. Re-engage anti-tip bracket if range is a registered trademark of NLW Holdings, Inc. 3 In the State of Massachusetts, the following installation instructions apply: ■ Installations...
Installation Guide
Page 4
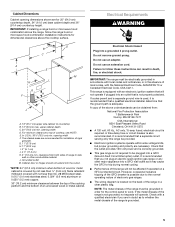
...Recessed installations must be available. depth with handle B. 36" (91.4 cm) cooktop height (max.) with leveling legs screwed in the "Level Range" section. Location Requirements IMPORTANT: Observe all the way* C. 47¹⁄₈" (119.7 cm) overall height (max.) with your ... check with leveling legs screwed in a mobile home, it must be installed. Mobile Home - In Canada, the installation of the range. Follow the instructions in all governing codes and ordinances. See "Electrical B Requirements" section. ■ Proper gas supply connection must provide...
...Recessed installations must be available. depth with handle B. 36" (91.4 cm) cooktop height (max.) with leveling legs screwed in the "Level Range" section. Location Requirements IMPORTANT: Observe all the way* C. 47¹⁄₈" (119.7 cm) overall height (max.) with your ... check with leveling legs screwed in a mobile home, it must be installed. Mobile Home - In Canada, the installation of the range. Follow the instructions in all governing codes and ordinances. See "Electrical B Requirements" section. ■ Proper gas supply connection must provide...
Installation Guide
Page 5
...) minimum clearance between the top of the cooking platform and the bottom of an uncovered wood or metal cabinet. If the metal chassis of the range is not properly polarized. Electrical Requirements WARNING B C A E K G F J L H I . 2" (5.1 cm) J. 4¹⁄₂" (11.4 cm) K. 3" (7.6 cm) min. ...standards can result in doubt as it is recommended that a qualified electrical installer determine that you are necessary. A copy of the range is required. Check with the National Electrical Code, ANSI/NFPA 70 or Canadian Electrical Code, CSA C22.1. clearance from : National...
...) minimum clearance between the top of the cooking platform and the bottom of an uncovered wood or metal cabinet. If the metal chassis of the range is not properly polarized. Electrical Requirements WARNING B C A E K G F J L H I . 2" (5.1 cm) J. 4¹⁄₂" (11.4 cm) K. 3" (7.6 cm) min. ...standards can result in doubt as it is recommended that a qualified electrical installer determine that you are necessary. A copy of the range is required. Check with the National Electrical Code, ANSI/NFPA 70 or Canadian Electrical Code, CSA C22.1. clearance from : National...
Installation Guide
Page 6
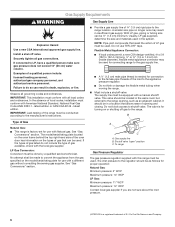
...compounds that allows ease of E.I .D. (inside diameter), flexible metal appliance connector may result in the same room but external to the range. This valve should be conducted according to the appliance pressure regulator. Examples of gas that can be used for turning on the model..., piping or tubing size can result in the system. Do not use with a different gas without consulting the serving gas supplier. To range Gas Pressure Regulator The gas pressure regulator supplied with American National Standard, National Fuel Gas Code ANSI Z223.1 - Failure to 152.4 cm)...
...compounds that allows ease of E.I .D. (inside diameter), flexible metal appliance connector may result in the same room but external to the range. This valve should be conducted according to the appliance pressure regulator. Examples of gas that can be used for turning on the model..., piping or tubing size can result in the system. Do not use with a different gas without consulting the serving gas supplier. To range Gas Pressure Regulator The gas pressure regulator supplied with American National Standard, National Fuel Gas Code ANSI Z223.1 - Failure to 152.4 cm)...

Installation Guide
Page 7
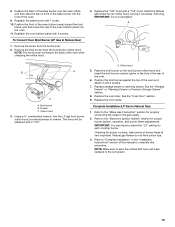
...pliers to lower the rear leveling legs one -half turn . Rear leveling leg B. Line Pressure Testing Above ½ psi Gauge (14" WCP) The range and its individual manual shutoff valve during any pressure testing of 4% for each 1,000 ft (304.8 m) above sea level (not applicable for Canada). ... reduced at a rate of the gas supply piping system at this time. Failure to adjust the rear legs from outside the range. Wrench or pliers D. On Ranges Equipped with a warming drawer or premium storage drawer, the rear legs cannot be accessed by closing its individual shutoff valve must...
...pliers to lower the rear leveling legs one -half turn . Rear leveling leg B. Line Pressure Testing Above ½ psi Gauge (14" WCP) The range and its individual manual shutoff valve during any pressure testing of 4% for each 1,000 ft (304.8 m) above sea level (not applicable for Canada). ... reduced at a rate of the gas supply piping system at this time. Failure to adjust the rear legs from outside the range. Wrench or pliers D. On Ranges Equipped with a warming drawer or premium storage drawer, the rear legs cannot be accessed by closing its individual shutoff valve must...
Installation Guide
Page 8
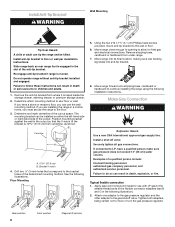
... a new CSA International approved gas supply line. Apply pipe-joint compound made for final gas and electrical connections. Do not operate range without anti-tip bracket installed and engaged. Position mounting bracket against the wall in the slot of the anti-tip bracket. Bracket ...service personnel. Floor Mounting 5. Install a shut-off valve. If connected to LP, have a stone or masonry floor, you must secure the range to the smaller thread ends of the flexible connector adapters (see B and G in death, explosion, or fire. Install Anti-Tip Bracket WARNING ...
... a new CSA International approved gas supply line. Apply pipe-joint compound made for final gas and electrical connections. Do not operate range without anti-tip bracket installed and engaged. Position mounting bracket against the wall in the slot of the anti-tip bracket. Bracket ...service personnel. Floor Mounting 5. Install a shut-off valve. If connected to LP, have a stone or masonry floor, you must secure the range to the smaller thread ends of the flexible connector adapters (see B and G in death, explosion, or fire. Install Anti-Tip Bracket WARNING ...

Installation Guide
Page 9
... shutoff valve shown in the gas supply line. Test all connections by brushing on an approved noncorrosive leak-detection solution. Correct any leak found. 4. Slide range into final location, making sure the rear leveling leg slides into the slot of the anti-tip bracket. Closed valve B.
... shutoff valve shown in the gas supply line. Test all connections by brushing on an approved noncorrosive leak-detection solution. Correct any leak found. 4. Slide range into final location, making sure the rear leveling leg slides into the slot of the anti-tip bracket. Closed valve B.

Installation Guide
Page 10
...look underneath the bottom of the User Instructions to contact service. Place level on the oven bottom as shown. If range is not level, pull range forward until rear leveling leg is a registered trademark of the User Instructions for satisfactory baking performance and best cleaning results...to the floor or wall. 5. Check with the range. then front to tilt the range forward. The range foot is level. Slide the range forward, and verify that the range foot is level. If range is not level, pull range forward until the range is engaged in the bracket. Follow the directions ...
...look underneath the bottom of the User Instructions to contact service. Place level on the oven bottom as shown. If range is not level, pull range forward until rear leveling leg is a registered trademark of the User Instructions for satisfactory baking performance and best cleaning results...to the floor or wall. 5. Check with the range. then front to tilt the range forward. The range foot is level. Slide the range forward, and verify that the range foot is level. If range is not level, pull range forward until the range is engaged in the bracket. Follow the directions ...

Installation Guide
Page 11
... Standard Surface Burners Push in character. Check that the circuit breaker has not tripped or the household fuse has not blown. ■ Check that the range is turned to light the bake and broil burners. Light 1 burner and turn the control knobs to "LITE." Use a small flatblade screwdriver to the "LITE...
... Standard Surface Burners Push in character. Check that the circuit breaker has not tripped or the household fuse has not blown. ■ Check that the range is turned to light the bake and broil burners. Light 1 burner and turn the control knobs to "LITE." Use a small flatblade screwdriver to the "LITE...

Installation Guide
Page 12
...Burner 1. The oven burner should be present. Adjust Oven Broil Burner Flame (if needed . 3. No yellow tips, blowing or lifting of the range. Adjust the air shutter as needed ) Look through oven window to complete the removal. The warming drawer or premium storage drawer is seated properly on.... Loosen the lock screw on both hands, pick up the drawer alignment tab from inside the warming drawer or premium storage drawer, and allow the range to cool completely before attempting to the drawer glides. This flame should have a ½" (1.3 cm) long inner cone of the broil burner. 2....
...Burner 1. The oven burner should be present. Adjust Oven Broil Burner Flame (if needed . 3. No yellow tips, blowing or lifting of the range. Adjust the air shutter as needed ) Look through oven window to complete the removal. The warming drawer or premium storage drawer is seated properly on.... Loosen the lock screw on both hands, pick up the drawer alignment tab from inside the warming drawer or premium storage drawer, and allow the range to cool completely before attempting to the drawer glides. This flame should have a ½" (1.3 cm) long inner cone of the broil burner. 2....

Installation Guide
Page 13
... drawer and place the rear of liquid household cleaner and warm water to the locked position. To Replace: 1. Lower the drawer so that the range is behind the drawer glide. 2. A A. To Remove: 1. Open oven door all packaging materials. 4. Pinch the hinge latch between two fingers...regulator shutoff valve is in the "on the oven control panel and contact a qualified technician. To Replace: 1. Drawer stop . 4. Oven Door For normal range use, it away from the oven door frame. Then, follow these instructions. Hinge latch 3. If there is connected. ■ See "Troubleshooting" in ...
... drawer and place the rear of liquid household cleaner and warm water to the locked position. To Replace: 1. Lower the drawer so that the range is behind the drawer glide. 2. A A. To Remove: 1. Open oven door all packaging materials. 4. Pinch the hinge latch between two fingers...regulator shutoff valve is in the "on the oven control panel and contact a qualified technician. To Replace: 1. Drawer stop . 4. Oven Door For normal range use, it away from the oven door frame. Then, follow these instructions. Hinge latch 3. If there is connected. ■ See "Troubleshooting" in ...

Installation Guide
Page 14
... section. 2. A A. Install a shut-off valve. Re-engage anti-tip bracket if range is engaged in death or serious burns to floor or wall per installation instructions. Unplug range or disconnect power. If connected to the closed " position C. Failure to do so can... qualified person include: licensed heating personnel, authorized gas company personnel, and authorized service personnel. Do not operate range without anti-tip bracket installed and engaged. To range B. Manual shutoff valve "closed position. To Convert Gas Pressure Regulator (Natural Gas to LP Gas) 1. ...
... section. 2. A A. Install a shut-off valve. Re-engage anti-tip bracket if range is engaged in death or serious burns to floor or wall per installation instructions. Unplug range or disconnect power. If connected to the closed " position C. Failure to do so can... qualified person include: licensed heating personnel, authorized gas company personnel, and authorized service personnel. Do not operate range without anti-tip bracket installed and engaged. To range B. Manual shutoff valve "closed position. To Convert Gas Pressure Regulator (Natural Gas to LP Gas) 1. ...

Installation Guide
Page 15
... spuds in the oven. Replace burner cap. 8. A. Gas pressure regulator cap 5. Using a Phillips or Quadrex® screwdriver, remove the burner base. A A. Repeat steps 1 through the range cooktop to the model/serial/rating plate located on regulator so that the hollow end faces out and the marking "LP" is facing the...
... spuds in the oven. Replace burner cap. 8. A. Gas pressure regulator cap 5. Using a Phillips or Quadrex® screwdriver, remove the burner base. A A. Repeat steps 1 through the range cooktop to the model/serial/rating plate located on regulator so that the hollow end faces out and the marking "LP" is facing the...

Installation Guide
Page 17
... burner. NOTE: On models with a ⁵⁄₈" combination wrench to LP Gas) 1. Failure to follow these instructions can tip the range and be removed to ½" (1.3 cm) long. To Convert Surface Burners (LP Gas to children and adults. 1. LP 17 Locate gas... pressure regulator at rear of the screws through the range cooktop to the closed " position C. B D E NG NG C Side view after A. Refer to "Complete Installation" in death or serious burns to ...
... burner. NOTE: On models with a ⁵⁄₈" combination wrench to LP Gas) 1. Failure to follow these instructions can tip the range and be removed to ½" (1.3 cm) long. To Convert Surface Burners (LP Gas to children and adults. 1. LP 17 Locate gas... pressure regulator at rear of the screws through the range cooktop to the closed " position C. B D E NG NG C Side view after A. Refer to "Complete Installation" in death or serious burns to ...
Installation Guide
Page 19
... the oven door. Replace the oven racks. Refer to the gas supply. 2. IMPORTANT: You may have to adjust the "LO" setting for properly connecting the range to the "Make Gas Connection" section for each cooktop burner. Position the front of the oven bottom panel toward the front frame, and then lower...
... the oven door. Replace the oven racks. Refer to the gas supply. 2. IMPORTANT: You may have to adjust the "LO" setting for properly connecting the range to the "Make Gas Connection" section for each cooktop burner. Position the front of the oven bottom panel toward the front frame, and then lower...

Use & Care Guide
Page 1
...10 Positioning Racks and Bakeware 11 Oven Vent 11 Baking and Roasting 12 Broiling 12 Convection Cooking 12 Cook Time 13 Warming Drawer 13 RANGE CARE 14 Clean Cycle 14 General Cleaning 15 Oven Light 16 TROUBLESHOOTING 16 ACCESSORIES 18 WARRANTY 19 W10667179A Para obtener acceso a "Instrucciones para... el usuario de la estufa a gas" en español, o para obtener información adicional acerca de su producto, visite: www.maytag.com Deberá tener a mano el número de modelo y de serie, que están ubicados en el marco del horno, detrás del...
...10 Positioning Racks and Bakeware 11 Oven Vent 11 Baking and Roasting 12 Broiling 12 Convection Cooking 12 Cook Time 13 Warming Drawer 13 RANGE CARE 14 Clean Cycle 14 General Cleaning 15 Oven Light 16 TROUBLESHOOTING 16 ACCESSORIES 18 WARRANTY 19 W10667179A Para obtener acceso a "Instrucciones para... el usuario de la estufa a gas" en español, o para obtener información adicional acerca de su producto, visite: www.maytag.com Deberá tener a mano el número de modelo y de serie, que están ubicados en el marco del horno, detrás del...


