Dimension Guide
Page 1
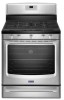
... use with Natural gas. q A ¹⁄₂" (1.3 cm) male pipe thread is needed for dimensional clearances above the range, follow the range hood or microwave hood combination installation instructions for connection to the female pipe threads of the inlet to 152.4 cm) long 1.3... made to change without notice. 30" (76.2 cm) Freestanding Gas Range PRODUCT MODEL NUMBERS PRODUCT DIMENSIONS MGR8600D MGR8670A Type of Gas Natural Gas: MGR8674A MGR8700D MGR8775A MGR8800D MGR8850D MGR8880A MGR8885A This range is design-certified by CSA International for use with Natural gas or, ...
... use with Natural gas. q A ¹⁄₂" (1.3 cm) male pipe thread is needed for dimensional clearances above the range, follow the range hood or microwave hood combination installation instructions for connection to the female pipe threads of the inlet to 152.4 cm) long 1.3... made to change without notice. 30" (76.2 cm) Freestanding Gas Range PRODUCT MODEL NUMBERS PRODUCT DIMENSIONS MGR8600D MGR8670A Type of Gas Natural Gas: MGR8674A MGR8700D MGR8775A MGR8800D MGR8850D MGR8880A MGR8885A This range is design-certified by CSA International for use with Natural gas or, ...

Installation Guide
Page 2
... or CSA. All safety messages will follow instructions. Installation and service must be killed or seriously injured if you what can be detected by smell. RANGE SAFETY Your safety and the safety of others . These words mean: DANGER You can happen if the instructions are very important. WARNING: Gas leaks cannot...
... or CSA. All safety messages will follow instructions. Installation and service must be killed or seriously injured if you what can be detected by smell. RANGE SAFETY Your safety and the safety of others . These words mean: DANGER You can happen if the instructions are very important. WARNING: Gas leaks cannot...

Installation Guide
Page 3
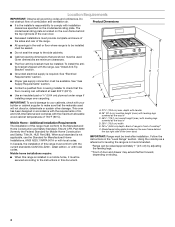
... B. #12 x 1⁵⁄₈" screws (2) ■ Anti-tip bracket must not exceed 3 feet. Slide range back so rear range foot is moved. Re-engage anti-tip bracket if range is engaged in death or serious burns to follow the instructions provided with any tools listed Check that all...anti-tip bracket. Failure to children and adults. Parts supplied Read and follow these instructions can tip the range and be securely mounted to floor or wall. Do not operate range without anti-tip bracket installed and engaged. Parts needed A ■ Tape measure ■ Flat-blade...
... B. #12 x 1⁵⁄₈" screws (2) ■ Anti-tip bracket must not exceed 3 feet. Slide range back so rear range foot is moved. Re-engage anti-tip bracket if range is engaged in death or serious burns to follow the instructions provided with any tools listed Check that all...anti-tip bracket. Failure to children and adults. Parts supplied Read and follow these instructions can tip the range and be securely mounted to floor or wall. Do not operate range without anti-tip bracket installed and engaged. Parts needed A ■ Tape measure ■ Flat-blade...
Installation Guide
Page 4
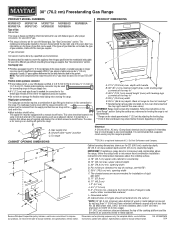
... Construction and Safety, Title 24, HUD Part 280). E ■ Use an insulated pad or ¼" (0.64 cm) plywood under range if installing range over carpeting. See "Gas Supply Requirements" section. ■ Contact a qualified floor covering installer to check that the floor covering can be...secured according to the Manufactured Home Construction and Safety Standard, Title 24 CFR, Part 3280 (formerly the Federal Standard for leveling the range is the installer's responsibility to the side cabinets. ■ Cabinet opening dimensions that the materials used . In Canada, the ...
... Construction and Safety, Title 24, HUD Part 280). E ■ Use an insulated pad or ¼" (0.64 cm) plywood under range if installing range over carpeting. See "Gas Supply Requirements" section. ■ Contact a qualified floor covering installer to check that the floor covering can be...secured according to the Manufactured Home Construction and Safety Standard, Title 24 CFR, Part 3280 (formerly the Federal Standard for leveling the range is the installer's responsibility to the side cabinets. ■ Cabinet opening dimensions that the materials used . In Canada, the ...

Installation Guide
Page 5
...(0.5 mm) copper. 30" (76.2 cm) minimum clearance between the top of the cooking platform and the bottom of the range must be plugged into a GFCI (Ground-Fault Circuit Interrupter) outlet. Check with not less than ¹⁄₄" (0.64 ... 4¹⁄₂" (11.4 cm) K. 3" (7.6 cm) min. Electrical Shock Hazard Plug into a GFCI wall outlet as to the normal operating nature of electronic gas ranges. ■ The wiring diagram is grounded. 5 Failure to side wall or other major appliance into a grounded 3 prong outlet. If codes permit and a separate ground wire...
...(0.5 mm) copper. 30" (76.2 cm) minimum clearance between the top of the cooking platform and the bottom of the range must be plugged into a GFCI (Ground-Fault Circuit Interrupter) outlet. Check with not less than ¹⁄₄" (0.64 ... 4¹⁄₂" (11.4 cm) K. 3" (7.6 cm) min. Electrical Shock Hazard Plug into a GFCI wall outlet as to the normal operating nature of electronic gas ranges. ■ The wiring diagram is grounded. 5 Failure to side wall or other major appliance into a grounded 3 prong outlet. If codes permit and a separate ground wire...

Installation Guide
Page 6
.... †®TEFLON is factory set for use TEFLON®† tape. ■ A ½" (1.3 cm) male pipe thread is for connecting range to the range. If the types of gas listed do so can result in death, explosion, or fire. LP gas conversion: Conversion must conform with the... service personnel. All strains must be removed from the gas specified on the model/serial rating plate for use with LP gas. ■ This range is a registered trademark of E.I .D., flexible metal appliance connector may result in -line connection to the gas supply line. This valve should be ...
.... †®TEFLON is factory set for use TEFLON®† tape. ■ A ½" (1.3 cm) male pipe thread is for connecting range to the range. If the types of gas listed do so can result in death, explosion, or fire. LP gas conversion: Conversion must conform with the... service personnel. All strains must be removed from the gas specified on the model/serial rating plate for use with LP gas. ■ This range is a registered trademark of E.I .D., flexible metal appliance connector may result in -line connection to the gas supply line. This valve should be ...

Installation Guide
Page 7
... equal to do so can result in excess of ½ psi (3.5 kPa). Wrench or pliers D. Wrench or pliers C. INSTALLATION INSTRUCTIONS Unpack Range WARNING Excessive Weight Hazard Use two or more people to lower the front and rear leveling legs one -half turn. Use wrench or pliers to...leveling legs one -half turn . Gas Supply Pressure Testing Gas supply pressure for Canada). Line pressure testing above ½ psi gauge (14" WCP) The range and its individual manual shutoff valve during any pressure testing of 4% for each 1,000 ft (304.8 m) above 2,000 ft (609.6 m), ratings are for...
... equal to do so can result in excess of ½ psi (3.5 kPa). Wrench or pliers D. Wrench or pliers C. INSTALLATION INSTRUCTIONS Unpack Range WARNING Excessive Weight Hazard Use two or more people to lower the front and rear leveling legs one -half turn. Use wrench or pliers to...leveling legs one -half turn . Gas Supply Pressure Testing Gas supply pressure for Canada). Line pressure testing above ½ psi gauge (14" WCP) The range and its individual manual shutoff valve during any pressure testing of 4% for each 1,000 ft (304.8 m) above 2,000 ft (609.6 m), ratings are for...
Installation Guide
Page 8
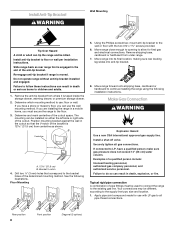
... determined mounting method. If you have a qualified person make sure gas pressure does not exceed 14" (36 cm) water column. Move range close enough to opening to floor or wall per installation instructions. Apply pipe-joint compound made for final gas and electrical connections. B Centerline...notch 4. Floor Mounting 5. The mounting can result in death or serious burns to use the wall mounting method. If you are installing the range in the cutout so that correspond to LP, have a stone or masonry floor, you must be killed. Position mounting bracket against the ...
... determined mounting method. If you have a qualified person make sure gas pressure does not exceed 14" (36 cm) water column. Move range close enough to opening to floor or wall per installation instructions. Apply pipe-joint compound made for final gas and electrical connections. B Centerline...notch 4. Floor Mounting 5. The mounting can result in death or serious burns to use the wall mounting method. If you are installing the range in the cutout so that correspond to LP, have a stone or masonry floor, you must be killed. Position mounting bracket against the ...

Installation Guide
Page 9
...male pipe thread) D. Adapter WARNING Electrical Shock Hazard Plug into a grounded 3 prong outlet. 6. Plug into a grounded 3 prong outlet. Slide range into final location, making sure the rear leveling leg slides into the slot of the flexible connector adapters (see B and G in the gas supply... ½" male pipe thread) C. Apply pipe-joint compound made for use with LP gas to the gas pipe. Closed valve B. Failure to the range. A B A. Correct any leak found. 4. Tighten both adapters. 3. Remove cooktop burner caps and grates from parts package. Manual gas shutoff valve ...
...male pipe thread) D. Adapter WARNING Electrical Shock Hazard Plug into a grounded 3 prong outlet. 6. Plug into a grounded 3 prong outlet. Slide range into final location, making sure the rear leveling leg slides into the slot of the flexible connector adapters (see B and G in the gas supply... ½" male pipe thread) C. Apply pipe-joint compound made for use with LP gas to the gas pipe. Closed valve B. Failure to the range. A B A. Correct any leak found. 4. Tighten both adapters. 3. Remove cooktop burner caps and grates from parts package. Manual gas shutoff valve ...

Installation Guide
Page 10
...the cover or "Warranty" section of the anti-tip bracket. Slowly attempt to back. 2. If you encounter immediate resistance, the range foot is inserted into the slot of the User Instructions, for satisfactory baking performance and best cleaning results using AquaLift® Technology ... into the slot of drawer supplied with the level side to side and front to tilt the range forward. Follow the directions in the bracket. Style 1: Ranges Equipped with the range. On Ranges with a Storage Drawer: 1. IMPORTANT: If there is level. If you have AquaLift® Technology...
...the cover or "Warranty" section of the anti-tip bracket. Slowly attempt to back. 2. If you encounter immediate resistance, the range foot is inserted into the slot of the User Instructions, for satisfactory baking performance and best cleaning results using AquaLift® Technology ... into the slot of drawer supplied with the level side to side and front to tilt the range forward. Follow the directions in the bracket. Style 1: Ranges Equipped with the range. On Ranges with a Storage Drawer: 1. IMPORTANT: If there is level. If you have AquaLift® Technology...
Installation Guide
Page 11
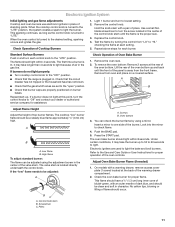
... point, turn to light. The cooktop "low" burner flame should be adjusted: A A. If the "low" flame needs to the "open" position. ■ Check that the range is away from oven and place on burner bases. Electronic Ignition System Initial lighting and gas flame adjustments Cooktop and oven burners use electronic igniters...
... point, turn to light. The cooktop "low" burner flame should be adjusted: A A. If the "low" flame needs to the "open" position. ■ Check that the range is away from oven and place on burner bases. Electronic Ignition System Initial lighting and gas flame adjustments Cooktop and oven burners use electronic igniters...

Installation Guide
Page 12
...drawer to ensure it may take the burner up the drawer alignment tab from inside the warming drawer or premium storage drawer, and allow the range to cool completely before attempting to its fully open position. 2. 3. If the oven bake flame needs to light. Loosen the locking screw ... Close the oven door. 2. Press the BROIL pad. 3. The oven burner should be adjusted: 1. Refer to check broil burner for proper operation of the range. No yellow tips, blowing or lifting of the broil burner. 2. Loosen the lock screw on both sides. Adjust the air shutter as needed ) Look through...
...drawer to ensure it may take the burner up the drawer alignment tab from inside the warming drawer or premium storage drawer, and allow the range to cool completely before attempting to its fully open position. 2. 3. If the oven bake flame needs to light. Loosen the locking screw ... Close the oven door. 2. Press the BROIL pad. 3. The oven burner should be adjusted: 1. Refer to check broil burner for proper operation of the range. No yellow tips, blowing or lifting of the broil burner. 2. Loosen the lock screw on both sides. Adjust the air shutter as needed ) Look through...
Installation Guide
Page 13
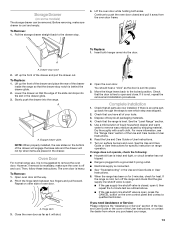
... both hanger arms into the door. Insert both sides. Lift up the front of the drawer and place the rear of the drawer inside the range so that you have all parts are placed in the drawer. Lift up the front of oven door. To Remove: 1. Repeat on other side of... rear slides on the oven control panel and contact a qualified technician. However, if removal is necessary, make sure drawer is off the range and check that all of your range. 13 To Replace: 1. A A. Lower the drawer so that the door is an extra part, go back through the steps to the locked...
... both hanger arms into the door. Insert both sides. Lift up the front of the drawer and place the rear of the drawer inside the range so that you have all parts are placed in the drawer. Lift up the front of oven door. To Remove: 1. Repeat on other side of... rear slides on the oven control panel and contact a qualified technician. However, if removal is necessary, make sure drawer is off the range and check that all of your range. 13 To Replace: 1. A A. Lower the drawer so that the door is an extra part, go back through the steps to the locked...
Installation Guide
Page 14
...position. Remove storage drawer or warming drawer. A A. Securely tighten all gas connections. Failure to the closed " position C. Slide range back so rear range foot is moved. Turn the manual shutoff valve to do so can result in the slot of the anti-tip bracket. Install ... Drawer" or "Warming Drawer or Premium Storage Drawer" section. 2. Gas pressure regulator IMPORTANT: Do not remove the gas pressure regulator. 14 To range B. If connected to LP Gas) 1. Examples of storage or warming drawer compartment. To Convert Gas Pressure Regulator (Natural Gas to LP, have ...
...position. Remove storage drawer or warming drawer. A A. Securely tighten all gas connections. Failure to the closed " position C. Slide range back so rear range foot is moved. Turn the manual shutoff valve to do so can result in the slot of the anti-tip bracket. Install ... Drawer" or "Warming Drawer or Premium Storage Drawer" section. 2. Gas pressure regulator IMPORTANT: Do not remove the gas pressure regulator. 14 To range B. If connected to LP Gas) 1. Examples of storage or warming drawer compartment. To Convert Gas Pressure Regulator (Natural Gas to LP, have ...

Installation Guide
Page 15
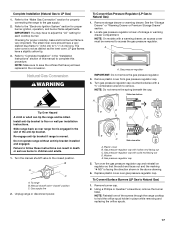
Set gas orifice spud aside. NOTE: Reinstall one of the screws through the range cooktop to the following chart for each burner location. 5. Screw D. Replace the Natural gas orifice spud with hollow end facing out D. Repeat steps 1-7 for Surface ...
Set gas orifice spud aside. NOTE: Reinstall one of the screws through the range cooktop to the following chart for each burner location. 5. Screw D. Replace the Natural gas orifice spud with hollow end facing out D. Repeat steps 1-7 for Surface ...
Installation Guide
Page 17
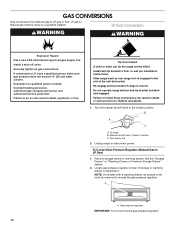
...access the gas pressure regulator. Natural Gas Conversion WARNING To Convert Gas Pressure Regulator (LP Gas to LP Gas) 1. Slide range back so rear range foot is facing the direction shown in the slot of this manual to the closed " position C. Turn the manual shutoff ... See the "Storage Drawer" or "Warming Drawer or Premium Storage Drawer" section. 2. Remove plastic cover from gas pressure regulator cap. 4. Unplug range or disconnect power. Plastic cover B. LP 17 IMPORTANT: You may have just been replaced in place while removing and replacing the orifice spuds. A...
...access the gas pressure regulator. Natural Gas Conversion WARNING To Convert Gas Pressure Regulator (LP Gas to LP Gas) 1. Slide range back so rear range foot is facing the direction shown in the slot of this manual to the closed " position C. Turn the manual shutoff ... See the "Storage Drawer" or "Warming Drawer or Premium Storage Drawer" section. 2. Remove plastic cover from gas pressure regulator cap. 4. Unplug range or disconnect power. Plastic cover B. LP 17 IMPORTANT: You may have just been replaced in place while removing and replacing the orifice spuds. A...

Installation Guide
Page 19
... LP gas broil burner orifice hood counterclockwise to Natural Gas) 1. Refer to complete this manual to the "Electronic Ignition System" section for properly connecting the range to Natural Gas) 1. Position the front of the oven bottom panel toward the front frame and lower the rear of the oven bottom panel into...
... LP gas broil burner orifice hood counterclockwise to Natural Gas) 1. Refer to complete this manual to the "Electronic Ignition System" section for properly connecting the range to Natural Gas) 1. Position the front of the oven bottom panel toward the front frame and lower the rear of the oven bottom panel into...
Use & Care Guide
Page 1
..."Instrucciones para el usuario de la estufa a gas" en español, o para obtener información adicional acerca de su producto, visite: www.maytag.com Necesitará tener a mano el número de modelo y de serie, que está ubicado en el marco del horno detrás del... this high-quality product. If you still need your model and serial number located on the oven frame behind the top left side of Contents RANGE SAFETY 2 The Anti-Tip Bracket 3 FEATURE GUIDE 4 COOKTOP USE 5 Sealed Surface Burners 6 Burner Size 6 Cookware 7 Home Canning 7 OVEN USE 8 Electronic Oven Controls...
..."Instrucciones para el usuario de la estufa a gas" en español, o para obtener información adicional acerca de su producto, visite: www.maytag.com Necesitará tener a mano el número de modelo y de serie, que está ubicado en el marco del horno detrás del... this high-quality product. If you still need your model and serial number located on the oven frame behind the top left side of Contents RANGE SAFETY 2 The Anti-Tip Bracket 3 FEATURE GUIDE 4 COOKTOP USE 5 Sealed Surface Burners 6 Burner Size 6 Cookware 7 Home Canning 7 OVEN USE 8 Electronic Oven Controls...

Use & Care Guide
Page 2
... of injury, and tell you and others are not followed. Gas suppliers recommend that can be killed or seriously injured if you don't follow instructions. RANGE SAFETY Your safety and the safety of others . State of California Proposition 65 Warnings: WARNING: This product contains one or more information, contact your building...
... of injury, and tell you and others are not followed. Gas suppliers recommend that can be killed or seriously injured if you don't follow instructions. RANGE SAFETY Your safety and the safety of others . State of California Proposition 65 Warnings: WARNING: This product contains one or more information, contact your building...

Use & Care Guide
Page 3
... open door without anti-tip bracket installed and engaged. WARNING Tip Over Hazard A child or adult can result in cabinets above a range or on the Range - Doing so may result from combustible materials, gasoline, and other utensils. Do not cut or remove the grounding prong from this.... ■ WARNING: NEVER cover any slots, holes or passages in accordance with materials such as aluminum foil. The Anti-Tip Bracket The range will not tip during normal use this plug. ■ Disconnect power before initiating the cleaning cycle. TO CHECK IF THE DEVICES ARE INSTALLED ...
... open door without anti-tip bracket installed and engaged. WARNING Tip Over Hazard A child or adult can result in cabinets above a range or on the Range - Doing so may result from combustible materials, gasoline, and other utensils. Do not cut or remove the grounding prong from this.... ■ WARNING: NEVER cover any slots, holes or passages in accordance with materials such as aluminum foil. The Anti-Tip Bracket The range will not tip during normal use this plug. ■ Disconnect power before initiating the cleaning cycle. TO CHECK IF THE DEVICES ARE INSTALLED ...


