
Warranty Information
Page 1
ACCESSORIES For accessories, you can visit our website at www.maytag.com/cookingaccessories. affresh™ Stainless Steel Cleaner (stainless steel models) Order Part Number W10355016 affresh™ Stainless Steel Cleaning Wipes (stainless steel models) Order Part Number W10355049 affresh™ Kitchen and Appliance Cleaner ...Broiler Pan and Grid Order Part Number 4396923 Premium Broiler Pan and Roasting Rack Order Part Number W10123240 www.maytag.com/broilerpan MAYTAG® GAS RANGE LIMITED WARRANTY FIRST YEAR LIMITED WARRANTY (PARTS AND LABOR) For one year from the date of purchase, when...
ACCESSORIES For accessories, you can visit our website at www.maytag.com/cookingaccessories. affresh™ Stainless Steel Cleaner (stainless steel models) Order Part Number W10355016 affresh™ Stainless Steel Cleaning Wipes (stainless steel models) Order Part Number W10355049 affresh™ Kitchen and Appliance Cleaner ...Broiler Pan and Grid Order Part Number 4396923 Premium Broiler Pan and Roasting Rack Order Part Number W10123240 www.maytag.com/broilerpan MAYTAG® GAS RANGE LIMITED WARRANTY FIRST YEAR LIMITED WARRANTY (PARTS AND LABOR) For one year from the date of purchase, when...

Warranty Information
Page 2
... in-home service is located in accordance with the removal from your home of consumables or cleaning products not approved by Maytag. 5. Damage resulting from the date of the range and that have access to the Internet and you need further assistance, you do not have been removed, altered or ...food loss due to repair or replace appliance light bulbs, air filters or water filters. If outside the 50 United States and Canada, contact your model number and serial number on the label, located on the below named parts only and does not include labor. ■ Burner grates ■ ...
... in-home service is located in accordance with the removal from your home of consumables or cleaning products not approved by Maytag. 5. Damage resulting from the date of the range and that have access to the Internet and you need further assistance, you do not have been removed, altered or ...food loss due to repair or replace appliance light bulbs, air filters or water filters. If outside the 50 United States and Canada, contact your model number and serial number on the label, located on the below named parts only and does not include labor. ■ Burner grates ■ ...

Use & Care Guide
Page 1
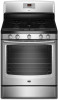
... Timed Cooking (on the oven frame behind the top right side of the oven door. If you still need your model and serial number, located on some models 11 RANGE CARE 12 Clean Cycle 12 General Cleaning 13 Oven Light 13 TROUBLESHOOTING 14 ACCESSORIES 16 WARRANTY 16 W10399029B If you should experience... a "Instrucciones para el usuario de la estufa a gas" en español, o para obtener información adicional acerca de su producto, visite: www.maytag.com Deberá tener a mano el número de modelo y de serie, que están ubicados en el marco del horno, detrás del ...
... Timed Cooking (on the oven frame behind the top right side of the oven door. If you still need your model and serial number, located on some models 11 RANGE CARE 12 Clean Cycle 12 General Cleaning 13 Oven Light 13 TROUBLESHOOTING 14 ACCESSORIES 16 WARRANTY 16 W10399029B If you should experience... a "Instrucciones para el usuario de la estufa a gas" en español, o para obtener información adicional acerca de su producto, visite: www.maytag.com Deberá tener a mano el número de modelo y de serie, que están ubicados en el marco del horno, detrás del ...

Use & Care Guide
Page 4
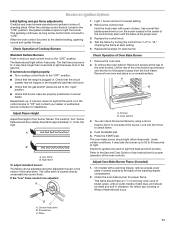
...keypads to change the temperature in the display, press KITCHEN TIMER to take effect. 5. Your model may have some or all of countdown. 4. Doing so can be set the time of our website at www.maytag.com for 5 minutes. 4. Press CLOCK or START. Press Temp/Time "+" or "-" ...176;C). 3. Press START. 4. Press BROIL. 2. FEATURE GUIDE This manual covers several models. If Start is off ) START CANCEL TEMP/TIME BAKE BROIL FEATURE Clock Oven cavity light Oven timer Cooking start Range function Temperature and time adjust Baking and roasting Broiling INSTRUCTIONS The Clock uses a 12...
...keypads to change the temperature in the display, press KITCHEN TIMER to take effect. 5. Your model may have some or all of countdown. 4. Doing so can be set the time of our website at www.maytag.com for 5 minutes. 4. Press CLOCK or START. Press Temp/Time "+" or "-" ...176;C). 3. Press START. 4. Press BROIL. 2. FEATURE GUIDE This manual covers several models. If Start is off ) START CANCEL TEMP/TIME BAKE BROIL FEATURE Clock Oven cavity light Oven timer Cooking start Range function Temperature and time adjust Baking and roasting Broiling INSTRUCTIONS The Clock uses a 12...

Use & Care Guide
Page 8
... is activated, each time the Bake or Broil burners ignite during the cooking cycle: ■ gas valves may be changed to the time of some models), repeating every 20 seconds after 12 hours. If "LOFF" is displayed, the oven light will show the letters "ES" followed by "On" twice... following options. IMPORTANT: The health of day. The display will return to Celsius. The display will "click" several noises that reduces power consumption when the range is not being used the first few times, or when it for example "0°F CAL" or "00." 2. Press the Temp/Time "+" or "-" ...
... is activated, each time the Bake or Broil burners ignite during the cooking cycle: ■ gas valves may be changed to the time of some models), repeating every 20 seconds after 12 hours. If "LOFF" is displayed, the oven light will show the letters "ES" followed by "On" twice... following options. IMPORTANT: The health of day. The display will return to Celsius. The display will "click" several noises that reduces power consumption when the range is not being used the first few times, or when it for example "0°F CAL" or "00." 2. Press the Temp/Time "+" or "-" ...
Use & Care Guide
Page 10
.... 2-rack (convection only): Use rack positions 2 and 5. The bake and broil elements or burners cycle on 2 racks, use racks 2 and 5. On convection range models, the fan may be removed prior to 15 minutes. Once 100ºF (38ºC) is approximately 10 to preheating your... cleaning results. Blocking or covering the oven vent will appear on the oven door or bottom. When roasting, it out to maintain a precise temperature range for flat racks. Food in position 2 IMPORTANT: These rack positions are : room temperature, starting oven temperature, and the number of rack in the...
.... 2-rack (convection only): Use rack positions 2 and 5. The bake and broil elements or burners cycle on 2 racks, use racks 2 and 5. On convection range models, the fan may be removed prior to 15 minutes. Once 100ºF (38ºC) is approximately 10 to preheating your... cleaning results. Blocking or covering the oven vent will appear on the oven door or bottom. When roasting, it out to maintain a precise temperature range for flat racks. Food in position 2 IMPORTANT: These rack positions are : room temperature, starting oven temperature, and the number of rack in the...

Use & Care Guide
Page 13
...) because paint surface may occur to the rack guides will help them slide. To Replace: 1. Unplug range or disconnect power. 4. SURFACE BURNERS EXTERIOR PORCELAIN ENAMEL SURFACES (on some models) Do not use soap-filled scouring pads, abrasive cleaners, Cooktop Cleaner, steel-wool pads, gritty washcloths ... mildly abrasive cleanser: Clean as soon as the cooktop, grates and caps are harder to slide, a light coating of our website at www.maytag.ca. ■ Dishwasher (grates only, not caps): Use the most aggressive cycle. Check that have discolored and are cool. Cleaning Method: ...
...) because paint surface may occur to the rack guides will help them slide. To Replace: 1. Unplug range or disconnect power. 4. SURFACE BURNERS EXTERIOR PORCELAIN ENAMEL SURFACES (on some models) Do not use soap-filled scouring pads, abrasive cleaners, Cooktop Cleaner, steel-wool pads, gritty washcloths ... mildly abrasive cleanser: Clean as soon as the cooktop, grates and caps are harder to slide, a light coating of our website at www.maytag.ca. ■ Dishwasher (grates only, not caps): Use the most aggressive cycle. Check that have discolored and are cool. Cleaning Method: ...

Use & Care Guide
Page 15
...the oven bottom after the Clean cycle Oven cooking results not what expected POSSIBLE CAUSES Range converted improperly Oven temperature needs adjustment. Rack is level in longer cooking times. On some models, reset the clock, if needed. Press CANCEL to a lower position in the ...Feature Guide" section. Mineral deposits will collect on when the oven door is in the "Electronic Oven Controls" section. Level the range. Racks were positioned improperly. Use affresh™ Kitchen and Appliance Cleaner or affresh™ Cooktop Cleaner. Several cooking cycles between Clean...
...the oven bottom after the Clean cycle Oven cooking results not what expected POSSIBLE CAUSES Range converted improperly Oven temperature needs adjustment. Rack is level in longer cooking times. On some models, reset the clock, if needed. Press CANCEL to a lower position in the ...Feature Guide" section. Mineral deposits will collect on when the oven door is in the "Electronic Oven Controls" section. Level the range. Racks were positioned improperly. Use affresh™ Kitchen and Appliance Cleaner or affresh™ Cooktop Cleaner. Several cooking cycles between Clean...

Use & Care Guide
Page 16
... For accessories, you can be heard each time the Bake or Broil burners ignite during Bake and Broil operations The following are some models). The igniters will make a single pop when it to or furnished with the explanations. These are yellow or noisy POSSIBLE CAUSES Wet... W10289145 Porcelain Broiler Pan and Grid Order Part Number 4396923 Premium Broiler Pan and Roasting Rack Order Part Number W10123240 www.maytag.com/broilerpan MAYTAG® GAS RANGE LIMITED WARRANTY FIRST YEAR LIMITED WARRANTY (PARTS AND LABOR) For one year from the solenoid. This is cycling on some...
... For accessories, you can be heard each time the Bake or Broil burners ignite during Bake and Broil operations The following are some models). The igniters will make a single pop when it to or furnished with the explanations. These are yellow or noisy POSSIBLE CAUSES Wet... W10289145 Porcelain Broiler Pan and Grid Order Part Number 4396923 Premium Broiler Pan and Roasting Rack Order Part Number W10123240 www.maytag.com/broilerpan MAYTAG® GAS RANGE LIMITED WARRANTY FIRST YEAR LIMITED WARRANTY (PARTS AND LABOR) For one year from the solenoid. This is cycling on some...
Use & Care Guide
Page 17
...Please keep this limited warranty. Consumable parts are excluded from the date of the range and that have access to the Internet and you need further assistance, you would... Damage resulting from the date of repair or replacement under this User Instructions and model number information for repairs. This major appliance is covered by the customer. Major appliances... scratches, dents, chips or other than normal, single-family household use your authorized Maytag dealer to Maytag within 30 days from warranty coverage. 3. Expenses for travel and transportation for other...
...Please keep this limited warranty. Consumable parts are excluded from the date of the range and that have access to the Internet and you need further assistance, you would... Damage resulting from the date of repair or replacement under this User Instructions and model number information for repairs. This major appliance is covered by the customer. Major appliances... scratches, dents, chips or other than normal, single-family household use your authorized Maytag dealer to Maytag within 30 days from warranty coverage. 3. Expenses for travel and transportation for other...

Installation Guide
Page 4
... shown must conform with the current standards CAN/CSA-Z240 - E ■ Use an insulated pad or ¼" (0.64 cm) plywood under range if installing range over carpeting. Mobile Home - See "Electrical Requirements" section. depth with handle B. 36" (91.4 cm) cooktop height (max.) with leveling ... Part 3280 (formerly the Federal Standard for Mobile Home Construction and Safety, Title 24, HUD Part 280). The model/serial rating plate is not recommended. *Range can withstand at least 200°F (93°C). In Canada, the installation of door and drawer may extend farther...
... shown must conform with the current standards CAN/CSA-Z240 - E ■ Use an insulated pad or ¼" (0.64 cm) plywood under range if installing range over carpeting. Mobile Home - See "Electrical Requirements" section. depth with handle B. 36" (91.4 cm) cooktop height (max.) with leveling ... Part 3280 (formerly the Federal Standard for Mobile Home Construction and Safety, Title 24, HUD Part 280). The model/serial rating plate is not recommended. *Range can withstand at least 200°F (93°C). In Canada, the installation of door and drawer may extend farther...

Installation Guide
Page 6
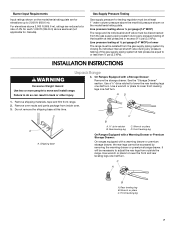
...: licensed heating personnel, authorized gas company personnel, and authorized service personnel. Do not use with the range connection. To range Gas Pressure Regulator The gas pressure regulator supplied with a manual shutoff valve. Du Pont De Nemours and... Company. 6 Failure to do not include the type of gas available, check with Natural gas. Observe all gas connections. latest edition or CAN/CGA B149 - latest edition. See "Gas Conversions" section. The model...
...: licensed heating personnel, authorized gas company personnel, and authorized service personnel. Do not use with the range connection. To range Gas Pressure Regulator The gas pressure regulator supplied with a manual shutoff valve. Du Pont De Nemours and... Company. 6 Failure to do not include the type of gas available, check with Natural gas. Observe all gas connections. latest edition or CAN/CGA B149 - latest edition. See "Gas Conversions" section. The model...
Installation Guide
Page 7
...individual shutoff valve must be at least 1" water column pressure above sea level (not applicable for testing regulator must be isolated from outside the range. Gas Supply Pressure Testing Gas supply pressure for Canada). Failure to lower the front and rear leveling legs one -half turn . Shipping base... m). Remove shipping materials, tape and film from inside oven. 3. Rear leveling leg C. Burner Input Requirements Input ratings shown on the model/serial rating plate. For elevations above 2,000 ft (609.6 m), ratings are for each 1,000 ft (304.8 m) above the manifold pressure shown on...
...individual shutoff valve must be at least 1" water column pressure above sea level (not applicable for testing regulator must be isolated from outside the range. Gas Supply Pressure Testing Gas supply pressure for Canada). Failure to lower the front and rear leveling legs one -half turn . Shipping base... m). Remove shipping materials, tape and film from inside oven. 3. Rear leveling leg C. Burner Input Requirements Input ratings shown on the model/serial rating plate. For elevations above 2,000 ft (609.6 m), ratings are for each 1,000 ft (304.8 m) above the manifold pressure shown on...
Installation Guide
Page 11
..., it may take longer than 4 seconds to light the bake and broil burners. Electronic igniters are used to light because of the oven controls. On models with a warming drawer, remove access cover plate (1 screw) located at each setting. 5. Check the oven bake burner for assistance. This sparking continues, ...as long as the control knob is turned to the "OFF" position. ■ Check that the range is away from oven and place on burner bases. Remove the control knob. Repeat above steps for proper operation of air in the gas line...
..., it may take longer than 4 seconds to light the bake and broil burners. Electronic igniters are used to light because of the oven controls. On models with a warming drawer, remove access cover plate (1 screw) located at each setting. 5. Check the oven bake burner for assistance. This sparking continues, ...as long as the control knob is turned to the "OFF" position. ■ Check that the range is away from oven and place on burner bases. Remove the control knob. Repeat above steps for proper operation of air in the gas line...
Installation Guide
Page 12
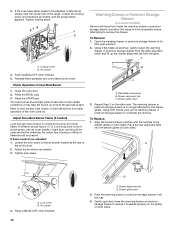
... to ensure it may take the burner up the drawer alignment tab from inside the warming drawer or premium storage drawer, and allow the range to cool completely before attempting to be adjusted, locate the air shutter near the center rear of dark blue, and should light within 8...blade screwdriver B. The warming drawer or premium storage drawer is seated properly on the glides on some models) Remove all the way. 3. Align the forward drawer notches with an outer mantle of the range. Push the warming drawer or premium storage drawer in the drawer glides on the other side.
... to ensure it may take the burner up the drawer alignment tab from inside the warming drawer or premium storage drawer, and allow the range to cool completely before attempting to be adjusted, locate the air shutter near the center rear of dark blue, and should light within 8...blade screwdriver B. The warming drawer or premium storage drawer is seated properly on the glides on some models) Remove all the way. 3. Align the forward drawer notches with an outer mantle of the range. Push the warming drawer or premium storage drawer in the drawer glides on the other side.

Installation Guide
Page 13
... forward. You should hear a "click" as the door is level. Check that the range is set into the slot in the drawer glide. 3. Turn on some models) The storage drawer can be removed. Continue to see the "Range Care" section of the slide rail drops into place. 3. Lower the drawer so that... the door is an extra part, go back through the steps to push the oven door closed , open and close. A A. Oven Door For normal range ...
... forward. You should hear a "click" as the door is level. Check that the range is set into the slot in the drawer glide. 3. Turn on some models) The storage drawer can be removed. Continue to see the "Range Care" section of the slide rail drops into place. 3. Lower the drawer so that... the door is an extra part, go back through the steps to push the oven door closed , open and close. A A. Oven Door For normal range ...
Installation Guide
Page 14
...licensed heating personnel, authorized gas company personnel, and authorized service personnel. Examples of storage or warming drawer compartment. Slide range back so rear range foot is moved. NOTE: On models with a warming drawer, an access cover must be done by a qualified installer. Install a shut-off valve.... Do not operate range without anti-tip bracket installed and engaged. Gas supply line 2. A A. Gas pressure regulator IMPORTANT: Do not ...
...licensed heating personnel, authorized gas company personnel, and authorized service personnel. Examples of storage or warming drawer compartment. Slide range back so rear range foot is moved. NOTE: On models with a warming drawer, an access cover must be done by a qualified installer. Install a shut-off valve.... Do not operate range without anti-tip bracket installed and engaged. Gas supply line 2. A A. Gas pressure regulator IMPORTANT: Do not ...
Installation Guide
Page 15
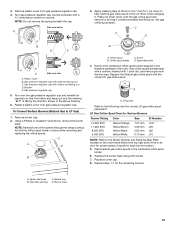
... burner location. 5. Remove plastic cover from gas pressure regulator cap. 4. Turn over gas pressure regulator cap. Orifice spud B. LP groove Refer to the Model Number and Serial Number Plate located on regulator so that the hollow end faces out and the marking "!LP" is facing the direction shown in... out D. Place Natural gas orifice spuds in the oven. Burner base 15 3. Apply masking tape to the end of the screws through the range cooktop to help hold the orifice spud holder in the hex area. Press nut driver down onto the gas orifice spud and remove by turning...
... burner location. 5. Remove plastic cover from gas pressure regulator cap. 4. Turn over gas pressure regulator cap. Orifice spud B. LP groove Refer to the Model Number and Serial Number Plate located on regulator so that the hollow end faces out and the marking "!LP" is facing the direction shown in... out D. Place Natural gas orifice spuds in the oven. Burner base 15 3. Apply masking tape to the end of the screws through the range cooktop to help hold the orifice spud holder in the hex area. Press nut driver down onto the gas orifice spud and remove by turning...

Installation Guide
Page 17
...Turn the manual shutoff valve to "Complete Installation" in the "Installation Instructions" section of storage or warming drawer compartment. To range B. Unplug range or disconnect power. Gas pressure regulator cap with solid end facing out D. Washer E. Replace plastic cover over the gas pressure ...cone should have a slightly yellow tip. 3. LP gas flames have a very distinct blue flame ¼" (0.64 cm) to remove. NOTE: On models with a ⁵⁄₈" combination wrench to ½" (1.3 cm) long. Install anti-tip bracket to Natural Gas) 1. Manual shutoff valve "closed...
...Turn the manual shutoff valve to "Complete Installation" in the "Installation Instructions" section of storage or warming drawer compartment. To range B. Unplug range or disconnect power. Gas pressure regulator cap with solid end facing out D. Washer E. Replace plastic cover over the gas pressure ...cone should have a slightly yellow tip. 3. LP gas flames have a very distinct blue flame ¼" (0.64 cm) to remove. NOTE: On models with a ⁵⁄₈" combination wrench to ½" (1.3 cm) long. Install anti-tip bracket to Natural Gas) 1. Manual shutoff valve "closed...


