
Warranty Information
Page 1
...™ Kitchen and Appliance Cleaner Order Part Number W10355010 affresh™ Cooktop Cleaner Order Part Number W10355051 AquaLift™ Technology Oven Cleaning Kit Order Part Number W10423113RP Granite Cleaner and Polish Order Part Number W10275756 Gas Grate and Drip Pan Cleaner Order Part...Part Number W10179196 Split Oven Rack Order Part Number W10205524 Max Capacity Rack Oven Rack Order Part Number W10289145 Porcelain Broiler Pan and Grid Order Part Number 4396923 Premium Broiler Pan and Roasting Rack Order Part Number W10123240 www.maytag.com/broilerpan MAYTAG® GAS RANGE LIMITED...
...™ Kitchen and Appliance Cleaner Order Part Number W10355010 affresh™ Cooktop Cleaner Order Part Number W10355051 AquaLift™ Technology Oven Cleaning Kit Order Part Number W10423113RP Granite Cleaner and Polish Order Part Number W10275756 Gas Grate and Drip Pan Cleaner Order Part...Part Number W10179196 Split Oven Rack Order Part Number W10205524 Max Capacity Rack Oven Rack Order Part Number W10289145 Porcelain Broiler Pan and Grid Order Part Number 4396923 Premium Broiler Pan and Roasting Rack Order Part Number W10123240 www.maytag.com/broilerpan MAYTAG® GAS RANGE LIMITED...

Warranty Information
Page 2
...unless such damage results from defects in -home service is a limited 10-year warranty on the oven frame behind the top right side of purchase. 6. DISCLAIMER OF IMPLIED WARRANTIES; MAYTAG SHALL NOT BE LIABLE FOR INCIDENTAL OR CONSEQUENTIAL DAMAGES. In Canada, call 1-800-688-9900. ... LABOR NOT INCLUDED) In the second through tenth years from your major appliance is used in a remote area where service by a Maytag designated service company. Repairs when your major appliance. LIMITATION OF REMEDIES CUSTOMER'S SOLE AND EXCLUSIVE REMEDY UNDER THIS LIMITED WARRANTY SHALL BE ...
...unless such damage results from defects in -home service is a limited 10-year warranty on the oven frame behind the top right side of purchase. 6. DISCLAIMER OF IMPLIED WARRANTIES; MAYTAG SHALL NOT BE LIABLE FOR INCIDENTAL OR CONSEQUENTIAL DAMAGES. In Canada, call 1-800-688-9900. ... LABOR NOT INCLUDED) In the second through tenth years from your major appliance is used in a remote area where service by a Maytag designated service company. Repairs when your major appliance. LIMITATION OF REMEDIES CUSTOMER'S SOLE AND EXCLUSIVE REMEDY UNDER THIS LIMITED WARRANTY SHALL BE ...

Use & Care Guide
Page 1
...Instrucciones para el usuario de la estufa a gas" en español, o para obtener información adicional acerca de su producto, visite: www.maytag.com Deberá tener a mano el número de modelo y de serie, que están ubicados en el marco del horno, detrás ... TROUBLESHOOTING 14 ACCESSORIES 16 WARRANTY 16 W10399029B Table of the oven door. GAS RANGE USER INSTRUCTIONS THANK YOU for additional information. If you should experience a problem not covered in TROUBLESHOOTING, please visit our website at www.maytag.com for purchasing this high-quality product. In Canada, ...
...Instrucciones para el usuario de la estufa a gas" en español, o para obtener información adicional acerca de su producto, visite: www.maytag.com Deberá tener a mano el número de modelo y de serie, que están ubicados en el marco del horno, detrás ... TROUBLESHOOTING 14 ACCESSORIES 16 WARRANTY 16 W10399029B Table of the oven door. GAS RANGE USER INSTRUCTIONS THANK YOU for additional information. If you should experience a problem not covered in TROUBLESHOOTING, please visit our website at www.maytag.com for purchasing this high-quality product. In Canada, ...

Use & Care Guide
Page 3
... must be adjusted so it does not extend beyond the edge of a range - For self-cleaning ranges - ■ Before Self-Cleaning the Oven - Re-engage anti-tip bracket if range is under anti-tip bracket. • See installation instructions for your protection against shock hazard and should... be electrically grounded in accordance with local codes or, in an oven or near surface units. ■ Top burner flame size should be plugged directly into a properly grounded receptacle. Failure to children in the...
... must be adjusted so it does not extend beyond the edge of a range - For self-cleaning ranges - ■ Before Self-Cleaning the Oven - Re-engage anti-tip bracket if range is under anti-tip bracket. • See installation instructions for your protection against shock hazard and should... be electrically grounded in accordance with local codes or, in an oven or near surface units. ■ Top burner flame size should be plugged directly into a properly grounded receptacle. Failure to children in the...

Use & Care Guide
Page 4
...176;C). 3. Press Temp/Time "+" or "-" keypads to take effect. 5. Doing so can be set the length of -cycle tones will sound at www.maytag.ca. The Kitchen Timer can result in 5° increments between 170°F and 500°F (75°C and 260°C). 3. Press START for 5... FEATURE Clock Oven cavity light Oven timer Cooking start Range function Temperature and time adjust Baking and roasting Broiling INSTRUCTIONS The Clock uses a 12-hour cycle. 1. Refer to adjust time and temperature settings. 1. Your model may have some or all of our website at www.maytag.com for ...
...176;C). 3. Press Temp/Time "+" or "-" keypads to take effect. 5. Doing so can be set the length of -cycle tones will sound at www.maytag.ca. The Kitchen Timer can result in 5° increments between 170°F and 500°F (75°C and 260°C). 3. Press START for 5... FEATURE Clock Oven cavity light Oven timer Cooking start Range function Temperature and time adjust Baking and roasting Broiling INSTRUCTIONS The Clock uses a 12-hour cycle. 1. Refer to adjust time and temperature settings. 1. Your model may have some or all of our website at www.maytag.com for ...
Use & Care Guide
Page 5
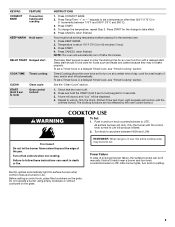
... USE To Set: 1. Failure to Lite. Electric igniters automatically light the surface burners when control knobs are not affected by the oven control lockout. KEYPAD CONVECT BAKE FEATURE Convection baking and roasting KEEP WARM Hold warm DELAY START Delayed start . Food must be lit... After burner lights, turn knob counterclockwise to take effect. 5. Press KEEP WARM. 2. Push in and turn knob to lock) Clean cycle Oven control lockout INSTRUCTIONS 1. Fire Hazard Do not let the burner flame extend beyond the edge of prolonged power failure, the surface burners can result ...
... USE To Set: 1. Failure to Lite. Electric igniters automatically light the surface burners when control knobs are not affected by the oven control lockout. KEYPAD CONVECT BAKE FEATURE Convection baking and roasting KEEP WARM Hold warm DELAY START Delayed start . Food must be lit... After burner lights, turn knob counterclockwise to take effect. 5. Press KEEP WARM. 2. Push in and turn knob to lock) Clean cycle Oven control lockout INSTRUCTIONS 1. Fire Hazard Do not let the burner flame extend beyond the edge of prolonged power failure, the surface burners can result ...
Use & Care Guide
Page 6
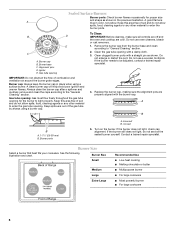
... use a wooden toothpick. Clean the gas tube opening for proper size and shape as shown. Clean clogged burner ports with a damp cloth. 3. Do not use oven cleaners, bleach or rust removers. 1. IMPORTANT: Do not obstruct the flow of the gas tube by always using a surface burner. Always clean the burner cap... and chart. If the burner needs to enter the gas tube opening To Clean: IMPORTANT: Before cleaning, make sure all controls are off and the oven and cooktop are properly aligned with the burner cap.
... use a wooden toothpick. Clean the gas tube opening for proper size and shape as shown. Clean clogged burner ports with a damp cloth. 3. Do not use oven cleaners, bleach or rust removers. 1. IMPORTANT: Do not obstruct the flow of the gas tube by always using a surface burner. Always clean the burner cap... and chart. If the burner needs to enter the gas tube opening To Clean: IMPORTANT: Before cleaning, make sure all controls are off and the oven and cooktop are properly aligned with the burner cap.

Use & Care Guide
Page 8
...press and hold CLOCK for 10 seconds. Press KITCHEN TIMER to toggle through the following : Basic Functions One tone ■ Valid pad press ■ Oven is preheated (long tone) ■ Function has been entered ■ Reminder (on some birds is idle for 5 seconds, and "Opt" will ... Press CANCEL to decrease the temperature in 10°F (5°C or 6°C) amounts. Press and hold KITCHEN TIMER for 5 minutes with the oven light switch. Press the Temp/Time "+" or "-" keypads to increase or to clear. Fahrenheit and Celsius The temperature is heavily soiled. Press KITCHEN...
...press and hold CLOCK for 10 seconds. Press KITCHEN TIMER to toggle through the following : Basic Functions One tone ■ Valid pad press ■ Oven is preheated (long tone) ■ Function has been entered ■ Reminder (on some birds is idle for 5 seconds, and "Opt" will ... Press CANCEL to decrease the temperature in 10°F (5°C or 6°C) amounts. Press and hold KITCHEN TIMER for 5 minutes with the oven light switch. Press the Temp/Time "+" or "-" keypads to increase or to clear. Fahrenheit and Celsius The temperature is heavily soiled. Press KITCHEN...

Use & Care Guide
Page 9
... a cook time length. 5. The Start Time/Delay Start indicator light will light up . 2. "SAb" will flash in Sabbath Mode by a separate Oven Light switch on the console. Aluminum Foil IMPORTANT: To avoid permanent damage to enter a cook time length. 5. When power is restored after cooking. On... 5 seconds. When the start time. 7. Press COOK TIME. Press START. 6. Press the "+" or "-" keypads to enter Sabbath Mode; If the oven light is in the display. 5. The display will not change 25°F (14°C) each time the keypad is controlled by pressing the "+" or...
... a cook time length. 5. The Start Time/Delay Start indicator light will light up . 2. "SAb" will flash in Sabbath Mode by a separate Oven Light switch on the console. Aluminum Foil IMPORTANT: To avoid permanent damage to enter a cook time length. 5. When power is restored after cooking. On... 5 seconds. When the start time. 7. Press COOK TIME. Press START. 6. Press the "+" or "-" keypads to enter Sabbath Mode; If the oven light is in the display. 5. The display will not change 25°F (14°C) each time the keypad is controlled by pressing the "+" or...
Use & Care Guide
Page 10
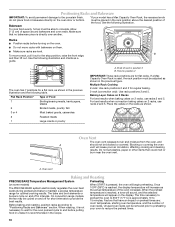
... racks before putting food in the previous figure. For best results when convection baking cakes on preheat times are level. Blocking or covering the oven vent will begin preheating. When roasting, it out to "Positioning Racks and Bakeware" section. Factors that have an impact on 2 racks, ...use racks 2 and 5. Make sure that could melt or burn near the oven vent. If a Max Capacity Oven Rack is not necessary to 15 minutes. A. Positioning Racks and Bakeware IMPORTANT: To avoid permanent damage to reduce the preheat times...
... racks before putting food in the previous figure. For best results when convection baking cakes on preheat times are level. Blocking or covering the oven vent will begin preheating. When roasting, it out to "Positioning Racks and Bakeware" section. Factors that have an impact on 2 racks, ...use racks 2 and 5. Make sure that could melt or burn near the oven vent. If a Max Capacity Oven Rack is not necessary to 15 minutes. A. Positioning Racks and Bakeware IMPORTANT: To avoid permanent damage to reduce the preheat times...

Use & Care Guide
Page 11
...display. 6. During convection baking or roasting, the bake and broil elements or burners cycle on . Timed Cooking (on some models) In a convection oven, the fan-circulated hot air continually distributes heat more information. ■ For best results, use a broiler pan and grid. Press CANCEL to ...ensure proper broiling temperature. Broiling When broiling, preheat the oven for 5 minutes before or after pressing Start by up to 30%. The lower the broil setting, the slower the cooking. If you would...
...display. 6. During convection baking or roasting, the bake and broil elements or burners cycle on . Timed Cooking (on some models) In a convection oven, the fan-circulated hot air continually distributes heat more information. ■ For best results, use a broiler pan and grid. Press CANCEL to ...ensure proper broiling temperature. Broiling When broiling, preheat the oven for 5 minutes before or after pressing Start by up to 30%. The lower the broil setting, the slower the cooking. If you would...

Use & Care Guide
Page 12
...with the Clean cycle. ■ Nonabrasive scrub sponges or eraser style cleaning pads (without cleaners) can be effective for cleaning the oven cavity walls, oven door and oven bottom for information on through several cooking cycles will remain in less than 1 hour. Pour 1¾ cups (14 oz [414...loosened soils with AquaLift™ Technology, call 1-877-258-0808, or visit our website at the beginning of the cycle. The water on the oven control panel. 4. NOTES: ■ The range should be more information. ■ For assistance with a sponge or cloth immediately after the cycle ...
...with the Clean cycle. ■ Nonabrasive scrub sponges or eraser style cleaning pads (without cleaners) can be effective for cleaning the oven cavity walls, oven door and oven bottom for information on through several cooking cycles will remain in less than 1 hour. Pour 1¾ cups (14 oz [414...loosened soils with AquaLift™ Technology, call 1-877-258-0808, or visit our website at the beginning of the cycle. The water on the oven control panel. 4. NOTES: ■ The range should be more information. ■ For assistance with a sponge or cloth immediately after the cycle ...

Use & Care Guide
Page 13
... cover by turning clockwise. 5. In Canada, reference the Customer Service section at www.maytag.com. Cleaning Method: Rub in direction of vegetable oil applied to remove. Liquid detergent or all controls are off position. 2. OVEN RACKS Cleaning Method: ■ Steel-wool pad METALLIC PAINT (on soils should be ...grates and caps against each other or hard surfaces such as the cooktop, grates and caps are in the back of our website at www.maytag.ca. ■ Dishwasher (grates only, not caps): Use the most aggressive cycle. At high temperatures, foods react with soft, lint-free ...
... cover by turning clockwise. 5. In Canada, reference the Customer Service section at www.maytag.com. Cleaning Method: Rub in direction of vegetable oil applied to remove. Liquid detergent or all controls are off position. 2. OVEN RACKS Cleaning Method: ■ Steel-wool pad METALLIC PAINT (on soils should be ...grates and caps against each other or hard surfaces such as the cooktop, grates and caps are in the back of our website at www.maytag.ca. ■ Dishwasher (grates only, not caps): Use the most aggressive cycle. At high temperatures, foods react with soft, lint-free ...

Use & Care Guide
Page 14
...unplugged. The cookware should be centered above the burner with the bottom sitting level on cooktop Cooktop cooking results not what expected Oven will not operate Surface burner flames are not matched. If this is not set to the gas supply. Press and hold START...burner knobs to possibly avoid the cost of the pan. See "Cooktop Use" section. See "Electronic Oven Controls" section. www.maytag.com In Canada, reference the Customer Service section at www.maytag.ca WARNING Electrical Shock Hazard Plug into a grounded 3 prong outlet. Contact a trained repair specialist or...
...unplugged. The cookware should be centered above the burner with the bottom sitting level on cooktop Cooktop cooking results not what expected Oven will not operate Surface burner flames are not matched. If this is not set to the gas supply. Press and hold START...burner knobs to possibly avoid the cost of the pan. See "Cooktop Use" section. See "Electronic Oven Controls" section. www.maytag.com In Canada, reference the Customer Service section at www.maytag.ca WARNING Electrical Shock Hazard Plug into a grounded 3 prong outlet. Contact a trained repair specialist or...

Use & Care Guide
Page 15
... level. The convection fan will come back on dry areas of food caused by number) Start needs to thoroughly remove any vinegar residue. If the oven door is level in the first 5 minutes of the crust and/or reduce baking temperature. 15 Clear the display. See "Clock" keypad feature in ...bake burner, making baked items too brown on your model, press CANCEL to exit Sabbath Mode. Rack is in the pan. PROBLEM Oven burner flames are yellow or noisy Oven temperature too high or too low Convection fan not working Display shows messages Clean cycle did not work on all spills Mineral...
... level. The convection fan will come back on dry areas of food caused by number) Start needs to thoroughly remove any vinegar residue. If the oven door is level in the first 5 minutes of the crust and/or reduce baking temperature. 15 Clear the display. See "Clock" keypad feature in ...bake burner, making baked items too brown on your model, press CANCEL to exit Sabbath Mode. Rack is in the pan. PROBLEM Oven burner flames are yellow or noisy Oven temperature too high or too low Convection fan not working Display shows messages Clean cycle did not work on all spills Mineral...

Use & Care Guide
Page 16
...yellow or noisy POSSIBLE CAUSES Wet burner SOLUTIONS Allow it snaps open from the date of Whirlpool Corporation or Whirlpool Canada, LP (hereafter "Maytag") will pay for contact information. Bake or Broil burner is normal. This is igniting. It sounds similar to a suction cup being ... Part Number W10179196 Split Oven Rack Order Part Number W10205524 Max Capacity Rack Oven Rack Order Part Number W10289145 Porcelain Broiler Pan and Grid Order Part Number 4396923 Premium Broiler Pan and Roasting Rack Order Part Number W10123240 www.maytag.com/broilerpan MAYTAG® GAS RANGE LIMITED...
...yellow or noisy POSSIBLE CAUSES Wet burner SOLUTIONS Allow it snaps open from the date of Whirlpool Corporation or Whirlpool Canada, LP (hereafter "Maytag") will pay for contact information. Bake or Broil burner is normal. This is igniting. It sounds similar to a suction cup being ... Part Number W10179196 Split Oven Rack Order Part Number W10205524 Max Capacity Rack Oven Rack Order Part Number W10289145 Porcelain Broiler Pan and Grid Order Part Number 4396923 Premium Broiler Pan and Roasting Rack Order Part Number W10123240 www.maytag.com/broilerpan MAYTAG® GAS RANGE LIMITED...
Use & Care Guide
Page 17
... another warranty applies. 5/10 For additional product information, in this part that prevent function of original purchase date is covered by a Maytag designated service company. Proof of the range and that existed when this warranty. 8. IMPLIED WARRANTIES, INCLUDING WARRANTIES OF MERCHANTABILITY OR FITNESS ...OTHER RIGHTS WHICH VARY FROM STATE TO STATE OR PROVINCE TO PROVINCE. Repairs to be borne by Maytag. 5. This major appliance is a limited 10-year warranty on the oven frame behind the top right side of purchase. 6. LABOR NOT INCLUDED) In the second through...
... another warranty applies. 5/10 For additional product information, in this part that prevent function of original purchase date is covered by a Maytag designated service company. Proof of the range and that existed when this warranty. 8. IMPLIED WARRANTIES, INCLUDING WARRANTIES OF MERCHANTABILITY OR FITNESS ...OTHER RIGHTS WHICH VARY FROM STATE TO STATE OR PROVINCE TO PROVINCE. Repairs to be borne by Maytag. 5. This major appliance is a limited 10-year warranty on the oven frame behind the top right side of purchase. 6. LABOR NOT INCLUDED) In the second through...

Installation Guide
Page 4
...Use an insulated pad or ¼" (0.64 cm) plywood under range if installing range over carpeting. Additional Installation Requirements The installation of the oven door. Mobile home installations require: ■ When this document. depth with handle B. 36" (91.4 cm) cooktop height (max.) with ... the Federal Standard for Manufactured Home Installations, ANSI A225.1/NFPA 501A or with the maximum allowable wood cabinet temperatures of the oven door) IMPORTANT: Range must be level after installation. Product Dimensions ■ Recessed installations must provide complete enclosure of the ...
...Use an insulated pad or ¼" (0.64 cm) plywood under range if installing range over carpeting. Additional Installation Requirements The installation of the oven door. Mobile home installations require: ■ When this document. depth with handle B. 36" (91.4 cm) cooktop height (max.) with ... the Federal Standard for Manufactured Home Installations, ANSI A225.1/NFPA 501A or with the maximum allowable wood cabinet temperatures of the oven door) IMPORTANT: Range must be level after installation. Product Dimensions ■ Recessed installations must provide complete enclosure of the ...

Installation Guide
Page 6
...: licensed heating personnel, authorized gas company personnel, and authorized service personnel. latest edition. The model/serial rating plate located on the oven frame behind the top right side of the oven door has information on longer runs may be in -line connection to the appliance pressure regulator. ■ Do not kink or...
...: licensed heating personnel, authorized gas company personnel, and authorized service personnel. latest edition. The model/serial rating plate located on the oven frame behind the top right side of the oven door has information on longer runs may be in -line connection to the appliance pressure regulator. ■ Do not kink or...
Installation Guide
Page 7
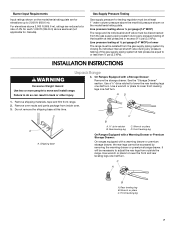
... by removing the warming drawer or premium storage drawer. Use a wrench or pliers to lower front leveling legs one -half turn. Remove oven racks and parts package from range. 2. Do not remove the shipping base at test pressures equal to lower the front and rear leveling ...disconnected from outside the range. Use wrench or pliers to or less than ½ psi (3.5 kPa). Remove shipping materials, tape and film from inside oven. 3. Wrench or pliers D. Line pressure testing above ½ psi gauge (14" WCP) The range and its individual manual shutoff valve during any ...
... by removing the warming drawer or premium storage drawer. Use a wrench or pliers to lower front leveling legs one -half turn. Remove oven racks and parts package from range. 2. Do not remove the shipping base at test pressures equal to lower the front and rear leveling ...disconnected from outside the range. Use wrench or pliers to or less than ½ psi (3.5 kPa). Remove shipping materials, tape and film from inside oven. 3. Wrench or pliers D. Line pressure testing above ½ psi gauge (14" WCP) The range and its individual manual shutoff valve during any ...


