Installation Guide
Page 15
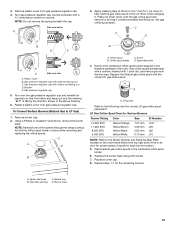
... Quadrex® screwdriver, remove the burner base. Orifice spud B. Orifice spud holder C. Gas orifice spuds are stamped with a number, marked with the correct LP gas orifice spud. Replace the burner base using both screw. 7. Press nut driver down onto the gas orifice spud and remove by turning it . Plastic cover B. C A D B B A. Remove the cardboard orifice spud holder shipped in the literature package in...
... Quadrex® screwdriver, remove the burner base. Orifice spud B. Orifice spud holder C. Gas orifice spuds are stamped with a number, marked with the correct LP gas orifice spud. Replace the burner base using both screw. 7. Press nut driver down onto the gas orifice spud and remove by turning it . Plastic cover B. C A D B B A. Remove the cardboard orifice spud holder shipped in the literature package in...
Installation Guide
Page 16
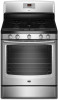
... to remove. Remove 1 screw from front of the panel is away from oven and set the bake burner aside. B A A. Install the LP gas bake burner orifice spud, turning it clockwise until snug. A B A C A. Screws C. See the "Storage Drawer" or "Warming Drawer or Premium Storage Drawer" section. 8. Reattach the ...1 screw. 10. IMPORTANT: Do not overtighten. Use a ³⁄₈" combination wrench and turn the Natural gas bake burner orifice spud counterclockwise to LP Gas) 1. Replace the oven door if it with 2 screws. 7. NOTE: The broil burner will hang in the...
... to remove. Remove 1 screw from front of the panel is away from oven and set the bake burner aside. B A A. Install the LP gas bake burner orifice spud, turning it clockwise until snug. A B A C A. Screws C. See the "Storage Drawer" or "Warming Drawer or Premium Storage Drawer" section. 8. Reattach the ...1 screw. 10. IMPORTANT: Do not overtighten. Use a ³⁄₈" combination wrench and turn the Natural gas bake burner orifice spud counterclockwise to LP Gas) 1. Replace the oven door if it with 2 screws. 7. NOTE: The broil burner will hang in the...

Installation Guide
Page 17
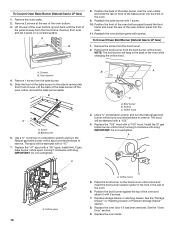
...a warming drawer, an access cover must be killed. Slide range back so rear range foot is engaged in place while removing and replacing the orifice spuds. B A C A. To range B. Washer E. NG" is very important. Using a Phillips or Quadrex® screwdriver, remove the burner base.... Plastic cover B. NOTE: Reinstall one of this manual to hold the orifice spud holder in the slot of storage or warming drawer compartment. Complete Installation (Natural Gas to remove. IMPORTANT: You may have a very...
...a warming drawer, an access cover must be killed. Slide range back so rear range foot is engaged in place while removing and replacing the orifice spuds. B A C A. To range B. Washer E. NG" is very important. Using a Phillips or Quadrex® screwdriver, remove the burner base.... Plastic cover B. NOTE: Reinstall one of this manual to hold the orifice spud holder in the slot of storage or warming drawer compartment. Complete Installation (Natural Gas to remove. IMPORTANT: You may have a very...

Installation Guide
Page 18
... of the bake burner to the side to remove. Remove the oven racks. 2. Remove from the bake burner. 5. Orifice spud B. Orifice spud holder C. Screw D. Spark electrode 4. Replace the LP gas orifice spud with a "47" spud. XXX A A. Stamped number Refer to the Model Number and Serial Number Plate located on the oven frame behind the ...top right side of the oven door for each burner location. 5. Natural Gas Orifice Spud Chart Burner Rating Color Size ID Number 18,000 BTU 17,000 BTU 15,000/15,500 BTU 14,200 BTU 13,000/13,500...
... of the bake burner to the side to remove. Remove the oven racks. 2. Remove from the bake burner. 5. Orifice spud B. Orifice spud holder C. Screw D. Spark electrode 4. Replace the LP gas orifice spud with a "47" spud. XXX A A. Stamped number Refer to the Model Number and Serial Number Plate located on the oven frame behind the ...top right side of the oven door for each burner location. 5. Natural Gas Orifice Spud Chart Burner Rating Color Size ID Number 18,000 BTU 17,000 BTU 15,000/15,500 BTU 14,200 BTU 13,000/13,500...
