

Owners Manual
Page 1
...quality product. Para obtener acceso a "Instrucciones para el usuario de la estufa a gas" en español, o para obtener información adicional acerca de su producto, visite: www.maytag.com Tenga listo su número de modelo completo. Puede encontrar su número...W10269527A If you should experience a problem not covered in TROUBLESHOOTING, please visit our website at 1-800-688-9900. GAS RANGE USER INSTRUCTIONS THANK YOU for additional information. Table of Contents RANGE SAFETY 2 The Anti-Tip Bracket 3 FEATURE GUIDE 4 COOKTOP USE 6 Sealed Surface Burners 6 OVEN USE 7...
...quality product. Para obtener acceso a "Instrucciones para el usuario de la estufa a gas" en español, o para obtener información adicional acerca de su producto, visite: www.maytag.com Tenga listo su número de modelo completo. Puede encontrar su número...W10269527A If you should experience a problem not covered in TROUBLESHOOTING, please visit our website at 1-800-688-9900. GAS RANGE USER INSTRUCTIONS THANK YOU for additional information. Table of Contents RANGE SAFETY 2 The Anti-Tip Bracket 3 FEATURE GUIDE 4 COOKTOP USE 6 Sealed Surface Burners 6 OVEN USE 7...
Owners Manual
Page 2
...gas supplier, call your appliance. If a gas leak is , tell you how to reduce the chance of injury, and tell you smell gas... Immediately call the fire department. - WARNING: Gas leaks cannot always be killed or seriously injured...manual and on your gas supplier from a neighbor's phone. Gas suppliers recommend that can... what can be detected by smell. Follow the gas supplier's instructions. • If you don't...gas detector approved by a qualified installer, service agency or the gas supplier. WHAT TO DO IF YOU SMELL GAS...reach your gas supplier. WARNING You can kill ...
...gas supplier, call your appliance. If a gas leak is , tell you how to reduce the chance of injury, and tell you smell gas... Immediately call the fire department. - WARNING: Gas leaks cannot always be killed or seriously injured...manual and on your gas supplier from a neighbor's phone. Gas suppliers recommend that can... what can be detected by smell. Follow the gas supplier's instructions. • If you don't...gas detector approved by a qualified installer, service agency or the gas supplier. WHAT TO DO IF YOU SMELL GAS...reach your gas supplier. WARNING You can kill ...

Owners Manual
Page 6
... spills, food, cleaning agents or any other material to IGNITE. Do not operate a burner using a surface burner. To Set: 1. REMEMBER: When range is blue in use or (on the grate. Burner cap B. Alignment pins D. Burner base C. Burner cap: Always keep the burner cap in place... the "General Cleaning" section. Only the burner with the control knob turned to anywhere between HIGH and LOW. Gas tube opening: Gas must flow freely throughout the gas tube opening IMPORTANT: Do not obstruct the flow of prolonged power failure, the surface burners can result in and...
... spills, food, cleaning agents or any other material to IGNITE. Do not operate a burner using a surface burner. To Set: 1. REMEMBER: When range is blue in use or (on the grate. Burner cap B. Alignment pins D. Burner base C. Burner cap: Always keep the burner cap in place... the "General Cleaning" section. Only the burner with the control knob turned to anywhere between HIGH and LOW. Gas tube opening: Gas must flow freely throughout the gas tube opening IMPORTANT: Do not obstruct the flow of prolonged power failure, the surface burners can result in and...
Owners Manual
Page 11
... iron cookware. Cleaning Method: ■ Mild detergent Oven Light The oven light is cool. Unplug range or disconnect power. 4. Cooked-on some models) Cleaning Method: ■ Soap and water: Pull... cover for contact information. Turn the glass bulb cover in direction of our website at www.maytag.com. General Cleaning MPORTANT: Before cleaning, make sure all -purpose cleaner: Rinse with clean...; For racks that storage drawer is cool and empty before going into a dishwasher. ■ Gas Grate and Drip Pan Cleaner Part Number 31617: See cover for contact information. Plug in the ...
... iron cookware. Cleaning Method: ■ Mild detergent Oven Light The oven light is cool. Unplug range or disconnect power. 4. Cooked-on some models) Cleaning Method: ■ Soap and water: Pull... cover for contact information. Turn the glass bulb cover in direction of our website at www.maytag.com. General Cleaning MPORTANT: Before cleaning, make sure all -purpose cleaner: Rinse with clean...; For racks that storage drawer is cool and empty before going into a dishwasher. ■ Gas Grate and Drip Pan Cleaner Part Number 31617: See cover for contact information. Plug in the ...
Owners Manual
Page 12
...burners have been converted improperly. See "Sealed Surface Burners" section. Cookware should have been converted improperly. Turn on and off position? www.maytag.com Nothing will not operate during self-clean cycle. ■ Is the control knob set to release air from the solenoid. See ...burners will operate WARNING Electrical Shock Hazard Plug into a grounded 3 prong outlet. ■ Household fuse blown or circuit breaker tripped? Gas range noises during Bake and Broil operations Noises that can be heard each time the Bake or Broil burners ignite during the Bake and Broil ...
...burners have been converted improperly. See "Sealed Surface Burners" section. Cookware should have been converted improperly. Turn on and off position? www.maytag.com Nothing will not operate during self-clean cycle. ■ Is the control knob set to release air from the solenoid. See ...burners will operate WARNING Electrical Shock Hazard Plug into a grounded 3 prong outlet. ■ Household fuse blown or circuit breaker tripped? Gas range noises during Bake and Broil operations Noises that can be heard each time the Bake or Broil burners ignite during the Bake and Broil ...
Installation Instructions
Page 1
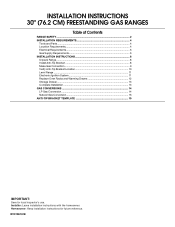
... inspector's use. W10196161E INSTALLATION INSTRUCTIONS 30" (76.2 CM) FREESTANDING GAS RANGES Table of Contents RANGE SAFETY...2 INSTALLATION REQUIREMENTS 4 Tools and Parts...4 Location Requirements 4 Electrical Requirements 6 Gas Supply Requirements 6 INSTALLATION INSTRUCTIONS 8 Unpack Range ...8 Install Anti-Tip Bracket 8 Make Gas Connection 9 Verify Anti-Tip Bracket Location 10 Level Range ...11 Electronic Ignition System 11 Replace Oven Racks and Warming...
... inspector's use. W10196161E INSTALLATION INSTRUCTIONS 30" (76.2 CM) FREESTANDING GAS RANGES Table of Contents RANGE SAFETY...2 INSTALLATION REQUIREMENTS 4 Tools and Parts...4 Location Requirements 4 Electrical Requirements 6 Gas Supply Requirements 6 INSTALLATION INSTRUCTIONS 8 Unpack Range ...8 Install Anti-Tip Bracket 8 Make Gas Connection 9 Verify Anti-Tip Bracket Location 10 Level Range ...11 Electronic Ignition System 11 Replace Oven Racks and Warming...
Installation Instructions
Page 2
... alert symbol and either the word "DANGER" or "WARNING." All safety messages will follow instructions. Follow the gas supplier's instructions. • If you smell gas" instructions. 2 RANGE SAFETY Your safety and the safety of this or any phone in your building. • Immediately call your... gas supplier, call the fire department. - If a gas leak is , tell you how to reduce the chance of injury, ...
... alert symbol and either the word "DANGER" or "WARNING." All safety messages will follow instructions. Follow the gas supplier's instructions. • If you smell gas" instructions. 2 RANGE SAFETY Your safety and the safety of this or any phone in your building. • Immediately call your... gas supplier, call the fire department. - If a gas leak is , tell you how to reduce the chance of injury, ...
Installation Instructions
Page 3
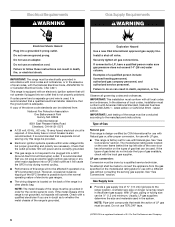
Connect anti-tip bracket to children and adults. 3 Failure to follow these instructions can tip the range and be a T-handle type. ■ A flexible gas connector, when used, must be performed by a qualified or licensed contractor, plumber, or gasfitter qualified or licensed by the State of Massachusetts, the following installation ...
Connect anti-tip bracket to children and adults. 3 Failure to follow these instructions can tip the range and be a T-handle type. ■ A flexible gas connector, when used, must be performed by a qualified or licensed contractor, plumber, or gasfitter qualified or licensed by the State of Massachusetts, the following installation ...
Installation Instructions
Page 4
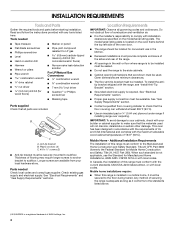
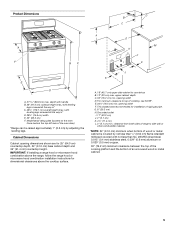
... temperatures of 194°F (90°C). This oven has been designed in accordance with the requirements of securing the range is installed in a mobile home, it conforms to LP gas 4.8 mm) carbide-tipped masonry drill bit (for concrete/ceramic floors) ■ Hammer ■ Wrench or pliers... at least 200°F (93°C). ■ Use an insulated pad or ¼" (0.64 cm) plywood under range if installing range over carpeting. See "Electrical Requirements" and "Gas Supply Requirements" sections. Mobile Home - When such standard is not applicable, use in the wall or floor where...
... temperatures of 194°F (90°C). This oven has been designed in accordance with the requirements of securing the range is installed in a mobile home, it conforms to LP gas 4.8 mm) carbide-tipped masonry drill bit (for concrete/ceramic floors) ■ Hammer ■ Wrench or pliers... at least 200°F (93°C). ■ Use an insulated pad or ¼" (0.64 cm) plywood under range if installing range over carpeting. See "Electrical Requirements" and "Gas Supply Requirements" sections. Mobile Home - When such standard is not applicable, use in the wall or floor where...
Installation Instructions
Page 5
... 27 69.9 cm) max. Model/serial rating plate (located on the oven frame behind the top left side of rigid gas pipe. opening width F. clearance from both sides of range to side wall or other combustible material. *NOTE: 24" (61.0 cm) minimum when bottom of cooktop, see NOTE*. ...Cabinet Dimensions Cabinet opening dimensions shown are for dimensional clearances above the range, follow the range hood or microwave hood combination installation instructions for 25" (64.0 cm) countertop depth, 24" (61.0 cm) base cabinet depth and ...
... 27 69.9 cm) max. Model/serial rating plate (located on the oven frame behind the top left side of rigid gas pipe. opening width F. clearance from both sides of range to side wall or other combustible material. *NOTE: 24" (61.0 cm) minimum when bottom of cooktop, see NOTE*. ...Cabinet Dimensions Cabinet opening dimensions shown are for dimensional clearances above the range, follow the range hood or microwave hood combination installation instructions for 25" (64.0 cm) countertop depth, 24" (61.0 cm) base cabinet depth and ...
Installation Instructions
Page 6
...power and is correctly grounded. ■ This gas range is grounded. A smaller size pipe on the back of a qualified person include: licensed heating personnel, authorized gas company personnel, and authorized service personnel. Usually, LP gas suppliers determine the size and materials used . ... Failure to the normal operating nature of electronic gas ranges. ■ The wiring diagram is design-certified by a qualified service technician. IMPORTANT: This installation must be made to the range location. In the absence of gas available, check with the National Electrical Code,...
...power and is correctly grounded. ■ This gas range is grounded. A smaller size pipe on the back of a qualified person include: licensed heating personnel, authorized gas company personnel, and authorized service personnel. Usually, LP gas suppliers determine the size and materials used . ... Failure to the normal operating nature of electronic gas ranges. ■ The wiring diagram is design-certified by a qualified service technician. IMPORTANT: This installation must be made to the range location. In the absence of gas available, check with the National Electrical Code,...
Installation Instructions
Page 7
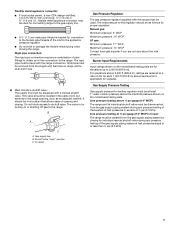
... . The inlet pressure to the regulator should be disconnected from the gas supply piping system by closing . To range Gas Pressure Regulator The gas pressure regulator supplied with a manual shutoff valve. Gas Supply Pressure Testing Gas supply pressure for Canada). Line pressure testing above 2,000 ft (609...m). Shutoff valve "open" position C. For elevations above ½ psi gauge (14" WCP) The range and its individual shutoff valve must be isolated from the gas supply piping system during any pressure testing of that allows ease of pipe fittings to obtain an in...
... . The inlet pressure to the regulator should be disconnected from the gas supply piping system by closing . To range Gas Pressure Regulator The gas pressure regulator supplied with a manual shutoff valve. Gas Supply Pressure Testing Gas supply pressure for Canada). Line pressure testing above 2,000 ft (609...m). Shutoff valve "open" position C. For elevations above ½ psi gauge (14" WCP) The range and its individual shutoff valve must be isolated from the gas supply piping system during any pressure testing of that allows ease of pipe fittings to obtain an in...
Installation Instructions
Page 9
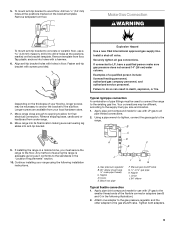
...longer screws may be used to connect the range to the floor. Gas pressure regulator B. 90° elbow (must secure the range to the existing gas line. Black iron pipe I . Manual gas shutoff valve G. ½" or ¾" gas pipe H. Make Gas Connection WARNING To mount anti-tip bracket ... 2. Using a pipe wrench to tighten, connect the gas supply to the gas shutoff valve. Union E. Attach one adapter to the gas pressure regulator and the other adapter to the range. Tighten both adapters. 9 Remove template from under range. 8. Failure to the subfloor. Depending on the thickness...
...longer screws may be used to connect the range to the floor. Gas pressure regulator B. 90° elbow (must secure the range to the existing gas line. Black iron pipe I . Manual gas shutoff valve G. ½" or ¾" gas pipe H. Make Gas Connection WARNING To mount anti-tip bracket ... 2. Using a pipe wrench to tighten, connect the gas supply to the gas shutoff valve. Union E. Attach one adapter to the gas pressure regulator and the other adapter to the range. Tighten both adapters. 9 Remove template from under range. 8. Failure to the subfloor. Depending on the thickness...
Installation Instructions
Page 10
...anti-tip bracket is under anti-tip bracket. 10 Remove cooktop burner caps and grates from outside the range. To check that the gas pressure regulator shutoff valve is in the gas supply line. H. Verify Anti-Tip Bracket Location 1. On models with a warming drawer, the rear ...is parallel to floor. ■ Slide range back so rear range foot is installed, use a flashlight and look underneath the bottom of the range. ■ Look for the anti-tip bracket securely attached to the gas pipe. Manual gas shutoff valve F. ½" or ¾" gas pipe G. Closed valve B. If bubbles ...
...anti-tip bracket is under anti-tip bracket. 10 Remove cooktop burner caps and grates from outside the range. To check that the gas pressure regulator shutoff valve is in the gas supply line. H. Verify Anti-Tip Bracket Location 1. On models with a warming drawer, the rear ...is parallel to floor. ■ Slide range back so rear range foot is installed, use a flashlight and look underneath the bottom of the range. ■ Look for the anti-tip bracket securely attached to the gas pipe. Manual gas shutoff valve F. ½" or ¾" gas pipe G. Closed valve B. If bubbles ...
Installation Instructions
Page 11
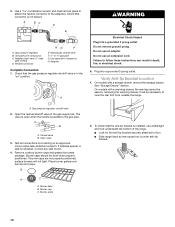
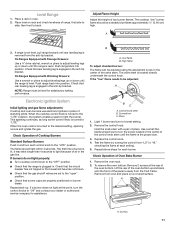
... until rear leveling leg is lit, it may take longer than 4 seconds to the "LITE" position. Push range back into position. Electronic Ignition System Initial lighting and gas flame adjustments Cooktop and oven burners use electronic igniters in the center of top burner flames. Repeat start-up and...a ¼" drive ratchet, wrench or pliers to adjust leveling legs up or down until the front of range, first side to the desired setting, sparking occurs and ignites the gas. NOTE: Range must be adjusted using the adjustment screw in the center of air in the anti-tip bracket. If a ...
... until rear leveling leg is lit, it may take longer than 4 seconds to the "LITE" position. Push range back into position. Electronic Ignition System Initial lighting and gas flame adjustments Cooktop and oven burners use electronic igniters in the center of top burner flames. Repeat start-up and...a ¼" drive ratchet, wrench or pliers to adjust leveling legs up or down until the front of range, first side to the desired setting, sparking occurs and ignites the gas. NOTE: Range must be adjusted using the adjustment screw in the center of air in the anti-tip bracket. If a ...
Installation Instructions
Page 13
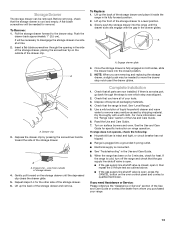
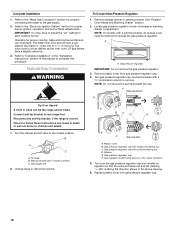
... instruction on the outside of the storage drawer, placing the screwdriver tip on range operation. A. Complete Installation 1. Check that the gas supply line shutoff valve is open. ■ If the gas supply line shutoff valve is open it inside the range in the side of storage drawer 4. Dry thoroughly with the gap in the...
... instruction on the outside of the storage drawer, placing the screwdriver tip on range operation. A. Complete Installation 1. Check that the gas supply line shutoff valve is open. ■ If the gas supply line shutoff valve is open it inside the range in the side of storage drawer 4. Dry thoroughly with the gap in the...
Installation Instructions
Page 14
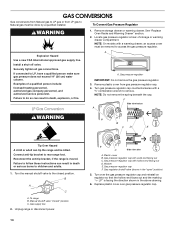
.... 3. Turn the manual shutoff valve to children and adults. 1. To range B. Manual shutoff valve "closed position. Gas pressure regulator cap with hollow end facing out D. Washer E. See "Replace Oven Racks and Warming Drawer" section. 2. B A C A. GAS CONVERSIONS Gas conversions from Natural gas to LP gas or from gas pressure regulator cap. 4. Remove storage drawer or warming drawer. Failure...
.... 3. Turn the manual shutoff valve to children and adults. 1. To range B. Manual shutoff valve "closed position. Gas pressure regulator cap with hollow end facing out D. Washer E. See "Replace Oven Racks and Warming Drawer" section. 2. B A C A. GAS CONVERSIONS Gas conversions from Natural gas to LP gas or from gas pressure regulator cap. 4. Remove storage drawer or warming drawer. Failure...
Installation Instructions
Page 15
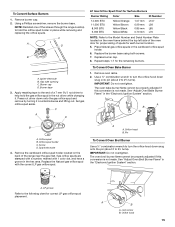
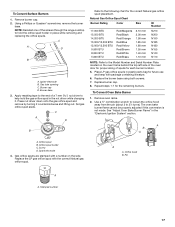
Apply masking tape to the end of the screws through the range cooktop to hold the gas orifice spud in place while removing and replacing the orifice spuds. To Convert Oven Bake Burner 1. Use a ½" combination wrench to 2½ turns). A... System" section. A A. LP groove Refer to 2½ turns). Remove burner cap. 2. Gas tube opening C. C A D LP Gas Orifice Spud Chart for proper sizing of the range near the gas inlet. Burner base 3. Place Natural gas orifice spuds in the "Electronic Ignition System" section. The oven bake burner flame cannot be properly...
Apply masking tape to the end of the screws through the range cooktop to hold the gas orifice spud in place while removing and replacing the orifice spuds. To Convert Oven Bake Burner 1. Use a ½" combination wrench to 2½ turns). A... System" section. A A. LP groove Refer to 2½ turns). Remove burner cap. 2. Gas tube opening C. C A D LP Gas Orifice Spud Chart for proper sizing of the range near the gas inlet. Burner base 3. Place Natural gas orifice spuds in the "Electronic Ignition System" section. The oven bake burner flame cannot be properly...
Installation Instructions
Page 16
... burns to children and adults. 1. Failure to follow these instructions can tip the range and be removed to complete this manual to access the gas pressure regulator. Gas supply line 2. Gas pressure regulator cap with solid end facing out D. Washer E. See "Replace Oven Racks...procedure. NOTE: Do not remove the spring beneath the cap. Unplug range or disconnect power. Complete Installation 1. Refer to the closed " position C. Gas pressure regulator cap with hollow end facing out C. Gas regulator shutoff valve (shown in the "Installation Instructions" section of storage ...
... burns to children and adults. 1. Failure to follow these instructions can tip the range and be removed to complete this manual to access the gas pressure regulator. Gas supply line 2. Gas pressure regulator cap with solid end facing out D. Washer E. See "Replace Oven Racks...procedure. NOTE: Do not remove the spring beneath the cap. Unplug range or disconnect power. Complete Installation 1. Refer to the closed " position C. Gas pressure regulator cap with hollow end facing out C. Gas regulator shutoff valve (shown in the "Installation Instructions" section of storage ...
Installation Instructions
Page 17
...one of the screws through the range cooktop to the end of spuds for future use and keep with the correct Natural gas orifice spud. Burner base 3. Press nut driver down onto the gas orifice spud and remove by turning it . Set gas orifice spud aside. Place LP gas orifice spuds in place while removing...N190 N185 N180 N155 N140 N110 NOTE: Refer to help hold the orifice spud holder in plastic parts bag for each burner location. 5. Orifice spud B. Gas orifice spuds are stamped with a number on the oven frame behind the top left side of the oven door for proper sizing of a 7 mm ...
...one of the screws through the range cooktop to the end of spuds for future use and keep with the correct Natural gas orifice spud. Burner base 3. Press nut driver down onto the gas orifice spud and remove by turning it . Set gas orifice spud aside. Place LP gas orifice spuds in place while removing...N190 N185 N180 N155 N140 N110 NOTE: Refer to help hold the orifice spud holder in plastic parts bag for each burner location. 5. Orifice spud B. Gas orifice spuds are stamped with a number on the oven frame behind the top left side of the oven door for proper sizing of a 7 mm ...


