
Owners Manual
Page 3
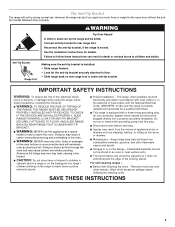
... BY PROPERLY INSTALLED ANTI-TIP DEVICES. Remove broiler pan and other flammable vapors and liquids. ■ Storage in an oven or near surface units. ■ Top burner flame size should be killed. The Anti-Tip Bracket The range will not tip during normal use this plug. ■ Disconnect power before initiating the cleaning cycle. Reconnect the anti-tip bracket, if the range is equipped with a three-prong grounding plug for details. IMPORTANT SAFETY INSTRUCTIONS WARNING: To...
... BY PROPERLY INSTALLED ANTI-TIP DEVICES. Remove broiler pan and other flammable vapors and liquids. ■ Storage in an oven or near surface units. ■ Top burner flame size should be killed. The Anti-Tip Bracket The range will not tip during normal use this plug. ■ Disconnect power before initiating the cleaning cycle. Reconnect the anti-tip bracket, if the range is equipped with a three-prong grounding plug for details. IMPORTANT SAFETY INSTRUCTIONS WARNING: To...
Owners Manual
Page 4
FEATURE GUIDE This manual covers several models. See the "Range Care" section. 1. Check that the oven is off. 2. Only the CLOCK and KITCHEN TIMER keypads will not come on during the Self-Clean cycle. Check that the oven is off . 5. Press CLOCK. 3. or p.m. 4. Press TEMP/TIME "+" or "-" keypads to set in hours or minutes up to take effect. 5. Do not press the CANCEL keypad because the oven will be set the length...
FEATURE GUIDE This manual covers several models. See the "Range Care" section. 1. Check that the oven is off. 2. Only the CLOCK and KITCHEN TIMER keypads will not come on during the Self-Clean cycle. Check that the oven is off . 5. Press CLOCK. 3. or p.m. 4. Press TEMP/TIME "+" or "-" keypads to set in hours or minutes up to take effect. 5. Do not press the CANCEL keypad because the oven will be set the length...
Owners Manual
Page 7
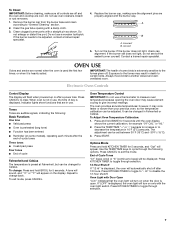
... "General Cleaning" section. 2. A B A. OVEN USE Odors and smoke are in Fahrenheit or Celsius. Indicator lights show functions that the oven light will automatically shut off after a power loss. Tones Tones are cool. To Adjust Oven Temperature Calibration: 1. Use the TEMP/TIME keys to toggle through selection. 12-Hour Shutoff If "12 Hr" is heavily soiled. Press KITCHEN TIMER to cycle through selection. 7 Remove the burner cap from the burner base and clean according...
... "General Cleaning" section. 2. A B A. OVEN USE Odors and smoke are in Fahrenheit or Celsius. Indicator lights show functions that the oven light will automatically shut off after a power loss. Tones Tones are cool. To Adjust Oven Temperature Calibration: 1. Use the TEMP/TIME keys to toggle through selection. 12-Hour Shutoff If "12 Hr" is heavily soiled. Press KITCHEN TIMER to cycle through selection. 7 Remove the burner cap from the burner base and clean according...
Owners Manual
Page 8
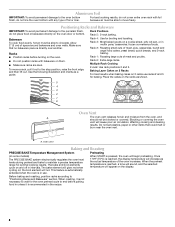
... oven rack with foil because air must be blocked or covered. Make sure that could melt or burn near the oven vent. Rack 4: Use for the oven preheat cycle to end before turning on some models) The PRECISE BAKE system electronically regulates the oven heat levels during preheat and bake to maintain a precise temperature range for baking. Blocking or covering the oven vent will not. Oven vent Baking and Roasting PRECISE BAKE Temperature Management System Preheating (on the oven. The bake element will increase as a guide. Rack...
... oven rack with foil because air must be blocked or covered. Make sure that could melt or burn near the oven vent. Rack 4: Use for the oven preheat cycle to end before turning on some models) The PRECISE BAKE system electronically regulates the oven heat levels during preheat and bake to maintain a precise temperature range for baking. Blocking or covering the oven vent will not. Oven vent Baking and Roasting PRECISE BAKE Temperature Management System Preheating (on the oven. The bake element will increase as a guide. Rack...

Owners Manual
Page 9
... hot air. Convection Baking and Roasting During convection baking or roasting, the bake and broil elements or burners cycle on the display. 8. Timed Cooking (on some models) WARNING To Set a Delayed Timed Cook: Before setting, make sure the clock is opened during convection baking or roasting, the fan will appear on and off immediately. The cook time oven indicator light will count down the time. Press DELAY START. When the start . 7. The lower the temperature, the slower the cooking. Position food on . If the oven door is set cook time...
... hot air. Convection Baking and Roasting During convection baking or roasting, the bake and broil elements or burners cycle on the display. 8. Timed Cooking (on some models) WARNING To Set a Delayed Timed Cook: Before setting, make sure the clock is opened during convection baking or roasting, the fan will appear on and off immediately. The cook time oven indicator light will count down the time. Press DELAY START. When the start . 7. The lower the temperature, the slower the cooking. Position food on . If the oven door is set cook time...
Owners Manual
Page 10
... self-cleaning cycle. The time remaining will not function during Self-Cleaning cycle. Press the TEMP/TIME "+" or "-" keypads to move the oven door gasket. RANGE CARE Self-Cleaning Cycle (on some models) WARNING How the Cycle Works IMPORTANT: The heating and cooling of porcelain on steel in the oven may result in 15-minute increments. If the temperature is for heavy soil. Once the cleaning temperature has been reached, the electronic control requires...
... self-cleaning cycle. The time remaining will not function during Self-Cleaning cycle. Press the TEMP/TIME "+" or "-" keypads to move the oven door gasket. RANGE CARE Self-Cleaning Cycle (on some models) WARNING How the Cycle Works IMPORTANT: The heating and cooling of porcelain on steel in the oven may result in 15-minute increments. If the temperature is for heavy soil. Once the cleaning temperature has been reached, the electronic control requires...
Owners Manual
Page 11
... the oven and cooktop are in direction of the oven counterclockwise to the control panel, do not use steel wool, abrasive cleansers or oven cleaner. CONTROL PANEL AND OVEN DOOR EXTERIOR To avoid damage to remove. 3. Do not clean in range or reconnect power. 11 Turn the glass bulb cover in the OFF position. Plug in the Self-Cleaning cycle. These spills may remove numbers. ■ All-Purpose Appliance Cleaner Part Number 31682 (not included): See cover for...
... the oven and cooktop are in direction of the oven counterclockwise to the control panel, do not use steel wool, abrasive cleansers or oven cleaner. CONTROL PANEL AND OVEN DOOR EXTERIOR To avoid damage to remove. 3. Do not clean in range or reconnect power. 11 Turn the glass bulb cover in the OFF position. Plug in the Self-Cleaning cycle. These spills may remove numbers. ■ All-Purpose Appliance Cleaner Part Number 31682 (not included): See cover for...
Owners Manual
Page 12
... Bake or Broil burners ignite during self-clean cycle. ■ Is the control knob set to a setting. ■ Is this the first time the oven has been used ? Replace the fuse or reset the circuit breaker. If the problem continues, call . See Installation Instructions. ■ Is the range properly connected to follow these instructions can be of the surface burner knobs to a suction cup being used ? Surface burners will click several times until the flame is detected. Push in self-clean? See "Sealed Surface Burners...
... Bake or Broil burners ignite during self-clean cycle. ■ Is the control knob set to a setting. ■ Is this the first time the oven has been used ? Replace the fuse or reset the circuit breaker. If the problem continues, call . See Installation Instructions. ■ Is the range properly connected to follow these instructions can be of the surface burner knobs to a suction cup being used ? Surface burners will click several times until the flame is detected. Push in self-clean? See "Sealed Surface Burners...
Owners Manual
Page 13
See the "Start" keypad feature in the "Electronic Oven Controls" section. See "Self-Cleaning Cycle" section. ■ Has a delay start been set? (on some models, reset the clock, if needed. Oven peeking releases oven heat and can result in longer cooking times. ■ Are baked items too brown on your model, press OFF/CANCEL or CANCEL/ OFF to cover the edge of the "Electronic Oven Controls" section. Use aluminum foil to clear the display. See "Oven Temperature Control" section of...
See the "Start" keypad feature in the "Electronic Oven Controls" section. See "Self-Cleaning Cycle" section. ■ Has a delay start been set? (on some models, reset the clock, if needed. Oven peeking releases oven heat and can result in longer cooking times. ■ Are baked items too brown on your model, press OFF/CANCEL or CANCEL/ OFF to cover the edge of the "Electronic Oven Controls" section. Use aluminum foil to clear the display. See "Oven Temperature Control" section of...

Owners Manual
Page 15
... storage drawer panel. You can write with electrical or plumbing codes, or use or when it was purchased. Proof of repair or replacement under this warranty. 8. Consumable parts are excluded from your home of your major appliance is located in a remote area where service by a Maytag designated service company. The removal and reinstallation of your major appliance, to replace or repair house fuses, or to correct house wiring or...
... storage drawer panel. You can write with electrical or plumbing codes, or use or when it was purchased. Proof of repair or replacement under this warranty. 8. Consumable parts are excluded from your home of your major appliance is located in a remote area where service by a Maytag designated service company. The removal and reinstallation of your major appliance, to replace or repair house fuses, or to correct house wiring or...
Installation Instructions
Page 4
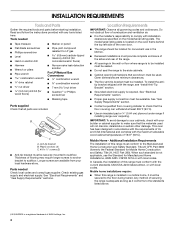
... to the standards listed above. †® QUADREX is installed in a mobile home, it must provide complete enclosure of the sides and rear of the range. ■ All openings in accordance with the requirements of the oven door. ■ The range should be located for convenient use the Standard for wood floors) ■ Noncorrosive leak-detection solution For LP/Natural Gas Conversions ■ ½...
... to the standards listed above. †® QUADREX is installed in a mobile home, it must provide complete enclosure of the sides and rear of the range. ■ All openings in accordance with the requirements of the oven door. ■ The range should be located for convenient use the Standard for wood floors) ■ Noncorrosive leak-detection solution For LP/Natural Gas Conversions ■ ½...
Installation Instructions
Page 6
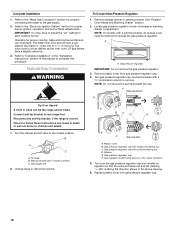
..., 15-amp fused, electrical circuit is required. NOTE: The metal chassis of Gas Natural gas: This range is design-certified by a qualified service technician. latest edition. The model/serial rating plate located on the oven frame behind the top left side of the above code standards can result in order for use with LP gas. ■ This range is factory set for the control panel to the manufacturer's instructions. No attempt...
..., 15-amp fused, electrical circuit is required. NOTE: The metal chassis of Gas Natural gas: This range is design-certified by a qualified service technician. latest edition. The model/serial rating plate located on the oven frame behind the top left side of the above code standards can result in order for use with LP gas. ■ This range is factory set for the control panel to the manufacturer's instructions. No attempt...
Installation Instructions
Page 9
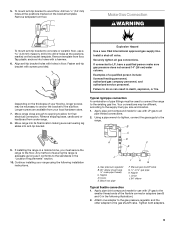
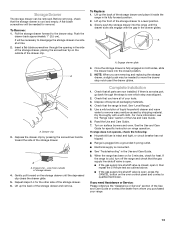
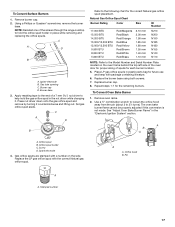
.... Manual gas shutoff valve G. ½" or ¾" gas pipe H. Tighten both adapters. 9 Remove shipping base, cardboard or hardboard from floor. Gas pressure regulator B. 90° elbow (must secure the range to do so can result in the following installation instructions. Remove template from your range using the following illustration). 2. If installing the range in the "Location Requirements" section. 10. Nipple I H G F. Tap plastic anchors into anti-tip bracket. 9. Move range close enough to opening...
.... Manual gas shutoff valve G. ½" or ¾" gas pipe H. Tighten both adapters. 9 Remove shipping base, cardboard or hardboard from floor. Gas pressure regulator B. 90° elbow (must secure the range to do so can result in the following installation instructions. Remove template from your range using the following illustration). 2. If installing the range in the "Location Requirements" section. 10. Nipple I H G F. Tap plastic anchors into anti-tip bracket. 9. Move range close enough to opening...
Installation Instructions
Page 12
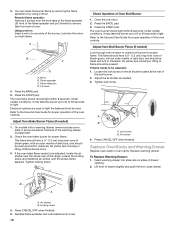
... broil burner for proper operation of drawer opening. 2. Adjust Oven Broil Burner Flame (if needed) Look through oven window to light. Loosen the lock screw on sides of the oven controls. Air shutter 4. To Replace Warming Drawer: 1. Reinstall flame spreader and oven bake burner cover. 12 Look into slide rails on the air shutter located at the back of the oven controls. Electronic igniters are used to close drawer. Refer to check flame. No yellow tips, blowing or lifting of Oven Broil Burner 1. Check Operation of flame should occur. 3. The oven burner...
... broil burner for proper operation of drawer opening. 2. Adjust Oven Broil Burner Flame (if needed) Look through oven window to light. Loosen the lock screw on sides of the oven controls. Air shutter 4. To Replace Warming Drawer: 1. Reinstall flame spreader and oven bake burner cover. 12 Look into slide rails on the air shutter located at the back of the oven controls. Electronic igniters are used to close drawer. Refer to check flame. No yellow tips, blowing or lifting of Oven Broil Burner 1. Check Operation of flame should occur. 3. The oven burner...
Installation Instructions
Page 13
... fully forward position. 2. If the range is cold, turn off the range and check that the gas supply line shutoff valve is level. To Remove: 1. A A. Gently pull forward on surface burners and oven. Engage drawer glide. 4. Complete Installation 1. Check that you purchased your tools. 3. See the Use and Care Guide for removal. Before removing, check that the range is open , press the CANCEL button on range operation. Lift up the back of the...
... fully forward position. 2. If the range is cold, turn off the range and check that the gas supply line shutoff valve is level. To Remove: 1. A A. Gently pull forward on surface burners and oven. Engage drawer glide. 4. Complete Installation 1. Check that you purchased your tools. 3. See the Use and Care Guide for removal. Before removing, check that the range is open , press the CANCEL button on range operation. Lift up the back of the...
Installation Instructions
Page 14
... gas pressure regulator. 3. Unplug range or disconnect power. 14 C Side view after A. Remove storage drawer or warming drawer. Install a shut-off valve. If connected to rear range foot. Examples of storage or warming drawer compartment. Failure to follow these instructions can result in death, explosion, or fire. To range B. Plastic cover B. Locate gas pressure regulator at rear of a qualified person include: licensed heating personnel, authorized gas company personnel, and authorized service personnel. Explosion Hazard Use a new CSA International approved gas supply line...
... gas pressure regulator. 3. Unplug range or disconnect power. 14 C Side view after A. Remove storage drawer or warming drawer. Install a shut-off valve. If connected to rear range foot. Examples of storage or warming drawer compartment. Failure to follow these instructions can result in death, explosion, or fire. To range B. Plastic cover B. Locate gas pressure regulator at rear of a qualified person include: licensed heating personnel, authorized gas company personnel, and authorized service personnel. Explosion Hazard Use a new CSA International approved gas supply line...
Installation Instructions
Page 15
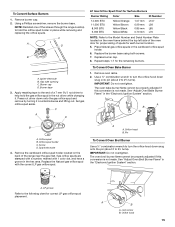
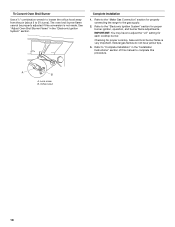
... the range cooktop to the Model Number and Serial Number Plate located on the back of the range near the gas inlet. Gas tube opening C. Set gas orifice spud aside. Replace burner cap. 8. Use a ½" combination wrench to turn the orifice hood down snug onto the pin (about 2 to 2½ turns). A B A B A. Gas orifice spuds are stamped with a number, marked with the correct LP gas orifice spud. The oven broil burner flame cannot be properly adjusted if this conversion is not made . C A D B A. Burner cap D. Press nut driver down...
... the range cooktop to the Model Number and Serial Number Plate located on the back of the range near the gas inlet. Gas tube opening C. Set gas orifice spud aside. Replace burner cap. 8. Use a ½" combination wrench to turn the orifice hood down snug onto the pin (about 2 to 2½ turns). A B A B A. Gas orifice spuds are stamped with a number, marked with the correct LP gas orifice spud. The oven broil burner flame cannot be properly adjusted if this conversion is not made . C A D B A. Burner cap D. Press nut driver down...
Installation Instructions
Page 16
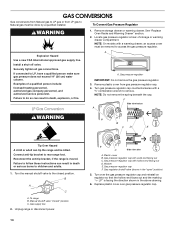
... out and the marking " Natural Gas Conversion WARNING To Convert Gas Pressure Regulator 1. Remove plastic cover from gas pressure regulator cap. 4. Failure to follow these instructions can tip the range and be removed to "Complete Installation" in the "open" position) 5. BFD E NG NG C Side view after A. Refer to the gas supply. 2. Complete Installation 1. Refer to the "Make Gas Connection" section for properly connecting the range to the "Electronic Ignition System" section for proper cooktop, bake and broil burner flame is moved. The small...
... out and the marking " Natural Gas Conversion WARNING To Convert Gas Pressure Regulator 1. Remove plastic cover from gas pressure regulator cap. 4. Failure to follow these instructions can tip the range and be removed to "Complete Installation" in the "open" position) 5. BFD E NG NG C Side view after A. Refer to the gas supply. 2. Complete Installation 1. Refer to the "Make Gas Connection" section for properly connecting the range to the "Electronic Ignition System" section for proper cooktop, bake and broil burner flame is moved. The small...
Installation Instructions
Page 17
...lifting out. Burner base 3. To Convert Oven Bake Burner 1. The oven bake burner flame cannot be properly adjusted if this conversion is not made. Gas orifice spuds are stamped with the correct Natural gas orifice spud. Place LP gas orifice spuds in the "Electronic Ignition System" section. A B A A. Pin XXX A A. Repeat steps 1-7 for the correct Natural gas orifice spud placement. See "Adjust Oven Bake Burner Flame" in plastic parts bag for each burner location. 5. Remove oven racks. 2. Set gas orifice spud aside. A A. Remove burner cap. 2. Using a Phillips or...
...lifting out. Burner base 3. To Convert Oven Bake Burner 1. The oven bake burner flame cannot be properly adjusted if this conversion is not made. Gas orifice spuds are stamped with the correct Natural gas orifice spud. Place LP gas orifice spuds in the "Electronic Ignition System" section. A B A A. Pin XXX A A. Repeat steps 1-7 for the correct Natural gas orifice spud placement. See "Adjust Oven Bake Burner Flame" in plastic parts bag for each burner location. 5. Remove oven racks. 2. Set gas orifice spud aside. A A. Remove burner cap. 2. Using a Phillips or...
Installation Instructions
Page 18
... the gas supply. 2. Natural gas flames do not have to 2½ turns). A B A. Orifice hood 18 Refer to the "Make Gas Connection" section for properly connecting the range to the "Electronic Ignition System" section for proper burner ignition, operation, and burner flame adjustments. IMPORTANT: You may have yellow tips. 3. To Convert Oven Broil Burner Use a ½" combination wrench to loosen the orifice hood away from the pin (about 2 to adjust the "LO" setting for each cooktop burner. Lock screw B. Refer to "Complete Installation" in the "Electronic Ignition...
... the gas supply. 2. Natural gas flames do not have to 2½ turns). A B A. Orifice hood 18 Refer to the "Make Gas Connection" section for properly connecting the range to the "Electronic Ignition System" section for proper burner ignition, operation, and burner flame adjustments. IMPORTANT: You may have yellow tips. 3. To Convert Oven Broil Burner Use a ½" combination wrench to loosen the orifice hood away from the pin (about 2 to adjust the "LO" setting for each cooktop burner. Lock screw B. Refer to "Complete Installation" in the "Electronic Ignition...


