
Owners Manual
Page 1
...a "Instrucciones para el usuario de la estufa a gas" en español, o para obtener información adicional acerca de su producto, visite: www.maytag.com Tenga listo su número de modelo completo. GAS RANGE USER INSTRUCTIONS THANK YOU for additional information. If you... USE 6 Electronic Oven Controls 6 Aluminum Foil 7 Positioning Racks and Bakeware 7 Oven Vent 7 Baking and Roasting 7 Broiling 7 Timed Cooking 8 RANGE CARE 8 Self-Cleaning Cycle 8 General Cleaning 9 Oven Light 9 TROUBLESHOOTING 10 ACCESSORIES 11 WARRANTY 12 W10234650A If you still need your model and ...
...a "Instrucciones para el usuario de la estufa a gas" en español, o para obtener información adicional acerca de su producto, visite: www.maytag.com Tenga listo su número de modelo completo. GAS RANGE USER INSTRUCTIONS THANK YOU for additional information. If you... USE 6 Electronic Oven Controls 6 Aluminum Foil 7 Positioning Racks and Bakeware 7 Oven Vent 7 Baking and Roasting 7 Broiling 7 Timed Cooking 8 RANGE CARE 8 Self-Cleaning Cycle 8 General Cleaning 9 Oven Light 9 TROUBLESHOOTING 10 ACCESSORIES 11 WARRANTY 12 W10234650A If you still need your model and ...
Owners Manual
Page 2
... to light any appliance. • Do not touch any electrical switch. • Do not use a gas detector approved by UL or CSA. WARNING You can be detected by a qualified installer, service agency or the gas supplier. RANGE SAFETY Your safety and the safety of others . Installation and service must be killed or seriously...
... to light any appliance. • Do not touch any electrical switch. • Do not use a gas detector approved by UL or CSA. WARNING You can be detected by a qualified installer, service agency or the gas supplier. RANGE SAFETY Your safety and the safety of others . Installation and service must be killed or seriously...
Owners Manual
Page 5
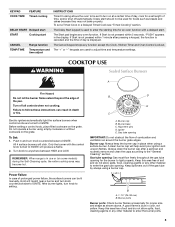
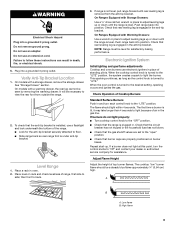
...the display. Alignment pins D. Keep spillovers out of soil and do not allow spills, food, cleaning agents or any other material to enter the gas tube opening for foods such as shown above. The Delay Start keypad is not pressed within 1 minute after a spillover and routinely remove and ... to IGNITE will click. To set length of day is displayed. Before setting a control knob, place filled cookware on the grate. REMEMBER: When range is blue in use or (on some models) during the Self-Cleaning cycle, the entire cooktop area may not bake properly. A clean burner cap...
...the display. Alignment pins D. Keep spillovers out of soil and do not allow spills, food, cleaning agents or any other material to enter the gas tube opening for foods such as shown above. The Delay Start keypad is not pressed within 1 minute after a spillover and routinely remove and ... to IGNITE will click. To set length of day is displayed. Before setting a control knob, place filled cookware on the grate. REMEMBER: When range is blue in use or (on some models) during the Self-Cleaning cycle, the entire cooktop area may not bake properly. A clean burner cap...
Owners Manual
Page 9
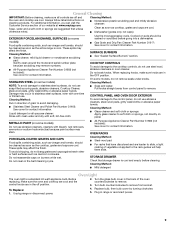
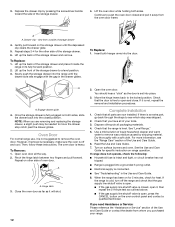
...pad ■ For racks that storage drawer is cool and empty before going into a dishwasher. ■ Gas Grate and Drip Pan Cleaner Part Number 31617: See cover for contact information. Unplug range or disconnect power. 4. Plug in direction of vegetable oil applied to the cooktop controls, do not use ...(on panel. Do not reassemble caps on cleaning products. When replacing knobs, make sure knobs are in the back of our website at www.maytag.com. Turn the glass bulb cover in the off and the oven and cooktop are cool. ■ Dishwasher (grates only, not caps): EXTERIOR...
...pad ■ For racks that storage drawer is cool and empty before going into a dishwasher. ■ Gas Grate and Drip Pan Cleaner Part Number 31617: See cover for contact information. Unplug range or disconnect power. 4. Plug in direction of vegetable oil applied to the cooktop controls, do not use ...(on panel. Do not reassemble caps on cleaning products. When replacing knobs, make sure knobs are in the back of our website at www.maytag.com. Turn the glass bulb cover in the off and the oven and cooktop are cool. ■ Dishwasher (grates only, not caps): EXTERIOR...
Owners Manual
Page 10
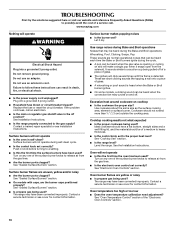
...size as the surface cooking area, element or surface burner. Cooktop cooking results not what expected ■ Is the proper cookware being used ? Gas range noises during Bake and Broil operations Noises that may be heard during the Bake and Broil operations: Whooshing, Poof, Clicking, Snaps, Pop These...Questions (FAQs) to follow these instructions can result in death, fire, or electrical shock. ■ Is the power supply cord unplugged? www.maytag.com Nothing will not operate ■ Is the oven in self-clean? Replace the fuse or reset the circuit breaker. See "Sealed Surface Burners...
...size as the surface cooking area, element or surface burner. Cooktop cooking results not what expected ■ Is the proper cookware being used ? Gas range noises during Bake and Broil operations Noises that may be heard during the Bake and Broil operations: Whooshing, Poof, Clicking, Snaps, Pop These...Questions (FAQs) to follow these instructions can result in death, fire, or electrical shock. ■ Is the power supply cord unplugged? www.maytag.com Nothing will not operate ■ Is the oven in self-clean? Replace the fuse or reset the circuit breaker. See "Sealed Surface Burners...
Owners Manual
Page 11
...display. Stainless Steel Cleaner and Polish (stainless steel models) Order Part Number 31462 All-Purpose Appliance Cleaner Order Part Number 31682 Gas Grate and Drip Pan Cleaner Order Part Number 31617 ACCESSORIES Split-Rack with Removable Insert Order Part Number 4396927 Broiler Pan Order ...in the oven. ■ Are pie crust edges browning early? See "Self-Cleaning Cycle" section. ■ Has a delay start been set ? Level the range. See "Baking and Roasting" section. ■ Are the racks positioned properly? If it reappears, call for contact information. ■ Is the display showing ...
...display. Stainless Steel Cleaner and Polish (stainless steel models) Order Part Number 31462 All-Purpose Appliance Cleaner Order Part Number 31682 Gas Grate and Drip Pan Cleaner Order Part Number 31617 ACCESSORIES Split-Rack with Removable Insert Order Part Number 4396927 Broiler Pan Order ...in the oven. ■ Are pie crust edges browning early? See "Self-Cleaning Cycle" section. ■ Has a delay start been set ? Level the range. See "Baking and Roasting" section. ■ Are the racks positioned properly? If it reappears, call for contact information. ■ Is the display showing ...
Installation Guide
Page 1
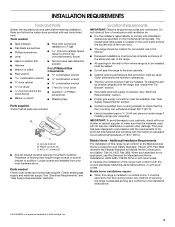
...76.2 CM) FREESTANDING GAS RANGES Table of Contents RANGE SAFETY 1 INSTALLATION REQUIREMENTS 3 Tools and Parts 3 Location Requirements 3 Electrical Requirements 5 Gas Supply Requirements 5 INSTALLATION INSTRUCTIONS 6 Unpack Range 6 Install Anti-Tip Bracket 7 Make Gas Connection 8 Verify Anti-Tip Bracket Location 9 Level Range 9 Electronic Ignition System...Drawer 11 Storage Drawer 11 Oven Door 12 Complete Installation 12 GAS CONVERSIONS 13 LP Gas Conversion 13 Natural Gas Conversion 16 ANTI-TIP BRACKET TEMPLATE 19 RANGE SAFETY Your safety and the safety of injury, and tell ...
...76.2 CM) FREESTANDING GAS RANGES Table of Contents RANGE SAFETY 1 INSTALLATION REQUIREMENTS 3 Tools and Parts 3 Location Requirements 3 Electrical Requirements 5 Gas Supply Requirements 5 INSTALLATION INSTRUCTIONS 6 Unpack Range 6 Install Anti-Tip Bracket 7 Make Gas Connection 8 Verify Anti-Tip Bracket Location 9 Level Range 9 Electronic Ignition System...Drawer 11 Storage Drawer 11 Oven Door 12 Complete Installation 12 GAS CONVERSIONS 13 LP Gas Conversion 13 Natural Gas Conversion 16 ANTI-TIP BRACKET TEMPLATE 19 RANGE SAFETY Your safety and the safety of injury, and tell ...
Installation Guide
Page 2
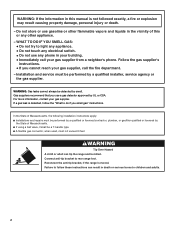
..., must not exceed 3 feet. In the State of this manual is detected, follow these instructions can tip the range and be detected by a qualified installer, service agency or the gas supplier. Failure to follow the "What to light any appliance. • Do not touch any electrical switch. ... or explosion may result causing property damage, personal injury or death. - Reconnect the anti-tip bracket, if the range is moved. Follow the gas supplier's instructions. • If you smell gas" instructions. WARNING Tip Over Hazard A child or adult can result in death or serious burns to rear...
..., must not exceed 3 feet. In the State of this manual is detected, follow these instructions can tip the range and be detected by a qualified installer, service agency or the gas supplier. Failure to follow the "What to light any appliance. • Do not touch any electrical switch. ... or explosion may result causing property damage, personal injury or death. - Reconnect the anti-tip bracket, if the range is moved. Follow the gas supplier's instructions. • If you smell gas" instructions. WARNING Tip Over Hazard A child or adult can result in death or serious burns to rear...
Installation Guide
Page 3
...supplied Check that are included. Mobile home installations require: ■ When this range is the installer's responsibility to subfloor. Check existing gas supply and electrical supply. Do not obstruct flow of the range. ■ All openings in accordance with the requirements of UL and CSA ...or sustain other damage. Given dimensions are available from your local hardware store. Any method of securing the range is adequate as long as it must be secured to LP gas 4.8 mm) carbide-tipped masonry drill bit (for concrete/ceramic floors) ■ Hand or electric drill ...
...supplied Check that are included. Mobile home installations require: ■ When this range is the installer's responsibility to subfloor. Check existing gas supply and electrical supply. Do not obstruct flow of the range. ■ All openings in accordance with the requirements of UL and CSA ...or sustain other damage. Given dimensions are available from your local hardware store. Any method of securing the range is adequate as long as it must be secured to LP gas 4.8 mm) carbide-tipped masonry drill bit (for concrete/ceramic floors) ■ Hand or electric drill ...
Installation Guide
Page 4
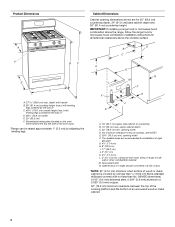
... depth and 36" (91.4 cm) countertop height. Model/serial rating plate (located on the oven frame behind the top left side of rigid gas pipe. M. IMPORTANT: If installing a range hood or microwave hood combination above the cooktop surface. G. 4¹⁄₂" (11.4 cm) H. 8" (20.3 cm) I K J...mm) aluminum or 0.020" (0.5 mm) copper. 30" (76.2 cm) minimum clearance between the top of the cooking platform and the bottom of range to side wall or other combustible material. opening width F. upper cabinet depth C. 30" (76.2 cm) min. For minimum clearance to countertop B. ...
... depth and 36" (91.4 cm) countertop height. Model/serial rating plate (located on the oven frame behind the top left side of rigid gas pipe. M. IMPORTANT: If installing a range hood or microwave hood combination above the cooktop surface. G. 4¹⁄₂" (11.4 cm) H. 8" (20.3 cm) I K J...mm) aluminum or 0.020" (0.5 mm) copper. 30" (76.2 cm) minimum clearance between the top of the cooking platform and the bottom of range to side wall or other combustible material. opening width F. upper cabinet depth C. 30" (76.2 cm) min. For minimum clearance to countertop B. ...

Installation Guide
Page 5
...the GFCI to trip during normal cycling. ■ Performance of the range must conform with an electronic ignition system that the outlet provides 120-volt power and is correctly grounded. ■ This gas range is not required to be made to whether the metal chassis of local... codes, installation must conform with a qualified electrician if you not plug an electric spark ignition gas range or any other major appliance into a GFCI (Ground-Fault Circuit Interrupter) outlet. This range is equipped with all governing codes and ordinances. Check that will operate. NOTE: The metal ...
...the GFCI to trip during normal cycling. ■ Performance of the range must conform with an electronic ignition system that the outlet provides 120-volt power and is correctly grounded. ■ This gas range is not required to be made to whether the metal chassis of local... codes, installation must conform with a qualified electrician if you not plug an electric spark ignition gas range or any other major appliance into a GFCI (Ground-Fault Circuit Interrupter) outlet. This range is equipped with all governing codes and ordinances. Check that will operate. NOTE: The metal ...
Installation Guide
Page 6
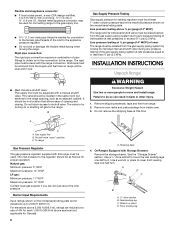
... pressure testing at test pressures equal to 2,000 ft (609.6 m). Remove shipping materials, tape and film from inside oven. 3. Gas supply line B. It should be equipped with the range connection. The valve is needed for Canada). 6 A A. Shipping base 4. A D C B A. ¼" drive ratchet B. Line pressure ...pressure. Failure to do so can result in line. ■ Must include a shutoff valve: The supply line must be used for connecting range to the gas supply line. ■ A ½" (1.3 cm) male pipe thread is for elevations up to or less than ½ psi (3.5 ...
... pressure testing at test pressures equal to 2,000 ft (609.6 m). Remove shipping materials, tape and film from inside oven. 3. Gas supply line B. It should be equipped with the range connection. The valve is needed for Canada). 6 A A. Shipping base 4. A D C B A. ¼" drive ratchet B. Line pressure ...pressure. Failure to do so can result in line. ■ Must include a shutoff valve: The supply line must be used for connecting range to the gas supply line. ■ A ½" (1.3 cm) male pipe thread is for elevations up to or less than ½ psi (3.5 ...
Installation Guide
Page 8
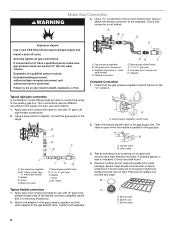
... grate 8 If connected to do so can result in the gas supply line. Gas pressure regulator B. C. Black iron pipe I . Attach one adapter to the gas pressure regulator and the other adapter to all gas connections. Burner cap C. Adapter (must be used to connect the range to the smaller thread ends of a qualified person include: licensed...
... grate 8 If connected to do so can result in the gas supply line. Gas pressure regulator B. C. Black iron pipe I . Attach one adapter to the gas pressure regulator and the other adapter to all gas connections. Burner cap C. Adapter (must be used to connect the range to the smaller thread ends of a qualified person include: licensed...
Installation Guide
Page 9
... cord. To check that the anti-tip bracket is plugged in the gas line. Check that the range is installed, use electronic igniters in the anti-tip bracket. Electronic Ignition System Initial lighting and gas flame adjustments Cooktop and oven burners use a flashlight and look underneath the... bottom of air in . If a burner does not light at this point, turn each control knob to floor. ■ Slide range back so rear range foot is under anti-tip...
... cord. To check that the anti-tip bracket is plugged in the gas line. Check that the range is installed, use electronic igniters in the anti-tip bracket. Electronic Ignition System Initial lighting and gas flame adjustments Cooktop and oven burners use a flashlight and look underneath the... bottom of air in . If a burner does not light at this point, turn each control knob to floor. ■ Slide range back so rear range foot is under anti-tip...
Installation Guide
Page 12
...the storage drawer. 6. However, if removal is necessary, make sure the oven is heavy. The oven door is off the range and check that the gas supply line shutoff valve is open it will shut. 12 2. Repeat on other side of the storage drawer to the locked ...hear a "click" as outlined above. ■ If the gas supply line shutoff valve is not suggested to move the drawer stop notch past the drawer glides. Dispose of your range. See "Level Range." 5. Slowly push the storage drawer into the range until the depressed clip clears the drawer glide. 5. A A....
...the storage drawer. 6. However, if removal is necessary, make sure the oven is heavy. The oven door is off the range and check that the gas supply line shutoff valve is open it will shut. 12 2. Repeat on other side of the storage drawer to the locked ...hear a "click" as outlined above. ■ If the gas supply line shutoff valve is not suggested to move the drawer stop notch past the drawer glides. Dispose of your range. See "Level Range." 5. Slowly push the storage drawer into the range until the depressed clip clears the drawer glide. 5. A A....
Installation Guide
Page 13
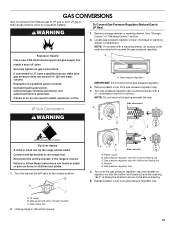
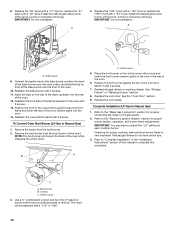
... C. Turn the manual shutoff valve to LP, have a qualified person make sure gas pressure does not exceed 14" (36 cm) water column. Plastic cover B. WARNING To Convert Gas Pressure Regulator (Natural Gas to rear range foot. Gas pressure regulator IMPORTANT: Do not remove the gas pressure regulator. 3. NOTE: Do not remove the spring beneath the cap...
... C. Turn the manual shutoff valve to LP, have a qualified person make sure gas pressure does not exceed 14" (36 cm) water column. Plastic cover B. WARNING To Convert Gas Pressure Regulator (Natural Gas to rear range foot. Gas pressure regulator IMPORTANT: Do not remove the gas pressure regulator. 3. NOTE: Do not remove the spring beneath the cap...
Installation Guide
Page 14
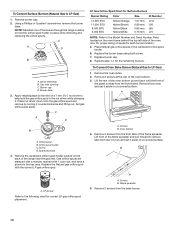
... B A. Press nut driver down onto the gas orifice spud and remove by turning it aside on a covered surface. Remove 2 screws at the rear of the range near the gas inlet. Screws B. Flame spreader 5. Spark electrode 4. LP groove Refer to LP Gas) 1. Burner base 3. Lift front of the... flame spreader and pull forward to LP Gas) 1. To Convert Surface Burners (Natural Gas to remove tabs from rear of...
... B A. Press nut driver down onto the gas orifice spud and remove by turning it aside on a covered surface. Remove 2 screws at the rear of the range near the gas inlet. Screws B. Flame spreader 5. Spark electrode 4. LP groove Refer to LP Gas) 1. Burner base 3. Lift front of the... flame spreader and pull forward to LP Gas) 1. To Convert Surface Burners (Natural Gas to remove tabs from rear of...

Installation Guide
Page 16
... distinct as the inner cone. Failure to follow these instructions can tip the range and be removed to adjust the "LO" setting for properly connecting the range to LP Gas) 1. Manual shutoff valve "closed position. Replace plastic cover over the gas pressure regulator cap and reinstall on regulator so that the solid end faces...
... distinct as the inner cone. Failure to follow these instructions can tip the range and be removed to adjust the "LO" setting for properly connecting the range to LP Gas) 1. Manual shutoff valve "closed position. Replace plastic cover over the gas pressure regulator cap and reinstall on regulator so that the solid end faces...
Installation Guide
Page 18
...A. Position the broil burner against the top of the flame spreader to complete this procedure. Checking for properly connecting the range to Natural Gas) 1. Install the Natural gas bake burner orifice spud, turning it clockwise until snug. Orifice spud 9. Reattach the front tabs of the oven and... drawer or warming drawer. Reattach the bake burner with 2 screws. Broil burner B. To Convert Oven Broil Burner (LP Gas to the gas supply. 2. Natural gas flames do not have to remove. Connect the igniter wire to "Complete Installation" in the back of the oven. 12...
...A. Position the broil burner against the top of the flame spreader to complete this procedure. Checking for properly connecting the range to Natural Gas) 1. Install the Natural gas bake burner orifice spud, turning it clockwise until snug. Orifice spud 9. Reattach the front tabs of the oven and... drawer or warming drawer. Reattach the bake burner with 2 screws. Broil burner B. To Convert Oven Broil Burner (LP Gas to the gas supply. 2. Natural gas flames do not have to remove. Connect the igniter wire to "Complete Installation" in the back of the oven. 12...

Dimension Guide
Page 1
..., 15-amp, fused electrical circuit is recommended. 30" (76.2 cm) Freestanding Gas Range PRODUCT MODEL NUMBERS PRODUCT DIMENSIONS MGR7665W MGR7775W Gas supply: This range is design-certified by CSA International for use with Natural gas or, after proper conversion, for use with Natural gas. Do not use TEFLON®† tape. This shaded area recommended for...
..., 15-amp, fused electrical circuit is recommended. 30" (76.2 cm) Freestanding Gas Range PRODUCT MODEL NUMBERS PRODUCT DIMENSIONS MGR7665W MGR7775W Gas supply: This range is design-certified by CSA International for use with Natural gas or, after proper conversion, for use with Natural gas. Do not use TEFLON®† tape. This shaded area recommended for...


