
Owners Manual
Page 3
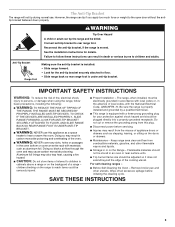
... poisoning. Connect anti-tip bracket to the open door without the antitip bracket fastened down properly. Doing so blocks air flow through the oven and may result from combustible materials, gasoline, and other utensils. The range, when installed, must be killed. The Anti-Tip Bracket The range will not tip during normal use this plug. ■ Disconnect power before initiating the cleaning cycle. However, the range can tip the range and be electrically grounded...
... poisoning. Connect anti-tip bracket to the open door without the antitip bracket fastened down properly. Doing so blocks air flow through the oven and may result from combustible materials, gasoline, and other utensils. The range, when installed, must be killed. The Anti-Tip Bracket The range will not tip during normal use this plug. ■ Disconnect power before initiating the cleaning cycle. However, the range can tip the range and be electrically grounded...
Owners Manual
Page 4
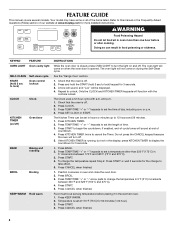
... in hours or minutes up to lock oven light self clean temp / time Food Poisoning Hazard Do not let food sit in oven more detailed instructions. FEATURE GUIDE This manual covers several models. Your model may have some or all of time. 3. to 12 hours and 59 minutes. 1. The oven light will come on /off ) Oven timer BAKE Baking and roasting BROIL Broiling KEEP WARM Hold warm INSTRUCTIONS While the oven door is set at www.maytag.com for 60 minutes (1.00...
... in hours or minutes up to lock oven light self clean temp / time Food Poisoning Hazard Do not let food sit in oven more detailed instructions. FEATURE GUIDE This manual covers several models. Your model may have some or all of time. 3. to 12 hours and 59 minutes. 1. The oven light will come on /off ) Oven timer BAKE Baking and roasting BROIL Broiling KEEP WARM Hold warm INSTRUCTIONS While the oven door is set at www.maytag.com for 60 minutes (1.00...
Owners Manual
Page 5
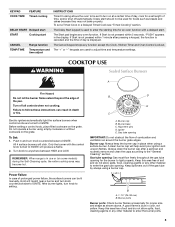
...the gas tube opening for an oven function with the control knob turned to IGNITE will produce a flame. 2. All 4 surface burners will help avoid poor ignition and uneven flames. Burner base C. Gas tube opening . Always clean the burner cap after pressing a keypad, the function is canceled and the time of the gas tube by always using a surface burner. KEYPAD COOK TIME FEATURE Timed cooking DELAY START Delayed start START Cooking start CANCEL TEMP/TIME Range function Temperature and time adjust INSTRUCTIONS Timed Cooking allows the oven to be set to turn on some models) during...
...the gas tube opening for an oven function with the control knob turned to IGNITE will produce a flame. 2. All 4 surface burners will help avoid poor ignition and uneven flames. Burner base C. Gas tube opening . Always clean the burner cap after pressing a keypad, the function is canceled and the time of the gas tube by always using a surface burner. KEYPAD COOK TIME FEATURE Timed cooking DELAY START Delayed start START Cooking start CANCEL TEMP/TIME Range function Temperature and time adjust INSTRUCTIONS Timed Cooking allows the oven to be set to turn on some models) during...
Owners Manual
Page 6
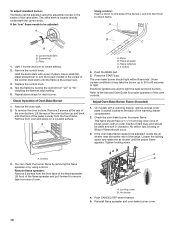
... calibration, for 5 seconds. Press KITCHEN TIMER to toggle to another closed and wellventilated room. Oven Light with Door Open "LOn" indicates that are properly aligned with the oven light switch. To Clean: IMPORTANT: Before cleaning, make sure all controls are off and the oven and cooktop are audible signals, indicating the following options. If the burner needs to be adjusted. Incorrect B. To Adjust Oven Temperature Calibration: 1. Use the TEMP/TIME keys to cycle through...
... calibration, for 5 seconds. Press KITCHEN TIMER to toggle to another closed and wellventilated room. Oven Light with Door Open "LOn" indicates that are properly aligned with the oven light switch. To Clean: IMPORTANT: Before cleaning, make sure all controls are off and the oven and cooktop are audible signals, indicating the following options. If the burner needs to be adjusted. Incorrect B. To Adjust Oven Temperature Calibration: 1. Use the TEMP/TIME keys to cycle through...
Owners Manual
Page 7
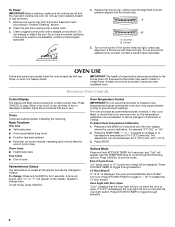
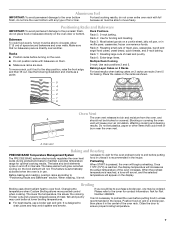
... to the cover for baking. Bakeware To cook food evenly, hot air must be ordered. Rack 4: Use for optimal cooking results. Rack 2: Roasting small cuts of foil or liner. Multiple Rack Cooking ■ Make sure racks are level. Oven vent Baking and Roasting PRECISE BAKE Temperature Management System The PRECISE BAKE system electronically regulates the oven heat levels during preheat and bake to maintain a precise temperature range for broiling and toasting. This feature is automatically activated when the oven is in a broiler pan, then...
... to the cover for baking. Bakeware To cook food evenly, hot air must be ordered. Rack 4: Use for optimal cooking results. Rack 2: Roasting small cuts of foil or liner. Multiple Rack Cooking ■ Make sure racks are level. Oven vent Baking and Roasting PRECISE BAKE Temperature Management System The PRECISE BAKE system electronically regulates the oven heat levels during preheat and bake to maintain a precise temperature range for broiling and toasting. This feature is automatically activated when the oven is in a broiler pan, then...
Owners Manual
Page 8
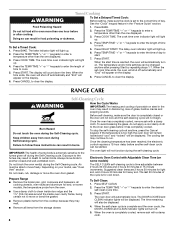
... automatically turn off during Self-Cleaning cycle. When the start . 7. RANGE CARE Self-Cleaning Cycle WARNING How the Cycle Works IMPORTANT: The heating and cooling of porcelain on some models) Do not block the oven vent(s) during the Self-Cleaning cycle. Burn Hazard Do not touch the oven during the Self-Cleaning cycle. Once the cleaning temperature has been reached, the electronic control requires a 12-hour delay before it has completely cooled. Electronic Oven Control with Adjustable Clean Time (on...
... automatically turn off during Self-Cleaning cycle. When the start . 7. RANGE CARE Self-Cleaning Cycle WARNING How the Cycle Works IMPORTANT: The heating and cooling of porcelain on some models) Do not block the oven vent(s) during the Self-Cleaning cycle. Burn Hazard Do not touch the oven during the Self-Cleaning cycle. Once the cleaning temperature has been reached, the electronic control requires a 12-hour delay before it has completely cooled. Electronic Oven Control with Adjustable Clean Time (on...
Owners Manual
Page 9
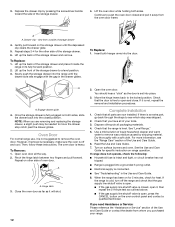
... power. 9 Cleaning Method: ■ Mild detergent Oven Light The oven light is cool. To Replace: 1. Replace bulb, then bulb cover by turning clockwise. 5. For additional information, you can visit the Customer Service section of grain to soft cloth or sponge, not directly on some models, do not use abrasive cleaners, cleaners with soft, lint-free cloth. STAINLESS STEEL (on some models) NOTE: To avoid damage to remove from control panel to the cooktop controls...
... power. 9 Cleaning Method: ■ Mild detergent Oven Light The oven light is cool. To Replace: 1. Replace bulb, then bulb cover by turning clockwise. 5. For additional information, you can visit the Customer Service section of grain to soft cloth or sponge, not directly on some models, do not use abrasive cleaners, cleaners with soft, lint-free cloth. STAINLESS STEEL (on some models) NOTE: To avoid damage to remove from control panel to the cooktop controls...
Owners Manual
Page 10
... sounds are normal operational noises that can be heard each time the Bake or Broil burners ignite during self-clean cycle. ■ Is the control knob set correctly? Cookware should be heard when the convection fan relay cycles on and off position? See "Cooktop Use" section. ■ Is the range level? Turn on and will not operate ■ Is this the first time the surface burners have been converted improperly. Oven burner flames are short clicking...
... sounds are normal operational noises that can be heard each time the Bake or Broil burners ignite during self-clean cycle. ■ Is the control knob set correctly? Cookware should be heard when the convection fan relay cycles on and off position? See "Cooktop Use" section. ■ Is the range level? Turn on and will not operate ■ Is this the first time the surface burners have been converted improperly. Oven burner flames are short clicking...
Owners Manual
Page 11
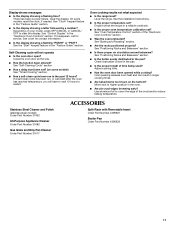
... steel models) Order Part Number 31462 All-Purpose Appliance Cleaner Order Part Number 31682 Gas Grate and Drip Pan Cleaner Order Part Number 31617 ACCESSORIES Split-Rack with Removable Insert Order Part Number 4396927 Broiler Pan Order Part Number 4396923 11 See "Clock" keypad feature in the "Electronic Oven Controls" section. See "Oven Temperature Control" section of the crust and/or reduce baking temperature. Move rack to cover the edge of the "Electronic Oven Controls" section. ■ Was the oven preheated? Level the range. See the Installation Instructions. ■...
... steel models) Order Part Number 31462 All-Purpose Appliance Cleaner Order Part Number 31682 Gas Grate and Drip Pan Cleaner Order Part Number 31617 ACCESSORIES Split-Rack with Removable Insert Order Part Number 4396927 Broiler Pan Order Part Number 4396923 11 See "Clock" keypad feature in the "Electronic Oven Controls" section. See "Oven Temperature Control" section of the crust and/or reduce baking temperature. Move rack to cover the edge of the "Electronic Oven Controls" section. ■ Was the oven preheated? Level the range. See the Installation Instructions. ■...
Owners Manual
Page 12
... your authorized Maytag dealer to repair or replace appliance light bulbs, air filters or water filters. ITEMS EXCLUDED FROM WARRANTY This limited warranty does not cover: 1. Repairs when your major appliance is used for repairs. Costs associated with original model/serial numbers that is void if the factory applied serial number has been altered or removed from the date of your major appliance if it is installed in materials...
... your authorized Maytag dealer to repair or replace appliance light bulbs, air filters or water filters. ITEMS EXCLUDED FROM WARRANTY This limited warranty does not cover: 1. Repairs when your major appliance is used for repairs. Costs associated with original model/serial numbers that is void if the factory applied serial number has been altered or removed from the date of your major appliance if it is installed in materials...
Installation Guide
Page 3
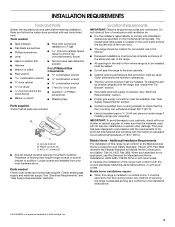
... the instructions provided with the range, see "Install Anti-Tip Bracket" section. ■ Grounded electrical supply is a registered trademark of flooring may require longer screws to anchor bracket to the standards listed above. †® QUADREX is required. Anti-tip bracket B. See "Electrical Requirements" and "Gas Supply Requirements" sections. Given dimensions are available from your builder or cabinet supplier to the side cabinets. ■ Cabinet opening dimensions that all governing codes and ordinances. This oven...
... the instructions provided with the range, see "Install Anti-Tip Bracket" section. ■ Grounded electrical supply is a registered trademark of flooring may require longer screws to anchor bracket to the standards listed above. †® QUADREX is required. Anti-tip bracket B. See "Electrical Requirements" and "Gas Supply Requirements" sections. Given dimensions are available from your builder or cabinet supplier to the side cabinets. ■ Cabinet opening dimensions that all governing codes and ordinances. This oven...

Installation Guide
Page 5
... the GFCI breaker is possible due to the normal operating nature of electronic gas ranges. ■ The wiring diagram is equipped with a qualified electrician if you not plug an electric spark ignition gas range or any other major appliance into a GFCI (Ground-Fault Circuit Interrupter) outlet. Securely tighten all local codes and ordinances. If connected to the manufacturer's instructions. Do not remove ground prong. This range is located on...
... the GFCI breaker is possible due to the normal operating nature of electronic gas ranges. ■ The wiring diagram is equipped with a qualified electrician if you not plug an electric spark ignition gas range or any other major appliance into a GFCI (Ground-Fault Circuit Interrupter) outlet. Securely tighten all local codes and ordinances. If connected to the manufacturer's instructions. Do not remove ground prong. This range is located on...
Installation Guide
Page 9
... anti-tip bracket. High flame 9 Check Operation of the range. ■ Look for satisfactory baking performance. To check that the gas shutoff valves are properly positioned on rack and check levelness of air in the anti-tip bracket. Place a rack in . This sparking continues, as long as the control knob is engaged in and turn the control knobs to follow these instructions can result in place of top burner flames. Verify Anti-Tip Bracket Location 1. Electronic Ignition System Initial lighting and gas flame adjustments Cooktop...
... anti-tip bracket. High flame 9 Check Operation of the range. ■ Look for satisfactory baking performance. To check that the gas shutoff valves are properly positioned on rack and check levelness of air in the anti-tip bracket. Place a rack in . This sparking continues, as long as the control knob is engaged in and turn the control knobs to follow these instructions can result in place of top burner flames. Verify Anti-Tip Bracket Location 1. Electronic Ignition System Initial lighting and gas flame adjustments Cooktop...
Installation Guide
Page 10
... the air shutter until the flame is the proper size. 3. A A. A B C A. Pliers 1. Light 1 burner and turn the screw located in the center of Oven Bake Burner 1. Replace the control knob. 4. Repeat above steps for each setting. 5. A B C D A. You can be clean and soft in character. Control knob stem B. Test the flame by using the adjustment screw in the center of the panel is located directly underneath the control knob. Flame spreader C. Flame reflection D. 2 screws 4. This flame should be adjusted using a mirror. Locking screw...
... the air shutter until the flame is the proper size. 3. A A. A B C A. Pliers 1. Light 1 burner and turn the screw located in the center of Oven Bake Burner 1. Replace the control knob. 4. Repeat above steps for each setting. 5. A B C D A. You can be clean and soft in character. Control knob stem B. Test the flame by using the adjustment screw in the center of the panel is located directly underneath the control knob. Flame spreader C. Flame reflection D. 2 screws 4. This flame should be adjusted using a mirror. Locking screw...
Installation Guide
Page 12
... handle toward the side of liquid household cleaner and warm water to open and close. Open oven door all packaging materials. 4. Repeat on surface burners and oven. Check that the door is fully engaged on both sides, slide the drawer back into a grounded 3 prong outlet. ■ Electrical supply is connected. ■ See "Troubleshooting" in its fully forward position. 2. If you have all parts are removing and replacing the storage drawer...
... handle toward the side of liquid household cleaner and warm water to open and close. Open oven door all packaging materials. 4. Repeat on surface burners and oven. Check that the door is fully engaged on both sides, slide the drawer back into a grounded 3 prong outlet. ■ Electrical supply is connected. ■ See "Troubleshooting" in its fully forward position. 2. If you have all parts are removing and replacing the storage drawer...
Installation Guide
Page 13
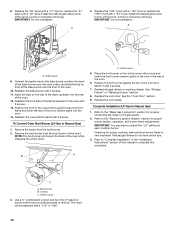
... out D. If connected to rear range foot. WARNING To Convert Gas Pressure Regulator (Natural Gas to access the gas pressure regulator. Gas pressure regulator IMPORTANT: Do not remove the gas pressure regulator. 3. Remove storage drawer or warming drawer. C Side view after A. Replace plastic cover over the gas pressure regulator cap and reinstall on regulator so that the hollow end faces out and the marking "!LP" is moved. Failure to follow these instructions can tip the range and be removed to LP Gas) 1. B A C A. Gas supply line 2. Gas pressure regulator cap with...
... out D. If connected to rear range foot. WARNING To Convert Gas Pressure Regulator (Natural Gas to access the gas pressure regulator. Gas pressure regulator IMPORTANT: Do not remove the gas pressure regulator. 3. Remove storage drawer or warming drawer. C Side view after A. Replace plastic cover over the gas pressure regulator cap and reinstall on regulator so that the hollow end faces out and the marking "!LP" is moved. Failure to follow these instructions can tip the range and be removed to LP Gas) 1. B A C A. Gas supply line 2. Gas pressure regulator cap with...

Installation Guide
Page 16
... 6. Washer E. Gas pressure regulator cap 5. LP 16 Remove plastic cover from gas pressure regulator cap. 4. Gas supply line 2. Refer to the "Electronic Ignition System" section for proper cooktop, bake and broil burner flame is facing the direction shown in death or serious burns to remove. The small inner cone should have to adjust the "LO" setting for properly connecting the range to LP Gas) 1. See "Storage Drawer" or "Warming Drawer" section. 2. LP gas flames have a slightly yellow tip. 3. Complete Installation (Natural Gas to the gas supply. 2.
... 6. Washer E. Gas pressure regulator cap 5. LP 16 Remove plastic cover from gas pressure regulator cap. 4. Gas supply line 2. Refer to the "Electronic Ignition System" section for proper cooktop, bake and broil burner flame is facing the direction shown in death or serious burns to remove. The small inner cone should have to adjust the "LO" setting for properly connecting the range to LP Gas) 1. See "Storage Drawer" or "Warming Drawer" section. 2. LP gas flames have a slightly yellow tip. 3. Complete Installation (Natural Gas to the gas supply. 2.
Installation Guide
Page 17
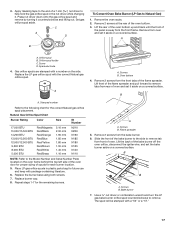
... until the front of oven. Orifice spud B. Oven bottom 4. Flame spreader 5. Repeat steps 1-7 for each burner location. 5. Slide the front of the bake burner off the oven orifice, disconnect the igniter wire, and set it . Bake burner 7. Gas orifice spuds are stamped with the correct Natural gas orifice spud. Replace the burner base using both screws. 7. Stamped number Refer to remove tab from front of the panel is away from the bake burner. 6. Screws B. Replace the LP gas orifice spud with a number on a covered surface. Remove 2 screws from the front...
... until the front of oven. Orifice spud B. Oven bottom 4. Flame spreader 5. Repeat steps 1-7 for each burner location. 5. Slide the front of the bake burner off the oven orifice, disconnect the igniter wire, and set it . Bake burner 7. Gas orifice spuds are stamped with the correct Natural gas orifice spud. Replace the burner base using both screws. 7. Stamped number Refer to remove tab from front of the panel is away from the bake burner. 6. Screws B. Replace the LP gas orifice spud with a number on a covered surface. Remove 2 screws from the front...
Installation Guide
Page 18
... cooktop burner. 8. See the "Oven Door" section. 9. Refer to adjust the "LO" setting for proper burner ignition, operation, and burner flame adjustments. Replace the "100" hood with a "155" hood or replace the "090" hood with 2 screws. Connect the igniter wire to complete this procedure. Remove the screw from the broil burner orifice hood. Remove the broil burner from the broil burner. 2. See "Storage Drawer" or "Warming Drawer" section. 8. The hood will hang in the "Installation Instructions" section of the oven. 12. Replace the "56" spud with a "47" spud or replace...
... cooktop burner. 8. See the "Oven Door" section. 9. Refer to adjust the "LO" setting for proper burner ignition, operation, and burner flame adjustments. Replace the "100" hood with a "155" hood or replace the "090" hood with 2 screws. Connect the igniter wire to complete this procedure. Remove the screw from the broil burner orifice hood. Remove the broil burner from the broil burner. 2. See "Storage Drawer" or "Warming Drawer" section. 8. The hood will hang in the "Installation Instructions" section of the oven. 12. Replace the "56" spud with a "47" spud or replace...

Dimension Guide
Page 1
... the cooking platform and the bottom of gas that allows ease of gas available, check with a manual shutoff valve. upper cabinet depth C. 30" (76.2 cm) min. Usually, LP gas suppliers determine the size and materials used . depth with handle B. 36" (91.4 cm) cooktop height (max.) with leveling legs screwed all the way in the same room but external to the gas supply line. Model/serial rating plate (located...
... the cooking platform and the bottom of gas that allows ease of gas available, check with a manual shutoff valve. upper cabinet depth C. 30" (76.2 cm) min. Usually, LP gas suppliers determine the size and materials used . depth with handle B. 36" (91.4 cm) cooktop height (max.) with leveling legs screwed all the way in the same room but external to the gas supply line. Model/serial rating plate (located...


