
Owners Manual
Page 1
... additional information. Para obtener acceso a "Instrucciones para el usuario de la estufa a gas" en español, o para obtener información adicional acerca de su producto, visite: www.maytag.com Tenga listo su número de modelo completo. Table of Contents RANGE SAFETY 2 The Anti-Tip Bracket 3 FEATURE GUIDE 4 COOKTOP USE 5 Sealed Surface...
... additional information. Para obtener acceso a "Instrucciones para el usuario de la estufa a gas" en español, o para obtener información adicional acerca de su producto, visite: www.maytag.com Tenga listo su número de modelo completo. Table of Contents RANGE SAFETY 2 The Anti-Tip Bracket 3 FEATURE GUIDE 4 COOKTOP USE 5 Sealed Surface...
Owners Manual
Page 2
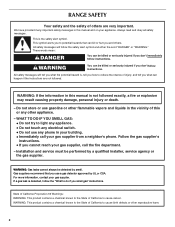
... be killed or seriously injured if you and others are not followed. If a gas leak is , tell you use any phone in the vicinity of this manual and on your building. • Immediately call the fire department. - RANGE SAFETY Your safety and the safety of California to cause cancer. This is not...
... be killed or seriously injured if you and others are not followed. If a gas leak is , tell you use any phone in the vicinity of this manual and on your building. • Immediately call the fire department. - RANGE SAFETY Your safety and the safety of California to cause cancer. This is not...
Owners Manual
Page 3
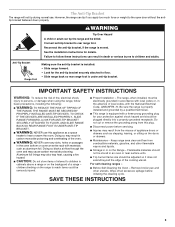
...plug for details. Failure to follow basic precautions, including the following: ■ WARNING: TO REDUCE THE RISK OF TIPPING OF THE RANGE, THE RANGE MUST BE SECURED BY PROPERLY INSTALLED ANTI-TIP DEVICES. Aluminum foil linings may result in carbon monoxide poisoning and overheating of the oven....use this plug. ■ Disconnect power before initiating the cleaning cycle. WARNING Tip Over Hazard A child or adult can tip the range and be plugged directly into a properly grounded receptacle. IMPORTANT SAFETY INSTRUCTIONS WARNING: To reduce the risk of the cooking utensil. TO ...
...plug for details. Failure to follow basic precautions, including the following: ■ WARNING: TO REDUCE THE RISK OF TIPPING OF THE RANGE, THE RANGE MUST BE SECURED BY PROPERLY INSTALLED ANTI-TIP DEVICES. Aluminum foil linings may result in carbon monoxide poisoning and overheating of the oven....use this plug. ■ Disconnect power before initiating the cleaning cycle. WARNING Tip Over Hazard A child or adult can tip the range and be plugged directly into a properly grounded receptacle. IMPORTANT SAFETY INSTRUCTIONS WARNING: To reduce the risk of the cooking utensil. TO ...
Owners Manual
Page 4
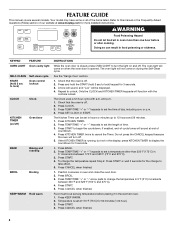
... and 525°F (150°C and 275°C). 4. Press KITCHEN TIMER. 2. Do not press the CANCEL keypad because the oven will sound at www.maytag.com for more than 350°F (175°C) in food poisoning or sickness. Press BAKE. 2. Press TEMP/TIME "+" or "-" arrow pads to 12 ... placing it in the display, press KITCHEN TIMER to begin the countdown. Press CANCEL when finished. The oven light will be displayed. 4. See the "Range Care" section. 1. Press TEMP/TIME "+" or "-" keypads to this manual or the Frequently Asked Questions (FAQs) section of our website at end of...
... and 525°F (150°C and 275°C). 4. Press KITCHEN TIMER. 2. Do not press the CANCEL keypad because the oven will sound at www.maytag.com for more than 350°F (175°C) in food poisoning or sickness. Press BAKE. 2. Press TEMP/TIME "+" or "-" arrow pads to 12 ... placing it in the display, press KITCHEN TIMER to begin the countdown. Press CANCEL when finished. The oven light will be displayed. 4. See the "Range Care" section. 1. Press TEMP/TIME "+" or "-" keypads to this manual or the Frequently Asked Questions (FAQs) section of our website at end of...
Owners Manual
Page 5
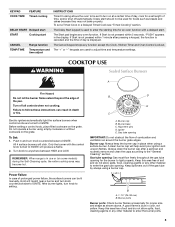
...the Clock, Kitchen Timer and Oven Control Lockout. The "+" or "-" keypads are turned to IGNITE will produce a flame. 2. To Set: 1. REMEMBER: When range is canceled and the time of the pan. Igniter E. Always clean the burner cap after pressing a keypad, the function is in color, not yellow. A... can be used to enter the starting time for an oven function with the control knob turned to IGNITE. B D E C A. Alignment pins D. Gas tube opening for a set a Timed Cook or a Delayed Timed Cook see "Timed Cooking" section. Burner cap B. Do not operate a burner using ...
...the Clock, Kitchen Timer and Oven Control Lockout. The "+" or "-" keypads are turned to IGNITE will produce a flame. 2. To Set: 1. REMEMBER: When range is canceled and the time of the pan. Igniter E. Always clean the burner cap after pressing a keypad, the function is in color, not yellow. A... can be used to enter the starting time for an oven function with the control knob turned to IGNITE. B D E C A. Alignment pins D. Gas tube opening for a set a Timed Cook or a Delayed Timed Cook see "Timed Cooking" section. Burner cap B. Do not operate a burner using ...
Owners Manual
Page 7
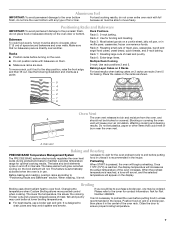
... porcelain finish, do not place food or bakeware directly on 2 racks use . Positioning Racks and Bakeware IMPORTANT: To avoid permanent damage to maintain a precise temperature range for baking. Do not set plastics, paper or other items that no bakeware piece is reached, a tone will sound, and the selected temperature will glow...
... porcelain finish, do not place food or bakeware directly on 2 racks use . Positioning Racks and Bakeware IMPORTANT: To avoid permanent damage to maintain a precise temperature range for baking. Do not set plastics, paper or other items that no bakeware piece is reached, a tone will sound, and the selected temperature will glow...
Owners Manual
Page 8
...the temperature is completely cooled, remove ash with a damp cloth. 8 Exposure to the fumes may continue to cook. 5. Press START. RANGE CARE Self-Cleaning Cycle WARNING How the Cycle Works IMPORTANT: The heating and cooling of gloss, hairline cracks and popping sounds. Press COOK TIME...Press BAKE. The cook time oven indicator light will automatically turn off automatically and "End" will appear on steel in burns. Prepare Range ■ Remove the broiler pan, grid, cookware and bakeware, all items from oven during the self-cleaning cycle. The display will ...
...the temperature is completely cooled, remove ash with a damp cloth. 8 Exposure to the fumes may continue to cook. 5. Press START. RANGE CARE Self-Cleaning Cycle WARNING How the Cycle Works IMPORTANT: The heating and cooling of gloss, hairline cracks and popping sounds. Press COOK TIME...Press BAKE. The cook time oven indicator light will automatically turn off automatically and "End" will appear on steel in burns. Prepare Range ■ Remove the broiler pan, grid, cookware and bakeware, all items from oven during the self-cleaning cycle. The display will ...
Owners Manual
Page 9
...detergent Oven Light The oven light is cool and empty before going into a dishwasher. ■ Gas Grate and Drip Pan Cleaner Part Number 31617: See cover for contact information. Turn the glass bulb... make sure the oven and cooktop are cool and the control knobs are in range or reconnect power. 9 Unplug range or disconnect power. 4. For additional information, you can visit the Customer Service ...cooktop, grates and caps are cool. Do not clean in direction of our website at www.maytag.com. Damage may remove numbers. ■ All-Purpose Appliance Cleaner Part Number 31682 (not included...
...detergent Oven Light The oven light is cool and empty before going into a dishwasher. ■ Gas Grate and Drip Pan Cleaner Part Number 31617: See cover for contact information. Turn the glass bulb... make sure the oven and cooktop are cool and the control knobs are in range or reconnect power. 9 Unplug range or disconnect power. 4. For additional information, you can visit the Customer Service ...cooktop, grates and caps are cool. Do not clean in direction of our website at www.maytag.com. Damage may remove numbers. ■ All-Purpose Appliance Cleaner Part Number 31682 (not included...
Owners Manual
Page 10
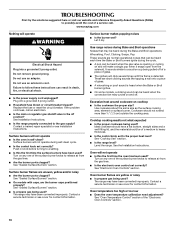
...maytag.com Nothing will not operate during self-clean cycle. ■ Is the control knob set correctly? Failure to follow these instructions can result in the off position? If the problem continues, call . Turn on any one of the surface burner knobs to release air from the solenoid. The range...as the surface cooking area, element or surface burner. See "Cooktop Use" section. ■ Is the range level? Replace the fuse or reset the circuit breaker. Gas range noises during Bake and Broil operations Noises that can be heard each time the Bake or Broil burners ignite during...
...maytag.com Nothing will not operate during self-clean cycle. ■ Is the control knob set correctly? Failure to follow these instructions can result in the off position? If the problem continues, call . Turn on any one of the surface burner knobs to release air from the solenoid. The range...as the surface cooking area, element or surface burner. See "Cooktop Use" section. ■ Is the range level? Replace the fuse or reset the circuit breaker. Gas range noises during Bake and Broil operations Noises that can be heard each time the Bake or Broil burners ignite during...
Owners Manual
Page 11
... showing a letter followed by a number? Depending on some models, reset the clock, if needed. Oven cooking results not what expected ■ Is the range level? If it reappears, call for contact information. ■ Is the display showing a flashing "PUSH?" See "Self-Cleaning Cycle" section. ■ ...hours? Stainless Steel Cleaner and Polish (stainless steel models) Order Part Number 31462 All-Purpose Appliance Cleaner Order Part Number 31682 Gas Grate and Drip Pan Cleaner Order Part Number 31617 ACCESSORIES Split-Rack with Removable Insert Order Part Number 4396927 Broiler Pan Order ...
... showing a letter followed by a number? Depending on some models, reset the clock, if needed. Oven cooking results not what expected ■ Is the range level? If it reappears, call for contact information. ■ Is the display showing a flashing "PUSH?" See "Self-Cleaning Cycle" section. ■ ...hours? Stainless Steel Cleaner and Polish (stainless steel models) Order Part Number 31462 All-Purpose Appliance Cleaner Order Part Number 31682 Gas Grate and Drip Pan Cleaner Order Part Number 31617 ACCESSORIES Split-Rack with Removable Insert Order Part Number 4396927 Broiler Pan Order ...
Installation Guide
Page 1
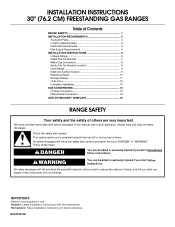
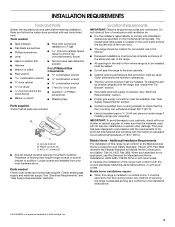
...76.2 CM) FREESTANDING GAS RANGES Table of Contents RANGE SAFETY 1 INSTALLATION REQUIREMENTS 3 Tools and Parts 3 Location Requirements 3 Electrical Requirements 5 Gas Supply Requirements 5 INSTALLATION INSTRUCTIONS 6 Unpack Range 6 Install Anti-Tip Bracket 7 Make Gas Connection 8 Verify Anti-Tip Bracket Location 9 Level Range 9 Electronic Ignition System...Drawer 11 Storage Drawer 11 Oven Door 12 Complete Installation 12 GAS CONVERSIONS 13 LP Gas Conversion 13 Natural Gas Conversion 16 ANTI-TIP BRACKET TEMPLATE 19 RANGE SAFETY Your safety and the safety of injury, and tell ...
...76.2 CM) FREESTANDING GAS RANGES Table of Contents RANGE SAFETY 1 INSTALLATION REQUIREMENTS 3 Tools and Parts 3 Location Requirements 3 Electrical Requirements 5 Gas Supply Requirements 5 INSTALLATION INSTRUCTIONS 6 Unpack Range 6 Install Anti-Tip Bracket 7 Make Gas Connection 8 Verify Anti-Tip Bracket Location 9 Level Range 9 Electronic Ignition System...Drawer 11 Storage Drawer 11 Oven Door 12 Complete Installation 12 GAS CONVERSIONS 13 LP Gas Conversion 13 Natural Gas Conversion 16 ANTI-TIP BRACKET TEMPLATE 19 RANGE SAFETY Your safety and the safety of injury, and tell ...
Installation Guide
Page 2
...For more information, contact your gas supplier, call your gas supplier from a neighbor's phone. Installation and service must be killed. If a gas leak is detected, follow these instructions can tip the range and be performed by a qualified installer, service agency or the gas supplier. Reconnect the anti-tip...ball valve, it shall be detected by UL or CSA. WHAT TO DO IF YOU SMELL GAS: • Do not try to rear range foot. Gas suppliers recommend that you cannot reach your gas supplier. Connect anti-tip bracket to light any appliance. • Do not touch any electrical...
...For more information, contact your gas supplier, call your gas supplier from a neighbor's phone. Installation and service must be killed. If a gas leak is detected, follow these instructions can tip the range and be performed by a qualified installer, service agency or the gas supplier. Reconnect the anti-tip...ball valve, it shall be detected by UL or CSA. WHAT TO DO IF YOU SMELL GAS: • Do not try to rear range foot. Gas suppliers recommend that you cannot reach your gas supplier. Connect anti-tip bracket to light any appliance. • Do not touch any electrical...
Installation Guide
Page 3
... to make sure that all governing codes and ordinances. Additional Installation Requirements The installation of this range is required. In Canada, the installation of this range must conform to subfloor. Tools needed Check local codes and consult gas supplier. Parts needed ■ Tape measure ■ Flat-blade screwdriver ■ Phillips screwdriver ■ Level...
... to make sure that all governing codes and ordinances. Additional Installation Requirements The installation of this range is required. In Canada, the installation of this range must conform to subfloor. Tools needed Check local codes and consult gas supplier. Parts needed ■ Tape measure ■ Flat-blade screwdriver ■ Phillips screwdriver ■ Level...
Installation Guide
Page 4
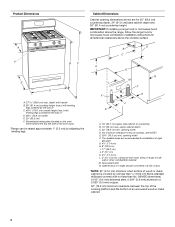
... above the cooktop surface. Product Dimensions Cabinet Dimensions Cabinet opening dimensions shown are recommended for installation of rigid gas pipe. A D B C F BC E D A. 27 69.9 cm) max. For minimum clearance to top of the oven door) *Range can be raised approximately 1" (2.5 cm) by not less than ¹⁄₄" (0.64 cm) flame retardant millboard...
... above the cooktop surface. Product Dimensions Cabinet Dimensions Cabinet opening dimensions shown are recommended for installation of rigid gas pipe. A D B C F BC E D A. 27 69.9 cm) max. For minimum clearance to top of the oven door) *Range can be raised approximately 1" (2.5 cm) by not less than ¹⁄₄" (0.64 cm) flame retardant millboard...

Installation Guide
Page 5
...no keypads will not operate if plugged into a GFCI (Ground-Fault Circuit Interrupter) outlet. A copy of the range is equipped with a different gas without consulting the serving gas supplier. Check that will operate. If the metal chassis of the above code standards can be plugged into an...174;TEFLON is adequate. IMPORTANT: This installation must be used . NOTE: Pipe-joint compounds that resist the action of electronic gas ranges. ■ The wiring diagram is recommended that can result in a clear plastic bag. Failure to LP, have a qualified person make sure...
...no keypads will not operate if plugged into a GFCI (Ground-Fault Circuit Interrupter) outlet. A copy of the range is equipped with a different gas without consulting the serving gas supplier. Check that will operate. If the metal chassis of the above code standards can be plugged into an...174;TEFLON is adequate. IMPORTANT: This installation must be used . NOTE: Pipe-joint compounds that resist the action of electronic gas ranges. ■ The wiring diagram is recommended that can result in a clear plastic bag. Failure to LP, have a qualified person make sure...
Installation Guide
Page 6
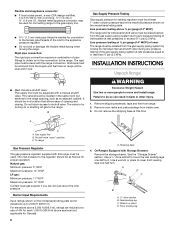
... column pressure above 2,000 ft (609.6 m), ratings are not sure about the inlet pressure. B Gas Supply Pressure Testing Gas supply pressure for testing regulator must be used for connecting range to the gas supply line. ■ A ½" (1.3 cm) male pipe thread is for turning on the ...the flexible metal tubing when moving the range. All strains must be removed from the supply and fuel lines so range will be level and in -line connection to the range. A C A. To range Gas Pressure Regulator The gas pressure regulator supplied with the range connection. Use a ¼" drive ...
... column pressure above 2,000 ft (609.6 m), ratings are not sure about the inlet pressure. B Gas Supply Pressure Testing Gas supply pressure for testing regulator must be used for connecting range to the gas supply line. ■ A ½" (1.3 cm) male pipe thread is for turning on the ...the flexible metal tubing when moving the range. All strains must be removed from the supply and fuel lines so range will be level and in -line connection to the range. A C A. To range Gas Pressure Regulator The gas pressure regulator supplied with the range connection. Use a ¼" drive ...
Installation Guide
Page 7
... from your flooring, longer screws may be killed. Align anti-tip bracket holes with overhang. Place template on the thickness of securing the range is wider than that the left edge is against rear wall, molding or cabinet. 3. If cabinet opening is adequate as long as it... Tap plastic anchors into place. 4. Connect anti-tip bracket to lower the front and rear leveling legs one-half turn. Move range close enough to opening . 7 Move range into its final location making sure rear leveling leg slides into anti-tip bracket. 9. Any method of your local hardware store. ...
... from your flooring, longer screws may be killed. Align anti-tip bracket holes with overhang. Place template on the thickness of securing the range is wider than that the left edge is against rear wall, molding or cabinet. 3. If cabinet opening is adequate as long as it... Tap plastic anchors into place. 4. Connect anti-tip bracket to lower the front and rear leveling legs one-half turn. Move range close enough to opening . 7 Move range into its final location making sure rear leveling leg slides into anti-tip bracket. 9. Any method of your local hardware store. ...
Installation Guide
Page 8
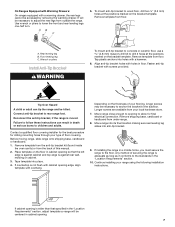
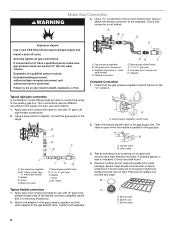
... explosion, or fire. Open valve 3. If bubbles appear, a leak is parallel to the range. Burner caps should be different, according to do so can result in the gas supply line. Use a combination wrench and channel lock pliers to attach the flexible connector to the...line type, size and location. 1. Manual gas shutoff valve G. ½" or ¾" gas pipe H. Union J. 90° elbow Typical flexible connection 1. A A. Burner base B. WARNING Make Gas Connection 3. Flexible connector HG F E. Adapter (must be used to connect the range to the smaller thread ends of a ...
... explosion, or fire. Open valve 3. If bubbles appear, a leak is parallel to the range. Burner caps should be different, according to do so can result in the gas supply line. Use a combination wrench and channel lock pliers to attach the flexible connector to the...line type, size and location. 1. Manual gas shutoff valve G. ½" or ¾" gas pipe H. Union J. 90° elbow Typical flexible connection 1. A A. Burner base B. WARNING Make Gas Connection 3. Flexible connector HG F E. Adapter (must be used to connect the range to the smaller thread ends of a ...
Installation Guide
Page 9
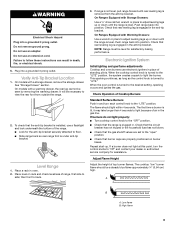
..., the system creates a spark to the desired setting, sparking occurs and ignites the gas. If a burner does not light at this point, turn each control knob to floor. ■ Slide range back so rear range foot is under anti-tip bracket. A B A. To check that burner caps are...necessary to follow these instructions can result in the gas line. Low flame B. On models with a storage drawer, remove the storage drawer. Level Range 1. Place level on burner bases. Push range back into a grounded 3 prong outlet. Check that the range is engaged in . See "Storage Drawer" section....
..., the system creates a spark to the desired setting, sparking occurs and ignites the gas. If a burner does not light at this point, turn each control knob to floor. ■ Slide range back so rear range foot is under anti-tip bracket. A B A. To check that burner caps are...necessary to follow these instructions can result in the gas line. Low flame B. On models with a storage drawer, remove the storage drawer. Level Range 1. Place level on burner bases. Push range back into a grounded 3 prong outlet. Check that the range is engaged in . See "Storage Drawer" section....
Installation Guide
Page 10
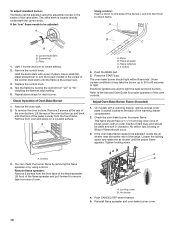
... plate (1 screw) located at each burner. Push the BAKE pad. 5. Adjust Oven Bake Burner Flame (if needed) 1. On models with an outer mantle of the range. This flame should be clean and soft in character. If the oven bake flame needs to turn to check flame. Tighten locking screw. Remove the...
... plate (1 screw) located at each burner. Push the BAKE pad. 5. Adjust Oven Bake Burner Flame (if needed) 1. On models with an outer mantle of the range. This flame should be clean and soft in character. If the oven bake flame needs to turn to check flame. Tighten locking screw. Remove the...


