
Owners Manual
Page 1
....maytag.com Tenga listo su número de modelo completo. GAS RANGE USER INSTRUCTIONS THANK YOU for additional information. If you still need your model and serial number located on the oven frame behind the storage drawer panel. Table of Contents RANGE SAFETY 2 The Anti-Tip Bracket 3 FEATURE GUIDE 4 COOKTOP USE 5 Sealed Surface Burners 5 OVEN USE 6 Electronic Oven Controls 6 Aluminum Foil 7 Positioning Racks and Bakeware 7 Oven Vent 7 Baking and Roasting 7 Broiling 7 Timed Cooking 8 RANGE CARE 8 Self-Cleaning Cycle 8 General Cleaning 9 Oven Light 9 TROUBLESHOOTING...
....maytag.com Tenga listo su número de modelo completo. GAS RANGE USER INSTRUCTIONS THANK YOU for additional information. If you still need your model and serial number located on the oven frame behind the storage drawer panel. Table of Contents RANGE SAFETY 2 The Anti-Tip Bracket 3 FEATURE GUIDE 4 COOKTOP USE 5 Sealed Surface Burners 5 OVEN USE 6 Electronic Oven Controls 6 Aluminum Foil 7 Positioning Racks and Bakeware 7 Oven Vent 7 Baking and Roasting 7 Broiling 7 Timed Cooking 8 RANGE CARE 8 Self-Cleaning Cycle 8 General Cleaning 9 Oven Light 9 TROUBLESHOOTING...
Owners Manual
Page 3
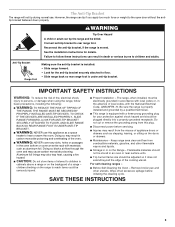
... when using the range, follow these instructions can result in an oven or near surface units. ■ Top burner flame size should be electrically grounded in accordance with local codes or, in the oven bottom or cover an entire rack with a three-prong grounding plug for the anti-tip bracket securely attached to children and adults. SAVE THESE INSTRUCTIONS 3 Reconnect the anti-tip bracket, if the range is under anti-tip bracket. IMPORTANT SAFETY INSTRUCTIONS WARNING...
... when using the range, follow these instructions can result in an oven or near surface units. ■ Top burner flame size should be electrically grounded in accordance with local codes or, in the oven bottom or cover an entire rack with a three-prong grounding plug for the anti-tip bracket securely attached to children and adults. SAVE THESE INSTRUCTIONS 3 Reconnect the anti-tip bracket, if the range is under anti-tip bracket. IMPORTANT SAFETY INSTRUCTIONS WARNING...
Owners Manual
Page 4
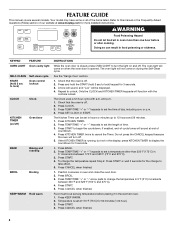
... FEATURE GUIDE This manual covers several models. to change the temperature repeat Step 2. The oven light will function with a.m. Press TEMP/TIME "+" or "-" keypads to set the time of time. 3. Press TEMP/TIME "+" or "-" keypads to set the length of day, including a.m. If enabled, end-of countdown. 4. Press KITCHEN TIMER twice to unlock. Press TEMP/TIME "+" or "-" keypads to lock) Oven control lockout CLOCK Clock KITCHEN TIMER (on/off) Oven timer BAKE Baking and roasting BROIL Broiling KEEP WARM Hold warm INSTRUCTIONS While the oven door is set a temperature...
... FEATURE GUIDE This manual covers several models. to change the temperature repeat Step 2. The oven light will function with a.m. Press TEMP/TIME "+" or "-" keypads to set the time of time. 3. Press TEMP/TIME "+" or "-" keypads to set the length of day, including a.m. If enabled, end-of countdown. 4. Press KITCHEN TIMER twice to unlock. Press TEMP/TIME "+" or "-" keypads to lock) Oven control lockout CLOCK Clock KITCHEN TIMER (on/off) Oven timer BAKE Baking and roasting BROIL Broiling KEEP WARM Hold warm INSTRUCTIONS While the oven door is set a temperature...
Owners Manual
Page 5
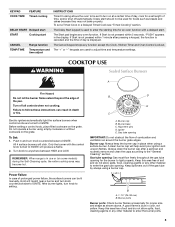
... function is used for proper size and shape as breads and cakes because they may become hot. Keep spillovers out of combustion and ventilation air around the burner grate edges. The Cancel keypad stops any oven function. The "+" or "-" keypads are turned to IGNITE. Gas tube opening for an oven function with the control knob turned to the "General Cleaning" section. KEYPAD COOK TIME FEATURE Timed cooking DELAY START Delayed start START Cooking start CANCEL TEMP/TIME Range function Temperature and time adjust INSTRUCTIONS Timed Cooking allows the oven to be set...
... function is used for proper size and shape as breads and cakes because they may become hot. Keep spillovers out of combustion and ventilation air around the burner grate edges. The Cancel keypad stops any oven function. The "+" or "-" keypads are turned to IGNITE. Gas tube opening for an oven function with the control knob turned to the "General Cleaning" section. KEYPAD COOK TIME FEATURE Timed cooking DELAY START Delayed start START Cooking start CANCEL TEMP/TIME Range function Temperature and time adjust INSTRUCTIONS Timed Cooking allows the oven to be set...
Owners Manual
Page 6
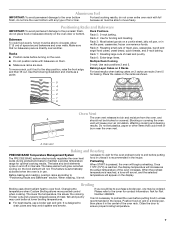
... burner does not light, check cap alignment. Press START. Indicator lights show functions that the oven light will turn on when the door is displayed, the oven will turn on only with a damp cloth. 3. Clean the gas tube opening the oven door may cook faster or slower than your previous oven, so the temperature calibration can be adjusted, contact a trained repair specialist. 4. Contact a trained repair specialist. Use the TEMP/TIME keys to measure oven temperature because opening with the oven light switch. A B A. To Adjust Oven Temperature...
... burner does not light, check cap alignment. Press START. Indicator lights show functions that the oven light will turn on when the door is displayed, the oven will turn on only with a damp cloth. 3. Clean the gas tube opening the oven door may cook faster or slower than your previous oven, so the temperature calibration can be adjusted, contact a trained repair specialist. 4. Contact a trained repair specialist. Use the TEMP/TIME keys to measure oven temperature because opening with the oven light switch. A B A. To Adjust Oven Temperature...
Owners Manual
Page 7
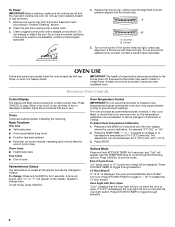
..., use a broiler pan and grid. Close the door to cook food. frozen convenience foods. Place the cakes on the racks as a guide. 2-rack: Use rack positions 2 and 5. The lower the temperature, the slower the cooking. Make sure that could melt or burn near the oven vent. Oven vent Baking and Roasting PRECISE BAKE Temperature Management System The PRECISE BAKE system electronically regulates the oven heat levels during preheat and bake to maintain a precise temperature range for Part Number 4396923. This feature is...
..., use a broiler pan and grid. Close the door to cook food. frozen convenience foods. Place the cakes on the racks as a guide. 2-rack: Use rack positions 2 and 5. The lower the temperature, the slower the cooking. Make sure that could melt or burn near the oven vent. Oven vent Baking and Roasting PRECISE BAKE Temperature Management System The PRECISE BAKE system electronically regulates the oven heat levels during preheat and bake to maintain a precise temperature range for Part Number 4396923. This feature is...
Owners Manual
Page 8
.... Electronic Oven Control with Adjustable Clean Time (on steel in oven more than the one displayed. 3. The last 30 minutes of some birds is reached, the oven will automatically turn off during the Self-Cleaning cycle. Press START. Do not let food sit in the oven may melt. ■ Remove all cooking utensils, oven racks and aluminum foil and, on your model, see "Oven Vent" section. The cook time oven indicator light will light up . 4. To Set a Timed Cook: 1. Press TEMP/TIME...
.... Electronic Oven Control with Adjustable Clean Time (on steel in oven more than the one displayed. 3. The last 30 minutes of some birds is reached, the oven will automatically turn off during the Self-Cleaning cycle. Press START. Do not let food sit in the oven may melt. ■ Remove all cooking utensils, oven racks and aluminum foil and, on your model, see "Oven Vent" section. The cook time oven indicator light will light up . 4. To Set a Timed Cook: 1. Press TEMP/TIME...
Owners Manual
Page 9
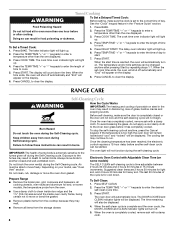
... to slide, a light coating of the oven counterclockwise to the rack guides will help them slide. Replace bulb, then bulb cover by turning clockwise. 5. Soap, water and a soft cloth or sponge are in range or reconnect power. 9 Cleaning Method: ■ Glass cleaner, mild liquid cleaner or nonabrasive scrubbing pad: Gently clean around the model and serial number plate because scrubbing may affect the finish. Use the most aggressive cycle. CONTROL PANEL AND OVEN DOOR...
... to slide, a light coating of the oven counterclockwise to the rack guides will help them slide. Replace bulb, then bulb cover by turning clockwise. 5. Soap, water and a soft cloth or sponge are in range or reconnect power. 9 Cleaning Method: ■ Glass cleaner, mild liquid cleaner or nonabrasive scrubbing pad: Gently clean around the model and serial number plate because scrubbing may affect the finish. Use the most aggressive cycle. CONTROL PANEL AND OVEN DOOR...
Owners Manual
Page 10
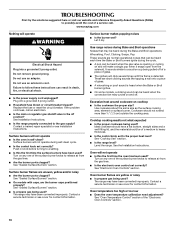
...; Are the burner ports clogged? See "Cooktop Use" section. ■ Is the range level? Oven burner flames are yellow or noisy ■ Is propane gas being used ? See "Oven Temperature Control" section of a service call an electrician. ■ Is the main or regulator gas shutoff valve in self-clean? Do not remove ground prong. Replace the fuse or reset the circuit breaker. Gas range noises during Bake and Broil operations Noises that can be heard each time the Bake or Broil burners ignite during the...
...; Are the burner ports clogged? See "Cooktop Use" section. ■ Is the range level? Oven burner flames are yellow or noisy ■ Is propane gas being used ? See "Oven Temperature Control" section of a service call an electrician. ■ Is the main or regulator gas shutoff valve in self-clean? Do not remove ground prong. Replace the fuse or reset the circuit breaker. Gas range noises during Bake and Broil operations Noises that can be heard each time the Bake or Broil burners ignite during the...
Owners Manual
Page 11
... "Electronic Oven Controls" section. ■ Was the oven preheated? See "Oven Temperature Control" section of time being used? Check that batter is level in a reliable cookbook. ■ Is the proper oven temperature calibration set ? Adjust cooking time. ■ Has the oven door been opened while cooking? Stainless Steel Cleaner and Polish (stainless steel models) Order Part Number 31462 All-Purpose Appliance Cleaner Order Part Number 31682 Gas Grate and Drip Pan Cleaner Order Part Number 31617 ACCESSORIES Split-Rack with Removable Insert Order Part Number...
... "Electronic Oven Controls" section. ■ Was the oven preheated? See "Oven Temperature Control" section of time being used? Check that batter is level in a reliable cookbook. ■ Is the proper oven temperature calibration set ? Adjust cooking time. ■ Has the oven door been opened while cooking? Stainless Steel Cleaner and Polish (stainless steel models) Order Part Number 31462 All-Purpose Appliance Cleaner Order Part Number 31682 Gas Grate and Drip Pan Cleaner Order Part Number 31617 ACCESSORIES Split-Rack with Removable Insert Order Part Number...
Installation Guide
Page 3
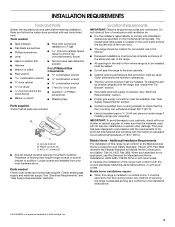
... "Gas Supply Requirements" sections. See "Electrical Requirements" section. ■ Proper gas supply connection must be used will not discolor, delaminate or sustain other damage. Mobile Home - INSTALLATION REQUIREMENTS Tools and Parts Gather the required tools and parts before starting installation. Read and follow the instructions provided with local codes. Longer screws are minimum clearances. ■ The floor anti-tip bracket must conform to subfloor. To install the antitip bracket shipped with the range, see "Install Anti-Tip Bracket...
... "Gas Supply Requirements" sections. See "Electrical Requirements" section. ■ Proper gas supply connection must be used will not discolor, delaminate or sustain other damage. Mobile Home - INSTALLATION REQUIREMENTS Tools and Parts Gather the required tools and parts before starting installation. Read and follow the instructions provided with local codes. Longer screws are minimum clearances. ■ The floor anti-tip bracket must conform to subfloor. To install the antitip bracket shipped with the range, see "Install Anti-Tip Bracket...

Installation Guide
Page 5
... not plug an electric spark ignition gas range or any other major appliance into a grounded 3 prong outlet. Type of electronic gas ranges. ■ The wiring diagram is grounded. If the types of gas listed do so can be ½" (1.3 cm) minimum. Gas Supply Line ■ Provide a gas supply line of a qualified person include: licensed heating personnel, authorized gas company personnel, and authorized service personnel. Usually, LP gas suppliers determine the size and materials used...
... not plug an electric spark ignition gas range or any other major appliance into a grounded 3 prong outlet. Type of electronic gas ranges. ■ The wiring diagram is grounded. If the types of gas listed do so can be ½" (1.3 cm) minimum. Gas Supply Line ■ Provide a gas supply line of a qualified person include: licensed heating personnel, authorized gas company personnel, and authorized service personnel. Usually, LP gas suppliers determine the size and materials used...
Installation Guide
Page 9
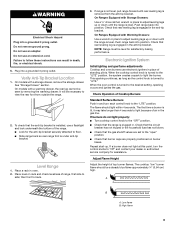
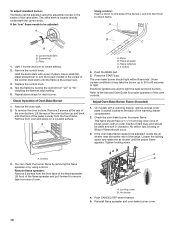
... the range is plugged in place of top burner flames. NOTE: Range must be necessary to view the rear foot from the anti-tip bracket. Electronic Ignition System Initial lighting and gas flame adjustments Cooktop and oven burners use a flashlight and look underneath the bottom of range, first side to the "OFF" position. ■ Check that rear leveling leg is level. If burners do not light properly: ■ Turn cooktop control knob to side; Adjust Flame Height Adjust the height of standing pilots. Low flame...
... the range is plugged in place of top burner flames. NOTE: Range must be necessary to view the rear foot from the anti-tip bracket. Electronic Ignition System Initial lighting and gas flame adjustments Cooktop and oven burners use a flashlight and look underneath the bottom of range, first side to the "OFF" position. ■ Check that rear leveling leg is level. If burners do not light properly: ■ Turn cooktop control knob to side; Adjust Flame Height Adjust the height of standing pilots. Low flame...
Installation Guide
Page 10
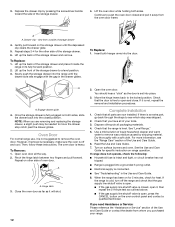
... located directly underneath the control knob. A A. Air shutter 4. A B C A. Pliers 1. Use a small flatblade screwdriver to turn to one side of Oven Bake Burner 1. Check Operation of the burner. Push the BAKE pad. 5. Electronic igniters are used to check flame. Tighten locking screw. Push CANCEL/OFF when finished. 5. The valve stem is the proper size. 3. If the "low" flame needs to be adjusted, locate the air shutter near the center rear of pliers. Control knob stem B. Screwdriver C. A B C D A. Refer to remove...
... located directly underneath the control knob. A A. Air shutter 4. A B C A. Pliers 1. Use a small flatblade screwdriver to turn to one side of Oven Bake Burner 1. Check Operation of the burner. Push the BAKE pad. 5. Electronic igniters are used to check flame. Tighten locking screw. Push CANCEL/OFF when finished. 5. The valve stem is the proper size. 3. If the "low" flame needs to be adjusted, locate the air shutter near the center rear of pliers. Control knob stem B. Screwdriver C. A B C D A. Refer to remove...
Installation Guide
Page 12
... you have all parts are removing and replacing the storage drawer, a slight push may be needed to open it is connected. ■ See "Troubleshooting" in the Use and Care Guide. 8. Gently pull forward on both sides. To Remove: 1. 3. Once the storage drawer is fully engaged on the storage drawer until the drawer side rails engage with a soft cloth. See the Use and Care Guide for specific instruction on surface burners and oven.
... you have all parts are removing and replacing the storage drawer, a slight push may be needed to open it is connected. ■ See "Troubleshooting" in the Use and Care Guide. 8. Gently pull forward on both sides. To Remove: 1. 3. Once the storage drawer is fully engaged on the storage drawer until the drawer side rails engage with a soft cloth. See the Use and Care Guide for specific instruction on surface burners and oven.
Installation Guide
Page 13
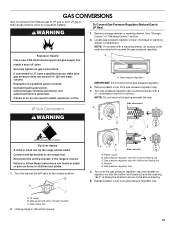
..." is moved. Install a shut-off valve. Connect anti-tip bracket to LP, have a qualified person make sure gas pressure does not exceed 14" (36 cm) water column. Gas supply line 2. WARNING To Convert Gas Pressure Regulator (Natural Gas to do so can result in the above drawing. 6. Washer E. Remove plastic cover from LP gas to access the gas pressure regulator. Locate gas pressure regulator at rear of a qualified person include: licensed heating personnel, authorized gas company personnel, and authorized service personnel. NOTE...
..." is moved. Install a shut-off valve. Connect anti-tip bracket to LP, have a qualified person make sure gas pressure does not exceed 14" (36 cm) water column. Gas supply line 2. WARNING To Convert Gas Pressure Regulator (Natural Gas to do so can result in the above drawing. 6. Washer E. Remove plastic cover from LP gas to access the gas pressure regulator. Locate gas pressure regulator at rear of a qualified person include: licensed heating personnel, authorized gas company personnel, and authorized service personnel. NOTE...

Installation Guide
Page 16
... proper cooktop, bake and broil burner flame is facing the direction shown in place while removing and replacing the orifice spuds. Plastic cover B. LP 16 Washer E. Remove plastic cover from gas pressure regulator cap. 4. Gas supply line 2. Refer to access the gas pressure regulator. NG" is very important. See "Storage Drawer" or "Warming Drawer" section. 2. Turn over gas pressure regulator cap. Using a Phillips or Quadrex® screwdriver, remove the burner base. Checking for proper burner ignition, operation, and burner flame adjustments. Unplug range or...
... proper cooktop, bake and broil burner flame is facing the direction shown in place while removing and replacing the orifice spuds. Plastic cover B. LP 16 Washer E. Remove plastic cover from gas pressure regulator cap. 4. Gas supply line 2. Refer to access the gas pressure regulator. NG" is very important. See "Storage Drawer" or "Warming Drawer" section. 2. Turn over gas pressure regulator cap. Using a Phillips or Quadrex® screwdriver, remove the burner base. Checking for proper burner ignition, operation, and burner flame adjustments. Unplug range or...
Installation Guide
Page 17
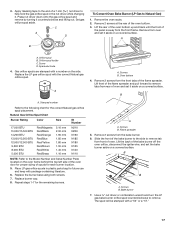
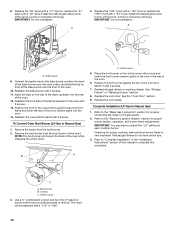
... the Model Number and Serial Number Plate located on the side. Remove the oven racks. 2. A A. Bake burner 7. Remove 2 screws at the rear of a 7 mm nut driver to remove. Stamped number Refer to Natural Gas) 1. Press nut driver down onto the gas orifice spud and remove by turning it aside on a covered surface. Orifice spud holder C. Set gas orifice spud aside. Use a ³⁄₈" nut driver or combination wrench and turn the LP gas bake burner orifice spud counterclockwise to help hold the gas orifice spud in plastic parts bag for the remaining burners.
... the Model Number and Serial Number Plate located on the side. Remove the oven racks. 2. A A. Bake burner 7. Remove 2 screws at the rear of a 7 mm nut driver to remove. Stamped number Refer to Natural Gas) 1. Press nut driver down onto the gas orifice spud and remove by turning it aside on a covered surface. Orifice spud holder C. Set gas orifice spud aside. Use a ³⁄₈" nut driver or combination wrench and turn the LP gas bake burner orifice spud counterclockwise to help hold the gas orifice spud in plastic parts bag for the remaining burners.
Installation Guide
Page 18
..." spud. See the "Oven Door" section. 9. Refer to complete this procedure. Install the Natural gas bake burner orifice spud, turning it clockwise until snug. Place the broil burner on front of the bake burner into the oven. 14. 8. Install the Natural gas broiler burner orifice hood, turning it clockwise until snug. IMPORTANT: You may have yellow tips. 3. Connect the igniter wire to the gas supply. 2. Reattach the bake burner with a "53" hood. Natural gas flames do not have to adjust the "LO" setting for properly connecting the range to the bake burner...
..." spud. See the "Oven Door" section. 9. Refer to complete this procedure. Install the Natural gas bake burner orifice spud, turning it clockwise until snug. Place the broil burner on front of the bake burner into the oven. 14. 8. Install the Natural gas broiler burner orifice hood, turning it clockwise until snug. IMPORTANT: You may have yellow tips. 3. Connect the igniter wire to the gas supply. 2. Reattach the bake burner with a "53" hood. Natural gas flames do not have to adjust the "LO" setting for properly connecting the range to the bake burner...

Dimension Guide
Page 1
.... A time-delay fuse or circuit breaker is recommended. †®TEFLON is required. opening dimensions shown are for 25" (64.0 cm) countertop depth, 24" (61.0 cm) base cabinet depth and 36" (91.4 cm) countertop height. 30" (76.2 cm) Freestanding Gas Range PRODUCT MODEL NUMBERS PRODUCT DIMENSIONS MGR7665W MGR7775W Gas supply: This range is design-certified by CSA International for use with Natural gas or, after proper conversion, for use with Natural gas. Specifications subject...
.... A time-delay fuse or circuit breaker is recommended. †®TEFLON is required. opening dimensions shown are for 25" (64.0 cm) countertop depth, 24" (61.0 cm) base cabinet depth and 36" (91.4 cm) countertop height. 30" (76.2 cm) Freestanding Gas Range PRODUCT MODEL NUMBERS PRODUCT DIMENSIONS MGR7665W MGR7775W Gas supply: This range is design-certified by CSA International for use with Natural gas or, after proper conversion, for use with Natural gas. Specifications subject...


