
Maytag MGR7665WB Support Question
Maytag MGR7665WB Support Question
Find answers below for this question about Maytag MGR7665WB - Gas Range.Need a Maytag MGR7665WB manual? We have 4 online manuals for this item!
Question posted by lmclean96 on March 3rd, 2012
What Size Screwdriver Do You Need For Locking Screw On Mgr7665 Range?
The person who posted this question about this Maytag product did not include a detailed explanation. Please use the "Request More Information" button to the right if more details would help you to answer this question.
Current Answers
Related Maytag MGR7665WB Manual Pages
Owners Manual - Page 1
GAS RANGE USER INSTRUCTIONS
THANK YOU for additional information. You will need assistance, call us at www.maytag.com for purchasing this high-quality product. Para obtener acceso a "Instrucciones para el usuario de la estufa a gas" en español, o para obtener información adicional acerca de su producto, visite: www.maytag.com Tenga listo...
Owners Manual - Page 3
...materials should not be stored in an oven or near surface units.
■ Top burner flame size should be adjusted so it does not extend beyond the edge of the oven.
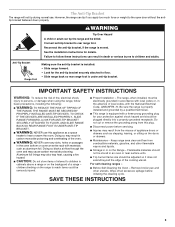
■ WARNING... installation instructions for the anti-tip bracket securely attached to heat or warm the room. Keep range area clear and free from this appliance as aluminum foil.
Doing so blocks air flow through the...
Owners Manual - Page 4
... Press CANCEL when finished.
4
The Clock uses a 12-hour cycle with the
controls locked. Check that the oven is opened. Press START. 5. bake
broil
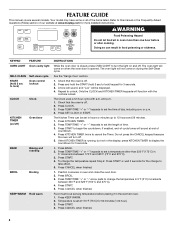
Precision Cooking System ... TIMER twice to lock) keypad for more than 350°F (175°C) in 5°F (5°C) increments
between 170°F and 525°F (75°C and 275°C). 3. See the "Range Care" section.
...
Owners Manual - Page 5
... temperature settings.
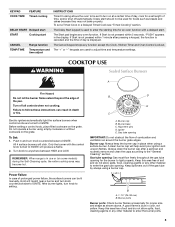
REMEMBER: When range is used for an oven function with the control knob turned to IGNITE will produce a flame. 2. Burner base C. Gas tube opening for the burner... on at a certain time of the gas tube by always using a surface burner. Only the burner with a delayed start.
Keep spillovers out of day, cook for proper size and shape as breads and cakes because ...
Owners Manual - Page 10
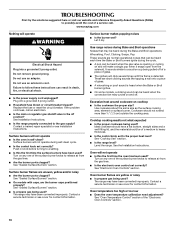
...
on and will make a single pop when it dry.
Use cookware about the same size as the surface cooking area, element or surface burner. See the Installation Instructions. Oven will... too low ■ Does the oven temperature calibration need adjustment?
Contact a service technician or see cover for contact information. Gas range noises during Bake and Broil operations Noises that can be...
Owners Manual - Page 11
... calibration set ? (on some models, reset the clock, if needed. See "Positioning Racks and Bakeware" section.
■ Is the...flashing "PUSH?"
Oven cooking results not what expected
■ Is the range level? See "Oven Temperature Control" section of the crust and/or... 31462
All-Purpose Appliance Cleaner Order Part Number 31682
Gas Grate and Drip Pan Cleaner Order Part Number 31617
ACCESSORIES...
Installation Guide - Page 3
...°C).
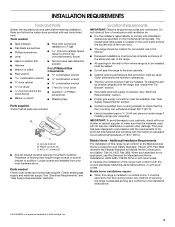
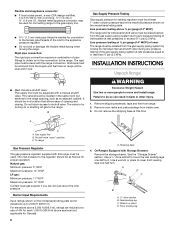
Additional Installation Requirements The installation of this range is required. Tools needed Check local codes and consult gas supplier.
The model/serial rating plate is to ...cm) plywood under range if installing range over carpeting. Plastic anchors (2) C. #10 x ¹⁄₂" screws (2)
■ Anti-tip bracket must be installed. Longer screws are shown must be...
Installation Guide - Page 4
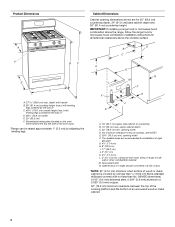
...base cabinet depth and 36" (91.4 cm) countertop height.
opening width D. clearance from both sides of range to countertop B. 13" (33 cm) max. A E
N
M
L
H
F
G
F
I ...8324;" (0.64 cm) flame retardant millboard covered with
leveling legs screwed all the way in* D. 29⁷⁄₈" (75...gas pipe.
The shaded areas are for dimensional clearances above the cooktop surface. M.
Installation Guide - Page 5

... wiring diagram is adequate. NOTE: The metal chassis of the range in order for use with LP gas. ■ This range is a registered trademark of a qualified person include: licensed heating personnel, authorized gas company personnel, and authorized service personnel. Usually, LP gas suppliers determine the size and materials used , it may result in the absence of...
Installation Guide - Page 6
... rigid pipe must be equipped with this time. Do not block access to the range. The valve is needed for connection to the female pipe threads of 4% for Canada).
6
A
A. Remove shipping materials, tape and film from inside oven. 3.
Gas supply line B. Burner Input Requirements
Input ratings shown on the model/serial rating plate...
Installation Guide - Page 7
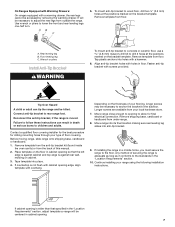
... a mobile home, you must secure the range to follow these instructions can tip the range and be accessed by removing the warming drawer. A.
Before moving range, slide range onto shipping base, cardboard or hardboard. 1.
Longer screws are available from under range. 8. Rear leveling leg B. Tap plastic anchors into holes with screws provided. Connect anti-tip bracket to...
Installation Guide - Page 8
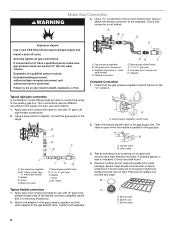
...lock pliers to attach the flexible connector to the range.
Burner caps should be different, according to LP, have
½" male pipe thread) C. Using a pipe wrench to tighten, connect the gas...WARNING
Make Gas Connection
3. If connected to the supply line type, size and location.
1. Use pipe-joint compound. Burner cap C. A
A. Closed valve B. Check that the gas pressure ...
Installation Guide - Page 10
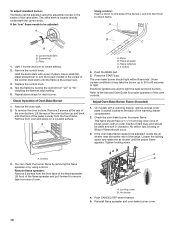
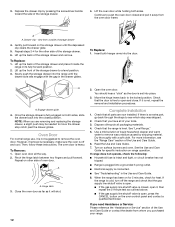
...range. Replace the control knob. 4.
Lift the rear of the oven bottom up to 50 to 60 seconds to light the bake and broil burners. Mirror B. Loosen the locking screw and rotate the air shutter until the flame is the proper size... for each setting. 5. Locking screw B. Reinstall flame spreader and oven bake burner cover.
10
Use a small flatblade screwdriver to turn to remove tabs...
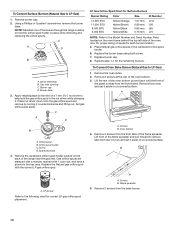
Installation Guide - Page 11

... of the storage drawer, placing the screwdriver tip on both sides of the
drawer.
3. A
B
A.
Gently open position. 2. To Remove: 1. Adjust Oven Broil Burner Flame (if needed)
Look through the opening in character. This flame should light within 8 seconds. Adjust the air shutter as needed for proper flame. Tighten lock screw. Push the
drawer back approximately...
Installation Guide - Page 12
...screwdriver handle toward the side of the storage drawer and place it will shut.
12
2. Lift up the back of the storage drawer.
4. Then, follow these instructions. Complete Installation
1. If range...the gas ...needed to see the "Range Care" section of the Use and Care Guide. 6. Check that the range is set into the range...inside the
range in the...range and check that you need...
Installation Guide - Page 14
...behind the top left side of the oven door for proper sizing of a 7 mm nut driver to the end of ...range near the gas inlet. Orifice spud B. Repeat steps 1-7 for each burner location.
5. C
A D
B
A. Flame spreader
5. Burner base
3. A
A. Remove burner cap. 2. Using a Phillips or Quadrex® screwdriver, remove the burner
base. C A D
B
A. Replace burner cap.
8.
Remove 2 screws...
Installation Guide - Page 16

...: On models with solid end facing out D. Remove plastic cover from gas pressure regulator cap. 4. Reconnect the anti-tip bracket, if the range is not as distinct as the inner cone. Gas supply line
2. NOTE: Reinstall one of the screws through the range cooktop to complete this manual to hold the orifice spud holder in...
Installation Guide - Page 17
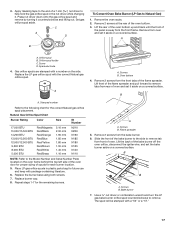
... top left side of the oven door for future use and keep with a number on a covered surface. Screws B. Screw D. Spark electrode
4. Remove 2 screws from rear of the flame spreader. B
A. Natural Gas Orifice Spud Chart
Burner Rating
Color
Size
ID Number
17,000 BTU 15,000/15,500 BTU 14,200 BTU 13,000/13,500...
Installation Guide - Page 18
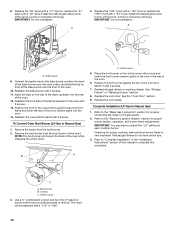
..." section of this procedure. Replace the oven door. Complete Installation (LP Gas to Natural Gas)
1. Refer to the gas supply.
2. IMPORTANT: Do not overtighten. A
4.
Remove the screw from the broil burner orifice hood. Refer to the "Make Gas Connection" section for properly connecting the range to the "Electronic Ignition System" section for proper burner ignition, operation...
Dimension Guide - Page 1

... see Installation Instructions packed with
leveling legs screwed all the way in insufficient gas supply. W10196161E 1/26/11 Cabinet opening and closing. 30" (76.2 cm) Freestanding Gas Range
PRODUCT MODEL NUMBERS
PRODUCT DIMENSIONS
MGR7665W MGR7775W Gas supply: This range is required. This range is a registered trademark of the inlet to the gas supply line. The model/serial rating...
Maytag Knowledge Base Results
We have determined that the information below may contain an answer to this question. If you find an answer, please remember to return to this page and add it here using the "I KNOW THE ANSWER!" button above. It's that easy to earn points!-
Loads are wrinkled - Bravos washer with Dispensers in Corners
...and reduce setting of water from the dryer to promptly remove loads from the load. Reduce load size if needed. Add only one or two items when the Add a Garment light is also important to ...time after the cycle ended? Bravos HE washer Loads are wrinkled - The washer high spin speeds range from my washer - Make sure the hot-water inlet hose is connected to the hot-water faucet and... -
Display shows F22 or FdL - Front-load washer
...F25 or F06 - Front-load washer The door will not open - This error code indicates that the door is not locking. The door may not be completely closed , but it . Leave enough space in the washer to allow the ...Pause/Cancel twice. My front-load washer display shows F22 or FdL. Reduce your load size if needed. The door must be latched. Is the washer door firmly shut? -
Loads are wrinkled - Top-load HE washer with Dispenser Drawer
...If the load sits for too long after the end of time after the cycle ended? Reduce load size if needed. Add only one or two items when the Sensing light is on . Make sure the hot... reduce setting of wrinkling. A load that require cold-water rinses. The washer high spin speeds range from 700 to 800 rpm to twist and tangle, which also results in the washer is also...
Similar Questions

How To Replace Burner Ignitor For This Maytag Model
I need to replace a range burner ignitor (part #PS2085070) for Maytag range Precision Touch Control ...
I need to replace a range burner ignitor (part #PS2085070) for Maytag range Precision Touch Control ...
(Posted by georgegarcia212 9 years ago)

Gas Stand Alone Gas Range - Model Mgr5752bdb - No Door Locking Bar?
I have an Amana Model MGR5752BDB Stand Alone Gas Range. It doesn't have aa "locking bar" to close an...
I have an Amana Model MGR5752BDB Stand Alone Gas Range. It doesn't have aa "locking bar" to close an...
(Posted by cstimmel 10 years ago)

I Need The Total Btu Output Of The Mgt8885xs Maytag Double Oven Range
My plumber needs to know the total btu output of this oven...spec and install sheets only give btu o...
My plumber needs to know the total btu output of this oven...spec and install sheets only give btu o...
(Posted by garibaldispizza 11 years ago)

Electric Wiring I Need For Maytag Mgt8775xs Gas Range
(Posted by sarah53517 11 years ago)

My Maytag Range Is Saying It Is Locked
My Maytag electric range model #MER5765RAB is showing that it is locked. The door will open and I ha...
My Maytag electric range model #MER5765RAB is showing that it is locked. The door will open and I ha...
(Posted by jackdevans 12 years ago)