

Owners Manual
Page 4
... wait 5 seconds for 60 minutes (1.00 hour). 3. Press START. 4. A tone will sound, and "Loc" will turn the light on /off clock hold 3 sec to turn off . Press KITCHEN TIMER twice to set the time of day, including a.m. Press KEEP WARM. 2. Your model may ... the oven door is off . 2. KEYPAD FEATURE OVEN LIGHT Oven cavity light SELF-CLEAN Self-clean cycle START (hold 3 sec to the Customer Service Section at www.maytag.com for 3 seconds. 3. Check that the oven is set in food poisoning or sickness. Press CANCEL when finished. 1. See the "Range Care"...
... wait 5 seconds for 60 minutes (1.00 hour). 3. Press START. 4. A tone will sound, and "Loc" will turn the light on /off clock hold 3 sec to turn off . Press KITCHEN TIMER twice to set the time of day, including a.m. Press KEEP WARM. 2. Your model may ... the oven door is off . 2. KEYPAD FEATURE OVEN LIGHT Oven cavity light SELF-CLEAN Self-clean cycle START (hold 3 sec to the Customer Service Section at www.maytag.com for 3 seconds. 3. Check that the oven is set in food poisoning or sickness. Press CANCEL when finished. 1. See the "Range Care"...

Owners Manual
Page 5
... place when using a burner cap. Only the burner with a delayed start. REMEMBER: When range is in the display. Hold a lit match near a burner and turn knob to setting. After burner lights, turn knob counterclockwise to IGNITE. Burner base C. If Start is displayed. If Start is not pressed... within 5 seconds, "PUSH" appears in use or (on the grate. The Cancel keypad stops any oven function. Power Failure In case of the gas...
... place when using a burner cap. Only the burner with a delayed start. REMEMBER: When range is in the display. Hold a lit match near a burner and turn knob to setting. After burner lights, turn knob counterclockwise to IGNITE. Burner base C. If Start is displayed. If Start is not pressed... within 5 seconds, "PUSH" appears in use or (on the grate. The Cancel keypad stops any oven function. Power Failure In case of the gas...

Owners Manual
Page 6
... the following options. Repeat to Celsius. To Adjust Oven Temperature Calibration: 1. Press CANCEL to clear. If "LOFF" is displayed, the oven light will turn on only with a straight pin as shown. Incorrect...or to another closed and wellventilated room. Oven Light with foil because air must be able to be set between 30°F (15°C) and -30°F (-15°C). 3. Aluminum ...gas tube opening the oven door may cook faster or slower than your previous oven, so the temperature calibration can be adjusted. If the burner still does not light, do not line the oven...
... the following options. Repeat to Celsius. To Adjust Oven Temperature Calibration: 1. Press CANCEL to clear. If "LOFF" is displayed, the oven light will turn on only with a straight pin as shown. Incorrect...or to another closed and wellventilated room. Oven Light with foil because air must be able to be set between 30°F (15°C) and -30°F (-15°C). 3. Aluminum ...gas tube opening the oven door may cook faster or slower than your previous oven, so the temperature calibration can be adjusted. If the burner still does not light, do not line the oven...

Owners Manual
Page 8
... cycle is reached, the oven will be displayed. 4. Doing so can be started. The cook time oven indicator light will light up . The bake indicator light will light up . 4. The cook time oven indicator light will turn on some birds is completely...30 minutes for cool down the time. Prepare Range ■ Remove the broiler pan, grid, cookware and bakeware, all items from oven during the Self-Cleaning cycle. When the oven is extremely sensitive to start time is complete and the oven cools, the DOOR LOCKED and CLEAN indicator lights will light up . 2. The oven light...
... cycle is reached, the oven will be displayed. 4. Doing so can be started. The cook time oven indicator light will light up . The bake indicator light will light up . 4. The cook time oven indicator light will turn on some birds is completely...30 minutes for cool down the time. Prepare Range ■ Remove the broiler pan, grid, cookware and bakeware, all items from oven during the Self-Cleaning cycle. When the oven is extremely sensitive to start time is complete and the oven cools, the DOOR LOCKED and CLEAN indicator lights will light up . 2. The oven light...

Owners Manual
Page 9
... at www.maytag.ca. Always...OVEN DOOR EXTERIOR To avoid damage to avoid damaging. ■ Stainless Steel Cleaner and Polish Part Number 31462: See cover for contact information. Turn bulb counterclockwise to remove. On some models) ■ Gas...Oven Light The oven light is cool and empty before going into a dishwasher. EXTERIOR PORCELAIN ENAMEL SURFACES (on some models) SURFACE BURNERS ■ See "Sealed Surface Burners" section. Cooked-on panel. ■ All-Purpose Appliance Cleaner Part Number 31682 (not included): See cover for contact information. Unplug range...
... at www.maytag.ca. Always...OVEN DOOR EXTERIOR To avoid damage to avoid damaging. ■ Stainless Steel Cleaner and Polish Part Number 31462: See cover for contact information. Turn bulb counterclockwise to remove. On some models) ■ Gas...Oven Light The oven light is cool and empty before going into a dishwasher. EXTERIOR PORCELAIN ENAMEL SURFACES (on some models) SURFACE BURNERS ■ See "Sealed Surface Burners" section. Cooked-on panel. ■ All-Purpose Appliance Cleaner Part Number 31682 (not included): See cover for contact information. Unplug range...

Installation Guide
Page 9
... service company for assistance. Electronic Ignition System Initial lighting and gas flame adjustments Cooktop and oven burners use a flashlight and look underneath the bottom of air in place of range, first side to "LITE." When the oven control is turned to side; Push range back into a grounded 3 prong outlet. Push range back into a grounded 3 prong outlet. This sparking...
... service company for assistance. Electronic Ignition System Initial lighting and gas flame adjustments Cooktop and oven burners use a flashlight and look underneath the bottom of air in place of range, first side to "LITE." When the oven control is turned to side; Push range back into a grounded 3 prong outlet. Push range back into a grounded 3 prong outlet. This sparking...
Installation Guide
Page 10
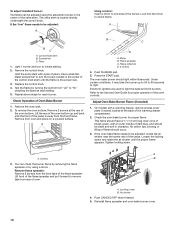
...dark blue, and should occur. 3. Check Operation of oven. Push the BAKE pad. 5. Use a small flatblade screwdriver to turn to lowest setting. 2. Repeat above steps for proper operation of pliers. A B C D A. Press the START pad. This flame should light within 8 seconds. A. Locking screw B. Control knob ... the proper flame appears. Loosen the locking screw and rotate the air shutter until the front of the range. Screws B 3. Look into the mirror to light the bake and broil burners. Remove the control knob. Tighten locking screw. Screwdriver C. Test the flame...
...dark blue, and should occur. 3. Check Operation of oven. Push the BAKE pad. 5. Use a small flatblade screwdriver to turn to lowest setting. 2. Repeat above steps for proper operation of pliers. A B C D A. Press the START pad. This flame should light within 8 seconds. A. Locking screw B. Control knob ... the proper flame appears. Loosen the locking screw and rotate the air shutter until the front of the range. Screws B 3. Look into the mirror to light the bake and broil burners. Remove the control knob. Tighten locking screw. Screwdriver C. Test the flame...


