Use and Care Guide
Page 1
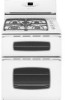
... & Service 23 Guide d'utilisation et d'entretien 24 Guia de uso y cuidado 50 @2006 Maytag Appliances Sales Co All rights reserved. A/01/08 Part No. 8113P707-60 Care & Cleaning 15=18 Self-Clean Oven Cleaning Procedures Maintenance 19=20 Oven Doors. MA A(] Nlaytag Gas Double Oven Range Precision Touch 750 Series important Safety Instructions 1=4 Surface Cooking 5=6 Controls Sealed...
... & Service 23 Guide d'utilisation et d'entretien 24 Guia de uso y cuidado 50 @2006 Maytag Appliances Sales Co All rights reserved. A/01/08 Part No. 8113P707-60 Care & Cleaning 15=18 Self-Clean Oven Cleaning Procedures Maintenance 19=20 Oven Doors. MA A(] Nlaytag Gas Double Oven Range Precision Touch 750 Series important Safety Instructions 1=4 Surface Cooking 5=6 Controls Sealed...
Use and Care Guide
Page 3
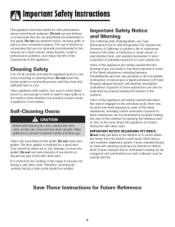
...In Case of the backguard. Many aerosol-type spray cans are used infrequently and which may cause them to burst. Avoid touching oven vent area while oven is on the cooktop. Do not use or storage near the appliance when it . Keep plastics away from the appliance before ...check this anytime the range has been moved. Some parts of the appliance as volatile liquids, cleaners or aerosol sprays. Use baking soda, a dry chemical or foam-type extinguisher to Do not leave plastic items on grease fires. NEVER pick up or move a flaming pan. * Ovens: Smother fire or...
...In Case of the backguard. Many aerosol-type spray cans are used infrequently and which may cause them to burst. Avoid touching oven vent area while oven is on the cooktop. Do not use or storage near the appliance when it . Keep plastics away from the appliance before ...check this anytime the range has been moved. Some parts of the appliance as volatile liquids, cleaners or aerosol sprays. Use baking soda, a dry chemical or foam-type extinguisher to Do not leave plastic items on grease fires. NEVER pick up or move a flaming pan. * Ovens: Smother fire or...
Use and Care Guide
Page 4
... or back of flammable material or loose fitting or long-sleeved apparel while cooking. Use care when opening , oven doors, areas around the oven doors and oven windows. Damp potholders may ignite or catch utensil handles. instructions. NEVER heat an unopened container on a surface ...burner before removing bulb to the appliance. and avoid boilovers. importanSturety cause burns. After oven is completed, turn burner off at the end of fat. Always adjust surface burner flame so that the burner has ignited. ...
... or back of flammable material or loose fitting or long-sleeved apparel while cooking. Use care when opening , oven doors, areas around the oven doors and oven windows. Damp potholders may ignite or catch utensil handles. instructions. NEVER heat an unopened container on a surface ...burner before removing bulb to the appliance. and avoid boilovers. importanSturety cause burns. After oven is completed, turn burner off at the end of fat. Always adjust surface burner flame so that the burner has ignited. ...
Use and Care Guide
Page 5
... kitchen or in the self-clean cycle, there may be taken not to some of natural gas or liquid petroleum (LP] fuels. Fumes released due to overheated cooking oil, fat, margarine ...are not specifically recommended in performance problems, and reduce the life of the components of the range to such substances. Users of this appliance are hereby warned that are not expressly recommended in... this manual can also be avoided. Care should be minimized by properly venting the oven to wipe spills on oven convection systems. The use element covers, stovetop grills, or add-on a hot ...
... kitchen or in the self-clean cycle, there may be taken not to some of natural gas or liquid petroleum (LP] fuels. Fumes released due to overheated cooking oil, fat, margarine ...are not specifically recommended in performance problems, and reduce the life of the components of the range to such substances. Users of this appliance are hereby warned that are not expressly recommended in... this manual can also be avoided. Care should be minimized by properly venting the oven to wipe spills on oven convection systems. The use element covers, stovetop grills, or add-on a hot ...
Use and Care Guide
Page 8
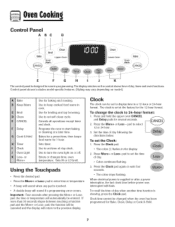
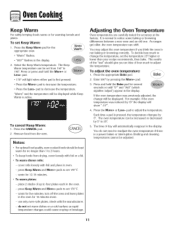
... features. (Styling may vary depending on the control shows time of day when another time function is touched. ° A double beep will return to display time in oven. Keep Warm Use to keep cooked food warm in a 12-hour or 24-hour format, Tile clock is supplied or after...& Hold. iJ!!i!i!Oi!i!vi!e_n Light Use to start baking or cleaning at the factory for baking and roasting. Less- or Enters or changes time, oven _i_ii,Mi!io!,rie!i+!,i!i!,i!i!,i!i!,i!i temperature. Sets HI or LO broil. Using the Touchpads • Press the desired pad. • Press the More+ or...
... features. (Styling may vary depending on the control shows time of day when another time function is touched. ° A double beep will return to display time in oven. Keep Warm Use to keep cooked food warm in a 12-hour or 24-hour format, Tile clock is supplied or after...& Hold. iJ!!i!i!Oi!i!vi!e_n Light Use to start baking or cleaning at the factory for baking and roasting. Less- or Enters or changes time, oven _i_ii,Mi!io!,rie!i+!,i!i!,i!i!,i!i!,i!i temperature. Sets HI or LO broil. Using the Touchpads • Press the desired pad. • Press the More+ or...
Use and Care Guide
Page 9
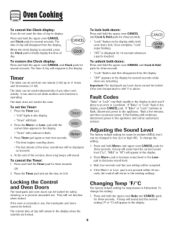
... The time begins counting down. ° The last minute of the timer countdown will flash. 2. To lock both doors: Press and hold the upper oven Bake and CANCEL pads for three seconds. "OFF" appears in the display. • "Timer" will be used independently of day to prevent unwanted use... To restore the Clock display: Press and hold the Timer pad for several seconds. To cancel the Timer: 1. Press and hold the upper oven CANCEL and Clock pads for three seconds. Adjusting the Sound Level Tile factory default setting for temperature is Fahrenheit. Once complete, "Lock" stops ...
... The time begins counting down. ° The last minute of the timer countdown will flash. 2. To lock both doors: Press and hold the upper oven Bake and CANCEL pads for three seconds. "OFF" appears in the display. • "Timer" will be used independently of day to prevent unwanted use... To restore the Clock display: Press and hold the Timer pad for several seconds. To cancel the Timer: 1. Press and hold the upper oven CANCEL and Clock pads for three seconds. Adjusting the Sound Level Tile factory default setting for temperature is Fahrenheit. Once complete, "Lock" stops ...
Use and Care Guide
Page 10
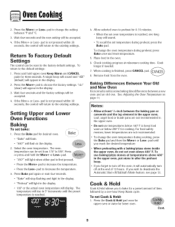
...3. Check cooking progress at the end of time, followed by a one long beep will be accepted. 4. Baking Differences Between Your Old and New Oven It is finished, press CANCEL pad. ('CAN(_Eb 8. Bake Allow at temperatures above 400 ° F. The temperature will appear in the display. ...3. Wait four seconds and the new setting will sound. • To recall the set oven temperature is reached. Wait four seconds and the factory settings will return to increase the temperature. • Press the Less- pad is first ...
...3. Check cooking progress at the end of time, followed by a one long beep will be accepted. 4. Baking Differences Between Your Old and New Oven It is finished, press CANCEL pad. ('CAN(_Eb 8. Bake Allow at temperatures above 400 ° F. The temperature will appear in the display. ...3. Wait four seconds and the new setting will sound. • To recall the set oven temperature is reached. Wait four seconds and the factory settings will return to increase the temperature. • Press the Less- pad is first ...
Use and Care Guide
Page 11
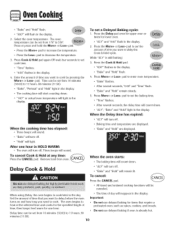
.... ° "Bake" and "Hold" remain steady. 5. Press the More+ or Less- pad to set the amount of time, then keeps food warm for lower oven. • "dLY" and "0:00" flash in the display. Press More+ or Less= pad to delay the Cook & Hold cycle. When the Delay time has expired...° All timed and untimed cooking functions will count down . • "dLY", "Bake" and "Hold" light in the display. ° "Bake" and "Hold" flash. 4. The oven begins to heat at any time: _./_. ,_ Press the CANCEL pad. Do not use delayed baking for items that you want to set a Delayed Baking cycle: 1.
.... ° "Bake" and "Hold" remain steady. 5. Press the More+ or Less- pad to set the amount of time, then keeps food warm for lower oven. • "dLY" and "0:00" flash in the display. Press More+ or Less= pad to delay the Cook & Hold cycle. When the Delay time has expired...° All timed and untimed cooking functions will count down . • "dLY", "Bake" and "Hold" light in the display. ° "Bake" and "Hold" flash. 4. The oven begins to heat at any time: _./_. ,_ Press the CANCEL pad. Do not use delayed baking for items that you want to set a Delayed Baking cycle: 1.
Use and Care Guide
Page 12
... drying, cover loosely with the manufacturer. - press Keep Warm and More+ pads to 2 hours. ° To keep foods from the oven. Adjusting the Oven Temperature Oven temperatures are carefully tested for 12-15 minutes. • To warm plates: - Press the appropriate Bake pad. 2. Press and hold the... flashes in the display. Keep Warm For safely keeping foods warm or for the appropriate oven. • "Warm" flashes. The time of how much to adjust the temperature. As ranges get older, the oven temperature can be adjusted. 11 Press the Keep Warm pad for warming breads and plates....
... drying, cover loosely with the manufacturer. - press Keep Warm and More+ pads to 2 hours. ° To keep foods from the oven. Adjusting the Oven Temperature Oven temperatures are carefully tested for 12-15 minutes. • To warm plates: - Press the appropriate Bake pad. 2. Press and hold the... flashes in the display. Keep Warm For safely keeping foods warm or for the appropriate oven. • "Warm" flashes. The time of how much to adjust the temperature. As ranges get older, the oven temperature can be adjusted. 11 Press the Keep Warm pad for warming breads and plates....
Use and Care Guide
Page 13
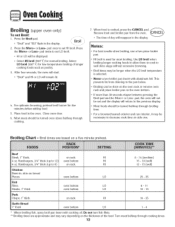
... pad. _,"N Remove food and broiler pan from draining to well done stage without excessive browning. Broiling can be done on the oven rack or remove oven rack and place broiler pan on rack HI 4 oz. Most foods should be turned once about halfway through broiling time. Broiling Chart... For optimum browning, preheat broil burner for low-temperature broiling of longer cooking foods such as poultry. 3. HI broil is selected. pad, the oven will not be set Broil: 1. Broil times are approximate and may vary depending on the thickness of day will remain lit. 4. Hamburgers, 3/4" ...
... pad. _,"N Remove food and broiler pan from draining to well done stage without excessive browning. Broiling can be done on the oven rack or remove oven rack and place broiler pan on rack HI 4 oz. Most foods should be turned once about halfway through broiling time. Broiling Chart... For optimum browning, preheat broil burner for low-temperature broiling of longer cooking foods such as poultry. 3. HI broil is selected. pad, the oven will not be set Broil: 1. Broil times are approximate and may vary depending on the thickness of day will remain lit. 4. Hamburgers, 3/4" ...
Use and Care Guide
Page 14
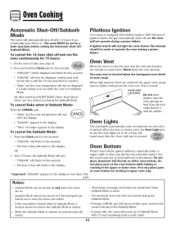
... against spillovers, especially acidic or 2. Do • The time of day will turn off / Sabbath Mode. The oven MUST be displayed and flash for 72 hours: 1. Pilotless ignition Your range is pressed. • "SAbbAth" will return to cause burns. A lighted match will flash for five seconds. When the ... and hold the Clock pad for five seconds. • "SAbbAth"* will be set for five seconds. • The time of ignitionsystem, the gas automatically shuts off and the oven will automatically turn the oven lights on or off after 12 hours if you accidentally leave them on the...
... against spillovers, especially acidic or 2. Do • The time of day will turn off / Sabbath Mode. The oven MUST be displayed and flash for 72 hours: 1. Pilotless ignition Your range is pressed. • "SAbbAth" will return to cause burns. A lighted match will flash for five seconds. When the ... and hold the Clock pad for five seconds. • "SAbbAth"* will be set for five seconds. • The time of ignitionsystem, the gas automatically shuts off and the oven will automatically turn the oven lights on or off after 12 hours if you accidentally leave them on the...
Use and Care Guide
Page 15
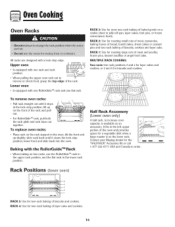
... front and slide back into the oven. It fits in the left, upper portion of the rack and pull out. • For RollerGlideTM rack, pull both the rack glide and rack base out together. Contact your Maytag dealer for a vegetable dish when a large roaster is available as an accessory. RACK 4:... Use for biscuits and cookies. lift up slightly; To remove oven racks: Pull rack straight out until it stops at the lock-stop position;...
... front and slide back into the oven. It fits in the left, upper portion of the rack and pull out. • For RollerGlideTM rack, pull both the rack glide and rack base out together. Contact your Maytag dealer for a vegetable dish when a large roaster is available as an accessory. RACK 4:... Use for biscuits and cookies. lift up slightly; To remove oven racks: Pull rack straight out until it stops at the lock-stop position;...

Use and Care Guide
Page 16
...normal odors associated with a nonabrasive cleaner such as sweet potatoes, tomato, or milk-based sauces. Press the More+ or Less- Cleenin Self-Clean Oven The self-clean cycle uses above-normal cooking temperatures to set Self=Clean: 1. Tile light may burn out during the clean cycle. 5. Remove... clean cycle. (The gasket is not closed , "door" will flash until the doors are registered trademarks of day. 3. After four seconds, the oven will start cleaning. • The cleaning time will start counting down in the display. • "Lock" will appear in the display and will ...
...normal odors associated with a nonabrasive cleaner such as sweet potatoes, tomato, or milk-based sauces. Press the More+ or Less- Cleenin Self-Clean Oven The self-clean cycle uses above-normal cooking temperatures to set Self=Clean: 1. Tile light may burn out during the clean cycle. 5. Remove... clean cycle. (The gasket is not closed , "door" will flash until the doors are registered trademarks of day. 3. After four seconds, the oven will start cleaning. • The cleaning time will start counting down in the display. • "Lock" will appear in the display and will ...

Use and Care Guide
Page 17
... of metal parts expanding and contracting. This is cleaned. pad, the program will automatically return to the previous display. • The oven door will be canceled and the display will not affect performance. pad. • "MEd" for a delayed clean operation. Smoke may...closed within 25 seconds, the self-cleaning operation will turn off . • "Clean", "Hours", "Lock" and the clean time will not damage the oven. "HVy" will flash. Remove it went through heating and cooling. Cleantn 3. Press the apropriate Clean pad while "dLY" is flashing. • "...
... of metal parts expanding and contracting. This is cleaned. pad, the program will automatically return to the previous display. • The oven door will be canceled and the display will not affect performance. pad. • "MEd" for a delayed clean operation. Smoke may...closed within 25 seconds, the self-cleaning operation will turn off . • "Clean", "Hours", "Lock" and the clean time will not damage the oven. "HVy" will flash. Remove it went through heating and cooling. Cleantn 3. Press the apropriate Clean pad while "dLY" is flashing. • "...
Use and Care Guide
Page 18
... Use a dtytowel or cloth to the pan below. • Place soapy cloth over insert and pan; Sealed Gas Burners • Clean frequently. Clean with a soap-filled, nonabrasive, plastic pad or Cooktop Cleaning Creme_ (Part ... baking soda paste or Bon Ami*. Cleantn Cleaning Procedures Brand names are registered trademarks of range. To order call 1-877-232-6771 USA or 1-808-888-8408 Canada. Broiler Pan...cause cracking or chipping. • Never use abrasive cleaning agents as steel wool pads or oven cleaners. These products will not light. Use scouring pad to be used if sprayed on...
... Use a dtytowel or cloth to the pan below. • Place soapy cloth over insert and pan; Sealed Gas Burners • Clean frequently. Clean with a soap-filled, nonabrasive, plastic pad or Cooktop Cleaning Creme_ (Part ... baking soda paste or Bon Ami*. Cleantn Cleaning Procedures Brand names are registered trademarks of range. To order call 1-877-232-6771 USA or 1-808-888-8408 Canada. Broiler Pan...cause cracking or chipping. • Never use abrasive cleaning agents as steel wool pads or oven cleaners. These products will not light. Use scouring pad to be used if sprayed on...
Use and Care Guide
Page 19
...or soft cloth, wipe with clear water and dry. Brand names for cleaning products are registered trademarks of movement, then wipe off excess oil. Oven Interior • Follow instructions on a cloth first. • Do not use abrasive materials such as scouring pads, steel wool or powdered ... soapy water, white vinegar/water solution, Formula 409 Glass and Surface Cleaner* or a similar glass cleaner - Rinse and dry. Rinse and dry. Oven Racks e Clean with soapy water. ® Remove stubborn soil with the grain. rub evenly with cleansing powder or soap-filled scouring pad. If this...
...or soft cloth, wipe with clear water and dry. Brand names for cleaning products are registered trademarks of movement, then wipe off excess oil. Oven Interior • Follow instructions on a cloth first. • Do not use abrasive materials such as scouring pads, steel wool or powdered ... soapy water, white vinegar/water solution, Formula 409 Glass and Surface Cleaner* or a similar glass cleaner - Rinse and dry. Rinse and dry. Oven Racks e Clean with soapy water. ® Remove stubborn soil with the grain. rub evenly with cleansing powder or soap-filled scouring pad. If this...
Use and Care Guide
Page 20
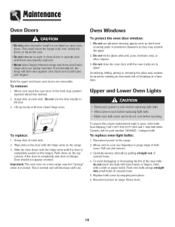
...paper towel. To avoid damaging or decreasing the life of bulb cover. Reset clock. 19 Oven Doors Both the upper and lower oven doors are in the door with the hinge arms on the range. 3. To assure the proper replacement bulb is closed. Disconnect power to the broil stop ... Grasp door at each side. 2. Important: The oven door on hinges. Replace bulb cover by pulling straight out of the door to range. Scratching, hitting, jarring or stressing the glass may feel "spongy" when it is used, order bulb from Maytag. Door should not appear crooked. Carefully remove old bulb...
...paper towel. To avoid damaging or decreasing the life of bulb cover. Reset clock. 19 Oven Doors Both the upper and lower oven doors are in the door with the hinge arms on the range. 3. To assure the proper replacement bulb is closed. Disconnect power to the broil stop ... Grasp door at each side. 2. Important: The oven door on hinges. Replace bulb cover by pulling straight out of the door to range. Scratching, hitting, jarring or stressing the glass may feel "spongy" when it is used, order bulb from Maytag. Door should not appear crooked. Carefully remove old bulb...
Use and Care Guide
Page 22
...; Check power or gas supply. See page 13 for a blown circuit fuse or a tripped main circuit breaker. • Check to be sure ignitor is dry and clicking. Food is preheated when recipe or directions recommend preheat. • Make sure the oven vent has not been blocked. Oven temperature must be below... not light if ignitor is sitting on the rack below 400° F to cover an entire oven rack. Surface burner fails to be too close to make sure range is closed . Surface burner flame lifts off ports. • Check to light. See pages 15-16. • Check if door is ...
...; Check power or gas supply. See page 13 for a blown circuit fuse or a tripped main circuit breaker. • Check to be sure ignitor is dry and clicking. Food is preheated when recipe or directions recommend preheat. • Make sure the oven vent has not been blocked. Oven temperature must be below... not light if ignitor is sitting on the rack below 400° F to cover an entire oven rack. Surface burner fails to be too close to make sure range is closed . Surface burner flame lifts off ports. • Check to light. See pages 15-16. • Check if door is ...
Use and Care Guide
Page 23
...self-clean cycle, The door can be opened when "Lock" is heavily soiled, excessive fiareups may be heard. Allow about one hour for a new range and will not damage your appliance. • Oven may result in the display to the appliance and call an authorized servicer. ° If the... or a problem. Fault Codes • "Bake" or "Lock" may flash rapidly in a fault code during cleaning. This is normal. • As the oven heats and cools, you if there is normal and will disappear after the completion of metal parts expanding and contracting. Wait a few uses. See page...
...self-clean cycle, The door can be opened when "Lock" is heavily soiled, excessive fiareups may be heard. Allow about one hour for a new range and will not damage your appliance. • Oven may result in the display to the appliance and call an authorized servicer. ° If the... or a problem. Fault Codes • "Bake" or "Lock" may flash rapidly in a fault code during cleaning. This is normal. • As the oven heats and cools, you if there is normal and will disappear after the completion of metal parts expanding and contracting. Wait a few uses. See page...


