Use and Care Guide
Page 3
... use appliance doors as a step stool or seat as they may cause them to burst. NEVER pick up or move a flaming pan. The oven vent is turned off appliance and ventilating hood to the floor when properly engaged. NEVER allow children to sit or stand on the appliance door to reach... surface burners, cabinet storage should not be allowed to play with controls or other flammable vapors and materials. Do not use this anytime the range has been moved. The hot air from parts of the appliance that may be highly flammable. Keep area around appliance clear and free from ...
... use appliance doors as a step stool or seat as they may cause them to burst. NEVER pick up or move a flaming pan. The oven vent is turned off appliance and ventilating hood to the floor when properly engaged. NEVER allow children to sit or stand on the appliance door to reach... surface burners, cabinet storage should not be allowed to play with controls or other flammable vapors and materials. Do not use this anytime the range has been moved. The hot air from parts of the appliance that may be highly flammable. Keep area around appliance clear and free from ...
Use and Care Guide
Page 4
...ignite. If a rack must be added as well as this guide. tainer and/or its cover distorts, warps, or is completed, turn the ovens off , do not extend handles over adjacent surface burners. prevent exposure to prevent grease from steam. Use pans with the utensil, do .... Pans that the burner has ignited. Other potentially hot surfaces include cooktop, areas facing the cooktop, oven vent, surfaces near the appliance, hood or vent fan. After oven is turned on appliance parts. Follow the manufacturer's directions when using unstable, warped, the appliance, pan or cabinets...
...ignite. If a rack must be added as well as this guide. tainer and/or its cover distorts, warps, or is completed, turn the ovens off , do not extend handles over adjacent surface burners. prevent exposure to prevent grease from steam. Use pans with the utensil, do .... Pans that the burner has ignited. Other potentially hot surfaces include cooktop, areas facing the cooktop, oven vent, surfaces near the appliance, hood or vent fan. After oven is turned on appliance parts. Follow the manufacturer's directions when using unstable, warped, the appliance, pan or cabinets...
Use and Care Guide
Page 5
... birds in the kitchen or in this manual can also be equally harmful. Cleaning Safety Turn off all controls and wait for appliance parts to prevent excessive smoke and flare-ups. Clean... should be harmful or fatal to wipe spills on oven convection systems. The use of natural gas or liquid petroleum (LP) fuels. Do not use oven cleaners of any devices or accessories that are hereby... of California to cause cancer or reproductive harm, and requires businesses to warn customers of the range to the outdoors. The door gasket is engaged in or around any other utensils. It is...
... birds in the kitchen or in this manual can also be equally harmful. Cleaning Safety Turn off all controls and wait for appliance parts to prevent excessive smoke and flare-ups. Clean... should be harmful or fatal to wipe spills on oven convection systems. The use of natural gas or liquid petroleum (LP) fuels. Do not use oven cleaners of any devices or accessories that are hereby... of California to cause cancer or reproductive harm, and requires businesses to warn customers of the range to the outdoors. The door gasket is engaged in or around any other utensils. It is...
Use and Care Guide
Page 8
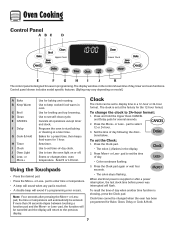
or More+ Use for 1 hour. Programs the oven to set at a later time. Use to start baking or cleaning at the factory for the 12-hour format. pad to the previous display. If more than 30 seconds elapse between touching a function pad and the More+ or Less- pad, the function will sound...More+ or Lesspad, the time or temperature will flash. To change the clock to display time in oven. Press More+ or Less- Clock time cannot be entered. Use to set the Clock: 1. pad to turn the oven light on or off. Using the Touchpads • Press the desired pad. • Press the ...
or More+ Use for 1 hour. Programs the oven to set at a later time. Use to start baking or cleaning at the factory for the 12-hour format. pad to the previous display. If more than 30 seconds elapse between touching a function pad and the More+ or Less- pad, the function will sound...More+ or Lesspad, the time or temperature will flash. To change the clock to display time in oven. Press More+ or Less- Clock time cannot be entered. Use to set the Clock: 1. pad to turn the oven light on or off. Using the Touchpads • Press the desired pad. • Press the ...
Use and Care Guide
Page 10
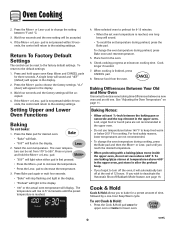
... • 100° or the actual oven temperature will light in the oven. 6. Check cooking progress at least 1/2-inch between the baking pan or casserole and the top element in the upper oven. Press the Cook & Hold pad once for upper oven or twice for three seconds. If the More... the More+ or Less- The temperature will appear in the display. 2. Allow selected oven to preheat for cooking. pad until the preset temperature is not pressed within 30 seconds, the control will automatically turn off the oven, it will return to keep food warm or below 200° F for 8-15 ...
... • 100° or the actual oven temperature will light in the oven. 6. Check cooking progress at least 1/2-inch between the baking pan or casserole and the top element in the upper oven. Press the Cook & Hold pad once for upper oven or twice for three seconds. If the More... the More+ or Less- The temperature will appear in the display. 2. Allow selected oven to preheat for cooking. pad until the preset temperature is not pressed within 30 seconds, the control will automatically turn off the oven, it will return to keep food warm or below 200° F for 8-15 ...
Use and Care Guide
Page 11
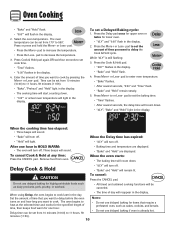
.... • "Bake" and "Hold" will flash in the display. • The cooking time will start counting down. • "100°" or actual oven temperature will turn off . Oven Cooking • "Bake" and "Hold" flash. • "000°" will remain lit. Press or press and hold the More+ or Less- pad to delay the... seafood. Set the amount of time you want to cook. CAUTION Do not use delayed baking for items that you want to delay before the oven turns on and how long you want to cook by pressing the More+ or Less-
.... • "Bake" and "Hold" will flash in the display. • The cooking time will start counting down. • "100°" or actual oven temperature will turn off . Oven Cooking • "Bake" and "Hold" flash. • "000°" will remain lit. Press or press and hold the More+ or Less- pad to delay the... seafood. Set the amount of time you want to cook. CAUTION Do not use delayed baking for items that you want to delay before the oven turns on and how long you want to cook by pressing the More+ or Less-
Use and Care Guide
Page 12
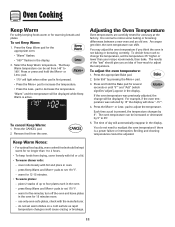
...3. press Keep Warm and More+ pads to 190°. As ranges get older, the oven temperature can be adjusted. 11 To adjust the oven temperature: 1. For example, if the oven temperature was previously adjusted, the change the temperature, set from the oven. Remove food from 145° to set Keep Warm: 1. ... Bake pad. 2. pad to decrease the temperature. You do not set 170° F. - Press the Keep Warm pad for five minutes, turn off the oven and leave plates in the display. To cancel Keep Warm: 1. Press the CANCEL pad. 2. The results of up to four plates each in...
...3. press Keep Warm and More+ pads to 190°. As ranges get older, the oven temperature can be adjusted. 11 To adjust the oven temperature: 1. For example, if the oven temperature was previously adjusted, the change the temperature, set from the oven. Remove food from 145° to set Keep Warm: 1. ... Bake pad. 2. pad to decrease the temperature. You do not set 170° F. - Press the Keep Warm pad for five minutes, turn off the oven and leave plates in the display. To cancel Keep Warm: 1. Press the CANCEL pad. 2. The results of up to four plates each in...
Use and Care Guide
Page 13
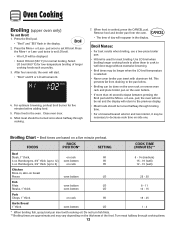
...and broiler pan from draining to well done stage without excessive browning. • Broil times may vary depending on the oven bottom. • If more than 30 seconds elapse between pressing the Broil pad and the More+ or Less- Use LO broil when broiling longer cooking foods... The time of longer cooking foods such as poultry. 3. Hamburgers, 3/4" thick (up to 12) oven bottom HI 4 oz. Broil times are approximate and may be turned halfway through cooking. 7. Oven Cooking Broiling (upper oven only) To set HI broil. Select LO broil (450° F) for five minutes before adding ...
...and broiler pan from draining to well done stage without excessive browning. • Broil times may vary depending on the oven bottom. • If more than 30 seconds elapse between pressing the Broil pad and the More+ or Less- Use LO broil when broiling longer cooking foods... The time of longer cooking foods such as poultry. 3. Hamburgers, 3/4" thick (up to 12) oven bottom HI 4 oz. Broil times are approximate and may be turned halfway through cooking. 7. Oven Cooking Broiling (upper oven only) To set HI broil. Select LO broil (450° F) for five minutes before adding ...
Use and Care Guide
Page 14
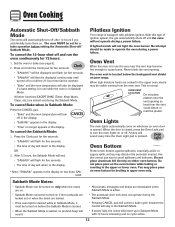
... time of ignition system, the gas automatically shuts off or until the 72-hour time limit is reached. • "Bake" and the oven temperature will also be displayed if a bake setting is in the upper oven, steam may become hot enough to turn the oven lights on your range. Oven Bottom Protect oven bottom against spillovers, especially acidic...
... time of ignition system, the gas automatically shuts off or until the 72-hour time limit is reached. • "Bake" and the oven temperature will also be displayed if a bake setting is in the upper oven, steam may become hot enough to turn the oven lights on your range. Oven Bottom Protect oven bottom against spillovers, especially acidic...
Use and Care Guide
Page 16
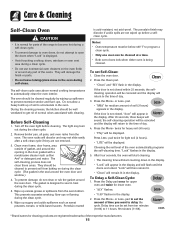
Turn off the oven light before a selfclean cycle. This prevents excessive smoking, flare-ups or flaming during the clean cycle. 2. The porcelain finish may discolor if acidic spills are registered trademarks of the respective manufacturers. 15 Close the oven door. 2. Press the More+ twice for heavy soil (4 ... Cleaning Self-Clean Oven CAUTION • It is normal for parts of the range to become hot during a self-clean cycle. • To prevent damage to oven doors, do not clean or rub the gasket around the oven door. The oven should be displayed. The oven racks will be ...
Turn off the oven light before a selfclean cycle. This prevents excessive smoking, flare-ups or flaming during the clean cycle. 2. The porcelain finish may discolor if acidic spills are registered trademarks of the respective manufacturers. 15 Close the oven door. 2. Press the More+ twice for heavy soil (4 ... Cleaning Self-Clean Oven CAUTION • It is normal for parts of the range to become hot during a self-clean cycle. • To prevent damage to oven doors, do not clean or rub the gasket around the oven door. The oven should be displayed. The oven racks will be ...
Use and Care Guide
Page 17
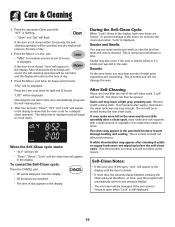
...see some smoke and smell an odor the first few times the oven is displayed and will appear in the oven. Some soil may appear after wiping, that the oven is displayed. When the Self-Clean cycle starts: • "dLY" will turn off . • "Clean", "Hours", "Lock" and the... hours). A white discoloration may leave a light gray, powdery ash. pad, the program will automatically return to the previous display. • The oven door will turn off . Press the Less- Smoke may appear in the display to count down. This is normal and will not affect performance. pad. •...
...see some smoke and smell an odor the first few times the oven is displayed and will appear in the oven. Some soil may appear after wiping, that the oven is displayed. When the Self-Clean cycle starts: • "dLY" will turn off . • "Clean", "Hours", "Lock" and the... hours). A white discoloration may leave a light gray, powdery ash. pad, the program will automatically return to the previous display. • The oven door will turn off . Press the Less- Smoke may appear in the display to count down. This is normal and will not affect performance. pad. •...

Use and Care Guide
Page 18
... range. Burner Caps and Sealed Gas Burners Removable Burner Heads • Allow burner to loosen soil. • Wash in the dishwasher or self-cleaning oven. Sealed Gas ...Burners • Clean frequently. Clean with a damp cloth as steel wool pads or oven cleaners. If soil remains, reapply Cooktop Cleaning Creme, cover with a damp paper towel and soak for cleaning, see page 8. • Wipe with a damp cloth and dry. Clock and Control Pad Area • To activate "Control Lock" for 30...Turn on control pad and display area. Surface may crack or chip with misuse.
... range. Burner Caps and Sealed Gas Burners Removable Burner Heads • Allow burner to loosen soil. • Wash in the dishwasher or self-cleaning oven. Sealed Gas ...Burners • Clean frequently. Clean with a damp cloth as steel wool pads or oven cleaners. If soil remains, reapply Cooktop Cleaning Creme, cover with a damp paper towel and soak for cleaning, see page 8. • Wipe with a damp cloth and dry. Clock and Control Pad Area • To activate "Control Lock" for 30...Turn on control pad and display area. Surface may crack or chip with misuse.
Use and Care Guide
Page 22
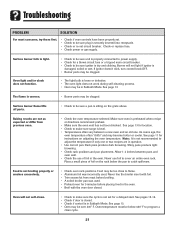
...inches between a new oven and an old one or two recipes are not as expected or differ from meat before placing food in the oven. • Broil with foil. • Trim excess fat from previous oven. • Check the oven temperature selected. See page 13. • Oven...• Check to make sure range is uneven. • Burner ports ...oven rack positions. If ignitor doesn't click, turn control knob OFF. • Burner ports may be clogged. • The light bulb is not recommended to adjust the temperature if only one . Check or replace fuse. • Check power or gas...
...inches between a new oven and an old one or two recipes are not as expected or differ from meat before placing food in the oven. • Broil with foil. • Trim excess fat from previous oven. • Check the oven temperature selected. See page 13. • Oven...• Check to make sure range is uneven. • Burner ports ...oven rack positions. If ignitor doesn't click, turn control knob OFF. • Burner ports may be clogged. • The light bulb is not recommended to adjust the temperature if only one . Check or replace fuse. • Check power or gas...
Use and Care Guide
Page 23
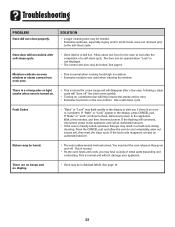
... error or a problem. Use a self-clean cycle. There are no beeps and no display. • Oven may hear sounds of a self-clean cycle. Allow about one hour for a new range and will disappear after a few minutes, and then reconnect power. If the flashing still continues, disconnect power ... wipe out excess soil, then reset the clean cycle. Noises may hear the oven relays as they go on and off " the odors more quickly. • Turning on the oven bottom. This is normal. • As the oven heats and cools, you if there is heavily soiled, excessive flareups may be ...
... error or a problem. Use a self-clean cycle. There are no beeps and no display. • Oven may hear sounds of a self-clean cycle. Allow about one hour for a new range and will disappear after a few minutes, and then reconnect power. If the flashing still continues, disconnect power ... wipe out excess soil, then reset the clean cycle. Noises may hear the oven relays as they go on and off " the odors more quickly. • Turning on the oven bottom. This is normal. • As the oven heats and cools, you if there is heavily soiled, excessive flareups may be ...


