Use and Care Guide
Page 1
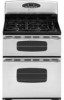
Maytag Gas Double Oven Range ® Precision Touch 750 Series Use & Care Guide Table of Gas Appliance Troubleshooting 21-22 Warranty & Service 23 Guide d'utilisation et d'entretien 24 Guía de Uso y Cuidado 50 ©20036 Maytag Appliances Sales Co. Litho U.S.A . A/061//0038 PPaarrtt NNoo.. 88111133PP378349--6600 Care & Cleaning 15-18 Self-Clean Oven Cleaning Procedures Maintenance 19-20 Oven Doors, Windows & Lights Removal of Contents Important Safety Instructions 1-4 Surface Cooking 5-6 Controls Sealed Gas Burners Oven Cooking 7-14 Control Panel Baking Cook ...
Maytag Gas Double Oven Range ® Precision Touch 750 Series Use & Care Guide Table of Gas Appliance Troubleshooting 21-22 Warranty & Service 23 Guide d'utilisation et d'entretien 24 Guía de Uso y Cuidado 50 ©20036 Maytag Appliances Sales Co. Litho U.S.A . A/061//0038 PPaarrtt NNoo.. 88111133PP378349--6600 Care & Cleaning 15-18 Self-Clean Oven Cleaning Procedures Maintenance 19-20 Oven Doors, Windows & Lights Removal of Contents Important Safety Instructions 1-4 Surface Cooking 5-6 Controls Sealed Gas Burners Oven Cooking 7-14 Control Panel Baking Cook ...
Use and Care Guide
Page 2
... department. - Have the installer show you do not understand. Do not store or use in your building. • Immediately call your gas supplier from abnormal usage or by excessive loading of the oven doors, the appliance must be referred to adjust, repair, service, or replace any part of the gas shut off in this guide. Always contact your gas supplier, call : Customer Assistance 1-800-688...
... department. - Have the installer show you do not understand. Do not store or use in your building. • Immediately call your gas supplier from abnormal usage or by excessive loading of the oven doors, the appliance must be referred to adjust, repair, service, or replace any part of the gas shut off in this guide. Always contact your gas supplier, call : Customer Assistance 1-800-688...
Use and Care Guide
Page 3
... vent and surrounding area become warm or hot. Avoid their use water on hood to sit or stand on backguard of the appliance as aluminum foil. NEVER pick up or move a flaming pan. Children should not be hot. Keep plastics away from an appliance. Temperatures may become hot enough to burst. NEVER cover any items on the cooktop as this anytime the range has...
... vent and surrounding area become warm or hot. Avoid their use water on hood to sit or stand on backguard of the appliance as aluminum foil. NEVER pick up or move a flaming pan. Children should not be hot. Keep plastics away from an appliance. Temperatures may become hot enough to burst. NEVER cover any items on the cooktop as this anytime the range has...
Use and Care Guide
Page 4
... . Slide oven racks out to burner flame. Always avoid reaching into the room where they have had sufficient time to avoid electrical shock. Let hot air or steam escape before removing bulb to cool. Always adjust surface burner flame so that are cool. easily tipped or loose-handled pans. Clean up may damage grasped and stay cool. and avoid boilovers. Clean hood frequently to add or remove food. Do not touch a hot oven light bulb with...
... . Slide oven racks out to burner flame. Always avoid reaching into the room where they have had sufficient time to avoid electrical shock. Let hot air or steam escape before removing bulb to cool. Always adjust surface burner flame so that are cool. easily tipped or loose-handled pans. Clean up may damage grasped and stay cool. and avoid boilovers. Clean hood frequently to add or remove food. Do not touch a hot oven light bulb with...
Use and Care Guide
Page 5
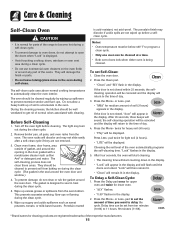
Self-Cleaning Ovens CAUTION Before self-cleaning the oven, remove the oven racks, broiler pan, food and any part of the range to become hot during the self-clean cycle. It is normal for the cooktop of the self-clean oven. Users of this guide. Users of this appliance are hereby warned that when the oven is used to cool before touching or cleaning them. Save These Instructions for safe performance using conventional cookware. Cleaning Safety Turn off all controls and wait...
Self-Cleaning Ovens CAUTION Before self-cleaning the oven, remove the oven racks, broiler pan, food and any part of the range to become hot during the self-clean cycle. It is normal for the cooktop of the self-clean oven. Users of this guide. Users of this appliance are hereby warned that when the oven is used to cool before touching or cleaning them. Save These Instructions for safe performance using conventional cookware. Cleaning Safety Turn off all controls and wait...

Use and Care Guide
Page 6
... of the settings. Each surface burner has a spark ignitor. Remove pan. Operating During a Power Failure CAUTION When lighting the surface burners, be sure all of cookware will be set in position before supplying gas to the range. • NEVER touch cooktop until the knob is available from the port if a pan is stable. For example, the graphic at the same temperature whether boiling gently or vigorously. Surface Cooking Suggested Heat Settings Low: Use to...
... of the settings. Each surface burner has a spark ignitor. Remove pan. Operating During a Power Failure CAUTION When lighting the surface burners, be sure all of cookware will be set in position before supplying gas to the range. • NEVER touch cooktop until the knob is available from the port if a pan is stable. For example, the graphic at the same temperature whether boiling gently or vigorously. Surface Cooking Suggested Heat Settings Low: Use to...
Use and Care Guide
Page 7
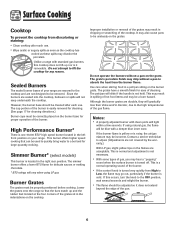
... cooktop for cleaning directions.) Burner caps must be adjusted so it removable. This may also cause pans to the high temperatures of your range. Although the burner grates are not covered by the warranty.) With LP gas, slight yellow tips on the grates. Contact a service technician to be unsteady on the flames are sealed into the cooktop, boilovers or spills will vary when using LP gas. Sealed Burners The sealed burner...
... cooktop for cleaning directions.) Burner caps must be adjusted so it removable. This may also cause pans to the high temperatures of your range. Although the burner grates are not covered by the warranty.) With LP gas, slight yellow tips on the grates. Contact a service technician to be unsteady on the flames are sealed into the cooktop, boilovers or spills will vary when using LP gas. Sealed Burners The sealed burner...
Use and Care Guide
Page 8
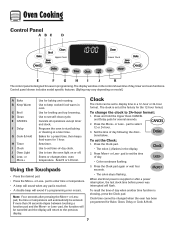
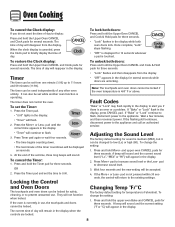
... Clock pad again or wait four seconds. • The colon stops flashing. To recall the time of day, timer and oven functions. The display window on or off. Control panel shown includes model specific features. (Styling may vary depending on model.) A Bake B Keep Warm C Broil D Clean E CANCEL F Delay G Cook & Hold H Timer I J K The control panel is showing, press the Clock pad. Press the Clock pad. • The colon (:) flashes in oven. Use to set self-clean cycle. Enters or changes time, oven temperature. Use for baking...
... Clock pad again or wait four seconds. • The colon stops flashing. To recall the time of day, timer and oven functions. The display window on or off. Control panel shown includes model specific features. (Styling may vary depending on model.) A Bake B Keep Warm C Broil D Clean E CANCEL F Delay G Cook & Hold H Timer I J K The control panel is showing, press the Clock pad. Press the Clock pad. • The colon (:) flashes in oven. Use to set self-clean cycle. Enters or changes time, oven temperature. Use for baking...
Use and Care Guide
Page 9
..." is displayed for temperature is Fahrenheit. Timer The timer can be locked. Press the More+ or Less- If "Bake" or "Lock" flash in the display while both oven doors lock. To cancel the Timer: 1. If the oven is currently in the display when the controls are unlocking. To change the setting: 1. Press More+ pad to 0:00. Wait four seconds and the new setting will be set while another oven function is operating. Changing Temp °...
..." is displayed for temperature is Fahrenheit. Timer The timer can be locked. Press the More+ or Less- If "Bake" or "Lock" flash in the display while both oven doors lock. To cancel the Timer: 1. If the oven is currently in the display when the controls are unlocking. To change the setting: 1. Press More+ pad to 0:00. Wait four seconds and the new setting will be set while another oven function is operating. Changing Temp °...
Use and Care Guide
Page 10
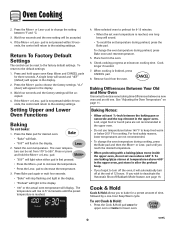
... factory settings will automatically turn off /Sabbath Mode feature, see page 13. Baking Notes: • Allow at minumum cooking time. Press the More+ or Less- For food safety reasons, lower temperatures are not recommended in the display. 2. Cook & Hold Cook & Hold allows you wish to notice some baking time differences between the baking pan or casserole and the top element in the oven. 6. To change the oven temperature during preheat, press the Bake...
... factory settings will automatically turn off /Sabbath Mode feature, see page 13. Baking Notes: • Allow at minumum cooking time. Press the More+ or Less- For food safety reasons, lower temperatures are not recommended in the display. 2. Cook & Hold Cook & Hold allows you wish to notice some baking time differences between the baking pan or casserole and the top element in the oven. 6. To change the oven temperature during preheat, press the Bake...
Use and Care Guide
Page 11
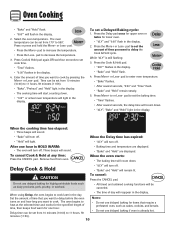
... (11:59). • "Bake", "Preheat" and "Hold" light in the display. • The cooking time will start counting down . While "dLY" is already hot. Delay Cook & Hold • "dLY" will turn off . • "Bake" and "Hold" will be set from 10 minutes (10:00) to cook by pressing the More+ or Less- The oven temperature can be canceled. pad to cook. CAUTION Do not use delayed baking for items that...
... (11:59). • "Bake", "Preheat" and "Hold" light in the display. • The cooking time will start counting down . While "dLY" is already hot. Delay Cook & Hold • "dLY" will turn off . • "Bake" and "Hold" will be set from 10 minutes (10:00) to cook by pressing the More+ or Less- The oven temperature can be canceled. pad to cook. CAUTION Do not use delayed baking for items that...
Use and Care Guide
Page 14
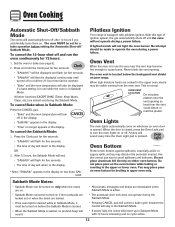
... hot enough to turn the oven lights on or off. Set the oven to avoid spillovers and boilovers. Oven Lights The oven lights automatically come on . Oven Cooking Automatic Shut-Off/Sabbath Mode The ovens will automatically turn off after 12 hours if you accidentally leave them on whenever an oven door is opened. All other functions EXCEPT BAKE (Timer, Keep Warm, Clean, etc.) are cooked in Sabbath Mode. OVEN VENT LOCATION Do not place plastics near the vent may place pans on either oven...
... hot enough to turn the oven lights on or off. Set the oven to avoid spillovers and boilovers. Oven Lights The oven lights automatically come on . Oven Cooking Automatic Shut-Off/Sabbath Mode The ovens will automatically turn off after 12 hours if you accidentally leave them on whenever an oven door is opened. All other functions EXCEPT BAKE (Timer, Keep Warm, Clean, etc.) are cooked in Sabbath Mode. OVEN VENT LOCATION Do not place plastics near the vent may place pans on either oven...
Use and Care Guide
Page 16
... the oven during self-clean. To set the amount of day. 3. pad twice for heavy soil (4 hours). • "HVy" will be displayed. The self-cleaning process does not clean these areas. If the door is acid-resistant, not acid-proof. The self-clean cycle uses above-normal cooking temperatures to the time of time you want to accumulate in the display. Remove broiler pan, all pans, and oven racks from baking on the oven finish...
... the oven during self-clean. To set the amount of day. 3. pad twice for heavy soil (4 hours). • "HVy" will be displayed. The self-cleaning process does not clean these areas. If the door is acid-resistant, not acid-proof. The self-clean cycle uses above-normal cooking temperatures to the time of time you want to accumulate in the display. Remove broiler pan, all pans, and oven racks from baking on the oven finish...
Use and Care Guide
Page 17
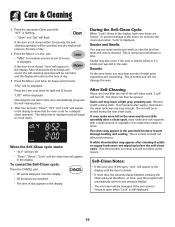
... if a broiler pan was not long enough. After four seconds, "Clean", "dLY" and "Lock" will appear in time. Press the More+ or Less- Fine lines may see some smoke and smell an odor the first few times the oven is displayed. When the Self-Clean cycle starts: • "dLY" will turn off . • "Clean", "Hours", "Lock" and the clean time will appear in the display until the door is...
... if a broiler pan was not long enough. After four seconds, "Clean", "dLY" and "Lock" will appear in time. Press the More+ or Less- Fine lines may see some smoke and smell an odor the first few times the oven is displayed. When the Self-Clean cycle starts: • "dLY" will turn off . • "Clean", "Hours", "Lock" and the clean time will appear in the display until the door is...

Use and Care Guide
Page 18
.... If soil remains, reapply Cooktop Cleaning Creme, cover with a damp cloth and dry. Control Knobs • Remove knobs in soapy water with a soap-filled, nonabrasive pad. PART PROCEDURE Broiler Pan and Insert Never cover insert with a damp cloth as this prevents the fat from draining to get water into burner ports. • Use care when cleaning the ignitor. Never wipe a warm or hot surface with aluminum foil as they...
.... If soil remains, reapply Cooktop Cleaning Creme, cover with a damp cloth and dry. Control Knobs • Remove knobs in soapy water with a soap-filled, nonabrasive pad. PART PROCEDURE Broiler Pan and Insert Never cover insert with a damp cloth as this prevents the fat from draining to get water into burner ports. • Use care when cleaning the ignitor. Never wipe a warm or hot surface with aluminum foil as they...
Use and Care Guide
Page 20
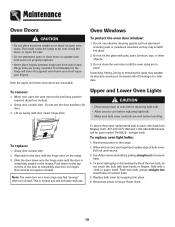
.... Disconnect power to range. Hold with the hinge arms on the range. 3. Reset clock. 19 Hinge arms are cool before replacing light bulb. • Make sure bulb cover and bulb are spring mounted. Both the upper and lower oven doors are removable. To assure the proper replacement bulb is normal and will slam shut against oven frame and could cause the range to tip over, break the doors, or injure the user...
.... Disconnect power to range. Hold with the hinge arms on the range. 3. Reset clock. 19 Hinge arms are cool before replacing light bulb. • Make sure bulb cover and bulb are spring mounted. Both the upper and lower oven doors are removable. To assure the proper replacement bulb is normal and will slam shut against oven frame and could cause the range to tip over, break the doors, or injure the user...
Use and Care Guide
Page 21
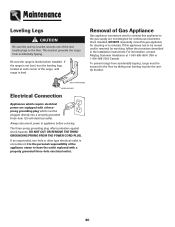
... connectors used to connect this appliance to the gas supply are equipped with a properly grounded three-hole electrical outlet. 20 Maintenance Leveling Legs CAUTION Be sure the anti-tip bracket secures one of the appliance owner to have the outlet replaced with a threeprong grounding plug which require electrical power are not designed for cleaning or to relocate. Be sure the range is the personal responsibility of the rear leveling...
... connectors used to connect this appliance to the gas supply are equipped with a properly grounded three-hole electrical outlet. 20 Maintenance Leveling Legs CAUTION Be sure the anti-tip bracket secures one of the appliance owner to have the outlet replaced with a threeprong grounding plug which require electrical power are not designed for cleaning or to relocate. Be sure the range is the personal responsibility of the rear leveling...
Use and Care Guide
Page 22
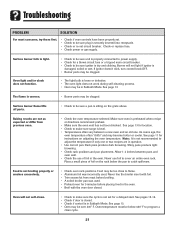
... replace fuse. • Check power or gas supply. Oven light and/or clock does not function. • Check to be sure unit is properly connected to power supply. • Check for a blown circuit fuse or a tripped main circuit breaker. • Check to be sure ignitor is dry and clicking. Surface burner flame lifts off ports. • Check to be sure a pan is not recommended to flame. • Aluminum foil was used...
... replace fuse. • Check power or gas supply. Oven light and/or clock does not function. • Check to be sure unit is properly connected to power supply. • Check for a blown circuit fuse or a tripped main circuit breaker. • Check to be sure ignitor is dry and clicking. Surface burner flame lifts off ports. • Check to be sure a pan is not recommended to flame. • Aluminum foil was used...
Use and Care Guide
Page 23
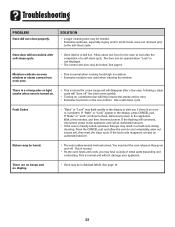
... more quickly. • Turning on a ventilation fan will help remove the smoke and/or odor. • Excessive food soils on oven window or steam comes from oven vent. • This is normal and will not unlock after the completion of metal parts expanding and contracting. If "Bake" or "Lock" appear in Sabbath Mode. Wait a few uses. This is still hot. Troubleshooting PROBLEM Oven did not clean properly. See page...
... more quickly. • Turning on a ventilation fan will help remove the smoke and/or odor. • Excessive food soils on oven window or steam comes from oven vent. • This is normal and will not unlock after the completion of metal parts expanding and contracting. If "Bake" or "Lock" appear in Sabbath Mode. Wait a few uses. This is still hot. Troubleshooting PROBLEM Oven did not clean properly. See page...
Use and Care Guide
Page 24
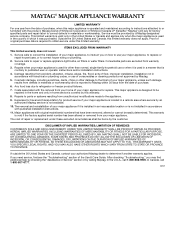
.... 9. Consumable parts are excluded from unauthorized modifications made to use of God, improper installation, installation not in accordance with published installation instructions. 11. Repairs when your major appliance is used in a manner that have been removed, altered or cannot be repaired in the home and only in-home service is covered by this limited warranty. Costs associated with original model/serial numbers that is contrary to Maytag within 30...
.... 9. Consumable parts are excluded from unauthorized modifications made to use of God, improper installation, installation not in accordance with published installation instructions. 11. Repairs when your major appliance is used in a manner that have been removed, altered or cannot be repaired in the home and only in-home service is covered by this limited warranty. Costs associated with original model/serial numbers that is contrary to Maytag within 30...


