Installation Guide
Page 1
... this manual and on your appliance. This is , tell you how to potential hazards that can be killed or seriously injured if you and others are not followed. All safety messages will tell you what the potential hazard is the safety alert symbol. Installer: Leave installation instructions...233;chaud ou tiroir de remisage de qualité supérieure .......31 Tiroir de remisage 32 Porte du four 32 Achever l'installation 33 CONVERSIONS POUR CHANGEMENT DE GAZ 34 Conversion pour l'alimentation au propane 34 Conversion pour l'alimentation au gaz naturel 38 RANGE SAFETY...
... this manual and on your appliance. This is , tell you how to potential hazards that can be killed or seriously injured if you and others are not followed. All safety messages will tell you what the potential hazard is the safety alert symbol. Installer: Leave installation instructions...233;chaud ou tiroir de remisage de qualité supérieure .......31 Tiroir de remisage 32 Porte du four 32 Achever l'installation 33 CONVERSIONS POUR CHANGEMENT DE GAZ 34 Conversion pour l'alimentation au propane 34 Conversion pour l'alimentation au gaz naturel 38 RANGE SAFETY...
Installation Guide
Page 2
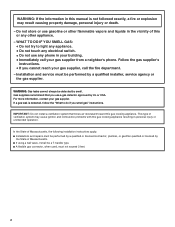
... unintended operation. IMPORTANT: Do not install a ventilation system that you smell gas" instructions. Installation and service must be performed by the State of Massachusetts, the following installation instructions apply: ■ Installations and repairs must not exceed 3 ...feet. 2 In the State of Massachusetts. ■ If using a ball valve, it shall be a T-handle type. ■ A flexible gas connector, when used, must be detected by UL or CSA. WARNING: If the information in this manual...
... unintended operation. IMPORTANT: Do not install a ventilation system that you smell gas" instructions. Installation and service must be performed by the State of Massachusetts, the following installation instructions apply: ■ Installations and repairs must not exceed 3 ...feet. 2 In the State of Massachusetts. ■ If using a ball valve, it shall be a T-handle type. ■ A flexible gas connector, when used, must be detected by UL or CSA. WARNING: If the information in this manual...

Installation Guide
Page 8
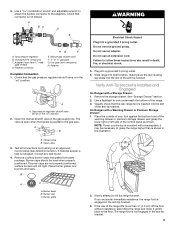
...LP, have ½" male pipe thread) C. Black iron pipe I . Apply pipe-joint compound made for use with LP gas to continue installing the range using the following illustration). 2. Examples of the flexible connector adapters (see B and G in death, explosion, or fire. Typical rigid...authorized service personnel. Securely tighten all pipe thread connections. 2. Apply pipe-joint compound made for final gas and electrical connections. Nipple D. Manual gas shutoff valve G. ½" or ¾" gas pipe H. Using the Phillips screwdriver, mount anti-tip bracket to allow for use ...
...LP, have ½" male pipe thread) C. Black iron pipe I . Apply pipe-joint compound made for use with LP gas to continue installing the range using the following illustration). 2. Examples of the flexible connector adapters (see B and G in death, explosion, or fire. Typical rigid...authorized service personnel. Securely tighten all pipe thread connections. 2. Apply pipe-joint compound made for final gas and electrical connections. Nipple D. Manual gas shutoff valve G. ½" or ¾" gas pipe H. Using the Phillips screwdriver, mount anti-tip bracket to allow for use ...
Installation Guide
Page 9
...valve is in the "on" position. C. Open the manual shutoff valve in the anti-tip bracket. 3. A B WARNING Electrical Shock Hazard Plug into a grounded 3 prong outlet. 6. Do not use an adapter. Verify Anti-Tip Bracket Is Installed and Engaged On Ranges with a Warming Drawer or Premium Storage...adjustable wrench to attach the flexible connector to tilt the range forward. Use pipe-joint compound. Adapter (must have ½" male pipe thread) D. Manual gas shutoff valve F. ½" or ¾" gas pipe G. Check that connector is inserted into the slot of the range. 3. A A....
...valve is in the "on" position. C. Open the manual shutoff valve in the anti-tip bracket. 3. A B WARNING Electrical Shock Hazard Plug into a grounded 3 prong outlet. 6. Do not use an adapter. Verify Anti-Tip Bracket Is Installed and Engaged On Ranges with a Warming Drawer or Premium Storage...adjustable wrench to attach the flexible connector to tilt the range forward. Use pipe-joint compound. Adapter (must have ½" male pipe thread) D. Manual gas shutoff valve F. ½" or ¾" gas pipe G. Check that connector is inserted into the slot of the range. 3. A A....
Installation Guide
Page 14
... range is engaged in the slot of the anti-tip bracket. Turn the manual shutoff valve to the closed " position C. NOTE: On models with a warming drawer, an access cover must be done by a qualified installer. Securely tighten all gas connections. Install anti-tip bracket to LP, have a qualified person make sure gas pressure...
... range is engaged in the slot of the anti-tip bracket. Turn the manual shutoff valve to the closed " position C. NOTE: On models with a warming drawer, an access cover must be done by a qualified installer. Securely tighten all gas connections. Install anti-tip bracket to LP, have a qualified person make sure gas pressure...
Installation Guide
Page 17
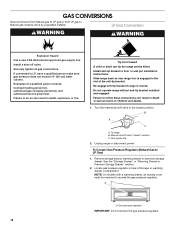
... Gas to the closed " position C. LP gas flames have to complete this manual to adjust the "LO" setting for proper burner ignition, operation and burner flame adjustments. Refer to "Complete Installation" in death or serious burns to access the gas pressure regulator. Remove storage drawer, warming drawer, or premium storage drawer. See...
... Gas to the closed " position C. LP gas flames have to complete this manual to adjust the "LO" setting for proper burner ignition, operation and burner flame adjustments. Refer to "Complete Installation" in death or serious burns to access the gas pressure regulator. Remove storage drawer, warming drawer, or premium storage drawer. See...

Installation Guide
Page 19
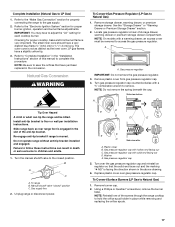
... NOTE: Be sure to save the orifices that have just been replaced in the rear of this procedure. Refer to complete this manual to "Complete Installation" in the back of the oven bottom panel into the front of the oven and attach it with a "090." 4. Place... Drawer" or "Warming Drawer or Premium Storage Drawer" section. 8. Natural gas flames do not have to Natural Gas) 1. Screws C. A x.xx A. Complete Installation (LP Gas to adjust the "LO" setting for proper cooktop, bake and broil burner flame is very important. Position the front of the oven bottom...
... NOTE: Be sure to save the orifices that have just been replaced in the rear of this procedure. Refer to complete this manual to "Complete Installation" in the back of the oven bottom panel into the front of the oven and attach it with a "090." 4. Place... Drawer" or "Warming Drawer or Premium Storage Drawer" section. 8. Natural gas flames do not have to Natural Gas) 1. Screws C. A x.xx A. Complete Installation (LP Gas to adjust the "LO" setting for proper cooktop, bake and broil burner flame is very important. Position the front of the oven bottom...


