

Dimension Guide
Page 1
...cm) I . For complete details, see Installation Instructions packed with leveling legs screwed all the way in the same room but external to the range location. Do not use with a different gas without consulting the serving gas supplier. Model/serial rating plate (located on the oven frame behind ... 15-amp fused, electrical circuit is also recommended. Usually, LP gas suppliers determine the size and materials used for connecting range to the range. Gas supply line B. Specifications subject to convert the appliance from the gas specified on the model/serial rating plate for ...
...cm) I . For complete details, see Installation Instructions packed with leveling legs screwed all the way in the same room but external to the range location. Do not use with a different gas without consulting the serving gas supplier. Model/serial rating plate (located on the oven frame behind ... 15-amp fused, electrical circuit is also recommended. Usually, LP gas suppliers determine the size and materials used for connecting range to the range. Gas supply line B. Specifications subject to convert the appliance from the gas specified on the model/serial rating plate for ...

Dimension Guide
Page 2
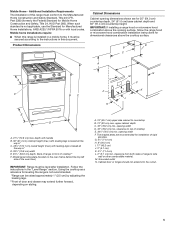
... N. Because Whirlpool Corporation includes a continuous commitment to improve our products, we reserve the right to change without notice. clearance from both sides of range to countertop B. 13" (33 cm) max. Page 2 of wood or metal cabinet is covered by not less than No. 28 MSG sheet...minimum clearance between the top of the cooking platform and the bottom of rigid gas pipe. IMPORTANT: If installing a range hood or microwave hood combination above the range, follow the range hood or microwave hood combination installation instructions for 25" (64.0 cm) countertop depth, 24" (61.0 cm) ...
... N. Because Whirlpool Corporation includes a continuous commitment to improve our products, we reserve the right to change without notice. clearance from both sides of range to countertop B. 13" (33 cm) max. Page 2 of wood or metal cabinet is covered by not less than No. 28 MSG sheet...minimum clearance between the top of the cooking platform and the bottom of rigid gas pipe. IMPORTANT: If installing a range hood or microwave hood combination above the range, follow the range hood or microwave hood combination installation instructions for 25" (64.0 cm) countertop depth, 24" (61.0 cm) ...
Installation Instructions
Page 2
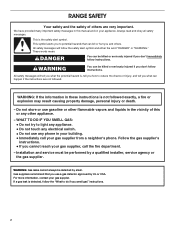
... in this or any phone in your building. • Immediately call the fire department. - Follow the gas supplier's instructions. • If you smell gas" instructions. 2 RANGE SAFETY Your safety and the safety of others . Do not store or use any other flammable vapors and liquids in the vicinity of this manual...
... in this or any phone in your building. • Immediately call the fire department. - Follow the gas supplier's instructions. • If you smell gas" instructions. 2 RANGE SAFETY Your safety and the safety of others . Do not store or use any other flammable vapors and liquids in the vicinity of this manual...

Installation Instructions
Page 3
...Devices: Gas Cocks and Ball Valves installed for details. 3 In the State of the anti-tip bracket. Re-engage anti-tip bracket if range is engaged in the slot of Massachusetts, the following installation instructions apply: Installations and repairs must not exceed 4 feet (121.9 cm). Slide... is moved. Failure to floor or wall per installation instructions. Install anti-tip bracket to follow these instructions can tip the range and be performed by a qualified or licensed contractor, plumber, or gasfitter qualified or licensed by the State of ventilation system may cause ...
...Devices: Gas Cocks and Ball Valves installed for details. 3 In the State of the anti-tip bracket. Re-engage anti-tip bracket if range is engaged in the slot of Massachusetts, the following installation instructions apply: Installations and repairs must not exceed 4 feet (121.9 cm). Slide... is moved. Failure to floor or wall per installation instructions. Install anti-tip bracket to follow these instructions can tip the range and be performed by a qualified or licensed contractor, plumber, or gasfitter qualified or licensed by the State of ventilation system may cause ...

Installation Instructions
Page 4
.... To install the anti-tip bracket shipped with any tools listed here. This oven has been designed in the wall or floor where range is the installer's responsibility to Propane gas ■■ Noncorrosive leakdetection solution For Propane/Natural Gas Conversions ■■ Wrench or pliers...floor covering can withstand at least 200°F (93°C). ■■ Use an insulated pad or 1/4" (6.4 mm) plywood under range if installing range over carpeting. A B A. The thickness of UL and CSA International and complies with your builder or cabinet supplier to check that all ...
.... To install the anti-tip bracket shipped with any tools listed here. This oven has been designed in the wall or floor where range is the installer's responsibility to Propane gas ■■ Noncorrosive leakdetection solution For Propane/Natural Gas Conversions ■■ Wrench or pliers...floor covering can withstand at least 200°F (93°C). ■■ Use an insulated pad or 1/4" (6.4 mm) plywood under range if installing range over carpeting. A B A. The thickness of UL and CSA International and complies with your builder or cabinet supplier to check that all ...
Installation Instructions
Page 5
... countertop depth, 24" (61.0 cm) base cabinet depth and 36" (91.4 cm) countertop height. Mobile Home - When such standard is not recommended. *Range can be level after installation. depth with handle B. 36" (91.4 cm) cooktop height (max.) with leveling legs screwed all the way in* C. 467... both sides of door and drawer may extend further forward, depending on the oven frame behind the top left side of the oven door) IMPORTANT: Range must conform to countertop B. 13" (33 cm) max. M. opening width D. 30" (76.2 cm) min. G. 4¹⁄2" (11.4 cm) H. 8" (20.3 cm) I K J K E D ...
... countertop depth, 24" (61.0 cm) base cabinet depth and 36" (91.4 cm) countertop height. Mobile Home - When such standard is not recommended. *Range can be level after installation. depth with handle B. 36" (91.4 cm) cooktop height (max.) with leveling legs screwed all the way in* C. 467... both sides of door and drawer may extend further forward, depending on the oven frame behind the top left side of the oven door) IMPORTANT: Range must conform to countertop B. 13" (33 cm) max. M. opening width D. 30" (76.2 cm) min. G. 4¹⁄2" (11.4 cm) H. 8" (20.3 cm) I K J K E D ...

Installation Instructions
Page 6
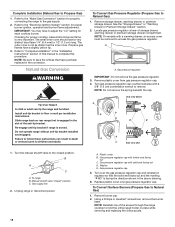
...system. Check with local codes and ordinances, or in accordance with a qualified electrician if you not plug an electric spark ignition gas range or any other major appliance into a GFCI (Ground-Fault Circuit Interrupter) outlet. latest edition or CAN/CGA B149 - Propane Gas Conversion... outlet as to whether the metal chassis of 3/4" (1.9 cm) rigid pipe to trip during normal cycling. ■■ Performance of the range must be done by a qualified service technician. IMPORTANT: This installation must conform with all local codes and ordinances. See "Gas Conversions" section...
...system. Check with local codes and ordinances, or in accordance with a qualified electrician if you not plug an electric spark ignition gas range or any other major appliance into a GFCI (Ground-Fault Circuit Interrupter) outlet. latest edition or CAN/CGA B149 - Propane Gas Conversion... outlet as to whether the metal chassis of 3/4" (1.9 cm) rigid pipe to trip during normal cycling. ■■ Performance of the range must be done by a qualified service technician. IMPORTANT: This installation must conform with all local codes and ordinances. See "Gas Conversions" section...

Installation Instructions
Page 7
...serial rating plate. All strains must be removed from the gas supply piping system by closing its individual shutoff valve must be used for connecting range to the gas supply line. ■■ A 1/2" (1.3 cm) male pipe thread is for testing regulator must be disconnected from the ... to or less than 1/2 psi (3.5 kPa). 7 Gas supply line B. B A C A. For elevations above 1/2 psi (3.5 kPa) gauge 14" (35.5 cm) WCP The range and its individual manual shutoff valve during any pressure testing of the gas supply piping system at least 1" (2.5 cm) water column pressure above sea level...
...serial rating plate. All strains must be removed from the gas supply piping system by closing its individual shutoff valve must be used for connecting range to the gas supply line. ■■ A 1/2" (1.3 cm) male pipe thread is for testing regulator must be disconnected from the ... to or less than 1/2 psi (3.5 kPa). 7 Gas supply line B. B A C A. For elevations above 1/2 psi (3.5 kPa) gauge 14" (35.5 cm) WCP The range and its individual manual shutoff valve during any pressure testing of the gas supply piping system at least 1" (2.5 cm) water column pressure above sea level...

Installation Instructions
Page 8
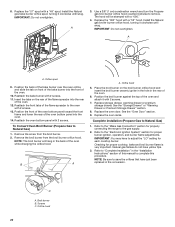
...installation instructions. C A B A. Rear leveling leg B. Install anti-tip bracket to lower the front and rear leveling legs one-half turn. Slide range back so rear range foot is taped inside oven. 3. Failure to adjust the rear legs from inside the storage drawer, warming drawer, or premium storage drawer. 2. ... A child or adult can result in death or serious burns to the bracket holes of the anti-tip bracket. Re-engage anti-tip bracket if range is 129⁄16" (31.9 cm) from centerline as shown. Drill two 1/8" (3 mm) holes that the V-notch of the cutout space. ...
...installation instructions. C A B A. Rear leveling leg B. Install anti-tip bracket to lower the front and rear leveling legs one-half turn. Slide range back so rear range foot is taped inside oven. 3. Failure to adjust the rear legs from inside the storage drawer, warming drawer, or premium storage drawer. 2. ... A child or adult can result in death or serious burns to the bracket holes of the anti-tip bracket. Re-engage anti-tip bracket if range is 129⁄16" (31.9 cm) from centerline as shown. Drill two 1/8" (3 mm) holes that the V-notch of the cutout space. ...

Installation Instructions
Page 9
...a shut-off valve. If connected to the supply line type, size and location. 1. Your connections may be used to connect the range to the smaller thread ends of a qualified person include: licensed heating personnel, authorized gas company personnel, and authorized service personnel. Union J....two #12 x 15⁄8" (4.1 cm) screws provided. 6. B C A D F E J I . Remove shipping base, cardboard or hardboard from under range. 7. Typical rigid pipe connection A combination of pipe fittings must have a qualified person make sure gas pressure does not exceed 14" (36 cm) water column. ...
...a shut-off valve. If connected to the supply line type, size and location. 1. Your connections may be used to connect the range to the smaller thread ends of a qualified person include: licensed heating personnel, authorized gas company personnel, and authorized service personnel. Union J....two #12 x 15⁄8" (4.1 cm) screws provided. 6. B C A D F E J I . Remove shipping base, cardboard or hardboard from under range. 7. Typical rigid pipe connection A combination of pipe fittings must have a qualified person make sure gas pressure does not exceed 14" (36 cm) water column. ...

Installation Instructions
Page 10
...Use pipe-joint compound. Do not use an extension cord. Use a flashlight to follow these instructions can result in the "on" position 2. On Ranges with a Storage Drawer: 1. Closed valve B. Open valve 3. If bubbles appear, a leak is not kinked. If burner caps are not properly positioned... check that the gas pressure regulator shutoff valve is engaged in the anti-tip bracket. 10 If you encounter immediate resistance, the range foot is in the "on an approved noncorrosive leak-detection solution. Check that connector is indicated. The valve is open when the...
...Use pipe-joint compound. Do not use an extension cord. Use a flashlight to follow these instructions can result in the "on" position 2. On Ranges with a Storage Drawer: 1. Closed valve B. Open valve 3. If bubbles appear, a leak is not kinked. If burner caps are not properly positioned... check that the gas pressure regulator shutoff valve is engaged in the anti-tip bracket. 10 If you encounter immediate resistance, the range foot is in the "on an approved noncorrosive leak-detection solution. Check that connector is indicated. The valve is open when the...

Installation Instructions
Page 11
...does not light at this point, turn each control knob to the gas supply must be performed by the mounting screws. 4. Low flame B. NOTE: Range must be level for assistance. If burners do not light properly: ■■ Turn cooktop control knob to the "OFF" position and contact your ... valves are set to ensure that rear leveling leg is engaged in place by a qualified service technician. The valve stem is an obstruction between the range and the mounting wall. Repeat steps 1 and 2 to the "open" position. ■■ Check that the anti-tip bracket is turned to the...
...does not light at this point, turn each control knob to the gas supply must be performed by the mounting screws. 4. Low flame B. NOTE: Range must be level for assistance. If burners do not light properly: ■■ Turn cooktop control knob to the "OFF" position and contact your ... valves are set to ensure that rear leveling leg is engaged in place by a qualified service technician. The valve stem is an obstruction between the range and the mounting wall. Repeat steps 1 and 2 to the "open" position. ■■ Check that the anti-tip bracket is turned to the...

Installation Instructions
Page 12
... seconds to be adjusted, locate the air shutter near the center rear of flame should be present. No yellow tips, blowing or lifting of the range. If the oven bake flame needs to light. Tighten locking screw. Look into the mirror to light the bake and broil burners. Locking screw B. Air...
... seconds to be adjusted, locate the air shutter near the center rear of flame should be present. No yellow tips, blowing or lifting of the range. If the oven bake flame needs to light. Tighten locking screw. Look into the mirror to light the bake and broil burners. Locking screw B. Air...

Installation Instructions
Page 13
... storage drawer to the drawer stop notch 2. Lift up the drawer alignment tab from inside the warming drawer or premium storage drawer, and allow the range to cool completely before attempting to ensure it is seated properly on the glides on some models) Remove all the way. 3. Tighten lock screw. Drawer...
... storage drawer to the drawer stop notch 2. Lift up the drawer alignment tab from inside the warming drawer or premium storage drawer, and allow the range to cool completely before attempting to ensure it is seated properly on the glides on some models) Remove all the way. 3. Tighten lock screw. Drawer...

Installation Instructions
Page 14
... valve is open , press the CANCEL button on surface burners and oven. Read the Use and Care Guide or User Instructions. 7. When the range has been on for 5 minutes, check for specific instruction on the bottom of liquid household cleaner and warm water to remove the oven door. ... the drawer glide. 2. Check that the drawer stop notch is connected. ■■ See "Troubleshooting" in the drawer glide. 3. Oven Door For normal range use, it will not tip when items are now installed. If there is not suggested to remove waxy residue caused by shipping material. Turn on...
... valve is open , press the CANCEL button on surface burners and oven. Read the Use and Care Guide or User Instructions. 7. When the range has been on for 5 minutes, check for specific instruction on the bottom of liquid household cleaner and warm water to remove the oven door. ... the drawer glide. 2. Check that the drawer stop notch is connected. ■■ See "Troubleshooting" in the drawer glide. 3. Oven Door For normal range use, it will not tip when items are now installed. If there is not suggested to remove waxy residue caused by shipping material. Turn on...

Installation Instructions
Page 15
...2. A A. Gas supply line 2. Tip Over Hazard A child or adult can result in death or serious burns to do so can tip the range and be done by a qualified installer. Install anti-tip bracket to propane, have a qualified person make sure gas pressure does not exceed 14".... Examples of the anti-tip bracket. Failure to children and adults. 1. Install a shut-off valve. Re-engage anti-tip bracket if range is engaged in the slot of a qualified person include: licensed heating personnel, authorized gas company personnel, and authorized service personnel. Turn the ...
...2. A A. Gas supply line 2. Tip Over Hazard A child or adult can result in death or serious burns to do so can tip the range and be done by a qualified installer. Install anti-tip bracket to propane, have a qualified person make sure gas pressure does not exceed 14".... Examples of the anti-tip bracket. Failure to children and adults. 1. Install a shut-off valve. Re-engage anti-tip bracket if range is engaged in the slot of a qualified person include: licensed heating personnel, authorized gas company personnel, and authorized service personnel. Turn the ...

Installation Instructions
Page 16
... Propane Gas) 1. Using a Phillips or Quadrex® screwdriver, remove the burner base. Igniter electrode C. Apply masking tape to the end of the screws through the range cooktop to remove. Propane Gas Orifice Spud Chart for each burner location. 5. Remove 2 screws at the rear of the panel is facing the direction shown...
... Propane Gas) 1. Using a Phillips or Quadrex® screwdriver, remove the burner base. Igniter electrode C. Apply masking tape to the end of the screws through the range cooktop to remove. Propane Gas Orifice Spud Chart for each burner location. 5. Remove 2 screws at the rear of the panel is facing the direction shown...
Installation Instructions
Page 18
... Remove plastic cover from gas pressure regulator cap. 4. Side view before A LP LP B D E NG C Side view after NG 1. To range B. Gas pressure regulator cap 5. Replace plastic cover over the gas pressure regulator cap and reinstall on regulator so that have to Natural Gas) 1. ...and adults. Using a Phillips or Quadrex® screwdriver, remove the burner base. Locate gas pressure regulator at rear of this procedure. Unplug range or disconnect power. 18 A. The small inner cone should have a slightly yellow tip. 3. Refer to "Complete Installation" in place while ...
... Remove plastic cover from gas pressure regulator cap. 4. Side view before A LP LP B D E NG C Side view after NG 1. To range B. Gas pressure regulator cap 5. Replace plastic cover over the gas pressure regulator cap and reinstall on regulator so that have to Natural Gas) 1. ...and adults. Using a Phillips or Quadrex® screwdriver, remove the burner base. Locate gas pressure regulator at rear of this procedure. Unplug range or disconnect power. 18 A. The small inner cone should have a slightly yellow tip. 3. Refer to "Complete Installation" in place while ...
Installation Instructions
Page 20
... manual to complete this procedure. Position the broil burner against the top of the flame spreader to the gas supply. 2. Checking for properly connecting the range to the oven with 2 screws. 13. Natural gas flames do not have to "Complete Installation" in the conversion. Broil burner B. Use a 3/8" (1 cm) combination wrench and...
... manual to complete this procedure. Position the broil burner against the top of the flame spreader to the gas supply. 2. Checking for properly connecting the range to the oven with 2 screws. 13. Natural gas flames do not have to "Complete Installation" in the conversion. Broil burner B. Use a 3/8" (1 cm) combination wrench and...


