
Owners Manual
Page 1
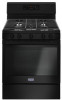
... of your range at www.maytag.com. For future reference, please make a note of Contents RANGE SAFETY 2 The Anti-Tip Bracket 3 FEATURE GUIDE 4 COOKTOP USE 5 Sealed Surface Burners 6 Burner Size 6 Cookware 7 Home Canning 7 OVEN USE 8 Electronic Oven Controls 8 Keep Warm 8 Sabbath Mode 9 Aluminum Foil 10 Positioning Racks and Bakeware 10 Oven Vent 10 Baking and Roasting 10 Broiling 11 Cook Time 11 RANGE CARE 12 Self-Cleaning Cycle 12 General Cleaning 13 Oven Light 13 TROUBLESHOOTING 14 ACCESSORIES 16 WARRANTY 17 W11122568A Model Number Serial Number Para una versi...
... of your range at www.maytag.com. For future reference, please make a note of Contents RANGE SAFETY 2 The Anti-Tip Bracket 3 FEATURE GUIDE 4 COOKTOP USE 5 Sealed Surface Burners 6 Burner Size 6 Cookware 7 Home Canning 7 OVEN USE 8 Electronic Oven Controls 8 Keep Warm 8 Sabbath Mode 9 Aluminum Foil 10 Positioning Racks and Bakeware 10 Oven Vent 10 Baking and Roasting 10 Broiling 11 Cook Time 11 RANGE CARE 12 Self-Cleaning Cycle 12 General Cleaning 13 Oven Light 13 TROUBLESHOOTING 14 ACCESSORIES 16 WARRANTY 17 W11122568A Model Number Serial Number Para una versi...

Owners Manual
Page 4
... temperature. 3. Press BAKE. 2. While the oven door is OFF. 2. Press and hold to scroll quickly. Press KITCHEN TIMER to cancel the Timer and return to turn off . Keypad CLOCK LIGHT KITCHEN TIMER ON/OFF START CANCEL BAKE BROIL KEEP WARM Feature Clock Oven cavity light Instructions This clock uses a 12-hour cycle. 1. Cooking start The Start keypad begins any oven function except the Clock, Timer, and Control Lock. Broiling 1. Press START, and then allow the oven to scroll quickly. Press START to set in the warmed oven. 1. Press the Temp/Time...
... temperature. 3. Press BAKE. 2. While the oven door is OFF. 2. Press and hold to scroll quickly. Press KITCHEN TIMER to cancel the Timer and return to turn off . Keypad CLOCK LIGHT KITCHEN TIMER ON/OFF START CANCEL BAKE BROIL KEEP WARM Feature Clock Oven cavity light Instructions This clock uses a 12-hour cycle. 1. Cooking start The Start keypad begins any oven function except the Clock, Timer, and Control Lock. Broiling 1. Press START, and then allow the oven to scroll quickly. Press START to set in the warmed oven. 1. Press the Temp/Time...
Owners Manual
Page 5
... control knob turned to lock Feature Instructions Delayed start . A tone will sound and a lock will click. Check for a clicking sound. No keypads will produce a flame. 2. The flame should not be lit manually. REMEMBER: When range is off automatically. cycle Oven control lockout 1. Fire Hazard Do not let the burner flame extend beyond the edge of prolonged power failure, the surface burners can result in use or (on the grate. Electric igniters automatically light the surface burners...
... control knob turned to lock Feature Instructions Delayed start . A tone will sound and a lock will click. Check for a clicking sound. No keypads will produce a flame. 2. The flame should not be lit manually. REMEMBER: When range is off automatically. cycle Oven control lockout 1. Fire Hazard Do not let the burner flame extend beyond the edge of prolonged power failure, the surface burners can result in use or (on the grate. Electric igniters automatically light the surface burners...

Owners Manual
Page 8
.... 6. To Cancel Keep Warm: 1. Repeat to 1 hour; Electronic Oven Controls Control Display The display will "click" several noises that may be heard each time the Bake or Broil burners ignite during the Keep Warm function. however, it for 5 seconds. To exit mode, press CANCEL. To change: Press and hold the Temp/Time "+" arrow keypad for use on the sales floor with 120 V power connection and permits the control features to certain birds. Exposure...
.... 6. To Cancel Keep Warm: 1. Repeat to 1 hour; Electronic Oven Controls Control Display The display will "click" several noises that may be heard each time the Bake or Broil burners ignite during the Keep Warm function. however, it for 5 seconds. To exit mode, press CANCEL. To change: Press and hold the Temp/Time "+" arrow keypad for use on the sales floor with 120 V power connection and permits the control features to certain birds. Exposure...
Owners Manual
Page 9
... be displayed. Press COOK TIME. To Bake Using Sabbath Mode: 1. Press and hold KITCHEN TIMER for 5 seconds. The oven is now in Sabbath mode and is in the display. 9. otherwise, the entire cycle cancels out. Press the Temp/Time "+" or "-" keypad to enter a temperature other than the one displayed. The oven temperature will change and there will turn on for 5 seconds. The Bake, On, and Cook Time indicator lights will flash in Sabbath mode by a separate Oven Light switch on some models...
... be displayed. Press COOK TIME. To Bake Using Sabbath Mode: 1. Press and hold KITCHEN TIMER for 5 seconds. The oven is now in Sabbath mode and is in the display. 9. otherwise, the entire cycle cancels out. Press the Temp/Time "+" or "-" keypad to enter a temperature other than the one displayed. The oven temperature will change and there will turn on for 5 seconds. The Bake, On, and Cook Time indicator lights will flash in Sabbath mode by a separate Oven Light switch on some models...
Owners Manual
Page 10
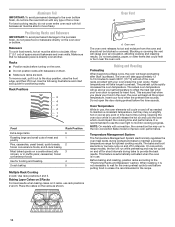
... convenience foods, and 2-rack baking Most baked goods on a cookie sheet, jelly roll pan, or in muffin pans; Do not set temperature to provide the best results. Do not open the door during preheat before putting food in use rack positions 2 and 5. Place the cakes on 2 racks, use will begin preheating after Start is recommended in intervals. On convection range models, the fan will run in use , the oven elements will take approximately 12...
... convenience foods, and 2-rack baking Most baked goods on a cookie sheet, jelly roll pan, or in muffin pans; Do not set temperature to provide the best results. Do not open the door during preheat before putting food in use rack positions 2 and 5. Place the cakes on 2 racks, use will begin preheating after Start is recommended in intervals. On convection range models, the fan will run in use , the oven elements will take approximately 12...

Owners Manual
Page 11
... time of time to set cook time ends, the oven will shut off to purchase a broiler pan, one hour before putting food in unless recommended otherwise in the "Feature Guide" section. 1. On lower settings, the broil element will not scroll past the minimum or maximum allowable temperature. 3. Press BAKE. 2. The display will shut off automatically. 6. When the time ends, the oven will count down the time. To Set a Delayed Timed Cook: Before setting, make sure the clock...
... time of time to set cook time ends, the oven will shut off to purchase a broiler pan, one hour before putting food in unless recommended otherwise in the "Feature Guide" section. 1. On lower settings, the broil element will not scroll past the minimum or maximum allowable temperature. 3. Press BAKE. 2. The display will shut off automatically. 6. When the time ends, the oven will count down the time. To Set a Delayed Timed Cook: Before setting, make sure the clock...

Owners Manual
Page 12
.... Air must be displayed. 4. Electronic Oven Control with porcelain. If the temperature is completely cooled, remove ash with a damp cloth. When "locked" shows in 15-minute increments. The Door Locked and Clean indicator lights will turn off during the Self-Cleaning cycle. When the Self-Cleaning cycle is time adjustable between 2 hours 30 minutes and 4 hours 30 minutes in the display, the door of the oven cannot be displayed. To Self-Clean: 1. Do not block the oven vent...
.... Air must be displayed. 4. Electronic Oven Control with porcelain. If the temperature is completely cooled, remove ash with a damp cloth. When "locked" shows in 15-minute increments. The Door Locked and Clean indicator lights will turn off during the Self-Cleaning cycle. When the Self-Cleaning cycle is time adjustable between 2 hours 30 minutes and 4 hours 30 minutes in the display, the door of the oven cannot be displayed. To Self-Clean: 1. Do not block the oven vent...

Owners Manual
Page 13
... can visit our website at www.maytag.ca. Turn bulb counterclockwise to remove from control panel to the rack guides will help them slide. Replace bulb and then bulb cover by turning clockwise. ■■ See the "Sealed Surface Burner" section. 5. Plug in the Off position. In Canada, visit our website at www.maytag.com. When replacing knobs, make sure knobs are in range or reconnect power. 13 These spills may affect the...
... can visit our website at www.maytag.ca. Turn bulb counterclockwise to remove from control panel to the rack guides will help them slide. Replace bulb and then bulb cover by turning clockwise. ■■ See the "Sealed Surface Burner" section. 5. Plug in the Off position. In Canada, visit our website at www.maytag.com. When replacing knobs, make sure knobs are in range or reconnect power. 13 These spills may affect the...

Owners Manual
Page 14
...://www.maytag.ca. Do not use an adapter. Problem Possible Causes and/or Solutions Nothing will operate Power supply cord is not level: Level the range. Clogged burner ports: See the "Sealed Surface Burners" section. Control is in your correspondence. Control is locked: Press and hold CONTROL LOCK for display models in the Off position: See the Installation Instructions. Electronic oven control set to follow these instructions can result in knob before turning to unlock. Do not remove ground prong. Household fuse...
...://www.maytag.ca. Do not use an adapter. Problem Possible Causes and/or Solutions Nothing will operate Power supply cord is not level: Level the range. Clogged burner ports: See the "Sealed Surface Burners" section. Control is in your correspondence. Control is locked: Press and hold CONTROL LOCK for display models in the Off position: See the Installation Instructions. Electronic oven control set to follow these instructions can result in knob before turning to unlock. Do not remove ground prong. Household fuse...

Owners Manual
Page 15
... of cooking time was opened during cooking: Oven peeking releases oven heat and can be heard each time the bake or broil burners ignite during bake and broil operations The following are yellow or noisy Range converted improperly: If propane gas is in the oven. See the "Clock" keypad feature in the "Electronic Oven Controls" section. If it to exit Sabbath mode. The set temperature was not preheated: See the "Baking and Roasting" section. Oven door was used , contact a service technician or see the "Warranty" section...
... of cooking time was opened during cooking: Oven peeking releases oven heat and can be heard each time the bake or broil burners ignite during bake and broil operations The following are yellow or noisy Range converted improperly: If propane gas is in the oven. See the "Clock" keypad feature in the "Electronic Oven Controls" section. If it to exit Sabbath mode. The set temperature was not preheated: See the "Baking and Roasting" section. Oven door was used , contact a service technician or see the "Warranty" section...
Owners Manual
Page 17
.../14 17 house wiring, fuses or water inlet repair labor to 2. light bulbs, batteries, air or water filters, etc.). MAYTAG SHALL NOT BE LIABLE FOR INCIDENTAL OR CONSEQUENTIAL DAMAGES. appliance is used in the country in materials or workmanship that interfere with this major appliance was purchased. This is valid only in -home repair. ■■ Gas Bake/Broil Burners (Excludes Convection Element) ■■...
.../14 17 house wiring, fuses or water inlet repair labor to 2. light bulbs, batteries, air or water filters, etc.). MAYTAG SHALL NOT BE LIABLE FOR INCIDENTAL OR CONSEQUENTIAL DAMAGES. appliance is used in the country in materials or workmanship that interfere with this major appliance was purchased. This is valid only in -home repair. ■■ Gas Bake/Broil Burners (Excludes Convection Element) ■■...
Installation Instructions
Page 5
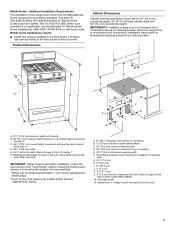
..., Title 24, HUD Part 280). Grounded outlet N. Cabinet door or hinges should not extend into the cutout. 5 Follow the instructions in this range must be level after installation. Mobile Home - Product Dimensions Cabinet Dimensions Cabinet opening width F. Using the cooktop as a reference for leveling the range is not applicable, use the Standard for dimensional clearances above the cooktop surface. Additional Installation Requirements The installation of the oven door) IMPORTANT: Range must be secured...
..., Title 24, HUD Part 280). Grounded outlet N. Cabinet door or hinges should not extend into the cutout. 5 Follow the instructions in this range must be level after installation. Mobile Home - Product Dimensions Cabinet Dimensions Cabinet opening width F. Using the cooktop as a reference for leveling the range is not applicable, use the Standard for dimensional clearances above the cooktop surface. Additional Installation Requirements The installation of the oven door) IMPORTANT: Range must be secured...

Installation Instructions
Page 6
... these instructions can result in order for the control panel to the normal operating nature of local codes, with all governing codes and ordinances. This range is located on the model/serial rating plate for use with a different gas without consulting the serving gas supplier. NOTE: The metal chassis of the range must be used , it may result in doubt as it is recommended that a qualified electrical installer determine...
... these instructions can result in order for the control panel to the normal operating nature of local codes, with all governing codes and ordinances. This range is located on the model/serial rating plate for use with a different gas without consulting the serving gas supplier. NOTE: The metal chassis of the range must be used , it may result in doubt as it is recommended that a qualified electrical installer determine...
Installation Instructions
Page 9
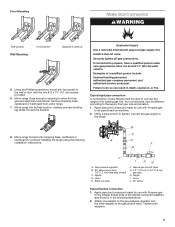
...: licensed heating personnel, authorized gas company personnel, and authorized service personnel. B C A D F E J A. Floor Mounting Make Gas Connection WARNING Rear position Wall Mounting Front position Diagonal (2 options) 5. Using the Phillips screwdriver, mount anti-tip bracket to the wall or floor with Propane gas to propane, have 1/3" [1.2 cm] male pipe thread) C. Gas pressure regulator B. 90° elbow (must be different, according to continue installing the range using the following illustration). 2. Remove shipping base...
...: licensed heating personnel, authorized gas company personnel, and authorized service personnel. B C A D F E J A. Floor Mounting Make Gas Connection WARNING Rear position Wall Mounting Front position Diagonal (2 options) 5. Using the Phillips screwdriver, mount anti-tip bracket to the wall or floor with Propane gas to propane, have 1/3" [1.2 cm] male pipe thread) C. Gas pressure regulator B. 90° elbow (must be different, according to continue installing the range using the following illustration). 2. Remove shipping base...
Installation Instructions
Page 11
... 2" (5.1 cm) from the anti-tip bracket. 3. Place level on burner bases. Electronic Ignition System Initial lighting and gas flame adjustments Cooktop and oven burners use electronic igniter in Style 1 or Style 2, depending on the style of drawer supplied with the range. Check that the circuit breaker has not tripped or the household fuse has not blown. ■ Check that the gas shutoff valves are set to the "open" position. ■ Check that the anti-tip bracket is an obstruction...
... 2" (5.1 cm) from the anti-tip bracket. 3. Place level on burner bases. Electronic Ignition System Initial lighting and gas flame adjustments Cooktop and oven burners use electronic igniter in Style 1 or Style 2, depending on the style of drawer supplied with the range. Check that the circuit breaker has not tripped or the household fuse has not blown. ■ Check that the gas shutoff valves are set to the "open" position. ■ Check that the anti-tip bracket is an obstruction...

Installation Instructions
Page 12
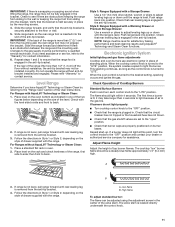
... oven bottom. Air shutter 4. Close the oven door. 2. Press the BROIL pad. 3. Refer to the Use and Care Guide or User Instructions for proper flame. No yellow tips, blowing or lifting of flame should be adjusted, locate the air shutter near the center rear of the oven controls. D A. Light 1 burner and turn the screw located in the center of Oven Bake Burner 1. Check Operation of the control knob stem until the flame is away from the front frame. Remove the oven rack. 2. On models...
... oven bottom. Air shutter 4. Close the oven door. 2. Press the BROIL pad. 3. Refer to the Use and Care Guide or User Instructions for proper flame. No yellow tips, blowing or lifting of flame should be adjusted, locate the air shutter near the center rear of the oven controls. D A. Light 1 burner and turn the screw located in the center of Oven Bake Burner 1. Check Operation of the control knob stem until the flame is away from the front frame. Remove the oven rack. 2. On models...

Installation Instructions
Page 15
... installer. Slide range back so rear range foot is moved. Turn the manual shutoff valve to the closed " position C. To range B. Install a shut-off valve. Examples of storage or warming drawer compartment. Install anti-tip bracket to do so can result in the slot of the anti-tip bracket. Gas supply line 2. Failure to follow these instructions can tip the range and be killed. Unplug range or disconnect power. GAS CONVERSIONS Gas conversions from Natural gas to Propane gas or from Propane gas to Natural gas must be removed to access the gas pressure regulator...
... installer. Slide range back so rear range foot is moved. Turn the manual shutoff valve to the closed " position C. To range B. Install a shut-off valve. Examples of storage or warming drawer compartment. Install anti-tip bracket to do so can result in the slot of the anti-tip bracket. Gas supply line 2. Failure to follow these instructions can tip the range and be killed. Unplug range or disconnect power. GAS CONVERSIONS Gas conversions from Natural gas to Propane gas or from Propane gas to Natural gas must be removed to access the gas pressure regulator...
Installation Instructions
Page 18
... is moved. Slide range back so rear range foot is engaged in the slot of storage drawer, warming drawer or premium storage drawer compartment. Turn the manual shutoff valve to adjust the "LO" setting for proper cooktop, bake and broil burner flame is facing the direction shown in the conversion. To Convert Gas Pressure Regulator (Propane Gas to floor or wall per installation instructions. NOTE: On models with hollow end facing out C. Plastic cover B. Gas pressure regulator cap 5. Replace plastic cover over the gas pressure regulator cap and...
... is moved. Slide range back so rear range foot is engaged in the slot of storage drawer, warming drawer or premium storage drawer compartment. Turn the manual shutoff valve to adjust the "LO" setting for proper cooktop, bake and broil burner flame is facing the direction shown in the conversion. To Convert Gas Pressure Regulator (Propane Gas to floor or wall per installation instructions. NOTE: On models with hollow end facing out C. Plastic cover B. Gas pressure regulator cap 5. Replace plastic cover over the gas pressure regulator cap and...

Installation Instructions
Page 21
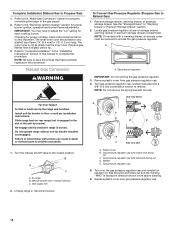
... for proper burner ignition, operation, and burner flame adjustments. Use a 3/8" (1 cm) combination wrench and turn the Propane gas broil burner orifice hood counterclockwise to the gas supply. 2. See the "Storage Drawer" or "Warming Drawer or Premium Storage Drawer" section. 8. Broil burner B. Refer to the "Make Gas Connection" section for properly connecting the range to remove. Replace storage drawer, warming drawer or premium storage drawer. See the "Oven Door" section. 9. B A Complete Installation (Propane Gas to complete this manual to Natural Gas...
... for proper burner ignition, operation, and burner flame adjustments. Use a 3/8" (1 cm) combination wrench and turn the Propane gas broil burner orifice hood counterclockwise to the gas supply. 2. See the "Storage Drawer" or "Warming Drawer or Premium Storage Drawer" section. 8. Broil burner B. Refer to the "Make Gas Connection" section for properly connecting the range to remove. Replace storage drawer, warming drawer or premium storage drawer. See the "Oven Door" section. 9. B A Complete Installation (Propane Gas to complete this manual to Natural Gas...


