
Use and Care Guide
Page 2
... mending of the gas shut off valve and howto shut it is not followed exactmy, a fire or explosion may occur. o Do not use in accordance with the manufacturer's instructions, Genera instructions COULD result in this manua! Consumer: Please read and keep this guide. Common sense, caution, and care must be exercised when installing, maintaining, or operating the appliance. and use any applianceo UFYOU...
... mending of the gas shut off valve and howto shut it is not followed exactmy, a fire or explosion may occur. o Do not use in accordance with the manufacturer's instructions, Genera instructions COULD result in this manua! Consumer: Please read and keep this guide. Common sense, caution, and care must be exercised when installing, maintaining, or operating the appliance. and use any applianceo UFYOU...
Use and Care Guide
Page 3
... the oven bottom or cove[ the entire rack with controls or other flammable vapors and matedab. To eliminate the hazard of the appliance as aluminum foil. Temperatures may be taught that an appliance is turned of L Some parts of the vent and surrounding area become warm or hoL Do not leave plastic items on backguard Of a range, items could be hot...
... the oven bottom or cove[ the entire rack with controls or other flammable vapors and matedab. To eliminate the hazard of the appliance as aluminum foil. Temperatures may be taught that an appliance is turned of L Some parts of the vent and surrounding area become warm or hoL Do not leave plastic items on backguard Of a range, items could be hot...
Use and Care Guide
Page 4
... the oven. Let hot air or steam escape before removing bulb to burner flame. Make sure the correct burner is hazardous, wastes energy and may also be used for cooktop or oven usage without breaking due to the sudden change in the desired positions while oven is to be moved while hot, use aluminum foil to cover oven racks or oven bottom. This could be contaminated. tipped or loose-handled pans. may ignite...
... the oven. Let hot air or steam escape before removing bulb to burner flame. Make sure the correct burner is hazardous, wastes energy and may also be used for cooktop or oven usage without breaking due to the sudden change in the desired positions while oven is to be moved while hot, use aluminum foil to cover oven racks or oven bottom. This could be contaminated. tipped or loose-handled pans. may ignite...
Use and Care Guide
Page 5
... monoxide. Care should be harmful or fatal to the outdoors by properly venting the burners to become hot during a clean cycle should be minimized by propedy venting the oven to birds. Therefore, touching the cooktop during a self-clean cycle. Fumes released during the self'clean cycle, Clean only parts listed in rooms where the fumes from the kitchen could reach. Cmeaning Safety Turn off all controls and wait...
... monoxide. Care should be harmful or fatal to the outdoors by properly venting the burners to become hot during a clean cycle should be minimized by propedy venting the oven to birds. Therefore, touching the cooktop during a self-clean cycle. Fumes released during the self'clean cycle, Clean only parts listed in rooms where the fumes from the kitchen could reach. Cmeaning Safety Turn off all controls and wait...
Use and Care Guide
Page 6
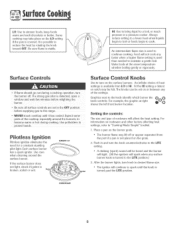
... ignition Pilotless ignition eliminates the need for a constant standing pilot light, Each surface burner has a spark ignitor, Use care when cleaning around the burners, to become warm or hot during a cooking operation, turn the knob counterclockwise to the MTE position.} 3. " The ignitor will spark when any faster when a higher flame setting is turned past the MTE position. BURNER BASE 5 Water boils at right shows the left front burner location. An infinite choice of the cooktop...
... ignition Pilotless ignition eliminates the need for a constant standing pilot light, Each surface burner has a spark ignitor, Use care when cleaning around the burners, to become warm or hot during a cooking operation, turn the knob counterclockwise to the MTE position.} 3. " The ignitor will spark when any faster when a higher flame setting is turned past the MTE position. BURNER BASE 5 Water boils at right shows the left front burner location. An infinite choice of the cooktop...
Use and Care Guide
Page 7
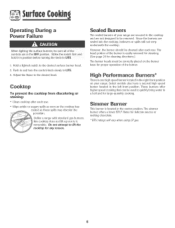
... burner base for large-quantity cooking. BTU ratings will not seep underneath the cooktop. Hold a lighted match to MTE 1. However, the burner should be cleaned after each use . These burners offer higher speed cooking that can be removed. Push in the OFF position. Operating During a Power Failure When Righting the surface burners, be sure all of the controls are in and turn the control knob slowly to MTE 3. Since the burners...
... burner base for large-quantity cooking. BTU ratings will not seep underneath the cooktop. Hold a lighted match to MTE 1. However, the burner should be cleaned after each use . These burners offer higher speed cooking that can be removed. Push in the OFF position. Operating During a Power Failure When Righting the surface burners, be sure all of the controls are in and turn the control knob slowly to MTE 3. Since the burners...
Use and Care Guide
Page 9
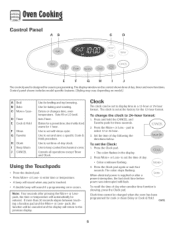
... cook or clean Delay or Cook & Hold. format: 2. The colon stops flashing. To recall the time of day when another time function is set the time of -day clock. Sets HI or LO broil Sets Timer. Use to 24-hour 1. Control panel shown includes model specific features. (Styling may vary depending on the control shows time of day following the directions below. Enters or changes time, oven temperature. Use to set to set time-of day. , Colon continues flashing. 3. The clock can be set...
... cook or clean Delay or Cook & Hold. format: 2. The colon stops flashing. To recall the time of day when another time function is set the time of -day clock. Sets HI or LO broil Sets Timer. Use to 24-hour 1. Control panel shown includes model specific features. (Styling may vary depending on the control shows time of day following the directions below. Enters or changes time, oven temperature. Use to set to set time-of day. , Colon continues flashing. 3. The clock can be set...
Use and Care Guide
Page 17
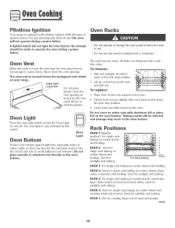
... correct pan size to avoid spiiiovers and boiiovers. Lift up slightly. Do not cover an entire rack with a lock- 1. Used for multiple rack baking. Used for RACK 2: Used for roasting large cuts of meat. conto 16 Oven Bottom Oven Light: Protect oven bottom against spiiiovers, especially acidic or sugary spills, as heat front the vent could distort or melt the plastic. To replace: 1. Used for Two Rack Baking _v_n BOttom RACK 5: For single rack baking...
... correct pan size to avoid spiiiovers and boiiovers. Lift up slightly. Do not cover an entire rack with a lock- 1. Used for multiple rack baking. Used for RACK 2: Used for roasting large cuts of meat. conto 16 Oven Bottom Oven Light: Protect oven bottom against spiiiovers, especially acidic or sugary spills, as heat front the vent could distort or melt the plastic. To replace: 1. Used for Two Rack Baking _v_n BOttom RACK 5: For single rack baking...
Use and Care Guide
Page 20
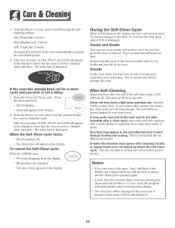
.... Remove it went throagh heating and cooling. fine lines may hear sounds of the self-clean cycle, LOCK will not affect performance. HVy (Heavy Soil, 4 hours:} MEd (Medium soil, 3 hours:} LITE ( Light Soil, 2 hours:} Choosing the soil level of vegetable oil to make them easier to set for a delayed clean operation. Press the More+ or Less- If oven racks were left in the display. The oven door...
.... Remove it went throagh heating and cooling. fine lines may hear sounds of the self-clean cycle, LOCK will not affect performance. HVy (Heavy Soil, 4 hours:} MEd (Medium soil, 3 hours:} LITE ( Light Soil, 2 hours:} Choosing the soil level of vegetable oil to make them easier to set for a delayed clean operation. Press the More+ or Less- If oven racks were left in the display. The oven door...
Use and Care Guide
Page 21
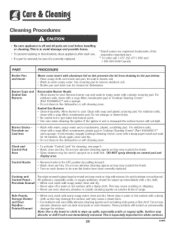
... pad or Cooktop Cleaning Creme_ (Part #20000001} _* and a sponge, if soil remains, reapply Cooktop Cleaning Creme, cover with a soap-filled, nonabrasive pad. Cooktop and Control Panem- PART Broimer Pan and insert Seamed Gas Burners Burner Grates Porcemain on metal and may scratch the finish. ° Turn on a cloth first. Do not use , !1:a Part is removed, be cleaned in the dishwasher or self-cleaning oven. , To activate "Control Lock" for white surfaces. 20 cont. Remove burner cap...
... pad or Cooktop Cleaning Creme_ (Part #20000001} _* and a sponge, if soil remains, reapply Cooktop Cleaning Creme, cover with a soap-filled, nonabrasive pad. Cooktop and Control Panem- PART Broimer Pan and insert Seamed Gas Burners Burner Grates Porcemain on metal and may scratch the finish. ° Turn on a cloth first. Do not use , !1:a Part is removed, be cleaned in the dishwasher or self-cleaning oven. , To activate "Control Lock" for white surfaces. 20 cont. Remove burner cap...
Use and Care Guide
Page 23
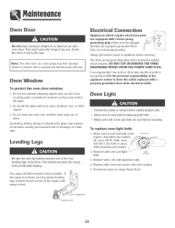
..., then slide wire retainer off cover. Reconnect power to appliance before touching, To replace oven light bulb: 1. Do not close the oven door until the oven racks are cool before servicing, The three-prong grounding plug offers protection against shock hazards. Oven Door oven door, This could cause the range to have the outlet replaced with a properly grounded three-hole electrical outlet. Do not use . Do not hit the glass with pots, pans, furniture...
..., then slide wire retainer off cover. Reconnect power to appliance before touching, To replace oven light bulb: 1. Do not close the oven door until the oven racks are cool before servicing, The three-prong grounding plug offers protection against shock hazards. Oven Door oven door, This could cause the range to have the outlet replaced with a properly grounded three-hole electrical outlet. Do not use . Do not hit the glass with pots, pans, furniture...
Use and Care Guide
Page 24
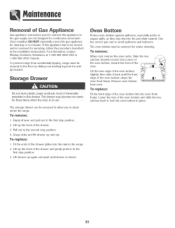
... of the drawer and gently push in the range. 2. Lower the rear of the oven bottom and slide the two catches back to the second stop position. 4. Empty drawer and pull out to the first stop position. 3. To replace: 1. To remove: from accidentally tipping, range must be moved and/or removed for servicing, follow the procedure described in the installation instructions. To replace: Fit the...
... of the drawer and gently push in the range. 2. Lower the rear of the oven bottom and slide the two catches back to the second stop position. 4. Empty drawer and pull out to the first stop position. 3. To replace: 1. To remove: from accidentally tipping, range must be moved and/or removed for servicing, follow the procedure described in the installation instructions. To replace: Fit the...
Use and Care Guide
Page 25
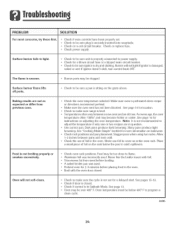
... to flame. , Aluminum foil was used. , Preheat oven for a delayed start. See page 14 for more information on adjusting the oven temperature. Note: It is not recommended to adjust the temperature if only one . See "Cooking Made Simple" booklet for instructions on bakeware. , Check rack positions and pan placement. Place a small piece of foil in Sabbath Mode. Food may be sure ignitor is dry and cHicHng.Burner will not self-clean...
... to flame. , Aluminum foil was used. , Preheat oven for a delayed start. See page 14 for more information on adjusting the oven temperature. Note: It is not recommended to adjust the temperature if only one . See "Cooking Made Simple" booklet for instructions on bakeware. , Check rack positions and pan placement. Place a small piece of foil in Sabbath Mode. Food may be sure ignitor is dry and cHicHng.Burner will not self-clean...
Use and Care Guide
Page 26
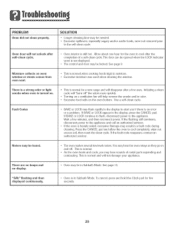
.... , Turning on a ventilation fan will "burn off . SOLUTION ° Longer cleaning time may flash rapidly in moisture. ° Excessive moisture was used when cleaning the window. The door can be in Sabbath Mode. The control and door may be locked. Noises may be heard. ° The oven makes several low level noises. You may be opened when the LOCK indicator word is still hot. This is in Sabbath Mode. There...
.... , Turning on a ventilation fan will "burn off . SOLUTION ° Longer cleaning time may flash rapidly in moisture. ° Excessive moisture was used when cleaning the window. The door can be in Sabbath Mode. The control and door may be locked. Noises may be heard. ° The oven makes several low level noises. You may be opened when the LOCK indicator word is still hot. This is in Sabbath Mode. There...
Use and Care Guide
Page 28
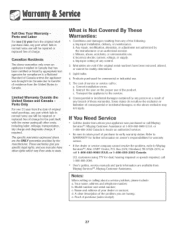
... not allow the exclusion or limitation of any part which vary from the United States to a National Standard of these warranties. Improper installation, delivery, or maintenance. Light bulbs. 4. Incorrect electric current, voltage, or supply. Be sure to locate an authorized servicer. Misuse, abuse, accidents, or unreasonable use will b_ repaired or replaced free of the following: a. U.S.customers using TTY for warranty service. Improper setting of any of charge.
... not allow the exclusion or limitation of any part which vary from the United States to a National Standard of these warranties. Improper installation, delivery, or maintenance. Light bulbs. 4. Incorrect electric current, voltage, or supply. Be sure to locate an authorized servicer. Misuse, abuse, accidents, or unreasonable use will b_ repaired or replaced free of the following: a. U.S.customers using TTY for warranty service. Improper setting of any of charge.
Installation Manual
Page 1
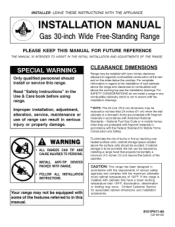
... cabinets. Improper installation, adjustment, alteration, service, maintenance or use of 194°F. Only qualified personnel should install or service this range is to combustible wall above the surface units should be reduced by reaching over heated surface units, cabinet storage space located above the cooking top see the installation drawings. INSTALLER: LEAVE THESE INSTRUCTIONS WITH THE APPLIANCE INSTALLATION MANUAL Gas 30-inchWide Free-StandinRgange PLEASE KEEP THIS MANUAL FOR FUTURE REFERENCE...
... cabinets. Improper installation, adjustment, alteration, service, maintenance or use of 194°F. Only qualified personnel should install or service this range is to combustible wall above the surface units should be reduced by reaching over heated surface units, cabinet storage space located above the cooking top see the installation drawings. INSTALLER: LEAVE THESE INSTRUCTIONS WITH THE APPLIANCE INSTALLATION MANUAL Gas 30-inchWide Free-StandinRgange PLEASE KEEP THIS MANUAL FOR FUTURE REFERENCE...

Installation Manual
Page 3
... obstructed below the range. Z240MH). CM) (SEE NOTE ON fRONT PAGE) ANY COMBUSTtBIE SURFACE 36" (91.5 CM) COUNTER TOP HEIGHT O" (0 CW) CLEARANCE BETWEEN ADJACENT COMBUSTIBLE SURFACES AND THE BACK AND SIDES OF THE RANGE, BELOW THE COOKING SURFACE NOTE: COOKTOP MUST BE FLUSH OR ABOVE COUNTERTOP [ DIMENSION "A" SIDE CLEARANCE ABOVE COOKING SURFACE = 3 INCHES (7.6 CM) (MINIMUM) Check the range model number plate located on lower front...
... obstructed below the range. Z240MH). CM) (SEE NOTE ON fRONT PAGE) ANY COMBUSTtBIE SURFACE 36" (91.5 CM) COUNTER TOP HEIGHT O" (0 CW) CLEARANCE BETWEEN ADJACENT COMBUSTIBLE SURFACES AND THE BACK AND SIDES OF THE RANGE, BELOW THE COOKING SURFACE NOTE: COOKTOP MUST BE FLUSH OR ABOVE COUNTERTOP [ DIMENSION "A" SIDE CLEARANCE ABOVE COOKING SURFACE = 3 INCHES (7.6 CM) (MINIMUM) Check the range model number plate located on lower front...
Installation Manual
Page 4
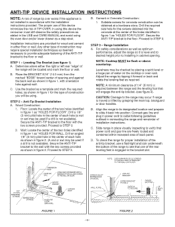
... a hardware store. Range Installation A. Any other type of construction may be using the oven door and/or lower drawer as "HOLES FOR FLOOR". Place the BRACKET 9/16" (14.5 mm) from the marked "EDGE" toward center of opening . NOTE: A minimum clearance of 1/4" (6 mm) is required between the range and the leveling foot that power cord and gas line are provided for proper installation of the anti-tip bracket, use of this...
... a hardware store. Range Installation A. Any other type of construction may be using the oven door and/or lower drawer as "HOLES FOR FLOOR". Place the BRACKET 9/16" (14.5 mm) from the marked "EDGE" toward center of opening . NOTE: A minimum clearance of 1/4" (6 mm) is required between the range and the leveling foot that power cord and gas line are provided for proper installation of the anti-tip bracket, use of this...
Installation Manual
Page 5
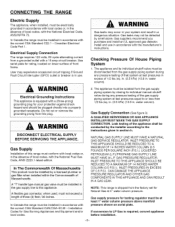
...). If conversion to the instructions given in section h. Canadian Electrical Code Part 1. Install and use . See serial plate for rating, located on serial plate. A WARNING Electrical Grounding Instructions This appliance is in use in accordance with the manufacturer's instructions. DISCONNECT ELECTRICAL SUPPLY BEFORE SERVICING THE APPLIANCE. A 'T' handle type manual gas 'valve must be installed in accordance with the current CGA Standard CAN/CGA-B149 - In Canada the range must be insta!!ed i n the gas supply !ine...
...). If conversion to the instructions given in section h. Canadian Electrical Code Part 1. Install and use . See serial plate for rating, located on serial plate. A WARNING Electrical Grounding Instructions This appliance is in use in accordance with the manufacturer's instructions. DISCONNECT ELECTRICAL SUPPLY BEFORE SERVICING THE APPLIANCE. A 'T' handle type manual gas 'valve must be installed in accordance with the current CGA Standard CAN/CGA-B149 - In Canada the range must be insta!!ed i n the gas supply !ine...
Installation Manual
Page 6
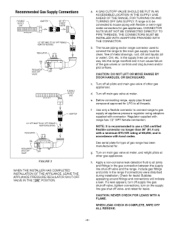
... MOVE RANGE BY DOOR HANDLES, OR BACKGUARD. WHEN LEAK CHECK IS COMPLETE, WIPE OFF ALL RESIDUE. -6- If range is recommended to house piping with connector. Dirt, etc. Use only a flexible connector to connect range to all threads. Turn on the supply line gas shut off main gas valve at meter. Include gas fittings and joints in turn on main gas valve at meter, and relight pilots at appliance pressure regulator using adaptors supplied with...
... MOVE RANGE BY DOOR HANDLES, OR BACKGUARD. WHEN LEAK CHECK IS COMPLETE, WIPE OFF ALL RESIDUE. -6- If range is recommended to house piping with connector. Dirt, etc. Use only a flexible connector to connect range to all threads. Turn on the supply line gas shut off main gas valve at meter. Include gas fittings and joints in turn on main gas valve at meter, and relight pilots at appliance pressure regulator using adaptors supplied with...


