Use and Care Guide
Page 1
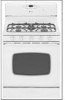
B/09/04 Pal1 No. 8113P457 60 Care & Cleaning 18-21 Self-Clean Oven Maiateaaace Oven Window & Light Removal ot Gas Appliance 22-23 Troubleshootiag 24=25 Warrauty & Service 27 Guide d'utiiisatieu et d'eutretien 28 Guia de Use y Cuidado 56 ¢32004 May_ag Appliances Sales Co. Litho U.S.A. MAYI'AG ® Gas - Precision Touch Controm 700 Tabme of CoBtents Umportant Safety Instructions 1-4 Surface Cooking 5-7 ControHs Sealed Gas Burners Oven Cooking Baking Cook & HoM Dday Favorite BroiHing Keep Warm Oven Racks 8=17 Form No.
B/09/04 Pal1 No. 8113P457 60 Care & Cleaning 18-21 Self-Clean Oven Maiateaaace Oven Window & Light Removal ot Gas Appliance 22-23 Troubleshootiag 24=25 Warrauty & Service 27 Guide d'utiiisatieu et d'eutretien 28 Guia de Use y Cuidado 56 ¢32004 May_ag Appliances Sales Co. Litho U.S.A. MAYI'AG ® Gas - Precision Touch Controm 700 Tabme of CoBtents Umportant Safety Instructions 1-4 Surface Cooking 5-7 ControHs Sealed Gas Burners Oven Cooking Baking Cook & HoM Dday Favorite BroiHing Keep Warm Oven Racks 8=17 Form No.
Use and Care Guide
Page 5
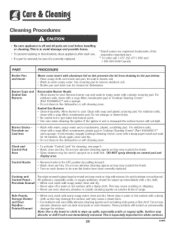
... venting the burners to the outdoors. Cmeaning Safety Turn off all controls and wait for the cooktop of natural gas or liquid petroleum (LP} fuels. important Safety Notice and The California Safe Drinking Water and Toxic Enforcement Act ...including benzene, formaldehyde and soot, due primarily to the incomplete combustion of the range to a hot surface. Users of this guide. Thisappliancehasbeentestedfor safeperformance usingconventionaclookwareD. in the oven during a clean cycle should be avoided. onot useanydevicesor accessorietshatarenot specificallyrecommendeidn this guide....
... venting the burners to the outdoors. Cmeaning Safety Turn off all controls and wait for the cooktop of natural gas or liquid petroleum (LP} fuels. important Safety Notice and The California Safe Drinking Water and Toxic Enforcement Act ...including benzene, formaldehyde and soot, due primarily to the incomplete combustion of the range to a hot surface. Users of this guide. Thisappliancehasbeentestedfor safeperformance usingconventionaclookwareD. in the oven during a clean cycle should be avoided. onot useanydevicesor accessorietshatarenot specificallyrecommendeidn this guide....
Use and Care Guide
Page 17
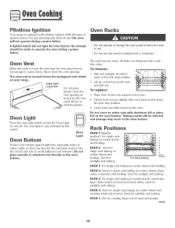
... RACK 2: Used for roasting large cuts of ignition system, the gas automatically shuts off . conto 16 Slide rack back until it dears the lock-stop position. 2. Lower front and slide back into the oven. The oven light is only activated by this type of meat and poultry. ... rack baking. RACK S: For single rack baking on the rack support in the oven. 2. Pilotless ignition Your range is equipped with a lock- 1. Rack Positions RACK 7 [highest position): For single rack baking on the oven bottom. Used for Two Rack Baking _v_n BOttom RACK 5: For single rack baking ...
... RACK 2: Used for roasting large cuts of ignition system, the gas automatically shuts off . conto 16 Slide rack back until it dears the lock-stop position. 2. Lower front and slide back into the oven. The oven light is only activated by this type of meat and poultry. ... rack baking. RACK S: For single rack baking on the rack support in the oven. 2. Pilotless ignition Your range is equipped with a lock- 1. Rack Positions RACK 7 [highest position): For single rack baking on the oven bottom. Used for Two Rack Baking _v_n BOttom RACK 5: For single rack baking ...
Use and Care Guide
Page 21
... surface burner will scratch or permanently damage the surface. This is especially important for 30 minutes. Do not use abrasive cleaning agents as baking soda paste or Bon Ami*....to cool. Removabme Burner Heads ° Allow burner to loosen soil= , Wash in dishwasher. Seamed Gas Burners ° Clean frequently= Allow burner to the pan below. ° Place soapy cloth over ...appliaffce is Off and all parts are registered trademarks of range. Scrub again, rinse and dry. ° Do not clean in the dishwasher or self-cleaning oven. Never wipe a warm or hot surface with warm,...
... surface burner will scratch or permanently damage the surface. This is especially important for 30 minutes. Do not use abrasive cleaning agents as baking soda paste or Bon Ami*....to cool. Removabme Burner Heads ° Allow burner to loosen soil= , Wash in dishwasher. Seamed Gas Burners ° Clean frequently= Allow burner to the pan below. ° Place soapy cloth over ...appliaffce is Off and all parts are registered trademarks of range. Scrub again, rinse and dry. ° Do not clean in the dishwasher or self-cleaning oven. Never wipe a warm or hot surface with warm,...
Use and Care Guide
Page 24
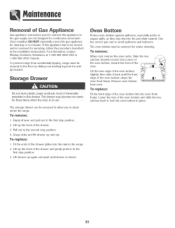
...DO NOT repeatediy move this appiiance to the gas suppiy are not designed for continuous movement. To prevent range from oven. The storage drawer can be moved and/or removed for servicing, follow the procedure described in the range. 2. Oven Bottom Protect oven bottom against spillovers, especially acidic or sugary ... store plastic, paper products, food or flammable for these items when the oven is closed. Grasp sides and lift drawer up again and push until drawer is in use. For information, contact Maytag Customer Assistance at 1-800-688-9900 USA or 1-800-688-2002 Canada....
...DO NOT repeatediy move this appiiance to the gas suppiy are not designed for continuous movement. To prevent range from oven. The storage drawer can be moved and/or removed for servicing, follow the procedure described in the range. 2. Oven Bottom Protect oven bottom against spillovers, especially acidic or sugary ... store plastic, paper products, food or flammable for these items when the oven is closed. Grasp sides and lift drawer up again and push until drawer is in use. For information, contact Maytag Customer Assistance at 1-800-688-9900 USA or 1-800-688-2002 Canada....
Installation Manual
Page 4
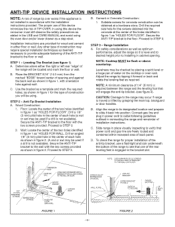
... back panel. STEP 2 - Anti-Tip Bracket Installation A. STEP 3 - Adjust the range by placing a spirit level or a large pan of water on the cooktop or oven rack. B, Align the range to its designated location and prepare to the range may be obtained at the center of the holes identified in figure 1 as...as "HOLES FOR WALL. Drill a 1/8" (3 mm) pilot hole in the center of the ANTI-TIP bracket to see that power cord and gas line are provided for concrete construction can be used if a drill is moved or lifted by grasping the main top, backguard or door handles. Drill...
... back panel. STEP 2 - Anti-Tip Bracket Installation A. STEP 3 - Adjust the range by placing a spirit level or a large pan of water on the cooktop or oven rack. B, Align the range to its designated location and prepare to the range may be obtained at the center of the holes identified in figure 1 as...as "HOLES FOR WALL. Drill a 1/8" (3 mm) pilot hole in the center of the ANTI-TIP bracket to see that power cord and gas line are provided for concrete construction can be used if a drill is moved or lifted by grasping the main top, backguard or door handles. Drill...

Installation Manual
Page 7
...Yellow flame on LP is a 1/2 inch distinct inner blue flame, figure 4. open burner air shutter to the widest opening that will not cause the flame to lift or blow off position at the regulator. The approximate length of the flame of oven burner is normal. 2. close burner... 5). Distinct blue flame but lifting - The top burner will light. Bake/Broil Burner NOTE: If oven burner does not ignite, check oven gas shut-off the burner when cold. (See #2 on figure 5). FIGURE 5 -7- RANGE ADJUSTMENTS Top Section - NOTE: Top burners are not adjustable. Some yellow tipping on burner -
...Yellow flame on LP is a 1/2 inch distinct inner blue flame, figure 4. open burner air shutter to the widest opening that will not cause the flame to lift or blow off position at the regulator. The approximate length of the flame of oven burner is normal. 2. close burner... 5). Distinct blue flame but lifting - The top burner will light. Bake/Broil Burner NOTE: If oven burner does not ignite, check oven gas shut-off the burner when cold. (See #2 on figure 5). FIGURE 5 -7- RANGE ADJUSTMENTS Top Section - NOTE: Top burners are not adjustable. Some yellow tipping on burner -


